Thingiverse

Wind Turbine by ztwillis
by Thingiverse
Last crawled date: 3 years ago
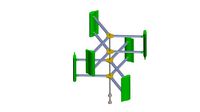
This is a 3 phase (2 winding per phase) 4 pole AC generator. THIS USES POWERFUL MAGNETS, HANDLE AT YOUR OWN RISK, YOU ARE LIABLE FOR YOUR OWN INJURIES. So have fun :) This is a very time intensive but gratifying project, especially for a science fair or alternative energy. I wish I had more time to test this to give you guys solid numbers, so I apologize. But I can tell you spinning it at a few hundred RPM I was able to produce ~1 Watt from one of the three phases. I will be putting my smaller models of generators on here at first opportunity! Thank you!!(if you feel inclined to tip it will go towards more alternative energy prints!)
Parts list:
1/4-20X2 1/4/bolts----------------------------------(4 of them:stator/mounting)
4-40x 1.5--------------------------------------------(4 of them: rotor)
~1/8 diameter bolts ~2 to 3 inches in length--(12 for the stator core)
1 inch cube N50 or N52 magnet----------------(4 for rotor poles) ~10$ each
1/4 ID inch ball bearings 1/2" OD---------------(2 actobotics/sparkfun)
1/4 inch shaft spacers-----------------------------(~6 actobotics/sparkfun)
1/2lb 28 gauge magnet wire----------------------(1 roll will do ya')
1/4 shaft collars/hub/sprocket------------------(2 depending on how you want it powered)
1/4 D-shaft 6 to 12" long------------------------(actobotics/sparkfun)
The Rotor:
I printed 2 of the rotor files placed the magnets and held the two halves together with a few 4-40 nuts and bolts i had laying around.
The rotor was printed to fit a 1/4 inch Actobotics D-Shaft. I used 1 inch magnets (4 of them) arranged alternating N and S (N,S,N,S).
Magnet Link:https://www.amazon.com/Applied-Magnets-Strong-Neodymium-Magnet/dp/B0012DNFP6/ref=sr_1_1?ie=UTF8&qid=1471988660&sr=8-1&keywords=1+inch+magnet+cube
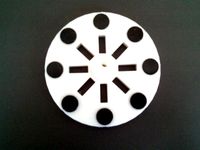
The Stator:
The stator is about 5 1/2 inches in diameter. The bolts holding the cap and the stator together are 1/4-20 x 2 1/2". For the "Stator core" I used bolts that are ~1/8" in diameter and 2" in length. Screw the ~1/8" diameter bolts into the 12 holes on the side. Pick a bolt to start on wrap 28 gauge wire around clock-wise 1400 times( at 12 o' clock....This part sucks) . Now without cutting the wire move to the bolt at a 90 degree angle(3 o'clock) from the bolt you just wrapped and wrap 1400 turns of wire around this bolt in the counter-clockwise direction. Move on to the bolt at the 6 o'clock position(without cutting the wire) and wind 1400 times in the clockwise direction. Lastly move on to the 9 o'clock bolt and wind 1400 turns in the counter clock wise direction...Whew you can cut the wire ...Now your A phase is done, now the B and C phases. So, Immediately next to the 12 o'clock bolt (the 1 o'clock bolt I guess) do the exact same thing as the A phase BUT the 1 o'clock winding should be in the Counter clockwise direction! wind 1 o'clock counter-clockwise, 4 o'clockwise, 7 o'clock counter-clockwise, and the 10 o'clock clockwise. This is your C phase. lastly the 11 o'clock bolt is wound counter-clockwise, 2 o'clock clockwise. 5 o'clock counter-clockwise, and the 8 o'clock counter-clockwise. This is your B phase.
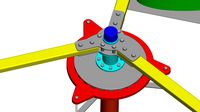
So your rotor is assembled and your stator is wound. now place a shaft collar on the shaft and tighten it down at your desired length from the end(leave space for rotor ect.). Now stack on top of the shaft collar a shaft spacer, a 1/4 bearing, 2 to 3 more shaft spacers to keep your rotor from hitting the casing while rotating, your rotor(may have to be pressed in with a vice or heat the shaft depending on tolerance...be careful!!!), then 2 to 3 more shaft spacers, the second bearing, one more spacer, and FINALLY your hub/shaft collar/sprocket.
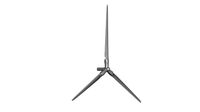
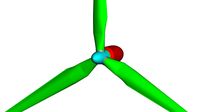
BOOM...spin and produce all of the electricity! Wire in Delta or Wye configuration.The blades I made for the wind turbine were made following these instructions ---> http://greenterrafirma.com/making-pvc-wind-turbine-blades.html use a hub to mount them or thread the shaft and use bolts! I've not been able to do much testing because i work 12 hours a day 7 days a week, but in the back of a pickup truck going 15 mph it easily produced 20 volts. Lastly the output can be increased just a tad by creating a complete path for the magnetic flux. I used hobby strips of stainless steel around the outside to create a return path for the flux.
Parts list:
1/4-20X2 1/4/bolts----------------------------------(4 of them:stator/mounting)
4-40x 1.5--------------------------------------------(4 of them: rotor)
~1/8 diameter bolts ~2 to 3 inches in length--(12 for the stator core)
1 inch cube N50 or N52 magnet----------------(4 for rotor poles) ~10$ each
1/4 ID inch ball bearings 1/2" OD---------------(2 actobotics/sparkfun)
1/4 inch shaft spacers-----------------------------(~6 actobotics/sparkfun)
1/2lb 28 gauge magnet wire----------------------(1 roll will do ya')
1/4 shaft collars/hub/sprocket------------------(2 depending on how you want it powered)
1/4 D-shaft 6 to 12" long------------------------(actobotics/sparkfun)
The Rotor:
I printed 2 of the rotor files placed the magnets and held the two halves together with a few 4-40 nuts and bolts i had laying around.
The rotor was printed to fit a 1/4 inch Actobotics D-Shaft. I used 1 inch magnets (4 of them) arranged alternating N and S (N,S,N,S).
Magnet Link:https://www.amazon.com/Applied-Magnets-Strong-Neodymium-Magnet/dp/B0012DNFP6/ref=sr_1_1?ie=UTF8&qid=1471988660&sr=8-1&keywords=1+inch+magnet+cube
The Stator:
The stator is about 5 1/2 inches in diameter. The bolts holding the cap and the stator together are 1/4-20 x 2 1/2". For the "Stator core" I used bolts that are ~1/8" in diameter and 2" in length. Screw the ~1/8" diameter bolts into the 12 holes on the side. Pick a bolt to start on wrap 28 gauge wire around clock-wise 1400 times( at 12 o' clock....This part sucks) . Now without cutting the wire move to the bolt at a 90 degree angle(3 o'clock) from the bolt you just wrapped and wrap 1400 turns of wire around this bolt in the counter-clockwise direction. Move on to the bolt at the 6 o'clock position(without cutting the wire) and wind 1400 times in the clockwise direction. Lastly move on to the 9 o'clock bolt and wind 1400 turns in the counter clock wise direction...Whew you can cut the wire ...Now your A phase is done, now the B and C phases. So, Immediately next to the 12 o'clock bolt (the 1 o'clock bolt I guess) do the exact same thing as the A phase BUT the 1 o'clock winding should be in the Counter clockwise direction! wind 1 o'clock counter-clockwise, 4 o'clockwise, 7 o'clock counter-clockwise, and the 10 o'clock clockwise. This is your C phase. lastly the 11 o'clock bolt is wound counter-clockwise, 2 o'clock clockwise. 5 o'clock counter-clockwise, and the 8 o'clock counter-clockwise. This is your B phase.
So your rotor is assembled and your stator is wound. now place a shaft collar on the shaft and tighten it down at your desired length from the end(leave space for rotor ect.). Now stack on top of the shaft collar a shaft spacer, a 1/4 bearing, 2 to 3 more shaft spacers to keep your rotor from hitting the casing while rotating, your rotor(may have to be pressed in with a vice or heat the shaft depending on tolerance...be careful!!!), then 2 to 3 more shaft spacers, the second bearing, one more spacer, and FINALLY your hub/shaft collar/sprocket.
BOOM...spin and produce all of the electricity! Wire in Delta or Wye configuration.The blades I made for the wind turbine were made following these instructions ---> http://greenterrafirma.com/making-pvc-wind-turbine-blades.html use a hub to mount them or thread the shaft and use bolts! I've not been able to do much testing because i work 12 hours a day 7 days a week, but in the back of a pickup truck going 15 mph it easily produced 20 volts. Lastly the output can be increased just a tad by creating a complete path for the magnetic flux. I used hobby strips of stainless steel around the outside to create a return path for the flux.
Similar models
thingiverse
free

BLDC motor
...ngs and a 1/4" shaft with a few 1/4" shaft spacers and a locking nut and shaft collar. printed with a longer orange 10.
thingiverse
free

Generator
...of my hand, and the principles can be scaled up. we can use readily available materials alongside 3d printing to do great things!
thingiverse
free

coil winding jig stator by dshay76
...coil winding jig stator by dshay76
thingiverse
coil winding jig for a 3 phase 12 magnet 9 coil stator for wind turbine
thingiverse
free

10/12 port siren rotor by Lumex120
... a 1/2 " shaft. it produces a minor harmonic 3rd when placed in a stator and spun. i will make a stator model for this soon.
thingiverse
free

12 W 2-phase Halbach array permanent magnet generator/alternator by matt113d
...the next etc. then wind 50 turns overlapping the first set of coils at the top with the same alternating pattern of cw ccw turns.
grabcad
free

coaxial rotor gearbox
...licopters
1:1 gear ratio
30 teeth bevel gear
main(engine) shaft: clockwise
outer shaft: counter clockwise
inner shaft: clockwise
thingiverse
free
Magnet Stator for a Mini Windmill Style Generator by Cotton80
...ill bit through the piece to ensure a good fit.
this thing can be scaled up to 200% to fit a 1/2" shaft and 1" magnets.
thingiverse
free
Pulse Motor(s) for Zero Back emf Experiment by Cotton80
.... you will need to use support on the coil piece and rotor. with the adapter horizontally stacking multiple motors are possible.
grabcad
free

Basic alternator
...ower generator features 12 coils on the stator, holding 50 windings per coil on an iron core, induced by 12 magnets on the rotor.
thingiverse
free

Axial Flux Generator by relic
...ll make one of these. i can print the parts and prepare the coils but it will be a while before i have the $$$ for 16 magnets !!!

Turbine
3d_export
$5

turbine
...turbine
3dexport
it is a turbine to use it in some spaceship
3d_export
$5

turbine
...turbine
3dexport
turbine, with animation included, more texture of it
3d_ocean
$4

Wind Turbine
...n
and render setup turbine wind
wind turbine, modeled with cinema4d r13 , render setup and textured, custom logo for wind turbine
turbosquid
$1

Turbine
...turbosquid
royalty free 3d model turbine for download as ige on turbosquid: 3d models for games, architecture, videos. (1385242)
3d_export
$40
wind turbine
...wind turbine
3dexport
wind turbine
3d_export
$40

wind turbine
...wind turbine
3dexport
wind turbine
3d_export
$40
wind turbine
...wind turbine
3dexport
wind turbine
3d_export
$40

wind turbine
...wind turbine
3dexport
wind turbine
3d_export
$40
wind turbine
...wind turbine
3dexport
wind turbine
3d_export
$40
wind turbine
...wind turbine
3dexport
wind turbine
Wind
design_connected
$4

Wind
...wind
designconnected
emmemobili wind dining tables computer generated 3d model. designed by chiara vaghi.
3d_ocean
$4
Wind Turbine
...n
and render setup turbine wind
wind turbine, modeled with cinema4d r13 , render setup and textured, custom logo for wind turbine
3d_export
$40
wind turbine
...wind turbine
3dexport
wind turbine
3d_export
$40
wind turbine
...wind turbine
3dexport
wind turbine
3d_export
$40
wind turbine
...wind turbine
3dexport
wind turbine
3d_export
$40
wind turbine
...wind turbine
3dexport
wind turbine
3d_export
$40
wind turbine
...wind turbine
3dexport
wind turbine
3d_export
$40
wind turbine
...wind turbine
3dexport
wind turbine
3d_export
$40

wind turbine
...wind turbine
3dexport
wind turbine
3d_export
$40

wind turbine
...wind turbine
3dexport
wind turbine