Thingiverse

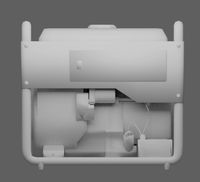
Generator
by Thingiverse
Last crawled date: 4 years, 2 months ago
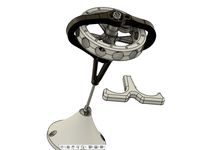
Single Phase 6 pole Generator:
One of the issues with 3d printed generators is magnetic permeability. I used 6 M3x16 bolts to concentrate and make better use of the magnetic flux. One of the benefits of using the bolts (which are arranged radially) is being able to thread them in or out to adjust the air gap.
Non printed components:
2x Flanged Ball Bearings 1/2" ID 1/4" ID
1x 1/4" diameter D-shaft (1/4" threaded rod can be used)
2x 1/4" ID shaft spacers
28 AWG Wire
Heat Shrink
12x 10mm x 2mm Diameter Magnets
Print:
1x Stator
1x LID
12x Coil Form
1x Rotor
Assembly:
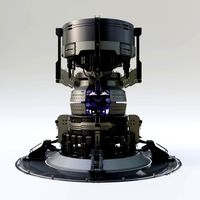
Rotor:
Two magnets fit in each hole, stacked on top of each other. Each pole/hole must alternate N/S/N/S/N/S all the way around the rotor. Press them into place, not too hard or the rotor may crack(depending on the tolerance of your printer). I use glue as well to hold all of the magnets in place. Then I wrap a thin layer of tape around the outside as an extra measure. Insert the D-shaft through the rotor(if its tight a hammer helps!).
Stator:
For each of the radial bolts thread one of the coilforms all the way to the top. Then I thread one more and keep it close to the bottom. Then I screw the bolts into the stator casing as shown in the picture. Once the bolts are placed radially around the stator I begin to wind. I did 200 windings around each bolt. Using one continuous wire wrap clockwise around the bolt 200 times, move to the next adjacent bolt wrap 200 turns clockwise, continue until all bolts are covered. Cover the windings with heatshrink or tape to protect them.
Final Assembly:
Insert one of the bearings into the stator casing, with the flange on the inside of the case, place a spacer(or washer if you don't have a spacer) on the shaft that has the rotor on it and place the shaft throught the stator case bearing. the rotor should kind of snap into place as it it attracted to the bolts. Now place a spacer on the lid and of the shaft, and the bearing with the flange facing inward. place the lid on the bearing and use 3 more M3x16 bolts to bolt the lid on the casing with the smaller raised diameter facing outward. Otherwise it will bind. Finally spin it and produce electricity! It will feel like a stepped motion because the permeable material is only every 45 degrees(and the lid retaining bolts). While spinning the last version at approximately 4000RPM it output 35ma @ 5.2v which is about 1.8W(through a rectifier and underload). I can't remember if i used more windings on that one, but spinning this one by hand i got a maximum oof 10.2Vpp and 3Vrms or so. It's not a lot of power, but enough to drive a few LED's or something else for a micro-wind/hydro installation or an IOT installation. There are a lot of things that can be improved and using materials with different material properties allows for higher output 3d printed generators. This fits in the palm of my hand, and the principles can be scaled up. We can use readily available materials alongside 3d printing to do great things!
One of the issues with 3d printed generators is magnetic permeability. I used 6 M3x16 bolts to concentrate and make better use of the magnetic flux. One of the benefits of using the bolts (which are arranged radially) is being able to thread them in or out to adjust the air gap.
Non printed components:
2x Flanged Ball Bearings 1/2" ID 1/4" ID
1x 1/4" diameter D-shaft (1/4" threaded rod can be used)
2x 1/4" ID shaft spacers
28 AWG Wire
Heat Shrink
12x 10mm x 2mm Diameter Magnets
Print:
1x Stator
1x LID
12x Coil Form
1x Rotor
Assembly:
Rotor:
Two magnets fit in each hole, stacked on top of each other. Each pole/hole must alternate N/S/N/S/N/S all the way around the rotor. Press them into place, not too hard or the rotor may crack(depending on the tolerance of your printer). I use glue as well to hold all of the magnets in place. Then I wrap a thin layer of tape around the outside as an extra measure. Insert the D-shaft through the rotor(if its tight a hammer helps!).
Stator:
For each of the radial bolts thread one of the coilforms all the way to the top. Then I thread one more and keep it close to the bottom. Then I screw the bolts into the stator casing as shown in the picture. Once the bolts are placed radially around the stator I begin to wind. I did 200 windings around each bolt. Using one continuous wire wrap clockwise around the bolt 200 times, move to the next adjacent bolt wrap 200 turns clockwise, continue until all bolts are covered. Cover the windings with heatshrink or tape to protect them.
Final Assembly:
Insert one of the bearings into the stator casing, with the flange on the inside of the case, place a spacer(or washer if you don't have a spacer) on the shaft that has the rotor on it and place the shaft throught the stator case bearing. the rotor should kind of snap into place as it it attracted to the bolts. Now place a spacer on the lid and of the shaft, and the bearing with the flange facing inward. place the lid on the bearing and use 3 more M3x16 bolts to bolt the lid on the casing with the smaller raised diameter facing outward. Otherwise it will bind. Finally spin it and produce electricity! It will feel like a stepped motion because the permeable material is only every 45 degrees(and the lid retaining bolts). While spinning the last version at approximately 4000RPM it output 35ma @ 5.2v which is about 1.8W(through a rectifier and underload). I can't remember if i used more windings on that one, but spinning this one by hand i got a maximum oof 10.2Vpp and 3Vrms or so. It's not a lot of power, but enough to drive a few LED's or something else for a micro-wind/hydro installation or an IOT installation. There are a lot of things that can be improved and using materials with different material properties allows for higher output 3d printed generators. This fits in the palm of my hand, and the principles can be scaled up. We can use readily available materials alongside 3d printing to do great things!
Similar models
thingiverse
free

BLDC motor
...ngs and a 1/4" shaft with a few 1/4" shaft spacers and a locking nut and shaft collar. printed with a longer orange 10.
thingiverse
free

Wind Turbine by ztwillis
...plete path for the magnetic flux. i used hobby strips of stainless steel around the outside to create a return path for the flux.
thingiverse
free
Gyroscope
... screw 45mm
4x m6 nut
1x m6 bolt 25mm
12x m3 bolts 20mm
12x m3 nuts
12x balls 15,85mm
1x gt2 belt
1x gt2 pulley 6mm bore 20 teeth
thingiverse
free

3-phase brushless motor by DylanMissu
... stator
3x spool
6x m3 hex nut
3x 30mm m3 bolt
1x 25mm m3 threaded rod
2x 8mm dia 3mm bore bearings
4x 6mm dia 4mm length magnets
3dwarehouse
free

Bearing flange for 35mm Shaft--4 Bolt
...dwarehouse
four bolt bearing flange with sealed bearing for a 35mm shaft. all dimensions based off of one i purchased from ebay.
thingiverse
free

3D Printed Brushless Motor
...1x 3d printed rotor
1x 3d printed stator
1x 3d printed bearing holder
1x 3d printed base
1x hobbywing skywalker 20a esc
thingiverse
free

Axial Flux Generator by relic
...ll make one of these. i can print the parts and prepare the coils but it will be a while before i have the $$$ for 16 magnets !!!
thingiverse
free

Ekobots - Perpetual motion motor by jsirgado
...e tips: http://www.thingiverse.com/make:224114
use small washers or plastic pipe to adjust the rotor position.
that is all folks!
thingiverse
free

Permanent Magnet Generator by motorheadv10
...r option for this project is to drive the rotor with a hard drive motor. i have included another option for the rotor and stator.
thingiverse
free

10/12 port siren rotor by Lumex120
... a 1/2 " shaft. it produces a minor harmonic 3rd when placed in a stator and spun. i will make a stator model for this soon.
Generator
3d_export
$17
Generator
...generator
3dexport
generator
archibase_planet
free
Generator
...base planet
generator electric generator
generator electric n300715 - 3d model (*.gsm+*.3ds+*.max) for interior 3d visualization.
design_connected
$20

Generation
...generation
designconnected
knoll generation computer generated 3d model. designed by formway design.
3d_export
$8

generator
...generator
3dexport
generator - obj, 3ds, fbx.
3d_export
$7

generator
...generator
3dexport
generator extures 4k resolution, basecolor -normal -metallic -ao-roughness-height tris:3084
turbosquid
free
generator
...rator
turbosquid
free 3d model generator for download as max on turbosquid: 3d models for games, architecture, videos. (1492909)
3ddd
$1

general
...general
3ddd
генерал
turbosquid
$99

generator
...urbosquid
royalty free 3d model generator for download as ma on turbosquid: 3d models for games, architecture, videos. (1514125)
turbosquid
$20

Generator
...rbosquid
royalty free 3d model generator for download as max on turbosquid: 3d models for games, architecture, videos. (1244841)
turbosquid
$2
Generator
...rbosquid
royalty free 3d model generator for download as fbx on turbosquid: 3d models for games, architecture, videos. (1245541)