Thingiverse
Toronto Micro Marathoner by designingpoorly
by Thingiverse
Last crawled date: 2 years, 11 months ago
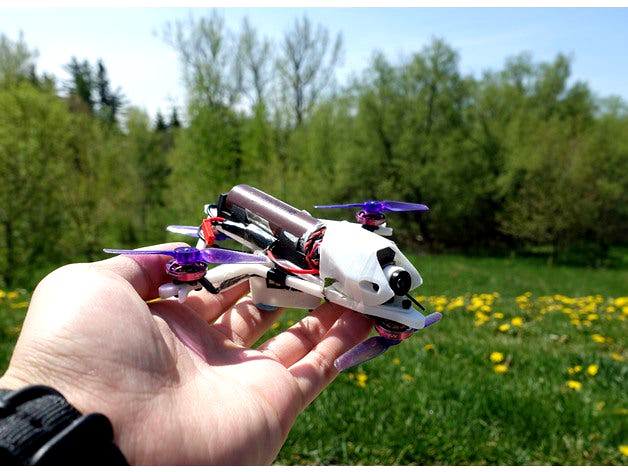
This partially inverted plus design is made to be super weird but also equally practical. It is able to get the props out of view of the camera while being super compact. The ability to use 18650 batteries is really convenient and economical. Just make sure not to get too excited while flying as it doesn't have too much punch out. This frame isn't really designed to be the lightest, best performing or the most advanced, it is just to try out a new idea and show what's possible with other frame configurations.
My build on Rotorbuilds for my full parts list: https://rotorbuilds.com/build/27266
Video on the frame design: https://youtu.be/CI2ykUmTqy4
Flight Footage: https://youtu.be/bSuooiEz3OQ
Recommended parts:
Flight Controller and ESC - DarwinFPV F411 AIO, FPV Cycle 1S AIO, NewBeeDrone BeeBrainBL V1 (F4 or better AIO Whoop 25.5 x 25.5 board that supports 1S (preferable more than 5A continuous rating for 3" props))
Motors: RCINPOWER 1202.5 11500Kv (these are the ones I used #teampink), Flywoo Robo RB 1202.5 11500Kv, FPVCycle Light 13mm 11250Kv 1S, and HGLRC AEOLUS 1202.5 11600Kv (I think the RCINPOWER and Flywoo are the same and the FPVCycle are made by RCINPOWER from what I have heard also) (I used the 1.5mm shafts because they are more common but just make sure the props you get correspond to your motor shaft diameter)
Props: HQ T65mm Durable (these are the ones I used, Gemfan 65R, and Gemfan Hurricane 3018 2 blade (Any 65mm/2.5" or 3" 2 blade prop will probably work well) (watch your throttle while using 3" as it can damage the battery and/or ESCs) (again, make sure that your props match the diameter of your motor shaft)
Battery: LG HG2 3000mAh, Samsung 25R 2500mAh, and Sony VTC6 (I use the LG and the Samsung as they are a good value usually) (a lot more batteries will work with this build, just make sure they can handle 20A continuous and 30A burst, especially if you are using 3" props) (you don't have to buy from this website, it is just an example, you can likely buy it at a local vape shop more conveniently)
Battery Tray: Something like this is what I used. (Update: I find that superglue didn't stick too well when I removed the battery tray and the screws were doing all the work. Perhaps try nano-tape or epoxy which may work better.)
5V Step-up Converter: There are a lot you can choose from but this is the one I used
Stack Screws - It is highly recommended that you do not use nylon screws or bolts, even if they are lighter. I recommend using M2x20mm stainless steel socket cap screws like these and adding nylon spacers as needed.
Motor Screws: I would recommend using M2x6mm or M2x7mm, just make sure your screws don't touch your motor winding.
For the camera, VTX, and receiver, just about any will work ok. For camera, you could even try mounting a Sharkbyte whoop camera or Caddx Loris maybe. For the receiver, I hear the Nano ExpressLRS receivers are really great options but probably a bit overkill. If you want the full list of the parts I used, check out my Rotorbuilds.
You could probably also transfer the parts from the Rekon 3 or #nanolongrange to the frame if you wanted to.
None of the links are affiliate links to my knowledge.
Similar models
grabcad
free

RCinpower-1202.5-11500kv
...rcinpower-1202.5-11500kv
grabcad
micro bldc motor for 1s toothpick drone.
11500kv motors
thingiverse
free

SENDHIT 4inch 1s version by Tarkux
... best setup for this awesome build .
footages here :https://youtu.be/dmvqxrkzvjw
recorded with nameless d400 dvr onboard w/ sound
thingiverse
free

Tomoquads Chopstick TPU parts
...:
flywoo aio fc
caddex ratel mini camera
flywoo 1202.5 motors
eachine triangle vtx
xm+ receiver
piro bi-pole antenna
small buzzer
thingiverse
free

FPVCYCLE 1s Battery Organizer by pksteffen
...fpvcycle 1s battery organizer by pksteffen
thingiverse
fits 450-600mah 1s batteries. perfect for your fpvcycle babytooth.
thingiverse
free
![Sanchez Air [Ultralight 3" Toothpick]](/t/5000494.jpg)
Sanchez Air [Ultralight 3" Toothpick]
....g. from a linear antenna). strip 25.8 mm of insulation. i also recommend adding a drop of glue on the connectors to secure them.
thingiverse
free

Nanolongrange V2 GPS FPV drone with single 18650 by Unboxingexperience7
...tracer, elrs... i used immersionrc ghost
3x 6mm and 10x 4mm m2 screws (i used titanium to save around 1g over steel)
rubber bands
thingiverse
free

Ultimate Brushed Tinywhoop frame 8520 motors, F3EVO by Xarhvid
...roducts/rdq-series-525mah-1s-80c-hv-ph2-0-lipo-battery-for-emax-tinyhawk
canopy:
https://www.thingiverse.com/thing:3275140/files
thingiverse
free

Cruiser Whoop by njd13
...e to remodel the battery holder for the back, but use a small ziptie for now.
included all the parts i modeled for others to use.
thingiverse
free
Toad 110 Remix - AIO FPV (Brushed 8.5mm Motors) by wiretap
...degree incline on the lower deck for a cam+vtx similar to the eachine tx02. -- added a slot on...
thingiverse
free

3D Printable Mini Brushed Drone "Gamma" by seanzhan0319
...or more information, refer to https://www.reddit.com/r/multicopter/comments/8bbs9t/designed_and_3d_printed_a_micro_im_so_glad_it/
Designingpoorly
thingiverse
free

KingKong/LDARC ET125 Canopy Upgrade by designingpoorly
...gning a camera mount for the slot, i recommned using 4 m3 screws.
youtube video for additional info: https://youtu.be/mfqxn1czwrq
thingiverse
free

Naked SJ8000 (Eken H9, SJ4000, Chinese Action Camera) by designingpoorly
...a 5v pad on my flight controller.
link to youtube video with additional information and disassembly: https://youtu.be/ihhdrltoeug
Marathoner
3ddd
free

Nieri Marathon
...nieri marathon
3ddd
nier , угловой
диван nieri marathon
3ddd
$1

FAGERHULT Marathon Rich
... marathon rich
fagerhult marathon rich, светильник, подвесной, направленный, с поворотом
turbosquid
$9

Marathon Boy Bust
...yalty free 3d model marathon boy statue for download as blend on turbosquid: 3d models for games, architecture, videos. (1600136)
humster3d
$75

3D model of Checker Marathon (A12) 1968
... 3d model of checker marathon (a12) 1968 in various file formats. all our 3d models were created maximally close to the original.
humster3d
$75

3D model of Checker Marathon (A12) Taxi 1978
...odel of checker marathon (a12) taxi 1978 in various file formats. all our 3d models were created maximally close to the original.
cg_studio
$99

Checker Cab A8 Marathon 1956-19823d model
...fbx .lwo .max .obj - checker cab a8 marathon 1956-1982 3d model, royalty free license available, instant download after purchase.
turbosquid
$27

Cattelan italia Flamingo chair Marathon table set
...go chair marathon table set for download as max, obj, and fbx on turbosquid: 3d models for games, architecture, videos. (1420156)
3d_export
$99

Checker Cab A8 Marathon 1956 to 1982 3D Model
... 1982 1956 50s cab interior 60s 70s taxi new york ny yellow a8
checker cab a8 marathon 1956 to 1982 3d model squir 83787 3dexport
3d_export
$25

Realistic Male Body 3D Model
...te man male sports olympic runner track field sprinter marathon jump fitness
realistic male body 3d model briarena 94242 3dexport
3d_export
$8

Realistic Male Body 3D Model
...nter marathon jump fitness gym athletics athletic gymnastics training traine
realistic male body 3d model briarena 94427 3dexport
Toronto
3ddd
free

TORONTO
...toronto
3ddd
toronto , капитоне
кроватьtoronto
3ddd
$1

SOFA TORONTO
...ronto
3ddd
toronto , угловой
http://yatasgrup.com.tr/product/enza/toronto/208/
turbosquid
$50

Toronto Cityscape
...
royalty free 3d model toronto cityscape for download as max on turbosquid: 3d models for games, architecture, videos. (1501602)
turbosquid
$4

Toronto sofa PBR
...del toronto sofa pbr for download as blend, fbx, obj, and stl on turbosquid: 3d models for games, architecture, videos. (1665601)
cg_studio
$75

toronto - skydome solo3d model
...kydome renaissance hotel
.3ds - toronto - skydome solo 3d model, royalty free license available, instant download after purchase.
cg_studio
$269

toronto - cn tower3d model
...e brewing renaissance hotel
.3ds - toronto - cn tower 3d model, royalty free license available, instant download after purchase.
turbosquid
$85

Toronto City 3d Model
...el for download as c4d, c4d, c4d, dxf, 3ds, stl, fbx, and obj on turbosquid: 3d models for games, architecture, videos. (1595857)
3d_export
$12

fire bowl 04 toronto
...imensions 80 x 80 x 33 cm; 14 kilograms ds max + vray (.max) 3ds max + corona (.max) obj/fbx export formats 3ds max version: 2016
3ddd
$1

кровать
...кровать 3ddd toronto кровать...
3d_export
$199

toronto city canada 60km
...der ready. 1. suitable for games, games, education, architecture etc. 2. mainly used for town and urban planning, real estate etc
Micro
3ddd
$1
Micro
...micro
3ddd
автобус
turbosquid
$80
MICRO
...ty free 3d model micro for download as max, c4d, obj, and fbx on turbosquid: 3d models for games, architecture, videos. (1700743)
3ddd
$1
JBL Micro Wireless
... micro , колонка , плеер
jbl micro wireless
turbosquid
$10
Suppressor Micro
...quid
royalty free 3d model suppressor micro for download as on turbosquid: 3d models for games, architecture, videos. (1380433)
turbosquid
$20
Micro Meter
...osquid
royalty free 3d model micro meter for download as fbx on turbosquid: 3d models for games, architecture, videos. (1350448)
turbosquid
$7
NIghtstand Micro
...d
royalty free 3d model nightstand micro for download as max on turbosquid: 3d models for games, architecture, videos. (1248117)
3ddd
$1
Micro wind turbine
...micro wind turbine
3ddd
турбина
micro wind turbine for your green building projects
turbosquid
$29
Micro Speakers
... available on turbo squid, the world's leading provider of digital 3d models for visualization, films, television, and games.
turbosquid
$29
Micro Servo.max
... available on turbo squid, the world's leading provider of digital 3d models for visualization, films, television, and games.
turbosquid
$20

Micro cells
... available on turbo squid, the world's leading provider of digital 3d models for visualization, films, television, and games.