Thingiverse
Seed Dryer by wardy89
by Thingiverse
Last crawled date: 3 years, 1 month ago
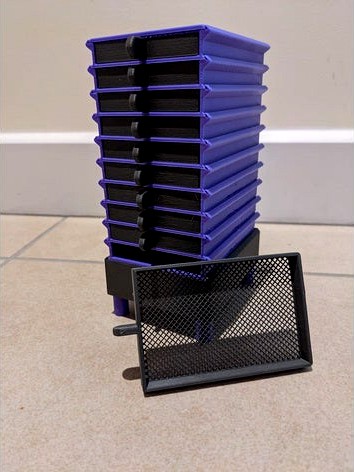
This has been designed as a modular seed dryer enabling you to print and stack as many layers as you require. (Two lengths of the dovetail are included one for a stack of 5 the other for a stack of 10) The idea is there is a fan housed in the bottom that pushes a gentle stream of air through the stack to expedite the seed drying process. This system is designed to be used with small/medium seeds. (chillis, tomatoes ect.)
There are two version of the base, one designed to have M3 screws self tap into the plastic the second to have brass M3 threaded inserts heat set into them.
Please read the printing instructions carefully.
Edit: Several people have mentioned modifying the design so to make that easier i have also included STEP files.
Print Settings:
-No support required for any parts. (The base has a support modelled into the design for the power jack hole. It should just be a single layer extrusion you need to break through and clean up before installing the power jack)
-Models should load in the correct print orientation,
Base + legs:
0.2 layer hight
2-3 perimeters
0-10% infill
Drawer + Lid + Seed Dryer Body + Dovetail
0.3 layer hight
2-7 perimeters
0-10% infill
Creating the mesh on the Drawer + Lid + Seed Dryer Body (the slightly trick part) there are two method you can use, both using the principle of remove top and bottom layers and setting infill density to create a mesh. You can manipulate how small the mesh is to suit by changing your infill density.
1st method (the easy way): Set the number of perimeters to 7, top and bottom layers to 0, infill 40% The minor downside to this method is it uses slightly more material. You might have to tweak the infill percentage and infill anchor setting to create a good bond between the infill and rest of the model. I get the cleanest results when i also enable 'detect thing walls' and "Avoid crossing perimeters". You could also use a hight modifier to apply the changes to just the bottom phew layers.
2nd Method: This one is slightly more complex but the result is having the mesh just where its needed. Load the part into your slicer (don't move it) then use the load Modifier function and select the modifier file i have provided for the part you are printing (it should automatically load into the correct place) You should then be able to select and set the top & bottom layer as well as infill density separately for the modifier. Again uses 0 top & bottom layer and i use grid infill at 40% You might also need to play with you infill anchor setting to make sure you get good anchors to the rest of the model.
Note: Before anyone asks, yes i did create a version where i modelled the mesh in CAD, While i could model the mesh no problems (my computer wasn't much of a fan!!) slicing software didn't like it at all, the usual result was a file that took 15-20 minutes to slice, and the mesh not properly attached to the print/big gaps in it. (I spent 2 days trying to get it to work, tweaking the model and slicer setting but didn't get to a solution i was happy with.)
Bill of Materials:
60x60x10mm fan
power jack
Power supply
4x M3x12mm machine screws.
Optional
4x M3 brass inserts (i use Ruthex ones.)
Tools:
Soldering equipment (or something to make the connection between the power jack and fan) When soldering the fan to the power jack make sure you have checked the polarity of your power supply first.
Driver to match the heads of your machine screws.
Parts Used: below i will put links for the exact components i used.
Fans: any 60x60x10mm fan with a 50mm hole spacing should work as long as you get the correct voltage power supply for the fan you buy.
Power jack: Again make sure you get ones to match the output plug on your power supply. If you use something different to me you might need to modify the mounting hole as it has been designed for the fitting linked below. (or send me a message and i can create a different version to work)
Power supply: Make sure you get the correct voltage for the fan you use.
Parts I used:
Power Jack- https://www.amazon.co.uk/gp/product/B01N8VV78D/ref=ppx_yo_dt_b_asin_title_o01_s00?ie=UTF8&psc=1
Fans- https://www.amazon.co.uk/gp/product/B07GX86CJN/ref=ppx_yo_dt_b_asin_title_o01_s00?ie=UTF8&psc=1
Power supply - https://www.amazon.co.uk/gp/product/B07KZNVZ2N/ref=ppx_yo_dt_b_asin_title_o01_s00?ie=UTF8&psc=1
Similar models
thingiverse
free

Ender 3 60mm Board Fan Cover by HansisThings
...gles infill.
thanks to timqui for the original power supply (psu) fan silencer (ender 3)https://www.thingiverse.com/thing:4631303
thingiverse
free

Furtive Shroud (Tealight holder - Voronoi) by voidbubble
...: 0
bottom layers: 0
infill density: 0
project files are provided for both slicers for you to adapt to your printer and filament.
thingiverse
free

Silica gel box with clip for spools by Printschnitzel
...ess)
infill->fill pattern: grid
layers and perimeters->bottom solid layers: 0
layers and perimeters->top solid layers: 0
thingiverse
free

Maker Mining Rig by bytestrome
...: 10
infill: 30%
t-slot nut w/ fan mount:
layer: 0.1 mm
filament: pla
perimeters: 10
top layers: 10
bottom layers: 10
infill: 30%
thingiverse
free

Tablet dock, high enough to allow inserting the power supply jack. by mirox3m
...hould be better) and 2 perimeters.
this thing was made with tinkercad. edit it online https://tinkercad.com/things/6zs1ec5r3lv
thingiverse
free

Anet A8 Power Supply fast fan bracket by Miranina
...u remix thanks : https://cad.onshape.com/documents/3344cda09bbb1e40a22ea094/w/dabe15396eae112b5522938d/e/c1b0596520d979756f4c083d
thingiverse
free

Stackable Inland filament spool holder by leftshoe
...ve everything.
printed at 20% infill and 2.5 layer height, should be able to print at whatever settings though with no supports.
thingiverse
free

Pegboard Power Supply (DPS5005)
...ttom to power the module. the stl does not have a hole for this so you can add/drill whatever sized hole you need for your setup.
thingiverse
free
Polygon Mesh Cat Bookend by jammi
...re print cooling or possibly slightly lower temperature, and finer k-value calibration (or retraction settings, if you use that).
cg_trader
$3

Cups and vases - crumpled surface | 3D
...table. you can print it with perimeters (e.g. 0,2mm layer height, 3 perimeters, 6 bottom layers, 0 top layers, 0 infill) or using
Wardy89
thingiverse
free

Eachine DVR03 Mount by wardy89
...ra sits flat.
i designed it so that i could use a piece of velcro on the bottom i could easily take it on and off various models.
thingiverse
free

Eachine TX01 Camera mount by wardy89
...ra sits flat.
i designed it so that i could use a piece of velcro on the bottom i could easily take it on and off various models.
thingiverse
free

5:1 Ogive nosecone by wardy89
...ckness of 1.5mm.
i have included files for all the parts separately, as well a file that has all 3 parts laid out ready to print.
thingiverse
free

2.5" Rocket Av Bay by wardy89
...ortly.
update:
minor changes to clearances for make build easier.
added a version that will take a perfectflite strato logger cf.
thingiverse
free

Seed Tray (Plug/Module Tray) by wardy89
...equire heat for germination, allowing germinated seeds to be moved off the heat while leaving non germinated ones where they are.
thingiverse
free

Wall Mount Soap Dish V1 by wardy89
... of the wall side dovetail that over doubles the tape bonding area, i was having issue with the smaller ones coming off the wall.
thingiverse
free

BT-60 AV Bay by wardy89
...ye bolts
m3 well nuts
2.5mm power jack
eggtimer quark
electrical wire
electrical connectors of your choice
battery of your choice
thingiverse
free

6 Cell Module Tray (Seed/Plug Tray) by wardy89
...63mm
print settings:
layer hight - 0.3
perimeters - 1
infill - 5-10% should be plenty
support- none
sugested material- petg, asa
thingiverse
free

Bondtech BMG MK3S & MK2.5S (V6 & Mosquito) Reverse Bowden/Filament Guide sensor cover (PC4-M10)
...sensor cover (pc4-m10) thingiverse this is a remix of wardy89#39;s mk3s filament guide. this is designed to fit the...
Seed
3ddd
$1

Seed 40x45h15
...seed 40x45h15
3ddd
seed
seed 40x45h15
3ddd
$1

SEED 50x30h18
...seed 50x30h18
3ddd
seed
seed 50x30h18
3ddd
$1

SEED 55x42h15
...seed 55x42h15
3ddd
seed
seed 55x42h15
3ddd
free

SEED 70x40h13
...seed 70x40h13
3ddd
seed
seed 70x40h13
3ddd
free

SEED 55x40h24
...seed 55x40h24
3ddd
seed
seed 55x40h24
3ddd
free

SEED 90x42h13
...seed 90x42h13
3ddd
seed
seed 90x42h13
turbosquid
$10

Seeds
...eeds
turbosquid
royalty free 3d model seeds for download as on turbosquid: 3d models for games, architecture, videos. (1641121)
turbosquid
$39

Seed
... available on turbo squid, the world's leading provider of digital 3d models for visualization, films, television, and games.
turbosquid
$14

Seeds
...3d model seeds for download as ma, ma, jpg, png, fbx, and obj on turbosquid: 3d models for games, architecture, videos. (1580398)
3ddd
free

Seed tondo 40h18
...seed tondo 40h18
3ddd
seed
seed tondo 40h18
Dryer
archibase_planet
free
Dryer
...dryer
archibase planet
dryer hand dryer
dryer hand dryer airblade n210114 - 3d model (*.gsm+*.3ds) for interior 3d visualization.
archibase_planet
free
Dryer
...yer
archibase planet
dryer washer dryer drying machine tumble dryer
dryer - 3d model (*.gsm+*.3ds) for interior 3d visualization.
archibase_planet
free

Dryer
...dryer
archibase planet
dryer hand dryer
dryer n221113 - 3d model (*.gsm+*.3ds+*.max) for interior 3d visualization.
archibase_planet
free

Dryer
...dryer
archibase planet
drying apparatus dryer
hand dryer - 3d model for interior 3d visualization.
archibase_planet
free
Dryer
...dryer
archibase planet
dryer kitchen ware
dryer - 3d model (*.gsm+*.3ds) for interior 3d visualization.
archibase_planet
free

Dryer
...dryer
archibase planet
dryer heater radiator
dryer 1 - 3d model (*.gsm+*.3ds) for interior 3d visualization.
archibase_planet
free
Dryer
...dryer
archibase planet
dryer radiator heater
dryer 2 - 3d model (*.gsm+*.3ds) for interior 3d visualization.
archibase_planet
free

Dryer
...dryer
archibase planet
dryer radiator heater
dryer towel rail n121213 - 3d model (*.gsm+*.3ds) for interior 3d visualization.
archibase_planet
free

Dryer
...rchibase planet
dryer radiator heater towel rail
dryer towel rail n241213 - 3d model (*.gsm+*.3ds) for interior 3d visualization.
archibase_planet
free

Dryer
...r towel rail radiator heater
dryer towel rail villeroy & boch n260514 - 3d model (*.gsm+*.3ds) for interior 3d visualization.