Thingiverse

Metronome Engine by brlaw
by Thingiverse
Last crawled date: 3 years ago
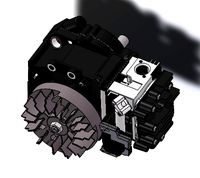
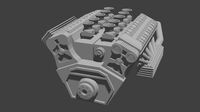
Metronome Engine.
I wanted to build a test rig to check some calculations I made to determine the dimensions for a compound pendulum , these had been done in Excel and were intended for a new wooden clock design I was working on. I had based the rig design on the engine used in a metronome. It's the only mechanism that I could find that actually used the compound pendulum so it turned out to be ideal for 3D printing. The rig is driven by a weight inside the steam engine style boiler on the end of a stalk, it drives an escape wheel through a gravity ratchet and a couple of gears to give around 2.5 minutes of running time. The compound pendulum controls the rate at which it tick-tocks. Moving the top weight up slows down the pendulum and visa verse. The top and bottom weights can also be changed out for bigger or smaller weights to also change the rate. With all these possible variations it was straight forward to finesse the results to get the right combination that could be scaled up for use in a larger wooden clock.
This rig could also be modified to add a scale so that it could be used as a metronome, as it is it's actually a nice little gadget to create on your 3D printer.
You will need 1 of each STL part except for the following:-
Spacer 3 requires 2 parts
Pawl requires 4 parts
Wedge requires 3 parts
Escapement requires 2 parts to be solvent bonded back to back
You will need some extra components to complete the build :-
6 roller bearings Ø2mm x Ø6mm x 3mm
1 piece Ø1.5mm steel rod for the pendulum
1 piece Ø2mm steel rod for the pendulum pivot
2 piece Ø2mm steel rod for the gear shafts
Acetone to solvent bond the frame and other parts together.
Ø9.5mm steel balls (Catapult ammo) for the weight.
Ø12mm Brass rod for the weights Or washers, 8 grams for top weight and 23 grams for the bottom weight.
Magnet Ø5 x 5mm long to hold the top pendulum weight in position.
STL files for download are in 3 groups Blue, Red, and Orange, Use the drawing as a guide for where the components fit into the assembly.
For more detail go to http://www.3dprinterclocks.com/page19.html.
View a video of the working rig here https://youtu.be/jI1B_eK7I_Q
STL files are grouped in the 3 ZIP files.
Similar models
thingiverse
free

Pendulum Wall Clock Final v2 by lustertone
... smoothly. i also added a tiny bit more to the hour/minute/seconds gear shafts so they would not have much friction between them.
thingiverse
free

Weight for swinging pendulum by bre
...hole in this for m5 threaded rod. you can use this for your clock as a pendulum weight. fill with pennies and adjust as you like.
thingiverse
free

Galileo's Pendulum Clock by ZombieCat
... period by making it easy for students to move washers or large nuts along notches on the pendulum (full length and half-way up).
thingiverse
free

Parametric Graham Escapement by syvwlch
...cad, and plan to eventually build up to a full clock. i'm amazed by how far, how fast i got with openscad, btw, it rocks! :-)
grabcad
free

open movement wall clock
...all clock
grabcad
an open movement wall clock. the clock will have a 2 pound power weight and a 250 gram weight for the pendulum
grabcad
free

Wooden Clock
.../8’’ / 3.175mm endmill.
- custom escapement with adjustable pallets.
to do:
- pendulum weight
- escapement weight
- clock hands
thingiverse
free

Simplified Galileo's Pendulum Escapement by dopeydavoid
...scapement and/or clock!
designed in autodesk inventor.
see more of my distractions here:https://hackaday.io/davidscholtenadelaide
cults
$8

Mechanical clock to wind up
...ially useful for support (which can not be printed) and final assembly.
if you have any questions, feel free to leave a comment.
thingiverse
free

Adjustable Pendulum Arm by Tommy3113
... the pendulums doubles as a weight holder) and the bottom pendulum. wing nuts seem to be the best to secure weights like washers.
grabcad
free

Experimental Skeleton Clock
... thick acrylic.
daisy wheel motion work.
inverted graham deadbeat escapement.
asymmetrical crutch.
fused quartz pendulum rod.
Brlaw
thingiverse
free

Minute Engine by brlaw
...unction, see link below for full instructions.
https://brianlawswoodenclocks.blogspot.com/2020/09/a-design-for-minute-engine.html
thingiverse
free

Ben and Jerry at the Gym by brlaw
...hen driven directly.
for more models to print, including several working clocks go to https://www.3dprinterclocks.com/page26.html
thingiverse
free

Bill and Ben Wheel Barrow race by brlaw
...straightforward, guided by the drawings shown here, only needing a 3d printer and some ø2 mm rod for the pivots, pins and shafts.
thingiverse
free

Mechanical Counter by brlaw
...ied the actuator and made it a simple push operation.
for complete instructions got to http://www.3dprinterclocks.com/page23.html
thingiverse
free

Lockable Container by brlaw
... to include the cutout through the pivot hole.
see new version of this with a hidden keyhttps://www.thingiverse.com/thing:3217723
thingiverse
free

Trolley Token by brlaw
...he double ended didn't work on all trolleys.
more things to make including 2 working clocks at http://www.3dprinterclocks.com
thingiverse
free

Tyrannosaurus Automatum by brlaw
...e this as a project maybe you would like my main project line which is wooden clocks. if so take a look at www.woodenclocks.co.uk
thingiverse
free

South Pointing Chariot by brlaw
...tails go to http://www.3dprinterclocks.com and view the video at https://www.youtube.com/watch?v=yzukr621gr4&feature=youtu.be
thingiverse
free

Automata-4 Ben rides around the clock by brlaw
...rs drive the unicycle around and the friction between the wheel and the top face of the box drives the legs around on the pedals.
Metronome
3d_ocean
$7

Metronome
...ime wooden
wooden metronome. animated model. modeling in 3ds max 2010 and rendered with vray 2.4. other files format – .max, obj.
turbosquid
$4

Metronome
...osquid
royalty free 3d model metronome for download as blend on turbosquid: 3d models for games, architecture, videos. (1325258)
turbosquid
$3

metronom
...turbosquid
royalty free 3d model metronom for download as ma on turbosquid: 3d models for games, architecture, videos. (1570069)
turbosquid
free

Metronome
...
free 3d model metronome for download as obj, fbx, and blend on turbosquid: 3d models for games, architecture, videos. (1445619)
turbosquid
$39

Metronome
... available on turbo squid, the world's leading provider of digital 3d models for visualization, films, television, and games.
turbosquid
$2

Metronome
... available on turbo squid, the world's leading provider of digital 3d models for visualization, films, television, and games.
3ddd
$1

Delta Light / Metronome
...delta light / metronome
3ddd
delta light
delta light
metronome 286 70 27 w
metronome h 286 70 28 в
3d_export
$5

Metronome 3D Model
... poser props obj mechanical mechanism metronome time keeper musical instrument music
metronome 3d model uncle808us 70814 3dexport
turbosquid
$9

Metronome black coin
...oyalty free 3d model metronome black coin for download as max on turbosquid: 3d models for games, architecture, videos. (1498842)
turbosquid
$9

Metronome gold coin
...royalty free 3d model metronome gold coin for download as max on turbosquid: 3d models for games, architecture, videos. (1498826)
Engine
3d_export
$5
engine
...engine
3dexport
engine
3d_export
free
Engine
...engine
3dexport
engine
archibase_planet
free
Engine
...engine
archibase planet
motor engine
engine - 3d model for interior 3d visualization.
archibase_planet
free
Engine
...engine
archibase planet
motor engine mover
engine n170708 - 3d model (*.3ds) for interior 3d visualization.
archibase_planet
free

Engine
...engine
archibase planet
engine locomotive train
locomotive - 3d model for interior 3d visualization.
turbosquid
$1

ENGINE
...osquid
royalty free 3d model ic engine for download as sldas on turbosquid: 3d models for games, architecture, videos. (1382781)
3d_export
$5

engine
...engine
3dexport
3d_export
free
engine
...engine
3dexport
turbosquid
$7

Engine
...d model animated engine mograph element3d for download as c4d on turbosquid: 3d models for games, architecture, videos. (1380716)
turbosquid
$1

ENGINE
...y free 3d model engine for download as max, 3ds, stl, and fbx on turbosquid: 3d models for games, architecture, videos. (1673703)