Thingiverse
K40 Height Adjust by Klave
by Thingiverse
Last crawled date: 3 years, 3 months ago
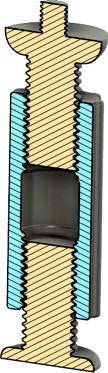
For those of us who cut a hole in the bottom of their K40 laser to fit a rotary tool, this may be useful to change the height of the laser. These legs replace the castor wheels which are a hazard anyway.
Legs let you change the height of the laser by turning the sleeve sections. The thread is 2.5mm pitch so one turn will change the height by 5mm. The sleeve has 10 flutes so one flute of turn will change the height 0.5mm. One of the flutes has a reference mark, you may want to write on the others, 0 to 5mm in 0.5mm steps or every second one for 1mm steps
The top threaded section will fit the nut from the castor wheel. You should tighten this lightly to prevent the top turning when you adjust the sleeve and some adhesive will be a good idea. I used some non-slip material that is usually put under carpets, mirror tape will be better.
You can't tighten this nut much, its just PLA.
There are 2 options for the top LH thread screw, one has a wide cap that supports the laser enclosure. I did this to strengthen the thinner screw joint, not sure if its necessary. This part gets printed with the cap down and will need supports with a concentric pattern for easy removal, I also use 3 line count for the shell and 45% infill. Uses 15g/5m of material taking almost 2 hours to print. This may be an overkill but putting those top nuts in can be a pain on one or 2 of them and I don't want to do that twice for the cost of a few grammes of filament.
The foot should have some anti slip material to ensure it doesn't turn.
The top left hand threaded post and bottom right hand threaded foot have had their diameter scaled by 96.5% so that they turn easily when printed. The smaller top threaded section is unchanged because the nut seems quite loose anyway.
I added a very small amount of silicone grease to the threads, this may be a bad idea in the long run but it did turn more smoothly afterwards.
Total adjustment is about 50mm, the threads are 35mm long but you need to leave about 3 threads engaged for stability.
Make sure the top and bottom don't turn when adjusting or the height will be inaccurate and it may come loose at the end.
Print time was 5 hours on my E3 v2
Similar models
thingiverse
free

Stand for BJD Doll (SmartDoll) by NermalAndGarfield
...ht is correct tighten both nuts against the top and bottom sections.
the adjustment uses left and right threaded shafts and nuts.
thingiverse
free

Non slipping T nut M3 by Darky82
...out of the channel so i made these wider to stop this issue but do have to be slid in from the end.
best printed at 0.16 or lower
thingiverse
free

One-Up Bed Adjust Nut Holder by jeffrey892
...d the nut. this one just slips over the bottom plate and holds the nut from turning. it fits tightly so it won't come loose.
thingiverse
free

Cohesion3D LCD Case for K40 Laser by Sonderklasse
...with support and has recessed lettering. you may be able to print this upside-down to save some material but i have not done so.
thingiverse
free

Z Adjustable Bed for K40 Chinese Laser by brianvanh
... to arrive, so i haven't tried it with the belt yet. i will update with a video once that arrives and i have it all working.
thingiverse
free

Dice case by MouldToast
...t if your nut will nicely fit into the hole at 104%, i can adjust and release multiple sized holes depending on what is required.
thingiverse
free

Sovol SV01 Spool Holder Adapter by Irontoad
...067600https://www.thingiverse.com/thing:3544593https://www.thingiverse.com/thing:4187370https://www.thingiverse.com/thing:4546031
grabcad
free

Extruder press
...ey and the one at the bottom with the wings by hand until the filament is free.
after changing the filament loosen the nuts again
thingiverse
free

Ender 3 Pro Spooler remix
...print setting when printing. i make the first 50mm or so 80% infill due to the first one cracking when i tighten up the back nut.
thingiverse
free

monoprice select / wanhao i3 fixed bed calibration by toyotaboy02
...*update: made this 5mm smaller (down from 30mm). if you tried to use the old version on the bottom too, it'll hit the frame.
Klave
thingiverse
free

Dremel Nut by Klave
... scaled 101% in the radial directions to make the fit slightly looser but 100% threaded on fine
lay it on its front face to print
thingiverse
free

LM2596 Enclosure by Klave
...he board. the lid will fit both ways so make sure you check the pot is visible.
for the side entry the lid will only fit one way
thingiverse
free

YAFS Yet another end of of filament sensor by Klave
...x 5.7 mm like these https://www.amazon.ca/gp/product/b07dgx9b9c)
it also doubles as an equally unnecessary filament guide
ender 3
thingiverse
free

Hex bit finger wrench by Klave
...tool holder so i can easily place and remove it. i also put a magnet in the wrench top to stick it to the nearest piece of steel.
thingiverse
free

Filter Sieve by Klave
...s, the bars are an easy distance to bridge, only 3.6mm, and the sides taper at 24 degrees from vertical so no supports are needed
thingiverse
free

CNC Tool Probe by Klave
...e that theirs is normally open and they had to set the probe as active low. this is not needed for my probe which is active high.
thingiverse
free

Honda Civic 2008 Front Emblem by Klave
...ted it, i just made a curved version of the flat one and added the two pins, about 2mm long. you will need supports for this one.
thingiverse
free

K40 mA meter Bezel by Klave
...high voltage on them.
the meter face is 56mm x 64mm and the large round section has a diameter 49mm
mine is similar to this meter
thingiverse
free

Zero Probe by Klave
...rotrude past the print head then you could use it but there are many available options for bed leveling that don't need this.
thingiverse
free

K40 mirrors by Klave
... had this experience, feel free to feed back to the mirror suppliers that their compatibility with k40 is marginal and deceptive.
K40
turbosquid
$9

Jaipur Rugs K40
... available on turbo squid, the world's leading provider of digital 3d models for visualization, films, television, and games.
3ddd
$1

FONTEALTA K40-S
...fontealta k40-s
3ddd
смеситель , fontealta
sink mixer withswivel spout, in inox steel
3ddd
$1

FONTEALTA K40-F
...fontealta k40-f
3ddd
смеситель , fontealta
sink mixer withswivel spout, in inox steel
3d_export
$22

xiaomi redmi k40 pro
...e so that the exported files (.dae, .stl, .usdc, .obj and .fbx) is ok please tell me in private message if you have any problems.
3d_export
$30

xiaomi redmi k40 gaming 2021
...reviews is made with lux core render free add-on render p.s .: priority - produced in blender program builds -** blender 2.92.0**
3d_export
$5
Chevy k20 3D Model
...chevy k20 3d model 3dexport chevy k20 k30 k40 k50 k5 blazer pickup dodge ford rims wheels tires...
thingiverse
free

K40 BigDesk (170x265m)
...k40 bigdesk (170x265m)
thingiverse
a bigdesk for the k40
in progress....
thingiverse
free

K40 handle by rafaljot
...k40 handle by rafaljot
thingiverse
handle for k40 co2 laser.
thingiverse
free

K40 Jig
...g
thingiverse
k40 jig to mark out a line corresponding to the lens focal height for the purpose of mounting a spring loaded bed.
thingiverse
free

K40 X carriage
...k40 x carriage
thingiverse
k40 replacement for the original x carriage
Adjust
3d_ocean
$7
Adjustable Wrench
...adjustable wrench
3docean
adjustable wrench highly detailed wrench
highly detailed adjustable wrench.
3ddd
$1
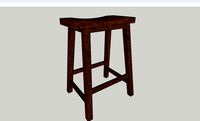
Adjustable Stool
...adjustable stool
3ddd
табурет
wooden adjustable stool.
3d_ocean
$20

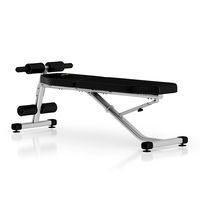
Adjustable Gym Bench
...st adjustable bench black equipement gym gymnastic indoor silver sport workout
3d model of black and silver adjustable gym bench.
3d_ocean
$20
Adjustable Gym Bench
...st adjustable bench black equipement gym gymnastic indoor silver sport workout
3d model of black and silver adjustable gym bench.
3d_ocean
$16

Adjustable Weight Bench
...arbell bench black equipement gym gymnastic indoor sport weight workout
3d model of black adjustable weight bench with a barbell.
turbosquid
$5

Adjustable wrench
...
royalty free 3d model adjustable wrench for download as fbx on turbosquid: 3d models for games, architecture, videos. (1313414)
3d_export
$5

adjustable tension lock
...adjustable tension lock
3dexport
adjustable tension lock
turbosquid
$1

Adjustable Wrench
...free 3d model adjustable wrench for download as obj and blend on turbosquid: 3d models for games, architecture, videos. (1446736)
turbosquid
$1

Adjustable Wrench
...y free 3d model adjustable wrench for download as c4d and fbx on turbosquid: 3d models for games, architecture, videos. (1379022)
3d_export
$5

Adjustable key
...adjustable key
3dexport
Height
turbosquid
$5
Height Stool
...ree 3d model height stool for download as blend, obj, and fbx on turbosquid: 3d models for games, architecture, videos. (1703076)
cg_studio
$20
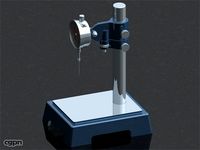
Height Gauge3d model
...ndustrial height gauge tool indutsrial
- height gauge 3d model, royalty free license available, instant download after purchase.
turbosquid
$6

4.5 meters in height
...oyalty free 3d model 4.5 meters in height for download as max on turbosquid: 3d models for games, architecture, videos. (1213038)
turbosquid
$1
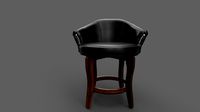
Counter Height Stool
... model counter height stool for download as obj, dae, and skp on turbosquid: 3d models for games, architecture, videos. (1318792)
turbosquid
$10
low height cabinet
...ow height cabinet for download as max, max, fbx, obj, and max on turbosquid: 3d models for games, architecture, videos. (1545300)
turbosquid
$5
Counter Height Bench
... available on turbo squid, the world's leading provider of digital 3d models for visualization, films, television, and games.
3ddd
free
Stanley furniture - Avalon heights
...stanley furniture - avalon heights
3ddd
stanley furniture
stanley furniture - avalon heights metal base empire writing desk
3d_ocean
$1

Maximum height sign
...ure applied. the object is ready to import and render in both formats. the model has been built to be able to subdivide flawle...
turbosquid
$20

Low height cabinet design
...y free 3d model low height cabinet design for download as max on turbosquid: 3d models for games, architecture, videos. (1402496)
turbosquid
$5
170cm height dual lamp
... available on turbo squid, the world's leading provider of digital 3d models for visualization, films, television, and games.