Thingiverse
Fishing Line Upgrade for Geeetech & Clones by Celcius1
by Thingiverse
Last crawled date: 3 years ago
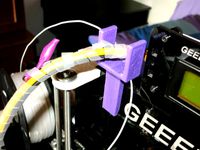
UPDATE 28/04/2017 Please ensure the lines are tensioned tight enough and check the tension every few prints, if you loose tension your print will fail a good simple test is pluck the fishing line if you hear a high C or high A you have sufficient tension in your fishing line and accurate printing, I found out by consequence with 3 failed prints.
I decided to upgrade the belt drives on my Geetech clone printer, So i trialed using fishing line instead of rubber belt drives.
I replaced my Y axis with a fishing line drive and the results are quite good, less jerk, and faster more stable print speeds.
To do this upgrade, you'll need the following
4 x 623ZZ bearings
2 x M3 20mm Screws
1 x M3 40mm Screw
1 x M3 65mm Screw
6 x M3 Nuts
6 x M3 Washers
Approx 5m of 40 to 80lb break line braid fishing line (must be braid, monoline has too much stretch in it)
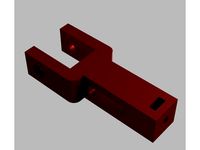
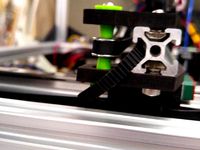
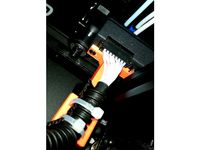
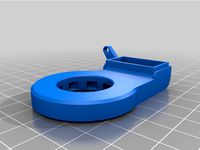
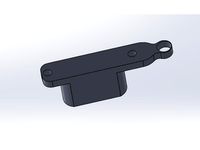
Basically print all the parts, the parts for this upgrade does both X and Y, the long line tensioner is for the X axis. Press fit 2 bearings into each idler wheel, they are a tight fit, so you will need to use a vice to press them in. The Idler wheels will need to be printed in ABS for flexibility, Tensioners as well for the strength, all other parts can be printed in PLA.
Assembly of the tensioners is easy just make sure to fit a washer either side of the idler wheel bearing and use a drop of mineral oil to ensure things run smoothly. Make sure you fit the 40mm screw first and secure in place with an M3 nut.
The thumb screws have an M3 nut fitted into them this eliminated the need for using useless wing nuts. Don't print the thumb screw with support otherwise too much crap gets into the hole where the M3 nut sits and it wont grip anything.
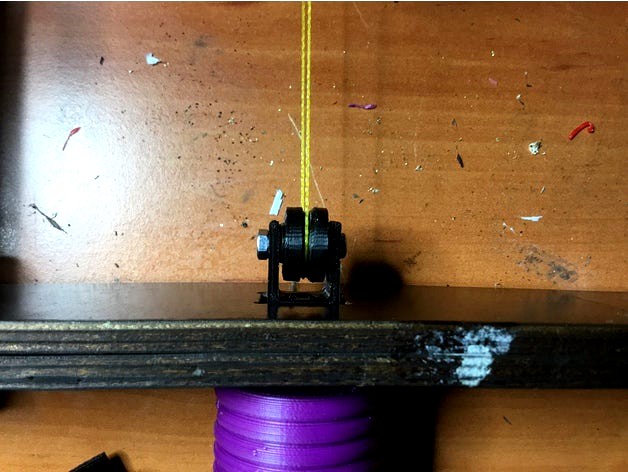
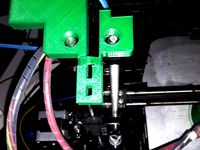
To install the line tie a loop in one end, feed it thru the idler wheel, ensure you don't tangle the line up run the fishing line round the drive wheel bout 5 to 6 times, be careful on how you do this, if you don't do it correctly you will run into a world of hurt. Tie the other end off on the bed using a grinner knot. Whilst feeding the line thru you need to keep it as taught as possible, and the line tensioner on its loosest setting.
Once all secured start turning the thumb screw until the line is tightened and when you pluck the line it should sound similar to a stringed instrument, the reason for the 80lb break line is due to the amount tension the line will be under in the photo's you can see the Y axis tensioner at full tension. Just note whilst you increase tension move the axis your tensioning back and forth to keep the tension even on the entire length of the line.
I've also included a basic calibration print as well so you can re-calibrate your printer to the changes
Print Settings for the items
Thumb Screw x 2
Print in PLA
0.3mm Layer Height
No Support
No Raft
Idler Wheel x 2
Print in ABS
0.1mm Layer Height
No Support
Use Raft
Drive Wheel x 2
Print in PLA
0.3mm Layer Height
Use Support
No Raft
Line Tensioner (Y Axis)
Print in ABS
0.1mm Layer Height
No Support
Use Raft
Line Tensioner Long (X Axis)
Print in ABS
0.1mm Layer Height
No Support
Use Raft
I decided to upgrade the belt drives on my Geetech clone printer, So i trialed using fishing line instead of rubber belt drives.
I replaced my Y axis with a fishing line drive and the results are quite good, less jerk, and faster more stable print speeds.
To do this upgrade, you'll need the following
4 x 623ZZ bearings
2 x M3 20mm Screws
1 x M3 40mm Screw
1 x M3 65mm Screw
6 x M3 Nuts
6 x M3 Washers
Approx 5m of 40 to 80lb break line braid fishing line (must be braid, monoline has too much stretch in it)
Basically print all the parts, the parts for this upgrade does both X and Y, the long line tensioner is for the X axis. Press fit 2 bearings into each idler wheel, they are a tight fit, so you will need to use a vice to press them in. The Idler wheels will need to be printed in ABS for flexibility, Tensioners as well for the strength, all other parts can be printed in PLA.
Assembly of the tensioners is easy just make sure to fit a washer either side of the idler wheel bearing and use a drop of mineral oil to ensure things run smoothly. Make sure you fit the 40mm screw first and secure in place with an M3 nut.
The thumb screws have an M3 nut fitted into them this eliminated the need for using useless wing nuts. Don't print the thumb screw with support otherwise too much crap gets into the hole where the M3 nut sits and it wont grip anything.
To install the line tie a loop in one end, feed it thru the idler wheel, ensure you don't tangle the line up run the fishing line round the drive wheel bout 5 to 6 times, be careful on how you do this, if you don't do it correctly you will run into a world of hurt. Tie the other end off on the bed using a grinner knot. Whilst feeding the line thru you need to keep it as taught as possible, and the line tensioner on its loosest setting.
Once all secured start turning the thumb screw until the line is tightened and when you pluck the line it should sound similar to a stringed instrument, the reason for the 80lb break line is due to the amount tension the line will be under in the photo's you can see the Y axis tensioner at full tension. Just note whilst you increase tension move the axis your tensioning back and forth to keep the tension even on the entire length of the line.
I've also included a basic calibration print as well so you can re-calibrate your printer to the changes
Print Settings for the items
Thumb Screw x 2
Print in PLA
0.3mm Layer Height
No Support
No Raft
Idler Wheel x 2
Print in ABS
0.1mm Layer Height
No Support
Use Raft
Drive Wheel x 2
Print in PLA
0.3mm Layer Height
Use Support
No Raft
Line Tensioner (Y Axis)
Print in ABS
0.1mm Layer Height
No Support
Use Raft
Line Tensioner Long (X Axis)
Print in ABS
0.1mm Layer Height
No Support
Use Raft
Similar models
thingiverse
free

Prusa Steel X axis with tensioner and 8mm leadscrew support by fedewolfie
...ner and a m5 screw and nut for the toothed idler, i use a cheap aliexpress toothed idler with a m5 bore.
prints without supports.
thingiverse
free

X axis idler for FLSUN Cube 3D printer by GregLen
...3 screw and nut to mount it through the hole in the acryiic slider.
just updated so that no support should be needed for printing
thingiverse
free

D-Bot Carriage Rear Plate with Adjustable Belt Tensioner by 1sPiRe
...o print tensionners at a height layer resolution (i.e 0.1mm)
more carriage parts to come...
part of my d-bot upgrades collection.
thingiverse
free
Wilson 2. Heavy Duty Y Tensioner. by lowfat
... to heat up the m3 nut for it to slide down the hole.
an m4 x 25mm and m4 nut is required to secure the tensioner to the y idler.
thingiverse
free

Anet A6 X-axis belt tensioner - alternate tensioner block by hehehaha8
...e the adjustment screw to the tensioner (spare from kit)
1 x washer - to provide support between the nut and the tensioner
enjoy!
thingiverse
free
Folger FT-5 Idler Supports by Sky120
...3 lock-nut are required for each pulley. the offset supports are for the y axis and the equal height supports are for the x axis.
thingiverse
free

X-axis belt tensioner Anet A8 for toothed idlerbearing 16T FREECAD BLUEPRINT ATTACHED
...you need is a longer belt. this thing is similar to the thing 1683070 , but with the difference,...
thingiverse
free

Hot bed system by Nidou
...nidou
thingiverse
easy top print. no supports, rafts or brims. prints in about an hour at 50mm/s
layer height 0.1mm
add a m3 nut
thingiverse
free

Z Axis Coupler by Hirgon
...oupler. uses m3 screw and nut.
print vertical at 50% infill
layer height at 0.2 with no support
layer height at 0.3 with support
thingiverse
free

Anet A8 x belt tensioner for toothed idler by GonzoG
... tensioner for anet a8 and toother idler.
it uses m3 screws with m3 5.5mm nuts. screws should have at least 20-25mm long thread.
Celcius1
thingiverse
free

Universal Hemera Cooling Duct by Celcius1
...designed my own fan duct mounted on the left and have also provided a mirrored version for those that want to mount on the right.
thingiverse
free

40mm Roller Mould with Shaft by Celcius1
...1.5") rollers. just make sure you use a silicone that is around a shure hardness of 35 to 37a
enjoy making your own rollers
thingiverse
free

Drill Pelletiser by Celcius1
...ck and decker handyman drills.
but make sure you use a nice sharp drill, i have one of the sutton cobalt range for the sharpness.
thingiverse
free

Filament Cooler for Filastruder V2.0 by Celcius1
...designed the cooler so the fan can pivot, plus the clamp is now larger i can provide an stl file that uses the original diameter.
thingiverse
free

Filastruder Hopper with Window by Celcius1
...to clear the main body of the filastruder. i also put a locating collar on the bracket to ensure it stays in the right position.
thingiverse
free

Cooling Fan bracket for E3D Volcano Hotend by Celcius1
...ced ready to print in abs
update 18/08/19 i've uploaded the fusion 360 file, for those of you who want to do a remix of this.
thingiverse
free

Vertical Hopper Chute Remix for the Filastruder v2.0 by Celcius1
...12v supply that can provide approx 14a as this is what the motor needs, (i kinda made the vibration mechanism a tad too powerful)
thingiverse
free

Hotend Bracket for E3D Volcano and BLTouch (to suit Geeetech printers & Clones) by Celcius1
...y laid out to print in the center of the bed, in abs. and with the correct print settings.
have fun with the new hot end bracket
Geeetech
3d_export
free
part right for geeetech acrylic i 3
...part right for geeetech acrylic i 3
3dexport
the engine can be shifted
3d_export
free
cable holder
...cable holder 3dexport for geeetech acrylic i...
thingiverse
free

geeetech a10 by Igor_garbuz
...geeetech a10 by igor_garbuz
thingiverse
model geeetech a10 ( solidworks).
thingiverse
free
geeetech calibration by muffler1979
...geeetech calibration by muffler1979
thingiverse
just a calibration test for the bed on a geeetech
thingiverse
free
Fan for Geeetech proB
...fan for geeetech prob
thingiverse
this is my fan for the geeetech pro b i3.
thingiverse
free

Chain for Geeetech A30
...chain for geeetech a30
thingiverse
this is my personal review of chain for geeetech a30.
thingiverse
free
Zugentlastung Hotend Geeetech A30T / Strain relief Geeetech A30T by 3DDennis1983
...zugentlastung hotend geeetech a30t / strain relief geeetech a30t by 3ddennis1983
thingiverse
zugentlastung hotend geeetech a30t
thingiverse
free
Kettenhalter i3x geeetech by Autark
...kettenhalter i3x geeetech by autark
thingiverse
geeetech i3x
thingiverse
free
Geeetech A10 Fanduct by stefan177gr
...geeetech a10 fanduct by stefan177gr
thingiverse
fanduct for geeetech a10
thingiverse
free
Geeetech filament guide by RicardoZ2018
...geeetech filament guide by ricardoz2018
thingiverse
desing for geeetech i3x
Upgrade
turbosquid
$15

Upgraded Glock
...e 3d model upgraded glock for download as obj, fbx, and blend on turbosquid: 3d models for games, architecture, videos. (1185950)
3ddd
$1

Calligaris / UPGRADE
...calligaris / upgrade
3ddd
calligaris
c материалом
3d_export
free

cz upgrade
...cz upgrade
3dexport
https://www.buymeacoffee.com/mestrezen3d https://linktr.ee/mestrezen3
turbosquid
$80

Custer Tank upgrade
... available on turbo squid, the world's leading provider of digital 3d models for visualization, films, television, and games.
turbosquid
$39

Domestos 1 upgrade
... available on turbo squid, the world's leading provider of digital 3d models for visualization, films, television, and games.
3d_export
$10

Upgraded tea cup
...upgraded tea cup
3dexport
a cup with an unusual design and a unique shape for a more enjoyable tea experience
3d_export
$8

dixy outlander classic style upgraded poplar wood lounge chair
...utlander classic style upgraded poplar wood lounge chair
3dexport
dixy outlander classic style upgraded poplar wood lounge chair
turbosquid
free

AK-12 + Upgrades low-poly 3D model
...ow-poly 3d model for download as fbx, blend, and unitypackage on turbosquid: 3d models for games, architecture, videos. (1501145)
evermotion
$700

Upgrade from V-ray 1.5 to 3.5 for 3ds max
...here is no need to purchase a new dongle - your current dongles will be reprogrammed to carry v-ray 3. evermotion 3d models shop.
evermotion
$300

Upgrade from V-Ray 2.0 to V-ray 3.5 for 3ds Max
... interface (gui) for editing settings on one machine and one render node for rendering on one machine. evermotion 3d models shop.
Fishing
archibase_planet
free
Fish
...fish
archibase planet
fish aquarium fish toy fish
fish n250113 - 3d model (*.gsm+*.3ds) for interior 3d visualization.
archibase_planet
free
Fish
...fish
archibase planet
fish aquarium fish toy fish
fish n310113 - 3d model (*.gsm+*.3ds) for interior 3d visualization.
archibase_planet
free

Fish
...fish
archibase planet
fish aquarium fish
fish - 3d model (*.gsm+*.3ds) for interior 3d visualization.
archibase_planet
free
Fish
...fish
archibase planet
fish aquarium fish
fish - 3d model (*.gsm+*.3ds) for interior 3d visualization.
turbosquid
$200

Fish Red | Fish 3D | Fish devil | Fish fat
... available on turbo squid, the world's leading provider of digital 3d models for visualization, films, television, and games.
3d_export
free
fish
...fish
3dexport
fish
3ddd
$1
fish
...fish
3ddd
рыба
fish
archibase_planet
free
Fish
...fish
archibase planet
fish sculpture statue
fish - 3d model for interior 3d visualization.
archibase_planet
free

Fish
...fish
archibase planet
fish picturesque element
fish - 3d model (*.gsm+*.3ds) for interior 3d visualization.
archibase_planet
free

Fish
...fish
archibase planet
fish picturesque element
fish - 3d model (*.gsm+*.3ds) for interior 3d visualization.
Clones
3d_export
$5
Clones great republic
...clones great republic
3dexport
clones great republic.those same clones from the star wars movie universe.4 clones available.
3d_export
$10
Clone 3D Model
...clone 3d model
3dexport
clone woman girl female lady chamber sci fi
clone 3d model calcm1 51695 3dexport
turbosquid
$5

Clone machine
... available on turbo squid, the world's leading provider of digital 3d models for visualization, films, television, and games.
archive3d
free
Clone trooper 3D Model
...nd army soldier trooper
clone trooper 2 - 3d model (*.gsm+*.3ds) for interior 3d visualization.
turbosquid
free
Lego Clone Walker
...ree 3d model lego sw clone walker for download as max and fbx on turbosquid: 3d models for games, architecture, videos. (1292252)
turbosquid
$15
Clone trooper helmet
...d model clone trooper helmet for download as ma, obj, and fbx on turbosquid: 3d models for games, architecture, videos. (1199355)
archive3d
free

Clone trooper 3D Model
...and army soldier trooper
clonetrooper 3 - 3d model (*.gsm+*.3ds) for interior 3d visualization.
archive3d
free
Clone trooper 3D Model
...and army soldier trooper
clonetrooper 1 - 3d model (*.gsm+*.3ds) for interior 3d visualization.
3d_ocean
$35

Surface Clone C4D materials
...+ of the most well made materials for maxon’s cinema 4d; on the internet today. each material is crafted with a specific purpo...
turbosquid
$3

Sci-fi cloning vats
...cloning vats for download as 3ds, obj, wrl, x, fbx, and blend on turbosquid: 3d models for games, architecture, videos. (1290168)
Line
design_connected
$20

Line
...line
designconnected
adriani e rossi line computer generated 3d model.
3ddd
$1

Line Credenza
...line credenza
3ddd
line credenza , комод
line credenza, small
designed by nathan yong
3d_export
$20

cheese line
...cheese line
3dexport
cheese line
3ddd
$1

Resta line
...resta line
3ddd
resta line
стул
3d_export
$15

elevator lining
...elevator lining
3dexport
elevator lining with carved elements and gold.
3ddd
$1

Resta line
...resta line
3ddd
resta line , барный
барный стул
3ddd
$1

Bubble line
...bubble line
3ddd
панель
гипсовые, стеновые 3д панели - bubble line
turbosquid
$25
Straight Line BearBrick Straight Line BearBrick
...ck straight line bearbrick for download as 3ds, max, and fbx on turbosquid: 3d models for games, architecture, videos. (1340992)
3ddd
$1

Line roset | Fenge
...3ddd
fenge , line roset , кожа
диван line roset
design_connected
$11

Framed Line
...framed line
designconnected
jacco maris framed line computer generated 3d model. designed by maris , jacco.