Thingiverse
Da Vinci Y-Axis Carriage by mfink70
by Thingiverse
Last crawled date: 3 years ago
The problem I have with some printer manufacturers is they use closed loop belts so if something were to happen to the belt you're out of luck unless you can source a belt or buy it at an inflated price from the manufacturer.
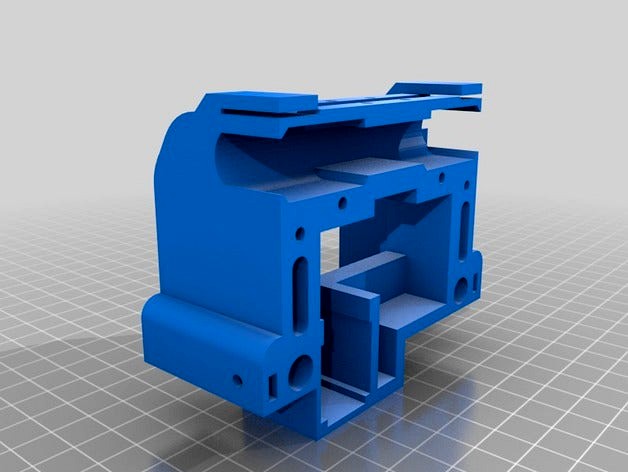
My goals were to create or modify a carriage to use the factory belt or use an open loop belt which are readily available. My second goal was the ability to replace the rods without having to thread a hole in the end of the new replacement rod. The Da Vinci printer uses a softer rods since bushings are used instead of linear bearings so if you use bearings on the rod it "may" wear out the rod after long usage. You may have to purchase hardened steel linear rods.
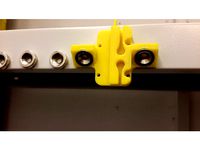
The small rectangular opening along side the holes for the linear rods are to fit an M3 nut in and then thread an m3 bolt into the hole on the side, once tightened this will hold the rod into the carriage without the need to thread the ends of your new linear rod.
Both of these carriages use LM8UU short linear bearings. The left carriage is not mine, I modified it for this project. https://www.thingiverse.com/thing:658517. The right side was inspired from this design https://www.thingiverse.com/thing:2563231 though I started out with a fresh slate.
The belt clamp / mounting was inspired from this design. https://www.thingiverse.com/thing:619347
2/26/18 Update:
Printed and did some test fitting of the motor side carriage, seem to be working well. Pictures are shown above.
Added an additional version (motor side Y-carriage) with hole to access rear upper motor mount screw.
My goals were to create or modify a carriage to use the factory belt or use an open loop belt which are readily available. My second goal was the ability to replace the rods without having to thread a hole in the end of the new replacement rod. The Da Vinci printer uses a softer rods since bushings are used instead of linear bearings so if you use bearings on the rod it "may" wear out the rod after long usage. You may have to purchase hardened steel linear rods.
The small rectangular opening along side the holes for the linear rods are to fit an M3 nut in and then thread an m3 bolt into the hole on the side, once tightened this will hold the rod into the carriage without the need to thread the ends of your new linear rod.
Both of these carriages use LM8UU short linear bearings. The left carriage is not mine, I modified it for this project. https://www.thingiverse.com/thing:658517. The right side was inspired from this design https://www.thingiverse.com/thing:2563231 though I started out with a fresh slate.
The belt clamp / mounting was inspired from this design. https://www.thingiverse.com/thing:619347
2/26/18 Update:
Printed and did some test fitting of the motor side carriage, seem to be working well. Pictures are shown above.
Added an additional version (motor side Y-carriage) with hole to access rear upper motor mount screw.
Similar models
thingiverse
free

Ball End Carriage 48mm by brood2540
...e back side holds a m3 nut. the balls are also angled down steeper for using longer rods.
edit 7-6-17 added 45mm spacing version.
thingiverse
free

Prusa Rework X-Carriage for LM8LUU by GiulianoM
...ck, and insert one of the m3 screws through the loop to secure it.
repeat the same for the other side, and then tension the belt.
thingiverse
free

Modified X_Ends for Quick-Fit and Mendelmax 1.5 by Spk64
... double bearings.
this set uses std 8mm threaded shafts, 10mm z shafts lm10uu, 8mm x shafts.
replaced files with fixed stl's.
thingiverse
free

Prusa i3 w/ printed frame and bearings by markdash
... and fan mount -http://www.thingiverse.com/thing:74983
going to try this auto leveler - http://www.thingiverse.com/thing:182889
thingiverse
free

i3 X-carriage for LM8UU with 45mm rod center-to-center by axelsp
...9; i3 rework 4mm mounting holes 23mm apart in a 2 by 2 configuration.
45mm 8mm rod center-to-center.
as of now, this is untested.
thingiverse
free

Linear Bearing Holder Combo by Bellorophon
...with this linear bearing holder. i modified gijs belt tensioner to give it a sharper curve and merged it with this holder combo.
thingiverse
free

X ends with rod distance adjustment by xavan
... increases the rod spacing by 0.25mm each turn.
the x-carriage used with these x-ends is: http://www.thingiverse.com/thing:798169
thingiverse
free
Belt driven Z upgrade by MarcusVoss
...idlers)
-two m5x8mm screws and two m5 nuts to mount the kfl008 bearing.
my rod holders: https://www.thingiverse.com/thing:2851231
thingiverse
free

Y-Carriage contra 3d-plexi-printer by steijlen
...ade for 8mm steel rods and t2.5 timing belt.
just examine the file to see if you can use it.
for any questions please contact me.
thingiverse
free
Magnetic carriage Linear rail by alex_des
...giverse.com/thing:2151380
magnetic carriage for delta printer, 15x5 magnets, 23x24 linear rail mount. gt2 belt lock. endstop pin.
Mfink70
thingiverse
free

Monoprice Mini misc. files by mfink70
...s by mfink70
thingiverse
a few designs i made for my own mini for the dual z motor setup. modify as needed.
infill is up to you.
thingiverse
free

Lead Screw Adapter Da Vinci by mfink70
... up with a different bracket for the z end stop as this bracket may interfere with the factory bracket.
tested and works perfect!
thingiverse
free

Axial SCX10 ESC Box by mfink70
... esc today and it was a bit tight. added a second enclosure box that i trimmed back the screw mounts to allow for more clearance.
thingiverse
free

Monoprice Select Mini Z-Stabilizer 6mm bearing bracket and cap by mfink70
...cap for monoprice select mini. must drill the screw holes to attach the bearing cap to the x-axis bracket.
infill is up to you.
thingiverse
free

MPSM Extruder box with Fan by mfink70
...nfig file it still got a bit too warm for me.
infill is up to you, 25% or better is probably good enough.
i used a 40 x 20mm fan.
thingiverse
free

Monoprice Select Mini MKS 3.2" LCD full enclosure with lid by mfink70
...ieboard conversion. must drill holes to attach lid to enclosure.
i mounted this all the way to the left even with the side plate.
thingiverse
free

Da Vinci MKS Sbase smoothieboard and mosfet mount by mfink70
... needed to the mount. i also ended up lengthening it a bit.
great mount! saved a ton of time. thanks go to the original designer!
thingiverse
free

Monoprice Mini Delta Effector / Mount by mfink70
... e3d v6 to keep it from sliding in the mount. this will locate the bottom of the e3d v6 heatsink with the bottom of the effector.
thingiverse
free

Monoprice mini X-Axis end cap by mfink70
...id another test print, alignment clip fits perfect now, i think i'm satisfied.
again infill is up to you.
thanks for looking!
thingiverse
free

Clodbuster beadlock wheel for SCX10 by mfink70
...n.com/hot-racing-slf10y08-aluminum-extension/dp/b00xf8g9zo/ref=sr_1_1?ie=utf8&qid=1532192912&sr=8-1&keywords=slf10y08
Vinci
3d_export
$9

clcok vinci
...clcok vinci
3dexport
clcok vinci
3ddd
$1
willisau vinci chair
...willisau vinci chair
3ddd
willisau , vinci
vinci chair from willisau ag.
design_connected
$13

Vinci chair
...vinci chair
designconnected
willisau vinci chair computer generated 3d model. designed by ballendat, martin.
3ddd
$1

BOVA-комод-vinci
...bova-комод-vinci
3ddd
bova , комод
bova-комод-vinci
3ddd
$1
leonardo da vinci
...leonardo da vinci
3ddd
всадник , лошадь
leonardo da vinci
3d_export
$25

a - leonardo da vinci
...a - leonardo da vinci
3dexport
a - leonardo da vinci<br>antiquity
turbosquid
$10

Pouf Vinci
...ty free 3d model pouf vinci for download as max, obj, and fbx on turbosquid: 3d models for games, architecture, videos. (1507069)
turbosquid
$30
Da Vinci
... available on turbo squid, the world's leading provider of digital 3d models for visualization, films, television, and games.
3d_export
$25
machine- leonardo da vinci
...machine- leonardo da vinci
3dexport
machine- leonardo da vinci
3d_export
$25

mortar - leonardo da vinci
...mortar - leonardo da vinci
3dexport
mortar - leonardo da vinci
Carriage
archibase_planet
free

Carriage
...arriage
archibase planet
perambulator baby carriage pram
carriage n250908 - 3d model (*.gsm+*.3ds) for interior 3d visualization.
3d_export
free

carriage
...carriage
3dexport
old fashion carriage model, more files here:
turbosquid
$140

Carriage
...urbosquid
royalty free 3d model carriage for download as max on turbosquid: 3d models for games, architecture, videos. (1482052)
turbosquid
$25

Carriage
...urbosquid
royalty free 3d model carriage for download as max on turbosquid: 3d models for games, architecture, videos. (1285944)
3d_export
free

carriage
...carriage
3dexport
game cart
3d_ocean
$15

Barrel Carriage
...ieval oak old transport wheels wine wood
this model contains a barrel and a carriage. it is a medieval type of wood oak carriage.
turbosquid
$40

Carriage
...ty free 3d model carriage for download as obj, fbx, and blend on turbosquid: 3d models for games, architecture, videos. (1290094)
turbosquid
free

Carriage
...yalty free 3d model carriage for download as ma, obj, and fbx on turbosquid: 3d models for games, architecture, videos. (1239157)
3d_export
$5

Medieval carriage
...medieval carriage
3dexport
medieval carriage in fairy style
turbosquid
$58

Carriage
...d model carriage with scene for download as max, obj, and fbx on turbosquid: 3d models for games, architecture, videos. (1276262)
Axis
3ddd
$1

Мария Axis
...
3ddd
кухня , классическая , axis
модель кухни.
3d_export
$22

Axis robot 6-axis robotic arm
...ing parts drawings, standard parts purchased parts list, can be produced directly according to the drawings, welcome to download!
3ddd
free

Versatile Axis
...ddd
nexus , плитка
http://bvtileandstone.com/ceramic-porcelain/versatile-axis/
3d_export
$19

robot 2 axis
...robot 2 axis
3dexport
robot 2 axis
turbosquid
$40

Axis R5F
... available on turbo squid, the world's leading provider of digital 3d models for visualization, films, television, and games.
turbosquid
$40

Axis S5F
... available on turbo squid, the world's leading provider of digital 3d models for visualization, films, television, and games.
turbosquid
$30

Axis Athlon
... available on turbo squid, the world's leading provider of digital 3d models for visualization, films, television, and games.
turbosquid
$10

Linear Axis
... available on turbo squid, the world's leading provider of digital 3d models for visualization, films, television, and games.
3d_export
$15

drawing axis
...drawing axis
3dexport
simple rendering of the scene file
3ddd
$1

versatile axis ARC
...versatile axis arc
3ddd
versatile , плитка
versatile axis arc red dot design award
Da
3ddd
$1

Luce da Vivere
...luce da vivere
3ddd
luce da vivere
luce da vivere mary 387/6+3
3ddd
$1

Luce da Vivere
...luce da vivere
3ddd
luce da vivere
luce da vivere
cristalline 494/12 rosso/cromo
turbosquid
$6

Cabinet DA
...ty free 3d model cabinet da for download as max, fbx, and obj on turbosquid: 3d models for games, architecture, videos. (1637312)
turbosquid
$6

Bookcase DA
... free 3d model bookcase da for download as max, fbx, and obj on turbosquid: 3d models for games, architecture, videos. (1639996)
turbosquid
$5

Partition DA
... free 3d model partition da for download as max, fbx, and obj on turbosquid: 3d models for games, architecture, videos. (1640359)
turbosquid
$5
Wardrobe DA
...y free 3d model wardrobe da for download as max, fbx, and obj on turbosquid: 3d models for games, architecture, videos. (1661117)
3ddd
$1
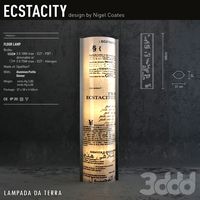
Ecstacity_LAMPADA DA TERRA
...ecstacity_lampada da terra
3ddd
ecstacity
торшер ecstacity_lampada da terra
3ddd
$1
leonardo da vinci
...leonardo da vinci
3ddd
всадник , лошадь
leonardo da vinci
turbosquid
$60

DA-ExoticWeapons
... available on turbo squid, the world's leading provider of digital 3d models for visualization, films, television, and games.
turbosquid
$32
DA-SpikedChainMace
... available on turbo squid, the world's leading provider of digital 3d models for visualization, films, television, and games.
Y
turbosquid
$1

Tetera y Galletas y Caf
... available on turbo squid, the world's leading provider of digital 3d models for visualization, films, television, and games.
3ddd
$1

Смеситель Y-CON
...смеситель y-con
3ddd
смеситель , y-con
смеситель y-con
3ddd
$1

Y-Chair
...y-chair
3ddd
tom dixon
y-chair designed by tom dixon,
3ds max + obj, corona
3ddd
$1

Y Chair compilation
....net/products/us/y-chair-sled-base
y chair swivel basehttp://www.tomdixon.net/products/us/y-chair-swivel-base
turbosquid
$7

Bench Y
...turbosquid
royalty free 3d model bench y for download as obj on turbosquid: 3d models for games, architecture, videos. (1488746)
turbosquid
$15

bonePile Y
...oyalty free 3d model bonepile y for download as blend and obj on turbosquid: 3d models for games, architecture, videos. (1546374)
turbosquid
$7

Y for Yarn
...d
royalty free 3d model y for yarn model for download as max on turbosquid: 3d models for games, architecture, videos. (1699732)
turbosquid
$2

FONT Y
...quid
royalty free 3d model font y for download as ma and obj on turbosquid: 3d models for games, architecture, videos. (1549457)
3ddd
$1

WOOD-y
...wood-y
3ddd
wooden guy
turbosquid
$150

Alien Y
... available on turbo squid, the world's leading provider of digital 3d models for visualization, films, television, and games.