Thingiverse
Cheap Filament Dryer/Feeder for less than 40 Euro (Customizable) by geit_de
by Thingiverse
Last crawled date: 3 years, 3 months ago
This is a small project, that just turned out great.
Moisture soaking filaments are a pain to use. That´s common knowledge and before even buying my first role of PETG or flexible filament, I was thinking about the infrastructure I would need, since I did not want to waste one spool after another just to print one or two parts a week.
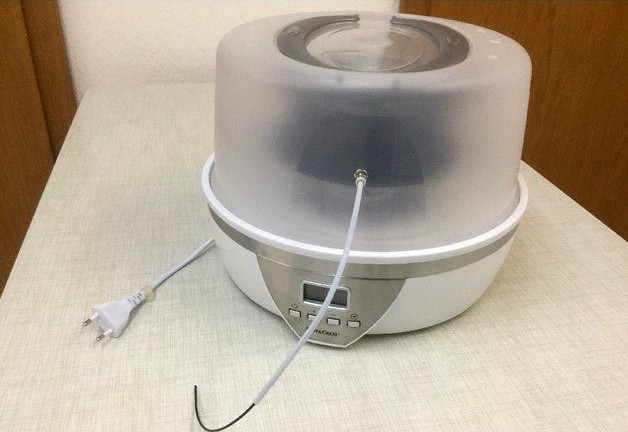
Within the ALDI and LIDL shops (if you are in Germany, LIDL has leftovers and ALDI gets the thing next week) in Germany I frequently saw these food dehydrator devices, which are big enough to fit a spool with my 10mm Axle mounted. All it required was a proper cover and a spool holder mounted inside.
Please Note: You don´t need this print, if you just want to dry filament, but it provides a better air flow than just putting the spool onto the floor of the dryer, where the hot air goes straight through the middle of the spool to the top of the cover.
Requirements:
*1 food dehydrator (dry food maker, Dörrautomat)
*1 32cm diameter cake tray cover. Any of these should do. Just make sure they are suitable for dish washer use, so they can handle the temperature.
*4 self cutting screws (the two delivered with the device are fine, but the case is prepared for four screws and you need slightly longer ones to secure the holder properly.
*Some ABS or other more temperature resistant filament to print the spool mount.
At first I was thinking about printing the entire enclosure. That´s why the source file includes a filament ring like the ones included with the dryer, just without the tray area.
However, even so my printer can handle the size, it would be a long print and I would require around 8 or 9 of those prints. We are talking about around 60 hours of printing or more.
Next idea was to cut out the plastic from the original rings. Problem: If one breaks we loose. I saw Jon from Proper Printing melting away the inner parts on his channel, but the result was not entirely to my liking, even if it is efficient and quick. It also take a huge amount of time to remove the floor grid and clean the result, so it looks okay.
Then I had the idea of buying a bowl as cover and when walking though a dollar store I found the perfect solution right next to the bowls. A cake tray! :D
A cake tray cover works fine, so I dropped the idea of the bowl. The one I found was perfect. You can use smaller ones, as long as the spool fits underneath and between. :D There is no need to create an air tight seal or so, as the air will be blown out there, rather than sucked in.
Building this thingy is quite easy. Just unscrew the old plastic cover, and put on the new printed one using four screws. Make sure the metal cover and the metal mesh stays in place and do not let a screw fall into the heating pipe pit. Conversion done.
You need to drill some holes into the top of the cake tray cover. Look onto the original plastic cover of the dryer to get an idea what size you need. These are required to release the moistened air. There is no need to cut anything, from the bottom of the cake tray cover unless the locking mechanism leftovers prevent it from being inserted into the food dehydrator. It does not need and must not be air tight.
If you also want to use the dryer as filament feeder, then you need an additional hole for the ptfe pipe coupler on the side.
To avoid breaking the plastic I suggest to use a heated screw driver to melt a pilot hole into the desired location. Then use a small drill bit and clean the hole. Go to the next one and next one until the hole is perfect in size. Better slow than breaking the thing and wasting money. Mine was sturdy, so I drilled just some pilot holes by hand and used my electric power drill to enlarge them.
In total this projects cost me about 40 Euro. 29,09 Euro for the food dehydrator and 7 Euro for the cake tray cover. PTFE coupling, screws, energy and filament are basically the rest.
The result looks quite professional and beside the cake tray cover nothing gets destroyed. You always can undo the changes done to the food dehydrator. Just do not use it for food, while there is an ABS part mounted inside. :D
Happy Printing
Moisture soaking filaments are a pain to use. That´s common knowledge and before even buying my first role of PETG or flexible filament, I was thinking about the infrastructure I would need, since I did not want to waste one spool after another just to print one or two parts a week.
Within the ALDI and LIDL shops (if you are in Germany, LIDL has leftovers and ALDI gets the thing next week) in Germany I frequently saw these food dehydrator devices, which are big enough to fit a spool with my 10mm Axle mounted. All it required was a proper cover and a spool holder mounted inside.
Please Note: You don´t need this print, if you just want to dry filament, but it provides a better air flow than just putting the spool onto the floor of the dryer, where the hot air goes straight through the middle of the spool to the top of the cover.
Requirements:
*1 food dehydrator (dry food maker, Dörrautomat)
*1 32cm diameter cake tray cover. Any of these should do. Just make sure they are suitable for dish washer use, so they can handle the temperature.
*4 self cutting screws (the two delivered with the device are fine, but the case is prepared for four screws and you need slightly longer ones to secure the holder properly.
*Some ABS or other more temperature resistant filament to print the spool mount.
At first I was thinking about printing the entire enclosure. That´s why the source file includes a filament ring like the ones included with the dryer, just without the tray area.
However, even so my printer can handle the size, it would be a long print and I would require around 8 or 9 of those prints. We are talking about around 60 hours of printing or more.
Next idea was to cut out the plastic from the original rings. Problem: If one breaks we loose. I saw Jon from Proper Printing melting away the inner parts on his channel, but the result was not entirely to my liking, even if it is efficient and quick. It also take a huge amount of time to remove the floor grid and clean the result, so it looks okay.
Then I had the idea of buying a bowl as cover and when walking though a dollar store I found the perfect solution right next to the bowls. A cake tray! :D
A cake tray cover works fine, so I dropped the idea of the bowl. The one I found was perfect. You can use smaller ones, as long as the spool fits underneath and between. :D There is no need to create an air tight seal or so, as the air will be blown out there, rather than sucked in.
Building this thingy is quite easy. Just unscrew the old plastic cover, and put on the new printed one using four screws. Make sure the metal cover and the metal mesh stays in place and do not let a screw fall into the heating pipe pit. Conversion done.
You need to drill some holes into the top of the cake tray cover. Look onto the original plastic cover of the dryer to get an idea what size you need. These are required to release the moistened air. There is no need to cut anything, from the bottom of the cake tray cover unless the locking mechanism leftovers prevent it from being inserted into the food dehydrator. It does not need and must not be air tight.
If you also want to use the dryer as filament feeder, then you need an additional hole for the ptfe pipe coupler on the side.
To avoid breaking the plastic I suggest to use a heated screw driver to melt a pilot hole into the desired location. Then use a small drill bit and clean the hole. Go to the next one and next one until the hole is perfect in size. Better slow than breaking the thing and wasting money. Mine was sturdy, so I drilled just some pilot holes by hand and used my electric power drill to enlarge them.
In total this projects cost me about 40 Euro. 29,09 Euro for the food dehydrator and 7 Euro for the cake tray cover. PTFE coupling, screws, energy and filament are basically the rest.
The result looks quite professional and beside the cake tray cover nothing gets destroyed. You always can undo the changes done to the food dehydrator. Just do not use it for food, while there is an ABS part mounted inside. :D
Happy Printing
Similar models
thingiverse
free

Filament spool dehydrator mounting adaptor by J741
...operating, i used a piece of soft pvc tubing (similar to aquarium air hose), in which i cut a...
thingiverse
free

Filament dehydrator lid handle by Wile_E_Coyote
...1385646164https://www.aliexpress.com/item/5-trays-food-dehydrator-fruit-vegetable-herb-drying-machine-food-dryer/32853692910.html
thingiverse
free

Filament Dryer / Dehydrator by fulg
...n the trays, and the top of the cake caddy will fit just fine without any air gaps. use the center piece from the original thing.
thingiverse
free

Presto Dehydrator PTFE Tube Mount by truglodite
... the stl file, and use supports.
also see my controller kit for presto dehydrators here:https://www.thingiverse.com/thing:2853628
thingiverse
free

horizontal filament spool roller for Suntec food dehydrator by KvanDijk
....
(note, this one has some problems with the air thats comming out of the dryer! there is an updated one, u can find in remixes.)
thingiverse
free

Filament dryer Drum by TimOGuy
...flow.
this will use the original lid and one tray unmodified to hold one spool. you can use the machine as normal for food items.
thingiverse
free

Presto Dehydrator Stackable Filament Dryer by jongsanders
...he petg shrinks a little bit as it gets warmed and contracts. the sections can fit one 4 kg spool or 2 partially-used 1kg spools.
thingiverse
free

Filament Dryer / Dehydrator by Tinkerman
...nt to unwind itself from the spool or fall off of the spool as a result of gravity (because the spool is unwinding horizontally).
thingiverse
free

Spool Box - Filament Dryer, Feeder and Storage by Schild0r
...ating this thing the function was broken. if you happen to visit aachen one time, contact me and i will buy you a coffee or beer.
thingiverse
free

Filament dryer rings/lid for cheap food dehydrators
...siccant bags on an empty spool for drying. if you print in pla, and go much higher in temp, the pla will likely start to deform.
Geit
thingiverse
free

GeitPrinter by geit_de
...(magnetic parking)
2x m3 15mm counter sunk enclosure screws (e3dv6 fan)
8x 4mm cubic neodymium magnets (magnetic parking)
3dwarehouse
free

model houdertje voor in geit
...model houdertje voor in geit
3dwarehouse
model houdertje voor in geit
3dwarehouse
free

Playground skip goat _Wip geit toestel
...playground skip goat _wip geit toestel
3dwarehouse
3dwarehouse
free

Geit Kip en Konijnenhok voor open verblijf
...geit kip en konijnenhok voor open verblijf
3dwarehouse
hok geschikt voor 2-3 dwergeitjes tot 50-60 cm 3-4 konijnen 3-5 kippen
3dwarehouse
free

Goat
...goat 3dwarehouse goat geit 3d geit 3d goat...
3dwarehouse
free
estonian 'my home'
...'my home' 3dwarehouse its my home in estonia autor geit griin #estonia #gonsiori...
3dwarehouse
free

Stal / Barn
...invented it myself. #barn #boerderij #cow #cows #farm #geit #geitn #hok #koe #koeien #schaap #schapen #sheep...
3dwarehouse
free

Ibex (adult male)
...steep regions to avoid predators. #animal #beast #beest #dier #geit #goat #ibex #mammal #mountain...
3dwarehouse
free
schaap
...leveren. het is een herkauwer, nauw verwant met de geit de soort behoort tot het geslacht ovis, waar ook...
Feeder
3d_export
free

Feeder
...feeder
3dexport
feeder.
3d_ocean
$7
bird feeders
...bird feeders
3docean
bird feeders wood
bird feeders
3d_export
$6

bird feeder
...bird feeder
3dexport
bird feeder
3d_export
free
Bird feeder
...feeder
3dexport
a beautiful, lovely and tranquil bird feeder, which you can use for your amazing games, animations, or pictures.
turbosquid
$2
Baby Feeder
...y free 3d model baby feeder for download as max, obj, and fbx on turbosquid: 3d models for games, architecture, videos. (1488786)
archive3d
free

Bird feeder 3D Model
...r tray feeder
bird feeder n250714 - 3d model (*.gsm+*.3ds+*.max) for interior 3d visualization.
turbosquid
$18
Pet feeder
...ee 3d model pet feeder for download as max, max, fbx, and obj on turbosquid: 3d models for games, architecture, videos. (1559898)
turbosquid
$3
dog feeder
... 3d model dog feeder for download as blend, dae, fbx, and obj on turbosquid: 3d models for games, architecture, videos. (1545601)
turbosquid
$29

Chicken Feeder
... available on turbo squid, the world's leading provider of digital 3d models for visualization, films, television, and games.
turbosquid
$29
Chicken Feeder
... available on turbo squid, the world's leading provider of digital 3d models for visualization, films, television, and games.
Dryer
archibase_planet
free
Dryer
...dryer
archibase planet
dryer hand dryer
dryer hand dryer airblade n210114 - 3d model (*.gsm+*.3ds) for interior 3d visualization.
archibase_planet
free
Dryer
...yer
archibase planet
dryer washer dryer drying machine tumble dryer
dryer - 3d model (*.gsm+*.3ds) for interior 3d visualization.
archibase_planet
free

Dryer
...dryer
archibase planet
dryer hand dryer
dryer n221113 - 3d model (*.gsm+*.3ds+*.max) for interior 3d visualization.
archibase_planet
free

Dryer
...dryer
archibase planet
drying apparatus dryer
hand dryer - 3d model for interior 3d visualization.
archibase_planet
free
Dryer
...dryer
archibase planet
dryer kitchen ware
dryer - 3d model (*.gsm+*.3ds) for interior 3d visualization.
archibase_planet
free

Dryer
...dryer
archibase planet
dryer heater radiator
dryer 1 - 3d model (*.gsm+*.3ds) for interior 3d visualization.
archibase_planet
free
Dryer
...dryer
archibase planet
dryer radiator heater
dryer 2 - 3d model (*.gsm+*.3ds) for interior 3d visualization.
archibase_planet
free

Dryer
...dryer
archibase planet
dryer radiator heater
dryer towel rail n121213 - 3d model (*.gsm+*.3ds) for interior 3d visualization.
archibase_planet
free

Dryer
...rchibase planet
dryer radiator heater towel rail
dryer towel rail n241213 - 3d model (*.gsm+*.3ds) for interior 3d visualization.
archibase_planet
free

Dryer
...r towel rail radiator heater
dryer towel rail villeroy & boch n260514 - 3d model (*.gsm+*.3ds) for interior 3d visualization.
Euro
3d_export
$5
euro pallet
...euro pallet
3dexport
euro pallet 1200-800
turbosquid
$17
euro
... available on turbo squid, the world's leading provider of digital 3d models for visualization, films, television, and games.
turbosquid
$7

euro
... available on turbo squid, the world's leading provider of digital 3d models for visualization, films, television, and games.
turbosquid
$1

euro
... available on turbo squid, the world's leading provider of digital 3d models for visualization, films, television, and games.
turbosquid
free

EURO
... available on turbo squid, the world's leading provider of digital 3d models for visualization, films, television, and games.
3d_export
$5
1 euro
...1 euro
3dexport
this coin is valid to be used instead of 1 euro coins in shopping carts.
3d_export
$5

EURO 3D Model
...euro 3d model
3dexport
euro money logo
euro 3d model eldor 72988 3dexport
3ddd
$1
Euro lamp art
...euro lamp art
3ddd
eurolampart
euro lamp art
3d_ocean
$5
Euro Balloon
... was modelled and prepared for photo-realistic renderings, close-ups, cg visualization. the model is ready to be inserted in y...
3d_ocean
$5

Euro Balloon
... was modelled and prepared for photo-realistic renderings, close-ups, cg visualization. the model is ready to be inserted in y...
Cheap
turbosquid
$30

Cheap Apartment
... available on turbo squid, the world's leading provider of digital 3d models for visualization, films, television, and games.
turbosquid
$20

CHEAP PEN.c4d
... available on turbo squid, the world's leading provider of digital 3d models for visualization, films, television, and games.
turbosquid
$1

Cheap terrain
... available on turbo squid, the world's leading provider of digital 3d models for visualization, films, television, and games.
turbosquid
$3
Cheap Baseball Bat
... available on turbo squid, the world's leading provider of digital 3d models for visualization, films, television, and games.
turbosquid
$2

Basic Cheap Cellphone
... available on turbo squid, the world's leading provider of digital 3d models for visualization, films, television, and games.
turbosquid
$1
Cheap Ballpoint Pen
... available on turbo squid, the world's leading provider of digital 3d models for visualization, films, television, and games.
turbosquid
$12
Cheap looking table and chair
...del cheap looking table and chair for download as max and fbx on turbosquid: 3d models for games, architecture, videos. (1439884)
3d_export
$5

Cheap laser sword 3D Model
...cheap laser sword 3d model
3dexport
star wars
cheap laser sword 3d model gettinqdown 79283 3dexport
turbosquid
$45

Cheap-A$$-Guitar II.3dm
... available on turbo squid, the world's leading provider of digital 3d models for visualization, films, television, and games.
turbosquid
$30

Cheap-A$$-Guitar I.3dm
... available on turbo squid, the world's leading provider of digital 3d models for visualization, films, television, and games.
Customizable
3d_export
$10
customizable sd port
...customizable sd port
3dexport
customizable sd port
turbosquid
$99

Customizable character
...alty free 3d model customizable character for download as max on turbosquid: 3d models for games, architecture, videos. (1152525)
turbosquid
$1

Customizable Mug
... available on turbo squid, the world's leading provider of digital 3d models for visualization, films, television, and games.
turbosquid
$1
Customizable Spider Mech
... free 3d model customizable spider mech for download as blend on turbosquid: 3d models for games, architecture, videos. (1462055)
turbosquid
$20
Customizable Egyptian Pillar
...zable egyptian pillar for download as ma, obj, fbx, and blend on turbosquid: 3d models for games, architecture, videos. (1307376)
turbosquid
$75

Fully Customizable Hospital
... available on turbo squid, the world's leading provider of digital 3d models for visualization, films, television, and games.
turbosquid
$20

Customizable Caste Pieces
... available on turbo squid, the world's leading provider of digital 3d models for visualization, films, television, and games.
turbosquid
$15
Customizable Tea Cup
... available on turbo squid, the world's leading provider of digital 3d models for visualization, films, television, and games.
turbosquid
free
Water Bottle(Customizeable)
... available on turbo squid, the world's leading provider of digital 3d models for visualization, films, television, and games.
3d_export
$49
Book customizable 3D Model
...3dexport
book booshelf novel teach library learn read pages cover fairy tales
book customizable 3d model guitargoa 74240 3dexport
Less
design_connected
free

Less
...less
designconnected
molteni & c less free models computer generated 3d model. designed by jean nouvel.
3d_export
$10

Two Less tables 3D Model
...two less tables 3d model
3dexport
less molteni molteni&c table desk model
two less tables 3d model boroda 56653 3dexport
3d_export
$7
MolteniC table Less 3D Model
...c table less 3d model
3dexport
table desk molteni molteni&c less model
moltenic table less 3d model boroda 56651 3dexport
3d_export
$7

MolteniC table Less 3D Model
...c table less 3d model
3dexport
table desk molteni molteni&c less model
moltenic table less 3d model boroda 56650 3dexport
turbosquid
$19

European Modern Couch - Less
...an modern couch - less for download as max, obj, fbx, and dwg on turbosquid: 3d models for games, architecture, videos. (1281460)
turbosquid
$4

Broom plastic less poly
... available on turbo squid, the world's leading provider of digital 3d models for visualization, films, television, and games.
design_connected
$13
ANNA TORFS Parts Low Less Sculpture Vases
...anna torfs parts low less sculpture vases
designconnected
anna torfs parts low less sculpture vases computer generated 3d model.
turbosquid
$20

Jewellery Collection 1 BY 1 JOIN NECK LESS PANAEN
...y collection 1 by 1 join neck less panaen for download as 3dm on turbosquid: 3d models for games, architecture, videos. (1712969)
turbosquid
$10

Low poly 10 standard C profiles with thickness less than 2mm Low-poly
...low-poly 3d model for download as blend, blend, gltf, and stl on turbosquid: 3d models for games, architecture, videos. (1594254)
3d_export
$450

ear less semi-automatic n95 mask machine assembly
... you can email to me.<br>designed with solidworks 2017, render with keyshot<br>**************************************
40
3d_export
$5
WD-40
...wd-40
3dexport
wd-40 :)
design_connected
$11

Artist 40
...artist 40
designconnected
nordlux artist 40 computer generated 3d model. designed by bønnelycke mdd.
design_connected
$13
Block 40
...block 40
designconnected
zero lighting block 40 computer generated 3d model. designed by backman, johanna jacobson.
design_connected
$4
40 Metriquadri
...etriquadri
designconnected
mdf italia 40 metriquadri dining tables computer generated 3d model. designed by alberto del biondi.
3ddd
$1
Диван Калинка 40
...диван калинка 40
3ddd
модульный
модульный диван калинка 40
3ddd
$1
ТеодорД-40
...теодорд-40
3ddd
стул
600х730х1020
turbosquid
$4

Ring 40
...yalty free 3d model ring 40 for download as obj, 3dm, and stl on turbosquid: 3d models for games, architecture, videos. (1404234)
turbosquid
free

WD-40
...e 3d model wd-40 for download as fbx, blend, and unitypackage on turbosquid: 3d models for games, architecture, videos. (1488034)
3ddd
$1

Reflex Bamboo 40
...reflex bamboo 40
3ddd
reflex , bamboo
стол reflex bamboo 40
turbosquid
$20

Bath 40
... free 3d model bath 40 for download as max, dxf, fbx, and dwg on turbosquid: 3d models for games, architecture, videos. (1276229)
Filament
3ddd
$1

Filament Cage
...filament cage
3ddd
лофт , filament cage
модель бра, делалась по фото!
turbosquid
$3

FILAMENT COUNTER
...d
royalty free 3d model filament counter for download as stl on turbosquid: 3d models for games, architecture, videos. (1563049)
3d_export
$5

Filament lamp 3D Model
...filament lamp 3d model
3dexport
filament lamp 3d model kevin 54161 3dexport
3d_export
$5

Filament led light bulb
...filament led light bulb
3dexport
realistic 3d model of filament light bulb with v-ray materials.
3d_export
$5

Filament led light bulb
...filament led light bulb
3dexport
realistic 3d model of filament light bulb with v-ray materials.
3d_export
$5

Filament led light bulb
...filament led light bulb
3dexport
realistic 3d model of filament light bulb with v-ray materials.
3d_export
$5

Filament led light bulb
...filament led light bulb
3dexport
realistic 3d model of filament light bulb with v-ray materials.
3d_export
$5

Filament led light bulb
...filament led light bulb
3dexport
realistic 3d model of filament light bulb with v-ray materials.
3d_export
$5

Filament bulb candle 3D Model
...filament bulb candle 3d model
3dexport
filament bulb-candle
filament bulb candle 3d model kevin 54163 3dexport
3ddd
$1

Factory filament metal shade
...factory filament metal shade
3ddd
restoration hardware
restoration hardware. 20th c. factory filament metal shade.
Than
turbosquid
$19

BETTER THAN CHOCOLATE SOFA
... better than chocolate sofa for download as max, obj, and fbx on turbosquid: 3d models for games, architecture, videos. (1144132)
3d_export
$39

Mercedes-Benz G Line Stronger Than Time 2021 wheel
...mercedes-benz g line stronger than time 2021 wheel
3dexport
turbosquid
$10
Low poly 10 standard C profiles with thickness less than 2mm Low-poly
...low-poly 3d model for download as blend, blend, gltf, and stl on turbosquid: 3d models for games, architecture, videos. (1594254)
turbosquid
$10

Low poly 43 standard C Profiles with thickness more than 2mm
...ferent c profiles for download as blend, blend, gltf, and stl on turbosquid: 3d models for games, architecture, videos. (1589928)
3d_export
$129

mercedes-benz g 400 d amg line stronger than time 2021
...------------------------- thank you for buying this product. we look forward to continuously dealing with you. creator 3d team!!!
3d_export
$5

world of wacraft - mobile-pc pack 3d
...fans of world of wacraft, this pack has more than 150 animations ready-made, it has more than 50 animated...
3ddd
$1

BOOKS
...books 3ddd книга more than a 50 books with high qaulaity...
3d_export
$7

simple gear
...gear 3dexport just a simple gear 3d model,nothing more than ...
3ddd
$1
Le Soleil by Foscarini
...by foscarini 3ddd foscarini le soleil by foscarini, more than lamps, pure...
3d_export
$7

flora fern art canvas
...any modern interior. who works in vray version lower than 3.1 be careful, in the materials in the brdf...