Thingiverse
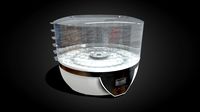
Filament Dryer / Dehydrator by Tinkerman
by Thingiverse
Last crawled date: 3 years ago
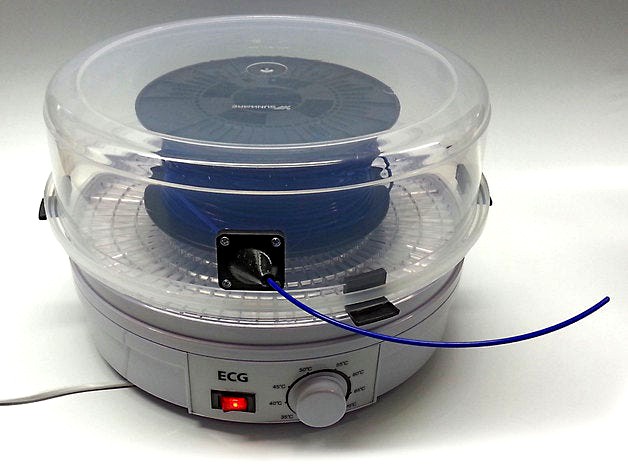
Filament dryer / dehydrator
Filament dryer based on a widely available food dehydrator, a plastic food container and some 3D printed parts.
The food dehydrator used is of the brand: ECG type SO 375
The cap used is the bottom part of a food container - brand: Sunware™ article 087
Building instructions:
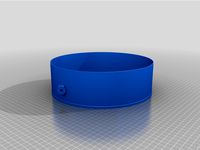
The food dehydrator comes with 5 layers (shelves) and a lit. For the filament dryer we use 1 shelve only and place it on the food dehydrator in the originally intended way.
Then we place (hang) 4 pieces of the 3D printed part named "Cap Brace" on the rim of this shelve (see pictures).
On these 4 "cap braces" we can now place the (bottom part of the) food container (upside down - or actually downside up) thus creating a transparent "cap" of the filament dryer.
We then attach the 3D printed part named "Filament Snoot" to this cap. In order to do this we make a hole with a diameter of approx. 20 mm in the cap and 4 more 3 mm holes to mount the filament snoot to the cap using M3 bolts and nuts.
Next we place the 3D printed part named "Spool Axes" in the center(hole) of the shelve. This part is modeled so that most (small and large) filament spools will fit on the "spool axes". The spool axes part enables the filament spool to unwind smoothly with minimal friction involved.
Pull the filament through the filament snoot and feed it into the 3D printer's extruder.
The filament snoot has a hole with a diameter of 3.5 mm, so 3mm as well as 1.75 mm filaments will easily pass through it.
Specifications:
This filament dryer enables you to:
dry filaments for many hours on end.
keep on drying the filament while printing.
dry food (because we did not damage the original food dryer, we have only supplemented it with 3D printed parts and a food container)
temperature range 35-70 °C
no build-in timer
The total cost of this filament dryer was €59,- (3D printed parts not included).
And as I said before: The food dryer can still be used as food dryer, because none of the parts of the original food dryer were damaged.
Update 12-6-2016:
Thanks to the idea of Crazy Dog, who suggested to include a PTFE filament guide clamp, I have now added an alternative snoot for those who would like to guide the filament with a Teflon tube right up to the extruder. This will enclose the filament so that it will not absorb moist on its way to the extruder, once it leaves the filament dryer. He also suggested to incorporate one of the many filament dust filters that are available here:http://www.thingiverse.com/thing:153807/#files
These filters can be clamped onto the other end of the PTFE tubing just before the filament enters the extruder, thus combining optimal drying and dust removal in one go.
The files that belong to this snoot and clamp are called:
Filament_Snoot_for_PTFE_Filament_Guide_Rod.STL
Filament_Guide_Clamp_Nut.STL
This PTFE guide rod option can hold and fix PTFE rods that have an outer diameter ranging from 4-6 mm so that it will be suitable for 3 mm as well as 1.75 mm filaments guide rods. It is meant to replace the default "Filament_Snoot" when using a PTFE rod as a filament guide.
Note that with this addition the Teflon rod can even be extended into the dryer so that the filament is being picked up by the Teflon tubing close to the spool, thus preventing the filament to unwind itself from the spool or fall off of the spool as a result of gravity (because the spool is unwinding horizontally).
Filament dryer based on a widely available food dehydrator, a plastic food container and some 3D printed parts.
The food dehydrator used is of the brand: ECG type SO 375
The cap used is the bottom part of a food container - brand: Sunware™ article 087
Building instructions:
The food dehydrator comes with 5 layers (shelves) and a lit. For the filament dryer we use 1 shelve only and place it on the food dehydrator in the originally intended way.
Then we place (hang) 4 pieces of the 3D printed part named "Cap Brace" on the rim of this shelve (see pictures).
On these 4 "cap braces" we can now place the (bottom part of the) food container (upside down - or actually downside up) thus creating a transparent "cap" of the filament dryer.
We then attach the 3D printed part named "Filament Snoot" to this cap. In order to do this we make a hole with a diameter of approx. 20 mm in the cap and 4 more 3 mm holes to mount the filament snoot to the cap using M3 bolts and nuts.
Next we place the 3D printed part named "Spool Axes" in the center(hole) of the shelve. This part is modeled so that most (small and large) filament spools will fit on the "spool axes". The spool axes part enables the filament spool to unwind smoothly with minimal friction involved.
Pull the filament through the filament snoot and feed it into the 3D printer's extruder.
The filament snoot has a hole with a diameter of 3.5 mm, so 3mm as well as 1.75 mm filaments will easily pass through it.
Specifications:
This filament dryer enables you to:
dry filaments for many hours on end.
keep on drying the filament while printing.
dry food (because we did not damage the original food dryer, we have only supplemented it with 3D printed parts and a food container)
temperature range 35-70 °C
no build-in timer
The total cost of this filament dryer was €59,- (3D printed parts not included).
And as I said before: The food dryer can still be used as food dryer, because none of the parts of the original food dryer were damaged.
Update 12-6-2016:
Thanks to the idea of Crazy Dog, who suggested to include a PTFE filament guide clamp, I have now added an alternative snoot for those who would like to guide the filament with a Teflon tube right up to the extruder. This will enclose the filament so that it will not absorb moist on its way to the extruder, once it leaves the filament dryer. He also suggested to incorporate one of the many filament dust filters that are available here:http://www.thingiverse.com/thing:153807/#files
These filters can be clamped onto the other end of the PTFE tubing just before the filament enters the extruder, thus combining optimal drying and dust removal in one go.
The files that belong to this snoot and clamp are called:
Filament_Snoot_for_PTFE_Filament_Guide_Rod.STL
Filament_Guide_Clamp_Nut.STL
This PTFE guide rod option can hold and fix PTFE rods that have an outer diameter ranging from 4-6 mm so that it will be suitable for 3 mm as well as 1.75 mm filaments guide rods. It is meant to replace the default "Filament_Snoot" when using a PTFE rod as a filament guide.
Note that with this addition the Teflon rod can even be extended into the dryer so that the filament is being picked up by the Teflon tubing close to the spool, thus preventing the filament to unwind itself from the spool or fall off of the spool as a result of gravity (because the spool is unwinding horizontally).
Similar models
thingiverse
free

Wanhao D9 Filament Guide Tube Holder by jamesarm97
...p fits over the d9 extruder top above the filament hole. the extruder cap will fit either the tube or a ptfe press fit connector.
thingiverse
free

Dehydrator Filament guide and spool holder by 3dphaus
...er by 3dphaus
thingiverse
filament guide and spool holder for food dehydrator.
this is for dehydrator with diameter of 27.5 cm.
thingiverse
free

Filament Dehydrator / Dryer Tray Extension by Petclaud
...24.5 mm). maybe there are more 'cheap' food dryers that have the same dimensions.
this will allow you to dry 1 kg spools.
thingiverse
free

Filament dryer rings/lid for cheap food dehydrators
...siccant bags on an empty spool for drying. if you print in pla, and go much higher in temp, the pla will likely start to deform.
grabcad
free

filament drying holder
...ther. user just requires 360 degree self-rotation to unlock both parts.
food dehydrator: https://ezbuy.my/product/431935028.html
thingiverse
free

Geepas Food Dehydrator mod filament dryer by omarhaasan
...ite
https://www.printdry.com/how-to-dry-filaments
see the picture for how it work
comments and makes are welcome
happy arab3d ;)
thingiverse
free

Filament Dry Box - Made from an ammo can box
...s shown.
be sure to add a container of desiccant in your new dry box. i use this to store and print nylon based filaments. enjoy.
thingiverse
free

Dehydrator Spool Holder by mslivkoff
...he post on the bottom of the dehydrator to hold the filament spool up and allow the warm are to circulate freely around the spool
thingiverse
free

Filament dehydrator lid handle by Wile_E_Coyote
...1385646164https://www.aliexpress.com/item/5-trays-food-dehydrator-fruit-vegetable-herb-drying-machine-food-dryer/32853692910.html
thingiverse
free
food dehydrator filamentdryer mod
...ys, so you can still use it as food dehydrator.
the diameter of the dehydrator is 235mm.
rolls up to 100mm width will fit inside.
Tinkerman
thingiverse
free

Gargoyle by Tinkerman
...use of supports is advised but the model will print 90% correct without supports (see example in gold)
happy printing!
tinkerman.
thingiverse
free
Outdoor bench by Tinkerman
...ood) and 1 piece of the bench side (l + r) each and press (or glue) the pieces together. that's it!
happy printing,
tinkerman
thingiverse
free

Fireplace by Tinkerman
...ut 3d flickering leds inside the flames and to color the lower part of the flames black (wood blocks).
happy printing!
tinkerman
thingiverse
free

Dollhouse vase by Tinkerman
...nsparant pet and it turned out pretty silvery,
in spite of my infill setting of 100%. can anyone achieve a more transparant look?
thingiverse
free

Dollhouse picture frame (cartoon style) by Tinkerman
...dollhouse picture frame (cartoon style) by tinkerman
thingiverse
dollhouse picture frame approx. 9x7 cm
thingiverse
free

Kyocera Stadium by Tinkerman
...nt settings:
pla: hotend 220°c - bed - 45°c
speed: 70 mm/s
layer height: 0.3 mm
nozzle diameter: 0.6 mm
happy printing,
tinkerman
thingiverse
free

Dollhouse classic table by Tinkerman
...20 cm long, 16 cm wide and approx. 10cm high and was specially designed for a knitted doll and her accessories that my wife made.
thingiverse
free

Medieval Cauldron by Tinkerman
...e of the pot reaches an angle of approx. 55 degrees a flat bottom comes in to top it off using bridging.
happy cooking!
tinkerman
thingiverse
free

Market Stall by Tinkerman
...glue), but almost any other glue will do fine too.
the current scale of these models is approx. 1:15.
happy printing!
tinkerman
thingiverse
free
Omnidirectional Fanduct for Tinkerman's E3D Titan Aero Bracket (with Vulcano hot-end) for the CR-10 by Tinkerman
...he non-volcano hot-end. filename: fanduct titan aero - non-volcano (65 mm diameter).stl
happy bridging and be cool!
tinkerman.
Dehydrator
3d_ocean
$1
Pumpkin Seeds Seamless Background
...tiling pattern • 1024×1024 pix texture • .jpg and flat .png file • tiling texture click here if you need bigger file at photodune
3d_export
$7

electric fruit dryer machine
...electric fruit dryer machine 3dexport fruit dehydrator machine 3d model:<br>dryer include fruits models that are randomly...
sketchfab
$4
Food Dehydrator
...food dehydrator
sketchfab
low poly food dehydrator - food dehydrator - buy royalty free 3d model by sunny (@sunny7610)
thingiverse
free

Dehydrator Extension by fluffywhitewolf
...the trays.
specific dehydrator model : http://www.amazon.com/gp/product/b075zb3v9s/
diameter is 240mm. printed on an ender5plus
thingiverse
free
food dehydrator filamentdryer mod
...ys, so you can still use it as food dehydrator.
the diameter of the dehydrator is 235mm.
rolls up to 100mm width will fit inside.
thingiverse
free
dehydrator with filament outlet by jemad871
...or with filament outlet by jemad871
thingiverse
ring for the cheap diy dehydrator to allow for 2 roles and outlet for 1 filament
thingiverse
free

DIY Filament Dehydrator
...n be used simultaneously to recharge desiccant packets. by printing additional collars more than two reels could be accommodated.
thingiverse
free
Dehydrator Spool Holder by mslivkoff
...he post on the bottom of the dehydrator to hold the filament spool up and allow the warm are to circulate freely around the spool
thingiverse
free
Dehydrator Filament guide and spool holder by 3dphaus
...er by 3dphaus
thingiverse
filament guide and spool holder for food dehydrator.
this is for dehydrator with diameter of 27.5 cm.
thingiverse
free

Lower Tray Westinghouse Dehydrator WFD100W by jtgraphics
...lower tray westinghouse dehydrator wfd100w by jtgraphics
thingiverse
lower tray for westinghouse dehydrator wfd100w
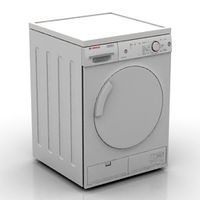
Dryer
archibase_planet
free
Dryer
...dryer
archibase planet
dryer hand dryer
dryer hand dryer airblade n210114 - 3d model (*.gsm+*.3ds) for interior 3d visualization.
archibase_planet
free
Dryer
...yer
archibase planet
dryer washer dryer drying machine tumble dryer
dryer - 3d model (*.gsm+*.3ds) for interior 3d visualization.
archibase_planet
free

Dryer
...dryer
archibase planet
dryer hand dryer
dryer n221113 - 3d model (*.gsm+*.3ds+*.max) for interior 3d visualization.
archibase_planet
free

Dryer
...dryer
archibase planet
drying apparatus dryer
hand dryer - 3d model for interior 3d visualization.
archibase_planet
free
Dryer
...dryer
archibase planet
dryer kitchen ware
dryer - 3d model (*.gsm+*.3ds) for interior 3d visualization.
archibase_planet
free

Dryer
...dryer
archibase planet
dryer heater radiator
dryer 1 - 3d model (*.gsm+*.3ds) for interior 3d visualization.
archibase_planet
free
Dryer
...dryer
archibase planet
dryer radiator heater
dryer 2 - 3d model (*.gsm+*.3ds) for interior 3d visualization.
archibase_planet
free

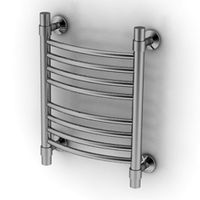
Dryer
...dryer
archibase planet
dryer radiator heater
dryer towel rail n121213 - 3d model (*.gsm+*.3ds) for interior 3d visualization.
archibase_planet
free

Dryer
...rchibase planet
dryer radiator heater towel rail
dryer towel rail n241213 - 3d model (*.gsm+*.3ds) for interior 3d visualization.
archibase_planet
free

Dryer
...r towel rail radiator heater
dryer towel rail villeroy & boch n260514 - 3d model (*.gsm+*.3ds) for interior 3d visualization.
Filament
3ddd
$1

Filament Cage
...filament cage
3ddd
лофт , filament cage
модель бра, делалась по фото!
turbosquid
$3

FILAMENT COUNTER
...d
royalty free 3d model filament counter for download as stl on turbosquid: 3d models for games, architecture, videos. (1563049)
3d_export
$5

Filament lamp 3D Model
...filament lamp 3d model
3dexport
filament lamp 3d model kevin 54161 3dexport
3d_export
$5

Filament bulb candle 3D Model
...filament bulb candle 3d model
3dexport
filament bulb-candle
filament bulb candle 3d model kevin 54163 3dexport
3d_export
$5

Filament led light bulb
...filament led light bulb
3dexport
realistic 3d model of filament light bulb with v-ray materials.
3d_export
$5

Filament led light bulb
...filament led light bulb
3dexport
realistic 3d model of filament light bulb with v-ray materials.
3d_export
$5

Filament led light bulb
...filament led light bulb
3dexport
realistic 3d model of filament light bulb with v-ray materials.
3d_export
$5

Filament led light bulb
...filament led light bulb
3dexport
realistic 3d model of filament light bulb with v-ray materials.
3d_export
$5

Filament led light bulb
...filament led light bulb
3dexport
realistic 3d model of filament light bulb with v-ray materials.
3ddd
$1

Factory filament metal shade
...factory filament metal shade
3ddd
restoration hardware
restoration hardware. 20th c. factory filament metal shade.