Thingiverse
Z-stop Microswitch Fine Adjustment Mount by mikepcw
by Thingiverse
Last crawled date: 3 years ago
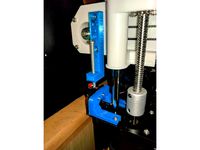
Enables easy fine adjustment of the Z-end stop height
For getting that first layer height dialled in good and proper each time!
This is intended to be mounted to this my Unbreakable Z-rod stabilizer (http://www.thingiverse.com/thing:158580)
Provided you have a fairly level bed, you should only need to check the height in the middle of the bed.
e.g. adjust wingnut and z-home the head. Tighten the wingnut to lower the microswitch (reduce print head offset), loosen to raise it. Repeat a couple of times to dial it in exactly as you want.
Required parts
M4 bolt with hex head (see photo of what I found in hardware store in Aus)
Spring (fairly stiff) and washers to go around the M4 bolt
Wingnut (you could also use this http://www.thingiverse.com/thing:13807 but i haven't tried)
Pre-installation procedure
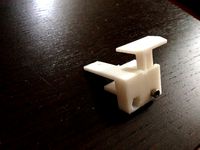
In its virgin, as-printed state, the male and female slider parts should interfere and will NOT slide. This is intentional, and you need file the mating surfaces such that they just slide smoothly but remain snug, without any play at all. This is important since any side-to-side wobble will negatively impact the precision of the adjustment. Sorry, this can take a bit of filing.
Use some sandpaper to finish off and get the mating surfaces nice and smooth.
Installation
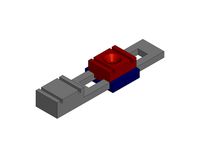
(colours refer to CAD drawing)
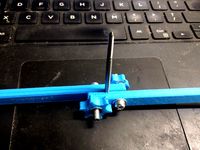
Position the Z-rod stabilizer (blue part in drawing, available here http://www.thingiverse.com/thing:158580) in the ball park level with your print bed.
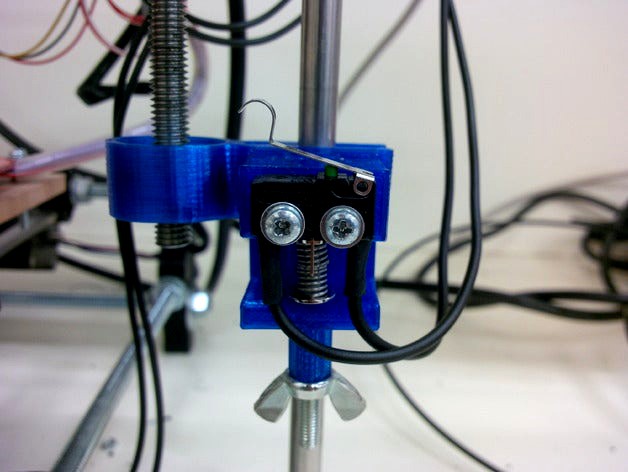
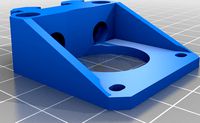
Attach the male, slider rail mount (pink in drawing) via the M3 holes. Screw this down fairly tight since access is difficult once installed. The heads of both screws should be completely recessed (see photo).
Press a hex-head M4 bolt into the T-shaped slot in the female half of the mount (green in drawing).
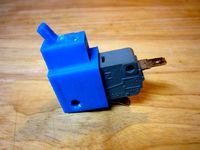
Attach your microswitch.
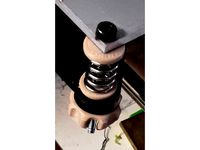
Install washer--spring--washer onto the M4 bolt (photo of me holding the assembly)
Put the bolt through the hole in the flanged part of the mount, and install wingnut on the bottom.
Tip
If you find it does not slide up when you loosen the wingnut, you need to sand the mating surfaces more or use a stiffer spring.
For getting that first layer height dialled in good and proper each time!
This is intended to be mounted to this my Unbreakable Z-rod stabilizer (http://www.thingiverse.com/thing:158580)
Provided you have a fairly level bed, you should only need to check the height in the middle of the bed.
e.g. adjust wingnut and z-home the head. Tighten the wingnut to lower the microswitch (reduce print head offset), loosen to raise it. Repeat a couple of times to dial it in exactly as you want.
Required parts
M4 bolt with hex head (see photo of what I found in hardware store in Aus)
Spring (fairly stiff) and washers to go around the M4 bolt
Wingnut (you could also use this http://www.thingiverse.com/thing:13807 but i haven't tried)
Pre-installation procedure
In its virgin, as-printed state, the male and female slider parts should interfere and will NOT slide. This is intentional, and you need file the mating surfaces such that they just slide smoothly but remain snug, without any play at all. This is important since any side-to-side wobble will negatively impact the precision of the adjustment. Sorry, this can take a bit of filing.
Use some sandpaper to finish off and get the mating surfaces nice and smooth.
Installation
(colours refer to CAD drawing)
Position the Z-rod stabilizer (blue part in drawing, available here http://www.thingiverse.com/thing:158580) in the ball park level with your print bed.
Attach the male, slider rail mount (pink in drawing) via the M3 holes. Screw this down fairly tight since access is difficult once installed. The heads of both screws should be completely recessed (see photo).
Press a hex-head M4 bolt into the T-shaped slot in the female half of the mount (green in drawing).
Attach your microswitch.
Install washer--spring--washer onto the M4 bolt (photo of me holding the assembly)
Put the bolt through the hole in the flanged part of the mount, and install wingnut on the bottom.
Tip
If you find it does not slide up when you loosen the wingnut, you need to sand the mating surfaces more or use a stiffer spring.
Similar models
thingiverse
free
Small Tap Handle by marmotjr
...nd set of wingnuts.
inspired by (but not a remix of) http://www.thingiverse.com/thing:584517.
print 2, and 2 of the wingnuts.
thingiverse
free

Ender 3 Adjustable Z Axis Stop / Limit Switch Mount by ShayneRW
... cap screw
2 - m3 nuts
1 - ender 3 original bed spring (if you haven't replaced them with yellow springs, you really should)
thingiverse
free
Eclips3d adjustable Z Endstop by cporto
...led on the bed. then raise the adjuster to trigger the endstop. tighten the screw to lock it into place.
lastly, level your bed.
thingiverse
free
Ender 3 Z-Axis Adjustable Stepper Bracket by jerryfudd
...ing:4699747
purpose:
adjustable mount for z-stepper
required:
m4 bolts (4020 rail mounting)
m4 t-nuts
m3 bolts (stepper mounting)
thingiverse
free

Adjustable Z-Bracket 2020 by TAG72
...ck the bottom screw of the adjustable bracket when position is set. loosen the bottom screw if further adjustments are required.
grabcad
free

Geared extruder v.3
... some m4 nuts and washers to adjust spring tension
~ 25mm spring
mk8 gear for driving filament
2x 625zz bearings
1x 608zz bearing
thingiverse
free
Anet A8 Z-EndStop Adjuster by ShaneAPowell
...cro-switch mounted. i didn't have enough adjustment with the m4 bolt. not sure why. the micro-switch is about 10mm lower.
thingiverse
free
Flsun bed washer by wunderkind
...rners of the bed.
the knob on the wingnut was printed from a file by another member.https://www.thingiverse.com/thing:2000216
thingiverse
free

ANET A8 Z-Stop Bracket by Raeln
...ocation. mounted to the frame with 2 m3x16 bolts, 4 washers and 2 m3 nuts.
remixed from https://www.thingiverse.com/thing:2008349
thingiverse
free
Railgauge
...thingiverse.com/thing:3687161
to assemble it, you need:
1 x m4 x 20 countersunk screw
1 x m4 screw nut
1 x washers
1 x m4 wingnut
Mikepcw
thingiverse
free

Unbreakable Sanguinololu Holder by mikepcw
...roat of the clevis.
pretty self-explanatory i hope :)
attach m3 screw and nut as shown to avoid damage to pcb once installed.
thingiverse
free

Sanguinololu Fan Mount (pushclamp mount) by mikepcw
...w.thingiverse.com/thing:158873)
simple enough, right?
see my other 'pushclamp' designs if in doubt on how to install.
thingiverse
free

NVIDIA Jetson TK1 sandwich board remix by mikepcw
...non printed parts in attached pdf bom (for australian electronics store, jaycar)
assembly instruction in attached illustration.
thingiverse
free

Z800 series double slot passive GPU fan duct by mikepcw
... superglue; apply duct tape where necessary.
probably needs to operate with side panel of z800 off to not choke the fan intake.
thingiverse
free

52mm Coffee Tamper with Hex Twist Handle by mikepcw
...y cup (and it can literally be used as a stamp too!)
you can try boolean cuts on this stl and achieve similar results, i guess.
thingiverse
free

Double slot passive GPU fan manifold v1.3 by mikepcw
...ackets may need to be bent out of the way to accommodate the width of the square end of part "a" where the fan attaches
thingiverse
free

Unbreakable Prusa Z-rod stabilizer constraint (push on, retrofittable) by mikepcw
...he other hole (closer to the throat) is intended for my fine adjustment end-stop mount (http://www.thingiverse.com/thing:158872).
thingiverse
free

External PCI bay extractor for ATX case by mikepcw
... seal around contact edges with pci bay
2x m3 hex head bolt
superglue
80mm or 92mm fan
be sure to read full instructions.
thingiverse
free

Unbreakable Bar Clamp (retrofittable) by mikepcw
...ned by 4 deg when printed (see drawing). this enables the clamp to pinch and friction lock against the smooth rod when tightened.
Microswitch
3d_export
$5

Microswitch
...microswitch
3dexport
microswitch<br>verts 287<br>faces 499
thingiverse
free

Microswitch With Roller12,7X5,6mm by scorpio_man30ro
...microswitch with roller12,7x5,6mm by scorpio_man30ro
thingiverse
microswitch with roller12,7x5,6mm
thingiverse
free
Microswitch hack by Terminus
...microswitch hack by terminus
thingiverse
turn a microswitch into an on / off switch.
thingiverse
free

Microswitch holder by rgthane
...microswitch holder by rgthane
thingiverse
this was designed for a cnc limit microswitch.
thingiverse
free

Microswitch holder by peze78
...microswitch holder by peze78
thingiverse
holder for microswitch for use in diy applications
thingiverse
free

Microswitch holder by bwitz
...icroswitch that is not part of a 3d printer. i needed this for my automated chicken coop to check if the door is open or closed.
thingiverse
free

Endstop Holder, Microswitch by PropsFactory
...endstop holder, microswitch by propsfactory
thingiverse
this is a small endstop holder for microswitch, 8mm rod
thingiverse
free

Microswitch by NilsR
...t as a reference test object as these microswitches are more or less the same over various manufacturers. this is the large type.
thingiverse
free

Silent microswitch for mouse
... diameter of 0.5mm.
i decline any responsibility for damage caused to the equipment in which these microswitches will be mounted.
thingiverse
free

X carriage with microswitch by Swejper
...oswitch by swejper
thingiverse
this is a remix to keep the microswitch on the carrier and use the original flsun v5 clone hotend
Fine
3ddd
$1

Fine Art
...fine art
3ddd
fine art lamps
торшер fine art
3ddd
$1

Fine Art_Chandelier
...fine art_chandelier
3ddd
fine art lamps
fine art_chandelier, crystal enchantment
3ddd
$1

Fine Art
...fine art
3ddd
fine art lamps
люстра и бра fine art
3ddd
$1

Fine Art
...fine art
3ddd
fine art lamps
люстра для бильярда fine art
3ddd
$1

Fine Art
...fine art
3ddd
fine art lamps
торшер и бра fine art
3ddd
$1
Fine Art
...fine art
3ddd
fine art lamps , сша
бра fine art lamps (сша)
3ddd
$1
Fine Art
...fine art
3ddd
fine art lamps , сша
люстра fine art lamps (сша)
3ddd
$1

Fine Art
...fine art
3ddd
fine art lamps , сша
настольная лампа fine art lamps (сша)
3ddd
$1
Fine Art
...fine art
3ddd
fine art lamps
светильники fine art
люстра и бра 750640
3ddd
$1
Fine Art
...fine art
3ddd
fine art lamps
светильники фирмы fine art
бра 429850
торшер 452230
люстра 429540
Stop
turbosquid
$5

Stop Stop
... available on turbo squid, the world's leading provider of digital 3d models for visualization, films, television, and games.
3d_export
free
stop
...stop
3dexport
classic stop.
3d_ocean
$12
Bus Stop
...bus stop
3docean
bus bus stop station
bus stop model
archibase_planet
free
Bus stop
...bus stop
archibase planet
bus stop bus-stop
bus stop n150111 - 3d model (*.gsm+*.3ds) for exterior 3d visualization.
3d_export
$10

stop valve
...stop valve
3dexport
stop valve
archibase_planet
free
Bus stop
...bus stop
archibase planet
bus stop bus-stop bus station
bus stop n070512 - 3d model (*.gsm+*.3ds) for exterior 3d visualization.
archibase_planet
free

Bus stop
...bus stop
archibase planet
bus stop bus-stop bus station
bus stop n181213 - 3d model (*.gsm+*.3ds) for exterior 3d visualization.
archibase_planet
free
Bus stop
...bus stop
archibase planet
bus stop bus-stop bus station
bus stop n120514 - 3d model (*.gsm+*.3ds) for exterior 3d visualization.
turbosquid
$1

stop
... available on turbo squid, the world's leading provider of digital 3d models for visualization, films, television, and games.
3d_ocean
$9
Stopping Place
...in zip pack the following items: 3d file stopping plac pack/.max/.obj// material and textures. well we hope you enjoy it regards.
Z
3d_export
$5

nissan z
...nissan z
3dexport
nissan z
3ddd
$1

Vase Z
...vase z
3ddd
vase z
3ddd
$1

полотенцесушить Z
...полотенцесушить z
3ddd
полотенцесушитель
полотенцесушить z
design_connected
free

Z-Chair
...z-chair
designconnected
free 3d model of z-chair designed by karman, aleksei.
design_connected
$11

Z Lamp
...z lamp
designconnected
phillips z lamp computer generated 3d model. designed by kalff, louis.
3d_export
$5

Dragon balls z
...dragon balls z
3dexport
dragon ball z
turbosquid
$20

Fighter Z
...
turbosquid
royalty free 3d model fighter z for download as on turbosquid: 3d models for games, architecture, videos. (1292563)
turbosquid
$9

Pen Z
...pen z
turbosquid
free 3d model pen z for download as obj on turbosquid: 3d models for games, architecture, videos. (1686775)
turbosquid
free

z chair
...z chair
turbosquid
free 3d model z chair for download as max on turbosquid: 3d models for games, architecture, videos. (1410230)
turbosquid
$5

Letter Z
...urbosquid
royalty free 3d model letter z for download as max on turbosquid: 3d models for games, architecture, videos. (1408540)
Adjustment
3d_ocean
$7

Adjustable Wrench
...adjustable wrench
3docean
adjustable wrench highly detailed wrench
highly detailed adjustable wrench.
3ddd
$1
Adjustable Stool
...adjustable stool
3ddd
табурет
wooden adjustable stool.
3d_ocean
$20

Adjustable Gym Bench
...st adjustable bench black equipement gym gymnastic indoor silver sport workout
3d model of black and silver adjustable gym bench.
3d_ocean
$20
Adjustable Gym Bench
...st adjustable bench black equipement gym gymnastic indoor silver sport workout
3d model of black and silver adjustable gym bench.
3d_ocean
$16

Adjustable Weight Bench
...arbell bench black equipement gym gymnastic indoor sport weight workout
3d model of black adjustable weight bench with a barbell.
turbosquid
$5

Adjustable wrench
...
royalty free 3d model adjustable wrench for download as fbx on turbosquid: 3d models for games, architecture, videos. (1313414)
3d_export
$5

adjustable tension lock
...adjustable tension lock
3dexport
adjustable tension lock
turbosquid
$1

Adjustable Wrench
...free 3d model adjustable wrench for download as obj and blend on turbosquid: 3d models for games, architecture, videos. (1446736)
turbosquid
$1

Adjustable Wrench
...y free 3d model adjustable wrench for download as c4d and fbx on turbosquid: 3d models for games, architecture, videos. (1379022)
3d_export
$5

Adjustable key
...adjustable key
3dexport
Mount
3d_export
free

mounting bracket
...mounting plate is the portion of a hinge that attaches to the wood. mounting plates can be used indoors, cabinetry and furniture.
turbosquid
$2

MOUNTING
... available on turbo squid, the world's leading provider of digital 3d models for visualization, films, television, and games.
turbosquid
free

Mounts
... available on turbo squid, the world's leading provider of digital 3d models for visualization, films, television, and games.
turbosquid
free

Mount Fuji
...fuji
turbosquid
free 3d model mount fuji for download as obj on turbosquid: 3d models for games, architecture, videos. (1579977)
3d_export
$5

Headphone mount LR
...headphone mount lr
3dexport
headphone mount l+r
turbosquid
$39

Mount rainier
...quid
royalty free 3d model mount rainier for download as fbx on turbosquid: 3d models for games, architecture, videos. (1492586)
turbosquid
$5

pipe mounting
...quid
royalty free 3d model pipe mounting for download as obj on turbosquid: 3d models for games, architecture, videos. (1293744)
turbosquid
$3

Mounting Tires
...uid
royalty free 3d model mounting tires for download as fbx on turbosquid: 3d models for games, architecture, videos. (1708511)
3d_export
$5

Magnetic GoPro Mount
...pro mount
3dexport
cool magnetic mount for gopro. allows you to mount the camera on flat metal surfaces and get exclusive shots.
turbosquid
$5

Stone Mount
...ty free 3d model stone mount for download as ma, obj, and fbx on turbosquid: 3d models for games, architecture, videos. (1370306)