Thingiverse
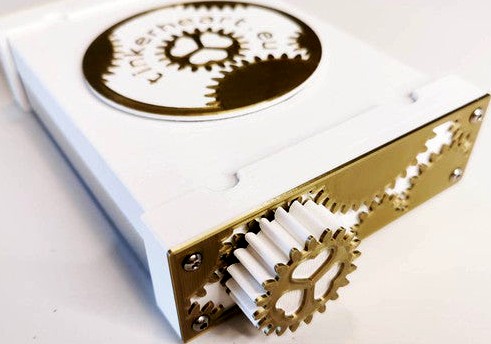
tinkerInduction MK1, DIY induction heater for demonstrating induction by tinkerheart
by Thingiverse
Last crawled date: 3 years, 1 month ago
This machine is less useful than our previous machines: an induction heater partially made from plastic. Depending on the type of plastic used to print the plastic parts, it may be prone to spectacular and dangerous failures, so don’t make one at home. I’ll provide the stl files in case someone wants to make the needed improvements to the design.
It works by inducing eddy currents, loops of electrical current induced within a conductor by a changing magnetic field, here generated by the rotating magnets. The conductor should ideally be made from a pure ferromagnetic metal and held above the rotor without touching it. In this video I use some iron grit.
A few more words about safety: This machine has exposed moving parts and can be dangerous to use, especially if not constructed properly. It is not a toy, not for kids and if you build one I recommend that you at the very least use it inside a proper enclosure. Neodymium magnets are not toys, they can attract metal and other magnets (no surprise) and they are brittle and prone to shattering on impact which can result in sharp shrapnel traveling at high velocity (possible surprise, also painful. And potentially blinding). So always protect your eyes (and other people’s eyes).
When sourcing materials there are a few things to be aware of. The fan I use can be purchased both as new and as refurbished – I recommend that you get new ones, as the quality of the refurbished ones varies too much to my experience. Also, when purchasing neodymium magnets the most common magnet strength ratings found on AliExpress are N35, N50 and N52 – sadly many sellers lie about the strength of their magnets since they know most people can’t measure the exact level of magnet strength, so do not focus so much on the strength rating, simply buy from a seller with good reviews.
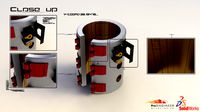
Assembly note: Adjacent magnets should have opposite polarities, an extra magnet is used to test polarities before things are glued in place!
See my other projects here: http://tinkerheart.eu
3d printing advice
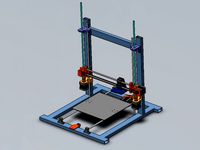
I printed my own machine parts using inexpensive PLA on a Prusa MK3S. PLA is not recommended, but I was low on supplies. Threaded parts should be printed at a layer height of 0.2mm or less. 3 perimeters and 10% or more infill works well for me.
How to build your very own tinkerInduction
Please watch this movie: https://youtu.be/nEV4mKGTtus
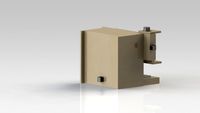
Printed parts
1 x inductionFront
1 x inductionBack
1 x inductionRotor
1 x inductionKnob
1 x inductionShell
Please visit http://tinkerheart.eu/tinkerinduction/ for the complete bill of materials.
This project is for information purposes only and does not form a professional relationship in any way; it is “use at your own risk” so do not work beyond your capability and seek help if you need it. I assume no liability for any direct, incidental, consequential, indirect or punitive damage incurred as a result of any of the information contained in this video. No information contained in this video shall create any expressed or implied warranty or guarantee of any particular result.
It works by inducing eddy currents, loops of electrical current induced within a conductor by a changing magnetic field, here generated by the rotating magnets. The conductor should ideally be made from a pure ferromagnetic metal and held above the rotor without touching it. In this video I use some iron grit.
A few more words about safety: This machine has exposed moving parts and can be dangerous to use, especially if not constructed properly. It is not a toy, not for kids and if you build one I recommend that you at the very least use it inside a proper enclosure. Neodymium magnets are not toys, they can attract metal and other magnets (no surprise) and they are brittle and prone to shattering on impact which can result in sharp shrapnel traveling at high velocity (possible surprise, also painful. And potentially blinding). So always protect your eyes (and other people’s eyes).
When sourcing materials there are a few things to be aware of. The fan I use can be purchased both as new and as refurbished – I recommend that you get new ones, as the quality of the refurbished ones varies too much to my experience. Also, when purchasing neodymium magnets the most common magnet strength ratings found on AliExpress are N35, N50 and N52 – sadly many sellers lie about the strength of their magnets since they know most people can’t measure the exact level of magnet strength, so do not focus so much on the strength rating, simply buy from a seller with good reviews.
Assembly note: Adjacent magnets should have opposite polarities, an extra magnet is used to test polarities before things are glued in place!
See my other projects here: http://tinkerheart.eu
3d printing advice
I printed my own machine parts using inexpensive PLA on a Prusa MK3S. PLA is not recommended, but I was low on supplies. Threaded parts should be printed at a layer height of 0.2mm or less. 3 perimeters and 10% or more infill works well for me.
How to build your very own tinkerInduction
Please watch this movie: https://youtu.be/nEV4mKGTtus
Printed parts
1 x inductionFront
1 x inductionBack
1 x inductionRotor
1 x inductionKnob
1 x inductionShell
Please visit http://tinkerheart.eu/tinkerinduction/ for the complete bill of materials.
This project is for information purposes only and does not form a professional relationship in any way; it is “use at your own risk” so do not work beyond your capability and seek help if you need it. I assume no liability for any direct, incidental, consequential, indirect or punitive damage incurred as a result of any of the information contained in this video. No information contained in this video shall create any expressed or implied warranty or guarantee of any particular result.
Similar models
thingiverse
free

tinkerStirrer MK1 light, DIY good but cheap'ish magnetic stirrer by tinkerheart
...cer
2 x stirrershell
other parts:
please visit http://tinkerheart.eu/tinkerstirrer-mk1-light/ for the complete bill of materials.
thingiverse
free

tinkerStirrer MK1, DIY high performance magnetic stirrer by tinkerheart
...tps://youtu.be/umn0ur9iaja
other parts:
please visit http://tinkerheart.eu/tinkerstirrer_mk1/ for the complete bill of materials.
thingiverse
free

5 Gallon Bucket High Speed Magnetic Stirbar by Mr_Dabrudda
...ll.
add the 4 machine screws and 8 nuts to make a spacer so the fan does get stuck to the bottom of the bucket and stops turning.
thingiverse
free

Magnet Polarity Tester for 10mm x 5mm Round Magnets by hammer32
...stead of repel.
i used these magnets:
https://www.amazon.com/gp/product/b01m0okuij/ref=oh_aui_search_detailpage?ie=utf8&psc=1
thingiverse
free

Magnetic Door Handle by Dorithos
...eodymium-magnets in those holes too.
check the polarity of the two magnets before glueing them in the casing.
no support needed.
thingiverse
free

Gloomhaven Magnetic Numbered Base Markers
...hand but any 1 mm height neodymium magnets with similar strength or better should...
thingiverse
free

Dark Knight Refrigerator Magnet by fbuehl
...e, even with strong magnets. it is less than 3 inches wide, so it does not take up much space. a robin magnet is available too!
thingiverse
free

Toy Train (Fridge magnet) by jhkim41314
...ded magnet size is 10 x 2 mm disk magnet.
can be purchased from the following links:https://amzn.to/2ibyfichttps://bit.ly/2tfugbb
thingiverse
free

Push Pin Magnet by spruceymoosey
...t.
i picked up 100 of them for around $12http://a.co/ck0jzdi
2019-08-12: added a version to house 1-1/2" x 1/2" magnet
grabcad
free

Magnetic PEN
...mium magnetic polar magnets stylus pen steel gift1 set 12 steel balls gold neodymium magnetic polar magnets stylus pen steel gift
Tinkerheart
thingiverse
free

Christmas baubles by tinkerheart
...christmas baubles by tinkerheart
thingiverse
a collection of christmas baubles.
thingiverse
free

Phone stand / holder for smartphones by tinkerheart
...phone stand / holder for smartphones by tinkerheart
thingiverse
a simple smartphone stand.
thingiverse
free

Direct drive BMG extruder for Prusa Mini clone by tinkerheart
...inter works with this modification.
firmware (provided as is, not tested much) can be found here:http://tinkerheart.eu/prusamini/
thingiverse
free

Direct drive BMG extruder for Prusa Mini clone, updated version by tinkerheart
...inter works with this modification.
firmware (provided as is, not tested much) can be found here:http://tinkerheart.eu/prusamini/
thingiverse
free

tinkerMicroscope MK1 by tinkerheart
...tripholder
1 x lightsource_stripcap
other parts
please visit tinkerheart.eu/tinkermicroscope/ for the complete bill of materials.
thingiverse
free

tinkerVortex mk1, DIY vortex mixer for eppendorf tubes by tinkerheart
... vortexplug
1 x vortexshell
other parts:
please visit http://tinkerheart.eu/tinkervortex-mk1/ for the complete bill of materials.
thingiverse
free
tinkerStirrer MK1, DIY high performance magnetic stirrer by tinkerheart
...tps://youtu.be/umn0ur9iaja
other parts:
please visit http://tinkerheart.eu/tinkerstirrer_mk1/ for the complete bill of materials.
thingiverse
free

tinkerCentrifuge MK1, DIY tabletop centrifuge for eppendorf tubes by tinkerheart
...cer
1 x centrifugeshell
other parts:
please visit http://tinkerheart.eu/tinkercentrifuge-mk1/ for the complete bill of materials.
thingiverse
free
tinkerStirrer MK1 light, DIY good but cheap'ish magnetic stirrer by tinkerheart
...cer
2 x stirrershell
other parts:
please visit http://tinkerheart.eu/tinkerstirrer-mk1-light/ for the complete bill of materials.
Mk1
turbosquid
$25

Cutlass MK1
...urbosquid
royalty free 3d model cutlass mk1 for download as on turbosquid: 3d models for games, architecture, videos. (1387253)
turbosquid
free
Lewis mk1
...s mk1
turbosquid
free 3d model lewis mk1 for download as fbx on turbosquid: 3d models for games, architecture, videos. (1614469)
3d_export
$5

Escort MK1
...escort mk1
3dexport
turbosquid
$14
Table Mk1
... available on turbo squid, the world's leading provider of digital 3d models for visualization, films, television, and games.
turbosquid
$10
Stove Mk1
... available on turbo squid, the world's leading provider of digital 3d models for visualization, films, television, and games.
3d_export
$99

Maserati 3500GT mk1
...maserati 3500gt mk1
3dexport
turbosquid
free

VW Golf MK1
...osquid
free 3d model vw golf mk1 for download as c4d and obj on turbosquid: 3d models for games, architecture, videos. (1707225)
turbosquid
$100

Hawker Fury MK1
... available on turbo squid, the world's leading provider of digital 3d models for visualization, films, television, and games.
turbosquid
$100

Hawker Fury MK1
... available on turbo squid, the world's leading provider of digital 3d models for visualization, films, television, and games.
turbosquid
$100

Hawker Fury MK1
... available on turbo squid, the world's leading provider of digital 3d models for visualization, films, television, and games.
Induction
turbosquid
$2

Induction hob
...quid
royalty free 3d model induction hob for download as skp on turbosquid: 3d models for games, architecture, videos. (1564919)
turbosquid
$10
Induction Hob
... 3d model whirlpool induction hob for download as max and obj on turbosquid: 3d models for games, architecture, videos. (1390871)
3ddd
$1

Siemens Induction Cooktop
...duction cooktop
3ddd
варочная поверхность , siemens
induction cooktop siemens eh975md21p
turbosquid
$10
Induction cooker
...del induction cooker for download as sldpr, max, fbx, and obj on turbosquid: 3d models for games, architecture, videos. (1698439)
3d_export
$15
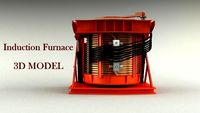
Induction Furnace Model 3D Model
...l
3dexport
inductor induction furnace ironworks cast steel stove hearth
induction furnace model 3d model conqueror 38004 3dexport
turbosquid
$38

Wimshurst Static Machine Induction
...st static machine induction for download as max, obj, and fbx on turbosquid: 3d models for games, architecture, videos. (1404224)
turbosquid
$25

Britannia Delphi Induction Oven
... available on turbo squid, the world's leading provider of digital 3d models for visualization, films, television, and games.
turbosquid
$50

Induction 4-Burner Cooktop Gaggenau
...3d model induction 4-burner cooktop gaggenau for download as on turbosquid: 3d models for games, architecture, videos. (1256929)
turbosquid
$25
48W_Tuscany Range - Burners-Griddle-Induction
... available on turbo squid, the world's leading provider of digital 3d models for visualization, films, television, and games.
turbosquid
$15
Miele KM 6115 Induction Cooker
... available on turbo squid, the world's leading provider of digital 3d models for visualization, films, television, and games.
Demonstrating
3d_export
$5

Solitaire Ring Demonstration 3D Model
...solitaire ring demonstration 3d model
3dexport
solitaire ring demonstration 3d model rehansheikh 30601 3dexport
3d_export
$9

Simple atmosphere fashion demonstration area SU model
...simple atmosphere fashion demonstration area su model
3dexport
simple atmosphere + fashion demonstration area su modelv
3d_export
$19

Enterotoxin demonstration internal organs anatomy gastrointestinal
...ation internal organs anatomy gastrointestinal, human organs medical animation black intestine stomach 2.files include 3dmax mb
3d_export
$7

Characteristic Chinese-style demonstration area landscape su model
... chinese-style demonstration area landscape su model
3dexport
characteristic chinese-style demonstration area landscape su model
3d_export
$5

robot cat
...robot cat
3dexport
3d model of a robot cat for demonstration or animation
3d_export
$299
dragon
...dragon
3dexport
a fully prepared model of the dragon, for animation. the scene and video file are attached for demonstration.
3d_export
$5

vertu new signature touch
...vertu new signature touch
3dexport
vertu phone for demonstration purposes, assistance in creating a picture or scene
3d_ocean
$30

Realistic Lens For Camera
...on ef lens mount without outside buttons and displays. perfect for mechanism of lens demonstration. all parts were made with l...
3d_export
$10

Toaster 3D Model
...toaster 3d model
3dexport
toaster house-hold kitchen electronics appliances
toaster 3d model demonstrator 32412 3dexport
3d_ocean
$2

Loudspeaker
...eaker
3docean
demonstration loudspeaker music police speaker tool voice
a high-quality model of a speakerphone with render set up
Heater
archibase_planet
free

Heater
... gas water heater
heater ariston gi7s 11l ffi ng gas water heater n160815 - 3d model (*.gsm+*.3ds) for interior 3d visualization.
3d_export
$5

heater
...heater
3dexport
heater 3d modelling.
3d_export
$5

heater
...heater
3dexport
simple room heater
archibase_planet
free
Heater
...ater water heater hot-water generator
heater thermex if 80 v tank n290114 - 3d model (*.gsm+*.3ds) for interior 3d visualization.
turbosquid
$20

Heater
...
turbosquid
royalty free 3d model heater for download as c4d on turbosquid: 3d models for games, architecture, videos. (1145030)
turbosquid
$25
Heater
... available on turbo squid, the world's leading provider of digital 3d models for visualization, films, television, and games.
turbosquid
$24

Heater
... available on turbo squid, the world's leading provider of digital 3d models for visualization, films, television, and games.
turbosquid
$20

heaters
... available on turbo squid, the world's leading provider of digital 3d models for visualization, films, television, and games.
turbosquid
$12
heater
... available on turbo squid, the world's leading provider of digital 3d models for visualization, films, television, and games.
turbosquid
$5

heater
... available on turbo squid, the world's leading provider of digital 3d models for visualization, films, television, and games.
Diy
3d_export
free
DIY 3D Printer
...diy 3d printer
3dexport
diy 3d printer model
turbosquid
$10

Diy tiered
...l diy tiered for download as max, max, max, max, fbx, and obj on turbosquid: 3d models for games, architecture, videos. (1603709)
turbosquid
$3
Diy Desk to Bench
...odel diy desk to bench for download as 3ds, max, obj, and fbx on turbosquid: 3d models for games, architecture, videos. (1506589)
turbosquid
$2

DIY Moon Light
...model diy moon light for download as obj, fbx, blend, and dae on turbosquid: 3d models for games, architecture, videos. (1501170)
3d_export
$8
DIY CNC Router 3D Model
...diy cnc router 3d model
3dexport
cnc; router; diy; homemade
diy cnc router 3d model maikeru86 58463 3dexport
turbosquid
$5

Diy Kitchen Cabinets
...itchen cabinets for download as 3ds, obj, fbx, blend, and dae on turbosquid: 3d models for games, architecture, videos. (1197373)
3d_export
free

Download free Diying Plant 3D Model
...download free diying plant 3d model
3dexport
diying plant blender
diying plant 3d model visitorsama 98607 3dexport
3ddd
$1
DIY coffee table + decor
... рамка для фото
кофейный столик diy 400х350х600(h) мм. моделился по фото. внимание: материалы - corona.
turbosquid
$3
Diy Wire Lamp Shade
...free 3d model diy wire lamp shade for download as 3ds and fbx on turbosquid: 3d models for games, architecture, videos. (1347605)
cg_studio
$12
DIY MONGOLIAN LAMB STOOLS3d model
... hair soft pile white
.max - diy mongolian lamb stools 3d model, royalty free license available, instant download after purchase.