Thingiverse
Relay Control OctoPrint Wanhao i3 by Jeffeb3
by Thingiverse
Last crawled date: 3 years ago
Introduction
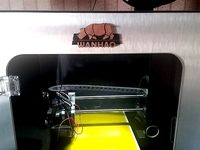
I have a Wanhao Duplicator i3, a raspberry pi 2 running octoprint (the octopi image), an LED light over the printer, and a 4 relay board from sainsmart.
There are places with instructions, tips, etc. But I wanted to share how I did it with this specific printer, and I wanted to illustrate exactly how I managed to control the printer power, and the light, with some rudamentary automation.
CAUTION
Duh, this is AC power. The printer can create a lot of juice, but it's nothing compared to the power coming from the walls. This can definitely kill you, so be cautious. If you don't know what you're doing, then stop.
GPIO Scripts
octopi comes with the gpio stuff installed, so just running "gpio" on the command line gives me several options. I made 4 scripts to control the relays. They were all in "/usr/local/bin/". I had to make them as root, and I had to add permissions "sudo chmod a+rx .sh" so that the pi user could execute them.
printer_on.sh:
#!/bin/bash
gpio export 23 out
gpio -g write 23 0
printer_off.sh:
#!/bin/bash
gpio export 23 out
gpio -g write 23 1
light_on.sh:
#!/bin/bash
gpio export 18 out
gpio -g write 18 0
light_off.sh:
#!/bin/bash
gpio export 18 out
gpio -g write 18 1
You can see, I wired GPIO 18 to the control of the light relay, and 23 to the control of the printer power relay.
You can also see that since I used the normally open connection, the signal is reversed (0 is on and 1 is off).
OctoPrint Config
So that's cool. I can type 'light_on.sh' and see the light turn on. But I don't want to ssh into the machine to do that, I want to use the octopi web interface.
The configuration for octopi is /home/pi/.octoprint/config.yaml
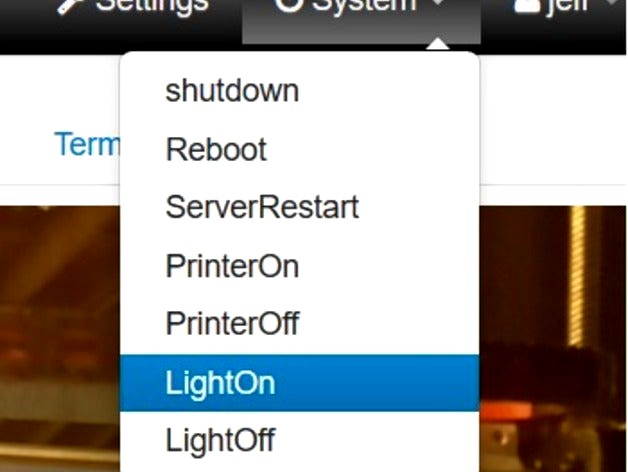
So, to let me run these commands from the "system" menu, I added this to my config:
system:
actions:
- action: pon
command: printer_on.sh
name: PrinterOn
- action: poff
command: printer_off.sh
confirm: Are you sure you want to turn off the printer?
name: PrinterOff
- action: lon
command: light_on.sh
name: LightOn
- action: loff
command: light_off.sh
name: LightOff
That gave me control of the lights, and printer from the system menu.
OctoPrint Config Part Two
That wasn't enough. I really wanted the lights to only be on when I'm printing, and I want the printer to be on when I restart the raspberry pi. So I also added this to the config. (See more details on the events part of the config here (http://docs.octoprint.org/en/master/events/index.html)
events:
enabled: true
subscriptions:
- command:
- printer_on.sh
- light_off.sh
event: Startup
type: system
- command: light_on.sh
event: PrintStarted
type: system
- command: light_off.sh
event: PrintFailed
type: system
- command: light_off.sh
event: PrintCancelled
type: system
- command: light_off.sh
event: PrintDone
type: system
What this does (if you can't tell by reading it) is that when octopi starts (Startup) it will turn on the printer, and off the lights. When a print starts (PrintStarted) it will turn on the lights. When a print fails, is cancelled, or finished correctly, it will turn off the light. I probably could have used the CaptureStart and CaptureDone events, because that's really more of what I need, but this is working.
I went ahead and tested all of that using just the relay board before I connected up the printer or light. Just trying to make fewer really big mistakes here.
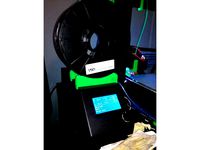
Wiring the Relay Board
I have a PiTFT screen, which is supposed to run OctoPiPanel. I haven't gotten that to work yet, but it does leave me with a challenge to wire up the relay. I don't have access to the general GPIO pins, because there is a screen on there. The screen covers the regular pins, but also provides them on another connector on the right side of the screen. For the relay board, I just soldered directly to the back of that connector. I only needed 4 wires, and they are as follows:
Pi Pin
Relay Pin
5V
Vcc
Gnd
Gnd
23
IN1
18
IN2
Connecting Printer Power
The power supply from Wanhao is noisy, and annoying. I would have preferred to control low voltage DC signals, but I want that power supply off too. So I chose to control the 120VAC that powers the power supply. The power going to the power supply comes from the connector, goes through the switch on the back, and then goes to the power supply and is attached with a screw. I took a picture of which wire I disconnected from the power supply, but be careful, yours might be different.
I ran that cable out to the relay board, and I ran another cable back into the control box to that spot on the power supply. I just ran the cables next to the fan, but I should print a new back, with a hole in it for these cables.
I wired the relay so that if the relay board loses power for some reason, then the printer will be shut off (Normally Open). Now that I think about it, I don't really like it that way, maybe I'll reverse it later.
Connecting LED Light
I have an LED light that illuminates the desk that the printer is on. I opened it up, and there's clearly a 120VAC cable coming in, and a power supply to convert the power to DC, likely a lot lower voltage, like 12, or 24V. I decided to put the relay on this lower DC line, instead. So I cut that cable, soldered in a 2 conductor wire, and ran both to the NO part of the second relay.
Part Links
This is the relay board I used:http://www.sainsmart.com/4-channel-5v-relay-module-for-pic-arm-avr-dsp-arduino-msp430-ttl-logic.html
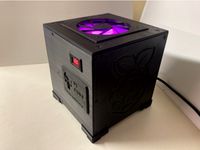
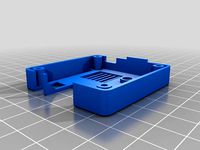
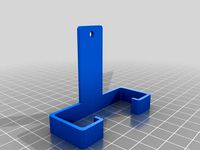
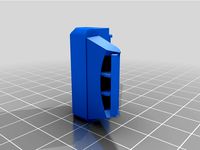
This is the cover I used:http://www.thingiverse.com/thing:957292
Update to work with PushBullet plugin
I use the Push Bullet plugin, and it sends me a photo at the end of every print. Unfortunately, it was taking the snapshot right after the lights went off :). So I modified the lights_off script like this, so that it will wait 5 seconds before turning off the lights, and wouldn't block the octopi running the job:
light_off.sh
#!/bin/bash
gpio export 18 out
(sleep 5 && gpio -g write 18 1)&
I first changed this:
gpio -g write 18 1
into this:
sleep 5
gpio -g write 18 1
And that worked fine, but someone told me that would be making octoprint stall for 5 seconds while it was doing that sleep (I don't believe them, but it was a very reputable source).
So I changed that to this:
(sleep 5 && gpio -g write 18 1)&
"sleep 5" waits five seconds. "&&" means that the first command has to complete with success, and then the second command will be called, so "sleep 5 && command" will wait five seconds, and call "command".
Putting that thing in parenthesis, and adding a "&" at the end means the whole thing will get run in the background, so that octoprint can keep on doing whatever it was doing before calling that script, wihtout waiting for the sleep or the command to finish.
I have a Wanhao Duplicator i3, a raspberry pi 2 running octoprint (the octopi image), an LED light over the printer, and a 4 relay board from sainsmart.
There are places with instructions, tips, etc. But I wanted to share how I did it with this specific printer, and I wanted to illustrate exactly how I managed to control the printer power, and the light, with some rudamentary automation.
CAUTION
Duh, this is AC power. The printer can create a lot of juice, but it's nothing compared to the power coming from the walls. This can definitely kill you, so be cautious. If you don't know what you're doing, then stop.
GPIO Scripts
octopi comes with the gpio stuff installed, so just running "gpio" on the command line gives me several options. I made 4 scripts to control the relays. They were all in "/usr/local/bin/". I had to make them as root, and I had to add permissions "sudo chmod a+rx .sh" so that the pi user could execute them.
printer_on.sh:
#!/bin/bash
gpio export 23 out
gpio -g write 23 0
printer_off.sh:
#!/bin/bash
gpio export 23 out
gpio -g write 23 1
light_on.sh:
#!/bin/bash
gpio export 18 out
gpio -g write 18 0
light_off.sh:
#!/bin/bash
gpio export 18 out
gpio -g write 18 1
You can see, I wired GPIO 18 to the control of the light relay, and 23 to the control of the printer power relay.
You can also see that since I used the normally open connection, the signal is reversed (0 is on and 1 is off).
OctoPrint Config
So that's cool. I can type 'light_on.sh' and see the light turn on. But I don't want to ssh into the machine to do that, I want to use the octopi web interface.
The configuration for octopi is /home/pi/.octoprint/config.yaml
So, to let me run these commands from the "system" menu, I added this to my config:
system:
actions:
- action: pon
command: printer_on.sh
name: PrinterOn
- action: poff
command: printer_off.sh
confirm: Are you sure you want to turn off the printer?
name: PrinterOff
- action: lon
command: light_on.sh
name: LightOn
- action: loff
command: light_off.sh
name: LightOff
That gave me control of the lights, and printer from the system menu.
OctoPrint Config Part Two
That wasn't enough. I really wanted the lights to only be on when I'm printing, and I want the printer to be on when I restart the raspberry pi. So I also added this to the config. (See more details on the events part of the config here (http://docs.octoprint.org/en/master/events/index.html)
events:
enabled: true
subscriptions:
- command:
- printer_on.sh
- light_off.sh
event: Startup
type: system
- command: light_on.sh
event: PrintStarted
type: system
- command: light_off.sh
event: PrintFailed
type: system
- command: light_off.sh
event: PrintCancelled
type: system
- command: light_off.sh
event: PrintDone
type: system
What this does (if you can't tell by reading it) is that when octopi starts (Startup) it will turn on the printer, and off the lights. When a print starts (PrintStarted) it will turn on the lights. When a print fails, is cancelled, or finished correctly, it will turn off the light. I probably could have used the CaptureStart and CaptureDone events, because that's really more of what I need, but this is working.
I went ahead and tested all of that using just the relay board before I connected up the printer or light. Just trying to make fewer really big mistakes here.
Wiring the Relay Board
I have a PiTFT screen, which is supposed to run OctoPiPanel. I haven't gotten that to work yet, but it does leave me with a challenge to wire up the relay. I don't have access to the general GPIO pins, because there is a screen on there. The screen covers the regular pins, but also provides them on another connector on the right side of the screen. For the relay board, I just soldered directly to the back of that connector. I only needed 4 wires, and they are as follows:
Pi Pin
Relay Pin
5V
Vcc
Gnd
Gnd
23
IN1
18
IN2
Connecting Printer Power
The power supply from Wanhao is noisy, and annoying. I would have preferred to control low voltage DC signals, but I want that power supply off too. So I chose to control the 120VAC that powers the power supply. The power going to the power supply comes from the connector, goes through the switch on the back, and then goes to the power supply and is attached with a screw. I took a picture of which wire I disconnected from the power supply, but be careful, yours might be different.
I ran that cable out to the relay board, and I ran another cable back into the control box to that spot on the power supply. I just ran the cables next to the fan, but I should print a new back, with a hole in it for these cables.
I wired the relay so that if the relay board loses power for some reason, then the printer will be shut off (Normally Open). Now that I think about it, I don't really like it that way, maybe I'll reverse it later.
Connecting LED Light
I have an LED light that illuminates the desk that the printer is on. I opened it up, and there's clearly a 120VAC cable coming in, and a power supply to convert the power to DC, likely a lot lower voltage, like 12, or 24V. I decided to put the relay on this lower DC line, instead. So I cut that cable, soldered in a 2 conductor wire, and ran both to the NO part of the second relay.
Part Links
This is the relay board I used:http://www.sainsmart.com/4-channel-5v-relay-module-for-pic-arm-avr-dsp-arduino-msp430-ttl-logic.html
This is the cover I used:http://www.thingiverse.com/thing:957292
Update to work with PushBullet plugin
I use the Push Bullet plugin, and it sends me a photo at the end of every print. Unfortunately, it was taking the snapshot right after the lights went off :). So I modified the lights_off script like this, so that it will wait 5 seconds before turning off the lights, and wouldn't block the octopi running the job:
light_off.sh
#!/bin/bash
gpio export 18 out
(sleep 5 && gpio -g write 18 1)&
I first changed this:
gpio -g write 18 1
into this:
sleep 5
gpio -g write 18 1
And that worked fine, but someone told me that would be making octoprint stall for 5 seconds while it was doing that sleep (I don't believe them, but it was a very reputable source).
So I changed that to this:
(sleep 5 && gpio -g write 18 1)&
"sleep 5" waits five seconds. "&&" means that the first command has to complete with success, and then the second command will be called, so "sleep 5 && command" will wait five seconds, and call "command".
Putting that thing in parenthesis, and adding a "&" at the end means the whole thing will get run in the background, so that octoprint can keep on doing whatever it was doing before calling that script, wihtout waiting for the sleep or the command to finish.
Similar models
thingiverse
free
PI CUBE ( octoprint) by madjack911
...r supply 5v 4a (pi4 / temp regulation / fan 40mm / esp8826 / led argb fan 120mm
12v 15a external led power supply
screw m3 and m4
thingiverse
free

Power Raspberry Pi from PSU & power printer on/off from OctoPrint by Roowan
...des and 2 screw holes.
links to components used (amazon):xt60 y splitter24v to usb 5v step down module5v one channel relay module
thingiverse
free

120mm PSU fan shroud w/ relay mount by orcusomega
...int
3) turn off lights
(i also use an ecobee plug, so i can add the "turn off printer" at the end if i want to as well)
thingiverse
free

AiO Ender 3 Octoprint Set Up with Power and Light Remote Control by giacomo30196
...t to support me, head to https://www.paypal.com/paypalme/giacomocavasin every bit helps me to make more things for you.thank you!
thingiverse
free

Relay Case for two single Relay Units (to be used with Octopi) by Dumbozo
...s using these (e.g. creality ender).
the lid has ventilation gaps in the form of octopi.
if you have any questions, let me know.
thingiverse
free

Anet A8 Power Supply Cover incl. fused C-14 power socket, 2 channel Relais and RS-15-5 5v Power supply by caesar_1111
...)
as always i included the freecad model.
caesar
ps: be careful when clipping in the rs-15-5 since the clips as somehow fragile.
thingiverse
free

Artillery Genius - Raspberry & 2 Relay Box - Octoprint by talud08
...octopi includes.
raspberry is holded in its own case.
it is a remix from a 2 realy box: https://www.thingiverse.com/thing:1621813
thingiverse
free
OrangePi and 2-channel relay case by Amd64bits
...an and zer0flag to create my octoprint case using an octopi zero h2 and a 2 channel relay to power on the printer and the lights.
thingiverse
free

Universal Power switch with Octoprint/Raspberry Pi (and for K8200/3Drag 24V heatbed upgrade) by eytec
...h wires.
the switch on the backside can select the mode:
"permanent on" / "off" / "raspi controll".
thingiverse
free

Guide: Alexa Octoprint Integration & Coaster
...t hub (node-fauxmo)https://github.com/lspiehler/node-fauxmo#readme
notes
feedback and input on improving this write-up welcome.
Jeffeb3
thingiverse
free

MPCNC Stand by Jeffeb3
...ch?v=m_xjd_aylyw
works great. looks great. really quite sturdy. it would be a little stronger if you added a shelf on the bottom.
thingiverse
free

DW611 Base to Plotter by Jeffeb3
...l for plotting on a cnc machine.
based on the work of barry99705, but i can't remember where his design ended and this began.
thingiverse
free
Belt Clamp GT2 by Jeffeb3
...e before and after. the part is the clear plastic in the belt.
update, added belt_clamp_2_small to try to fit into smaller spaces
thingiverse
free

LED holes on simple Naze32 cover. by Jeffeb3
...hole for the leds. i don't like the letters either (makes it hard to stick things to the top). i removed the letters as well.
thingiverse
free
5 way Tactile Switch Cover by Jeffeb3
...9;s supposed to be at 45 degrees from square), so i also made the thumbstick_wrong_direction.stl, which has the arrows off by 45.
thingiverse
free

Stocking Holder for Mantle by Jeffeb3
..., and change it a few times in the print (maybe like green on the outside, and red on the inside? that would look good, i think).
thingiverse
free

Fossil Q stand rotated by Jeffeb3
...ey for probably many slicers.
werewolf_fr, feel free to suck in this stl file into your design, and i'll delete this version.
thingiverse
free

Short Peon 230 by Jeffeb3
...sily to this smaller panel.
thanks tech2c for a fun design. i have printed and broken several of these while improving my flying.
thingiverse
free

E3D V6 Fan Duct with 40mm Part Fan by Jeffeb3
...ve one fan. i haven't tested it's performance, but it fits, and it's blowing air in the part's general direction.
thingiverse
free
LCD Hinge Longer (for Skyzone SKY-700D) by Jeffeb3
...e screw holes on the back don't do anything, but the screw hole on the bottom holds a 1/4" bolt and it's very solid.
Octoprint
thingiverse
free

Octoprint Case + Relais by bennylu
...octoprint case + relais by bennylu
thingiverse
octoprint case+ doppel relais
thingiverse
free
Octoprint Control-Panel by sanisam
...von: https://plugins.octoprint.org/plugins/display_panel/?utm_medium=announcements&utm_source=octoprint&utm_content=1.5.2
thingiverse
free

Octoprint Controller by CandlerCustoms
...control. it's super handy.
check out my post about it here: http://www.candlercustoms.com/3d-printed-octoprint-controller/
thingiverse
free

Octoprint Raspberry Pi Logo by ProtomakerSprint
...octoprint raspberry pi logo by protomakersprint
thingiverse
octoprint raspberry pi logo
thingiverse
free

Octoprint plugin - DisplayLayerProgress
...o the plug inhttps://github.com/ollisgit/octoprint-displaylayerprogresshttps://github.com/ollisgit/octoprint-displaylayerprogress
thingiverse
free

OctoPrint Wifi Display by Nori0aw
...it on character lcd screen (20x4).
boards:
esp8266
lcd screen (20x4)
source code: https://github.com/nori0aw/octoprintwifidisplay
thingiverse
free

Octoprint Logo Molle by oiitsame
...octoprint logo molle by oiitsame
thingiverse
thingiverse
free

OctoPrint Statue by KingRahl
...ng octoprint free and available for anyone to use.
a special thanks to janina himmen (@zwergimbikini on twitter) for the design.
thingiverse
free
Case Octoprint (for Raspberry, DC/DC converter and Relay) In file list "Octoprint" is correct! by Genna1986
...ot; is correct! by genna1986
thingiverse
case for raspberry, relay board and dc/dc converter... all you need to use octoprint...
thingiverse
free
Octoprint Ultimaker holder by klenk
...my simple design for attaching my octoprint server to my ultimaker.
raspberry case used: http://www.thingiverse.com/thing:1015706
Wanhao
thingiverse
free

Wanhao Logo Plate / Wanhao Logo Schild by JMDesigns
...wanhao logo plate / wanhao logo schild by jmdesigns
thingiverse
wanhao logo plate / wanhao logo schild
thingiverse
free
Wanhao logo by nebtio
...wanhao logo by nebtio
thingiverse
wanhao logo
thingiverse
free

Wanhao keychain by Rein3003
...wanhao keychain by rein3003
thingiverse
a keychain with the logo of wanhao
thingiverse
free
Wanhao Di3 v2 Light / Wanhao Di3 v2 Beleuchtung by JMDesigns
...wanhao di3 v2 light / wanhao di3 v2 beleuchtung by jmdesigns
thingiverse
wanhao di3 v2 light / wanhao di3 v2 beleuchtung
thingiverse
free
TUSH For Wanhao by wtmi1992
...tush for wanhao by wtmi1992
thingiverse
the ultimate spool holder, modified for the top of the wanhao control box. fits snug.
thingiverse
free
fanduct wanhao d12 by theopoilmek
...fanduct wanhao d12 by theopoilmek
thingiverse
fanduct pour wanhao d12
thingiverse
free

Wanhao i3 Marlin by johan21
...wanhao i3 marlin by johan21
thingiverse
marlin for wanhao i3 rampsboard 1.4.
thingiverse
free

Wanhao Duplicator i3 by imagineering4
...wanhao duplicator i3 by imagineering4
thingiverse
these are the stl files for the improvements to the wanhao duplicator i3, v2
thingiverse
free

Wanhao D6 filament guard
...wanhao d6 filament guard
thingiverse
this is a filament guard for wanhao d6 machine to avoid the filament unrolling
thingiverse
free

Wanhao Duplicator i3 Model by Hilde3D
...wanhao duplicator i3 model by hilde3d
thingiverse
wanhao duplicator i3 model
Relay
turbosquid
$50

Relay Spaceship
... model relay spaceship for download as skp, 3ds, dae, and obj on turbosquid: 3d models for games, architecture, videos. (1655800)
3ddd
$1

Scavolini / Grand Relais
...scavolini / grand relais
3ddd
scavolini
scavolini модель grand relais дизайн gianni pareschi
3ddd
$1

Сантехника Globo Relais
... унитаз , зеркало
сантехника globo relais
умывальник,зеркало,унитаз.
3d_export
$8
relay automatic assembly line
...relay automatic assembly line
3dexport
relay automatic assembly line
3ddd
free

Унитаз и биде Relais
... биде , унитаз
унитаз art.re001 bi и биде art.re009 bi
turbosquid
free

Relay 8 pin
... available on turbo squid, the world's leading provider of digital 3d models for visualization, films, television, and games.
cg_studio
$110

Power relay station3d model
...el
cgstudio
.3ds .fbx .max .obj - power relay station 3d model, royalty free license available, instant download after purchase.
3ddd
$1

Стол обеденный -Scavolini- Grand Relais
...s
3ddd
обеденный , scavolini
обеденный стол scavolini - grand relais, в трёх расцветках.
3d_export
$10

relay jd1912 12v 40a with connector
...lowing bodies: 1. relay jd1912 12v 40a - 1 piece; 2. connector housing - 1 piece; 3. terminal with a part of the wire - 4 pieces.
3ddd
free

Globo Relais furnitures
... , раковина
раковина с консолью st070.ne
зеркалоsp070.bi
стакан re0381x
мыльница re0391x
I3
3d_export
$10

suv i3
...suv i3
3dexport
suv i3 2013 series
3d_ocean
$89

BMW i3 2012
...y, in real units of measurement, qualitatively and maximally close to the original. model formats: - *.max (3ds max 2008 scanl...
cg_studio
$99

BMW i3 20143d model
...
cgstudio
.3ds .c4d .fbx .lwo .max .obj - bmw i3 2014 3d model, royalty free license available, instant download after purchase.
cg_studio
$99

BMW i3 20123d model
...tudio
.3ds .c4d .fbx .lwo .max .mb .obj - bmw i3 2012 3d model, royalty free license available, instant download after purchase.
cg_studio
$99

BMW i3 20143d model
...tudio
.3ds .c4d .fbx .lwo .max .mb .obj - bmw i3 2014 3d model, royalty free license available, instant download after purchase.
humster3d
$75

3D model of BMW i3 2014
...
buy a detailed 3d model of bmw i3 2014 in various file formats. all our 3d models were created maximally close to the original.
humster3d
$40

3D model of Kitchen Set I3
...uy a detailed 3d model of kitchen set i3 in various file formats. all our 3d models were created maximally close to the original.
3d_ocean
$30

Kitchen set i3
...ensils oven plates shelves sink table ware
kitchen set i3 include 3d models: cooker, oven, sink, cupboards, table, chair, plates.
3d_ocean
$89

BMW i3 2014
...y, in real units of measurement, qualitatively and maximally close to the original. model formats: - *.max (3ds max 2008 scanl...
cg_studio
$99

BMW i3 Concept 20113d model
...i3
.3ds .c4d .fbx .lwo .max .obj - bmw i3 concept 2011 3d model, royalty free license available, instant download after purchase.
Control
3d_ocean
$4
Controller TQFP32
...qfp32
3docean
chip controller cpu electronic gpu mcu micro controller silicon smd tqfp wafer
a micro controller in tqfp32 package
3d_ocean
$4
Controller TQFP44
...44
3docean
chip controller cpu electronic gpu mcu micro controller package smd tqfp tqfp44
a micro controller in a tqfp44 package
3d_export
$15
control unit
...control unit
3dexport
control unit
3ddd
$1
Yacht control
...yacht control
3ddd
yacht control
3d_export
$5
controle pgdm
...controle pgdm
3dexport
carcaca controle pgdm
turbosquid
free

controler
... available on turbo squid, the world's leading provider of digital 3d models for visualization, films, television, and games.
3ddd
$1

Control
...
http://www.schmitz-leuchten.de/html-ru/einzelleuchten-lampentyp-details.php?lamptype_no=700&group;=917&id;=731
3d_ocean
$4
Controller TQFP100
...100
3docean
chip computer cpu electronic gpu mcu micro controller pin platine silicon wafer
a micro controller in tqfp100 package
3d_ocean
$4
Controller TQFP64
...qfp64
3docean
chip computer cpu gpu mcu micro controller package silicon tqfp tqfp64 wafer
a micro controller in a tqfp64 package
3d_ocean
$7

Remote controller
... control switcher tv remote
remote controller for tv, sound systems etc easy to edit textures photo real rendered with mental ray