Thingiverse
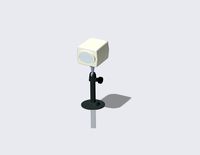
PiSec Cam MKII by stmorgan
by Thingiverse
Last crawled date: 3 years ago
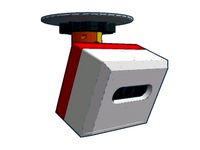
NOTICE: This model has been superceded by the PiSec MKIII. Printed out the Body, CamMount, PiPlate, and Cradle. All fit together fine with slight filing to account for elephant's foot, but this is as far as I got before it just seemed on the large side for what I wanted. Will leave files up, but be warned the mounts and the trim ring have not been tested.
Edit for Clarification:
► "PiPlate", "CamMount", and "Cradle" are used for all versions.
► "TrimRing" fits all versions, camera can be built without it. Sized to fit a 3mm thick piece of acrylic between itself and "CamMount"
► 2x "PiPlateClip" hold the Raspberry Pi onto "PiPlate".
► The plain "Body" file has no cable hole nor mounting lug.
► The "Body_Cat6" file has a 6.5mm hole for network cable, as well as a mounting lug that fits "Mount" and "Mount B."
► "MountB" will require either "MountB_ArmHigh" or "MountB_ArmLow"
► "Joint" works with "Mount" and "MountB"
► "MountC" requires all parts labeled "MountC" including the body that's specific to this mount, which also includes the 6.5mm network cable hole. "MountC" does not need "Joint."
► "MountD" is a ceiling mount, requires all parts labeled "MountD" Works with "MountC_Body"
► "MountC_Body_Sealed" is the same as "MountC_Body" except it has a hole in the back to accept a watertight gland and a small O-ring groove on the front.
► "TrimRing_Sealed" is the trim ring used with "MountC_Body_Sealed" to make a waterproof version of the camera. 1x 65mm x 2mm, 1x 100mm x 2mm, 4x 5mm x 1mm O-rings needed. (OD x thickness) Remember the 3mm acrylic is important if using this design, too thin or too thick won't allow a seal. 1/8" should also work.
► "CamMount-Fixed" has had the outer diameter reduced to 100mm, and two cutouts made top and bottom so it can be gripped for removal from the outer case. The clip slots have also been deepened by another 0.2mm so the PiPlate connection is more reasonable.
Original:
This one should be a much better design than the previous model. As of yet the body will need a mounting lug added, or holes for an articulating type mount to screw onto the back. Made sure the walls were all 2mm thick this time. The faceplate will most likely need support but it should be easy to remove if printed face down. The body may or may not need support depending on how well your printer does overhangs. It shouldn't need any support inside, just to the buildplate on the chamfer.
This should fit a Pi3 and a Waveshare IR camera. Mine is the Makerfocus model from Amazon, but it appears to be the same camera. There should be room beneath the Pi plate for a small active POE to MicroUSB adapter.
Changes/Additions:
3-08: Added a trim ring to pretty up the front. Should allow a 3mm gap between the cam mounting plate and itself to hold a piece of acrylic. I'll have to make a light dam to slip around the lens to keep out the IR glare but should be no big deal. Alternatively you could just trim 3mm off the front of the case in Tinkercad (Import the body STL) to use without the acrylic.
3-08: Added Body with mounting lug, joint, and mount for 4" round electrical box.
Body will need supports to build plate, mounting plate and joint will probably do best with supports everywhere. Screw holes in the mount should be sized for #6 Sheetmetal screws. The camera body should be sized for M3 or maybe #4-40 machine screws. The "Cat6" body and mount files have 6.5mm holes for network cable to pass through.
3-08: Fixed PiPlate, there was a separation in the plate.
3-08: Printed out the CamMount and the PiPlate. Camera fits fine, PiPlate snaps on as intended, though it's pretty snug. Shouldn't have to worry about it coming off.
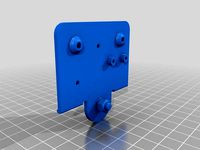
3-09: Added "MountB" files. (The yellow one in the pics.) I like this one better, it's a two piece mount, the arm can be printed laying flat on the build plate, will be much stronger than the original mount due to the print grain running along it instead of across it. And it looks better. Should just clip together and a 3mm screw can be inserted to lock it in place.
3-09: Fixed MountB ArmLow, mistakenly thought the plate was 4mm thick where the clips slid on, it's only 3mm, adjusted clips accordingly. Added MountB ArmHigh, is the red arm in pic.
3-09: Added cradle to hold POE adapter.
3-09: Printed out cradle. Fits fine with 4x 3mm screws and nuts. Two zip ties secures it fine. I printed with supports on all overhangs over 45*, had to shimmy a putty knife in between support and flat section, pop it a bit on the rounded part of the joint to get it free. Could get away with less support I'm sure, depending on how well your machine prints overhangs, I didn't want to risk a bad print just to see. Now that I think about it, the cradle would do fine printed vertically with no supports needed, and be stronger around the arch too. Would need a brim though.
3-10: Added "UP ↑" indicator to CamMount, Body_Cat6, and PiPlate to make it a little more obvious these parts don't fit together symmetrically. Found a weird surface anomaly on the MountB STL. Looks like a TinkerCad hiccup from a trim box overhanging. It's been fixed and reupped. Not sure if it would even show up in a print since it was shallow.
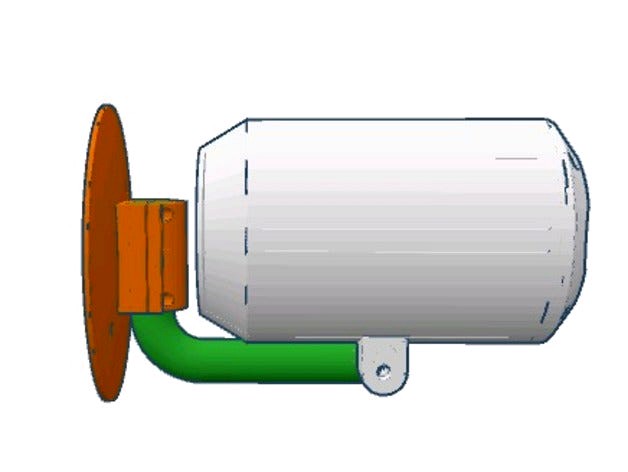
3-10: Added MountC (Green arm in pics). My favorite so far. The round mounting arm will require supports, and probably some cleanup to make the finish consistent, but it's a nice looking, versatile mount I think. The mounting arm should accept a 3mmID x 5mmOD hot set insert on each side. The mount itself just accepts 3mm screws directly into the plastic. I don't think hot sets are necessary here as the load is spread across 4 screws and the step helps hold it. This one will require the MountC body as the offsets and construction are different.
3-10: Added MountD ceiling mount. Works with MountC_Body, which is held upside down. I recommend printing the MountD arm laying down, it would probably be best to not have the load trying to pull the arm apart at the layer lines.
3-10: Added MountC Body Sealed and TrimRing Sealed. Needs a watertight gland in the back "PG7 gland" from Amazon with 0.49" threads should fit. 1x 100mm x 2mm O-ring fits around the step in the TrimRing, 1x 65mm x 2mm O-ring should press into the groove around the arpeture, and 4x 5mm x 1mm should fit under the screw heads. Of course these should be made of ASA for UV resistance if outdoors.
3-11: Added CamMount-Fixed. Should ease disassembly of camera.
3-12: Added TrimRing-Fixed, TrimRing_Sealed-Fixed. Shrunk diameter of shoulder to 100.5mm to ease assembly/disassembly.
Edit for Clarification:
► "PiPlate", "CamMount", and "Cradle" are used for all versions.
► "TrimRing" fits all versions, camera can be built without it. Sized to fit a 3mm thick piece of acrylic between itself and "CamMount"
► 2x "PiPlateClip" hold the Raspberry Pi onto "PiPlate".
► The plain "Body" file has no cable hole nor mounting lug.
► The "Body_Cat6" file has a 6.5mm hole for network cable, as well as a mounting lug that fits "Mount" and "Mount B."
► "MountB" will require either "MountB_ArmHigh" or "MountB_ArmLow"
► "Joint" works with "Mount" and "MountB"
► "MountC" requires all parts labeled "MountC" including the body that's specific to this mount, which also includes the 6.5mm network cable hole. "MountC" does not need "Joint."
► "MountD" is a ceiling mount, requires all parts labeled "MountD" Works with "MountC_Body"
► "MountC_Body_Sealed" is the same as "MountC_Body" except it has a hole in the back to accept a watertight gland and a small O-ring groove on the front.
► "TrimRing_Sealed" is the trim ring used with "MountC_Body_Sealed" to make a waterproof version of the camera. 1x 65mm x 2mm, 1x 100mm x 2mm, 4x 5mm x 1mm O-rings needed. (OD x thickness) Remember the 3mm acrylic is important if using this design, too thin or too thick won't allow a seal. 1/8" should also work.
► "CamMount-Fixed" has had the outer diameter reduced to 100mm, and two cutouts made top and bottom so it can be gripped for removal from the outer case. The clip slots have also been deepened by another 0.2mm so the PiPlate connection is more reasonable.
Original:
This one should be a much better design than the previous model. As of yet the body will need a mounting lug added, or holes for an articulating type mount to screw onto the back. Made sure the walls were all 2mm thick this time. The faceplate will most likely need support but it should be easy to remove if printed face down. The body may or may not need support depending on how well your printer does overhangs. It shouldn't need any support inside, just to the buildplate on the chamfer.
This should fit a Pi3 and a Waveshare IR camera. Mine is the Makerfocus model from Amazon, but it appears to be the same camera. There should be room beneath the Pi plate for a small active POE to MicroUSB adapter.
Changes/Additions:
3-08: Added a trim ring to pretty up the front. Should allow a 3mm gap between the cam mounting plate and itself to hold a piece of acrylic. I'll have to make a light dam to slip around the lens to keep out the IR glare but should be no big deal. Alternatively you could just trim 3mm off the front of the case in Tinkercad (Import the body STL) to use without the acrylic.
3-08: Added Body with mounting lug, joint, and mount for 4" round electrical box.
Body will need supports to build plate, mounting plate and joint will probably do best with supports everywhere. Screw holes in the mount should be sized for #6 Sheetmetal screws. The camera body should be sized for M3 or maybe #4-40 machine screws. The "Cat6" body and mount files have 6.5mm holes for network cable to pass through.
3-08: Fixed PiPlate, there was a separation in the plate.
3-08: Printed out the CamMount and the PiPlate. Camera fits fine, PiPlate snaps on as intended, though it's pretty snug. Shouldn't have to worry about it coming off.
3-09: Added "MountB" files. (The yellow one in the pics.) I like this one better, it's a two piece mount, the arm can be printed laying flat on the build plate, will be much stronger than the original mount due to the print grain running along it instead of across it. And it looks better. Should just clip together and a 3mm screw can be inserted to lock it in place.
3-09: Fixed MountB ArmLow, mistakenly thought the plate was 4mm thick where the clips slid on, it's only 3mm, adjusted clips accordingly. Added MountB ArmHigh, is the red arm in pic.
3-09: Added cradle to hold POE adapter.
3-09: Printed out cradle. Fits fine with 4x 3mm screws and nuts. Two zip ties secures it fine. I printed with supports on all overhangs over 45*, had to shimmy a putty knife in between support and flat section, pop it a bit on the rounded part of the joint to get it free. Could get away with less support I'm sure, depending on how well your machine prints overhangs, I didn't want to risk a bad print just to see. Now that I think about it, the cradle would do fine printed vertically with no supports needed, and be stronger around the arch too. Would need a brim though.
3-10: Added "UP ↑" indicator to CamMount, Body_Cat6, and PiPlate to make it a little more obvious these parts don't fit together symmetrically. Found a weird surface anomaly on the MountB STL. Looks like a TinkerCad hiccup from a trim box overhanging. It's been fixed and reupped. Not sure if it would even show up in a print since it was shallow.
3-10: Added MountC (Green arm in pics). My favorite so far. The round mounting arm will require supports, and probably some cleanup to make the finish consistent, but it's a nice looking, versatile mount I think. The mounting arm should accept a 3mmID x 5mmOD hot set insert on each side. The mount itself just accepts 3mm screws directly into the plastic. I don't think hot sets are necessary here as the load is spread across 4 screws and the step helps hold it. This one will require the MountC body as the offsets and construction are different.
3-10: Added MountD ceiling mount. Works with MountC_Body, which is held upside down. I recommend printing the MountD arm laying down, it would probably be best to not have the load trying to pull the arm apart at the layer lines.
3-10: Added MountC Body Sealed and TrimRing Sealed. Needs a watertight gland in the back "PG7 gland" from Amazon with 0.49" threads should fit. 1x 100mm x 2mm O-ring fits around the step in the TrimRing, 1x 65mm x 2mm O-ring should press into the groove around the arpeture, and 4x 5mm x 1mm should fit under the screw heads. Of course these should be made of ASA for UV resistance if outdoors.
3-11: Added CamMount-Fixed. Should ease disassembly of camera.
3-12: Added TrimRing-Fixed, TrimRing_Sealed-Fixed. Shrunk diameter of shoulder to 100.5mm to ease assembly/disassembly.
Similar models
thingiverse
free

Antenna V mount for ZMR250 by faisalshah
...ther version which fits better. i added a 0.3mm clearance on all sides in contact with the frame. no sanding should be necessary.
thingiverse
free

Anderson PowerPole panel mount for "D" type 19" rack panel holes
...looks a bit ugly since i just combined the rack plate mesh with dhg864's connector mount. but it slices and prints just fine.
thingiverse
free
Guitar Wall Mount - Fender Squier Telecaster by ismaan
...from backing against the wall.
i printed with 2mm walls and 20% infill and it feels very sturdy. no supports or rafts are needed.
thingiverse
free

Raspbery Pi 4 CASE (M3 mount + 40x40 Fan) by apomavi
...no top or bottom layers to leave infill visible. fan is designed to be a friction fit in the lid so no fixings / glue are needed.
thingiverse
free

Toolless PiPlate for RPi 2 or 3 by stmorgan
...ing on their side though, so the layer lines run in the unstressed axis. they're oriented correctly for printing in the stls.
thingiverse
free
3/8" quick release plate for benro tripod
...ew hole. metal 3/8" screw should to be used. printed screw not sturdy enough to hold any camera with 3/8" mount thread.
thingiverse
free

Da Vinci 1.0 Pro cable chain mounts by Jgam5095
...i used a 10x10mm chain here but the connector was tricky to fit through and care needed to be taken to prevent damage to harness.
thingiverse
free

Vageeswari Tripod Adapter by robertbieber
...es to fit in a socket wrench. get them snug, but don't overtighten as you don't want to pull the threaded inserts loose.
thingiverse
free
xyz pro bed plate and spring tensioners by Jgam5095
... on the black support arm.
avoid pla, a differnt verson i had installed distorted after printing materials at higher tempratures!
thingiverse
free

Omniadrop Mount CR10SPro by Nusel
...s petg would do fine, too.
i added the step file, so feel free to customize as needed.
happy printing with this awesome extruder!
Stmorgan
thingiverse
free
Garden hose to 1/4NPT adapter by stmorgan
...garden hose to 1/4npt adapter by stmorgan
thingiverse
need to back flush the block on the tractor. this should do it.
thingiverse
free

Honda Keychain Solid Back by stmorgan
...chain solid back by stmorgan
thingiverse
wanted a bit sturdier keychain so i filled in the hollow version with a 2mm thick back.
thingiverse
free

Flat top cap for desiccant box by stmorgan
...a slick lid to make everything easier to print by flipping it over and having it flat on the glass, so i chopped the letters off.
thingiverse
free

Big Black Bowden Bulkhead by stmorgan
...nt to print the regular nuts with a raft. i ran into problems with the overhang where it began building threads close to the bed.
thingiverse
free

Height Micrometer by stmorgan
...001"? just move one notch, loosen bit and lightly push it up from the underside until it contacts micrometer. retighten jig.
thingiverse
free

Blade disposal box for Stanley single edge razors by stmorgan
... stanley single edge razors by stmorgan
thingiverse
just a little box to keep your dull blades from poking out of the trash bag.
thingiverse
free
E3DNonVolcanoMount-enlarged nut pockets by stmorgan
...this and the 3mm nuts slip in much easier. i've however since swapped to a microswiss because i didn't like losing the y.
thingiverse
free
CR-10 Carriage minus wheels - TinkerCAD friendly by stmorgan
...ke this more tinkercad friendly. just slabbed them off. threads and standoffs are still there, x and z dimensions still the same.
thingiverse
free

CR-10 Pen holder by stmorgan
...ear the reduced diameter where the cap snaps on and trimmed the outside edge so it doesn't hang over the original x carriage.
thingiverse
free

Pi Camera mount by stmorgan
...al old pla, print the top standing vertically with supports, resist the urge to lay it flat, the hooks will break at layer lines.
Mkii
turbosquid
$30

PUMA MKII
... available on turbo squid, the world's leading provider of digital 3d models for visualization, films, television, and games.
turbosquid
$20

SPITFIRE MKII
... available on turbo squid, the world's leading provider of digital 3d models for visualization, films, television, and games.
turbosquid
$15

Sten mkII
... available on turbo squid, the world's leading provider of digital 3d models for visualization, films, television, and games.
turbosquid
$15
STEN MKII
... available on turbo squid, the world's leading provider of digital 3d models for visualization, films, television, and games.
3d_export
$35

STEN MKII 3D Model
...sten mkii 3d model
3dexport
submachine gun weapon sten mk mkii army war british
sten mkii 3d model bolksw 65264 3dexport
turbosquid
$125
Gloster Gladiator MKII
... available on turbo squid, the world's leading provider of digital 3d models for visualization, films, television, and games.
turbosquid
$35

Grenade MkII (Mk2)
... available on turbo squid, the world's leading provider of digital 3d models for visualization, films, television, and games.
turbosquid
$15

Goblin MKII Raider
... available on turbo squid, the world's leading provider of digital 3d models for visualization, films, television, and games.
3d_export
$140

FX Impact-MkII PCP
...fx impact-mkii pcp
3dexport
full model
3d_export
$18
Sten MkII SMG 3D Model
...n rifle sniper machine gatling gun pistol handgun weapon game ready gameready
sten mkii smg 3d model martialartist 24128 3dexport
Cam
archibase_planet
free

Cam
...cam
archibase planet
tv camera equipment
cam dolly - 3d model (*.gsm+*.3ds) for interior 3d visualization.
3d_export
$8

Cam and Follower
...ry to linear (reciprocating) motion. as the cam rotates, the follower rises and falls in a process known as reciprocating motion.
3d_ocean
$15
Studio Cam
...p. made in 3ds max 2013 1- 3dsmax with vray render included material and light 2- obj file 3- fbx file hope you like it please...
3d_export
$37

thermal cam
...thermal cam
3dexport
turbosquid
$19
Security cam
...oyalty free 3d model security cam for download as ige and obj on turbosquid: 3d models for games, architecture, videos. (1331128)
turbosquid
$40

Security Cam
...y free 3d model security cam for download as ma, fbx, and obj on turbosquid: 3d models for games, architecture, videos. (1601103)
3d_export
$40

security cam
...security cam
3dexport
home security camera
turbosquid
$280

cam-bot
... available on turbo squid, the world's leading provider of digital 3d models for visualization, films, television, and games.
turbosquid
$33

AT_minivan_(CAM)
... available on turbo squid, the world's leading provider of digital 3d models for visualization, films, television, and games.
turbosquid
$10

video cam
... available on turbo squid, the world's leading provider of digital 3d models for visualization, films, television, and games.