Thingiverse
OctoLapse camera holder with NeoPixel light by lynspm
by Thingiverse
Last crawled date: 3 years, 1 month ago
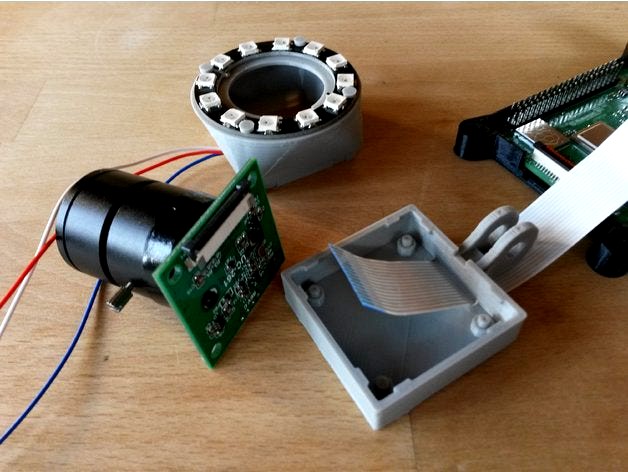
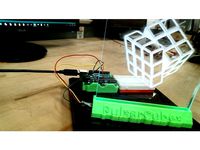
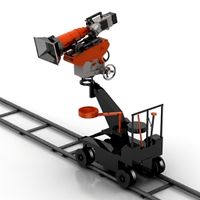
This is a holder for a RasPi camera equipped with a lens such as this or this. While fully compatible to the standard RasPi camera, the dimensions of the board are different and, due to the lens, it is also considerably heavier. This is the main reason why I dropped the original idea of simply adapting NERDVille's OctoPrint - FULLY Adjustable Camera + Light Rig because this would require the heavy camera to be moved with the print bead. Instead, I decided to install the camera at a fixed position and use OctoLapse to stabilize the timelapse.
NERDVille's OctoPrint - FULLY Adjustable Camera + Light Rig still remained the main source of inspiration. Thank you @NERDVille! However, except for one part (the camera rotational head), I redesigned all parts on my own (using OpenSCAD).
The camera is available with two different lenses: one with 4mm focus and one with 6mm focus. I tried both. They have slighly different dimensions, hence two variants of the case.
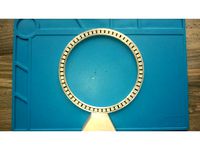
The neopixel ring is one with 12 LEDs. Use four pins to mount it. You might need to redrill the holes in the case top to 2mm.
Case top and bottom snap together. No glue required.
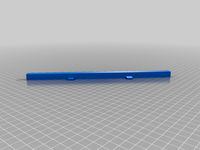
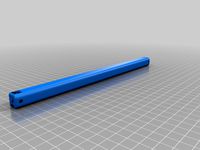
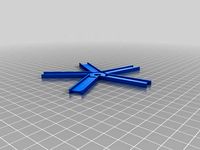
The arm is inspied by the Anet Raspi Camera Mount by SkyRunner and may or may not be useful for other printer models. As the design is modular, you can always combine with other attachments. I redesigned the arm to have a much lower height to accomodate for the additional mounting elements required (on the photo, you still see the longer original part). connect.stl is used to connect the camera rotational head to the arm.
The camera rotational head part is taken from @NERDVille. After taking the photo, I mirrored this part so the screw heads are now accessible from the right side and the nuts are on the left. I used one M5x20 and one M5x15 screw.
NERDVille's OctoPrint - FULLY Adjustable Camera + Light Rig still remained the main source of inspiration. Thank you @NERDVille! However, except for one part (the camera rotational head), I redesigned all parts on my own (using OpenSCAD).
The camera is available with two different lenses: one with 4mm focus and one with 6mm focus. I tried both. They have slighly different dimensions, hence two variants of the case.
The neopixel ring is one with 12 LEDs. Use four pins to mount it. You might need to redrill the holes in the case top to 2mm.
Case top and bottom snap together. No glue required.
The arm is inspied by the Anet Raspi Camera Mount by SkyRunner and may or may not be useful for other printer models. As the design is modular, you can always combine with other attachments. I redesigned the arm to have a much lower height to accomodate for the additional mounting elements required (on the photo, you still see the longer original part). connect.stl is used to connect the camera rotational head to the arm.
The camera rotational head part is taken from @NERDVille. After taking the photo, I mirrored this part so the screw heads are now accessible from the right side and the nuts are on the left. I used one M5x20 and one M5x15 screw.
Similar models
thingiverse
free

Geeetech Adaptor for NERDVille OctoPrint FULLY Adjustable Camera + Light Rig by darrenjrobinson
...rig to the front of a geeetech i3 pro c.
waiting on a longer raspberry pi camera cable so i can mount the raspberry pi elsewhere.
thingiverse
free

Prusa MK2 Raspi Cam Case and Bed Mount by Phredie
...sed:
raspi camera: https://goo.gl/g8ruzr
raspi ribbon cable: https://goo.gl/tororw
compatable fisheye lens: https://goo.gl/lkrjcl
thingiverse
free

Ender 3 Pi Camera Mount (Tall!) by wigguno
...tely (each have different camera controls!) rotating the module 180° is sufficient, or flipping both horizontally and vertically.
thingiverse
free

Camera Cover for Raspberry Pi Camera V2.1 / NERDVille OctoPrint by poloniusDergath
...changed the mesh in blender for it to fit. also strengthened the top claw of the cover to prevent it from breaking when mounting.
grabcad
free

Microsoft lifecam hd-6000 lens adjuster and a lens surround the perfect size to make mounts for the camera innards
...ogize for the mess of files i cannot remember which ones were the perfect fit so i have uploaded all of them here for you to try.
thingiverse
free

Raspberry Pi High Quality Camera Microscope Mount by windchine
... dressing during assembly for smooth but snug operation of dovetail slide.
fully parametric design in openscad easy to customise.
cg_trader
$3

RP0W OctoPrint All-in-One Mount for Creality Ender 3 | 3D
... with built-in camera and led light. minimal wiring.
requires m3 screws to connect the mount arms and the pi to the swivel plate.
thingiverse
free

Prusa I3 MK3 Raspberry Pi Camera Mount by lab27
...ting the cameras lens left or right.
let me know if you have any improvements to the design.
please post photos if you make this!
thingiverse
free

PI camera case simple mount by TimothyK
...e mounting it in the case.
in the future i will add additional parts to mount the case on an adjustable arm to the printer frame.
thingiverse
free

Raspberry Pi Camera Module Adapter for Micro Four Thirds Mount. by kmori2017
...e pibow case, you can use 2nd stl "raspberry-pi-camera-module-m43-w-pibow.stl" to attach raspberry pi onto this module.
Lynspm
thingiverse
free

Whetstone holder by lynspm
...eed
2pc 6 mm threaded rod (length around 25cm each, may be cut from 1m piece)
2 cover nuts 6 mm
2 wing nuts 6 mm
4 washers 6.4 mm
thingiverse
free

Slimline Dell Laptop Dock Spacer by lynspm
...mm - fits more snugly to the chamfered edge of the docking station and matches the height of the original dell part
covered holes
thingiverse
free

Fully customizable vaccine vial holder by lynspm
...
if you use it, consider donating to https://www.aerzte-ohne-grenzen.de/ or the corresponding local organization of your country.
thingiverse
free

Parametric universal spool holder with variable number of cutouts by lynspm
... bearing prints more precisely in this orientation. therefore i reduced the extra diameter for the bearing from +0.6mm to +0.4mm.
thingiverse
free

Recycled CD lamp by lynspm
... release (2015.03) as this version does not support the angle argument in rotate_extrude(). you will need a development snapshot.
thingiverse
free
Universal Spool Holder for M8 Threaded Rods and 608 Bearings by datdiy
...number of cutouts as seen in the design by lynspm changed the shape of the cutouts to an elliptic...
Octolapse
thingiverse
free

Flexible right angle webcam mount for Octolapse
...e right angle webcam mount for octolapse
thingiverse
needed a right angle mount for my webcam so designed this one in tinkercad.
thingiverse
free

Octolapse Yubi holder lithophane QR cover by Juntendo
...e qr cover with octolapse switch mount.https://www.thingiverse.com/thing:4890776
no support required
infill - 100%
print time-1hr
thingiverse
free

Webcam Mount (Remix) for TeachingTech's "Flexible webcam mount for Octolapse" by DougJoseph
..., rising up to look across).
https://youtu.be/zztq6avcha4
https://youtu.be/qq_slqb5dls
note: all amazon urls are affiliate links.
thingiverse
free

Ender 3 Panning Octolapse system by Linear_Chaos
...he slack. you want all the slack out of the string.
the camera used is hxsj s70 so just remix the camera mount however you need.
thingiverse
free

Ender 3 Webcam Mount by Koolsami7
...webcam on my ender 3 pro to use with octolapse ...
thingiverse
free

Canon BR-E1 Remote Mount for Ender 3 by NachoRoto
...wirelsss remote. once mounted you don’t even need the octolapse software or an octopi. simply use the time-lapse settings...
thingiverse
free

Eryone Thinker S Logitech C920 Camera Mount
...thingiverse wanted a way to mount the webcam for octolapse and did not see anything for the thinker s...
thingiverse
free
3D Printer Control Box by buildcomics
...3d printing control box providing: external psu on/off for octolapse smoke detector failsafe off manual reset & off/off for...
thingiverse
free
Pi Case Upper solid gpio and 16pin cutout by Jason_55904
...i am also using a night vision camera with octoprint-octolapse so i added a cutout for the 16 pin...
Neopixel
thingiverse
free

NeoPixel Mount
...neopixel mount
thingiverse
geeetech a10m neopixel mount
thingiverse
free
neopixel clock by arradan
...neopixel clock by arradan
thingiverse
this is frame for neopixel clock with 60 led neopixel ring.
thingiverse
free
neopixel cover
...neopixel cover
thingiverse
a basic cover made for neopixel's using clear pla filament
thingiverse
free
Neopixel Cover
...neopixel cover
thingiverse
neopixel cover i made for a knight rider light bar build made in freecad.
thingiverse
free
Joseph Neopixel by ShimmyJ
...joseph neopixel by shimmyj
thingiverse
neopixel shifts colors
thingiverse
free
3DX Neopixel Project
...3dx neopixel project
thingiverse
a design for a neopixel based off of arduino.
thingiverse
free

Neopixel Triplet by reed
...neopixel triplet by reed
thingiverse
holds three single pieces of a neopixel ribbon.
thingiverse
free

3dx neopixel by 21smithe
...3dx neopixel by 21smithe
thingiverse
print, then glue neopixels to the print. plug in the code and go
thingiverse
free
NeoPixel Star by fvan84
...neopixel star by fvan84
thingiverse
a star shape piece to fit 5 neopixel sticks
thingiverse
free

Funny Neopixel glasses
...funny neopixel glasses
thingiverse
tested with arduino uno and adafruit neopixel library :-) d=50mm
Camera
archibase_planet
free
Camera
...base planet
camera surveillance camera video camera
camera surveillance n090211 - 3d model (*.3ds) for interior 3d visualization.
archibase_planet
free
Camera
...hibase planet
camera security camera video camera
camera security n210515 - 3d model (*.gsm+*.3ds) for exterior 3d visualization.
archibase_planet
free
Camera
...se planet
camera web camera webcam
camera butterfly usb pc camera n090713 - 3d model (*.gsm+*.3ds) for interior 3d visualization.
archibase_planet
free
Camera
...mera
archibase planet
surveillance camera video camera camcorder
camera n011211 - 3d model (*.3ds) for exterior 3d visualization.
archibase_planet
free
Camera
...camera
archibase planet
camera digital camera
camera canon digital n041211 - 3d model (*.3ds) for interior 3d visualization.
archibase_planet
free
Camera
...camera
archibase planet
camera film camera phototechnique
camera n100214 - 3d model (*.gsm+*.3ds) for interior 3d visualization.
archibase_planet
free

Camera
...amera
archibase planet
camera video camera camcorder
camera video n070315 - 3d model (*.gsm+*.3ds) for interior 3d visualization.
archibase_planet
free
Camera
...rchibase planet
camera video camera camcorder
camera studio n101213 - 3d model (*.gsm+*.3ds+*.max) for interior 3d visualization.
archibase_planet
free
Camera
...ibase planet
digital camera camera phototechnique
camera canon ixus 400 n310311 - 3d model (*.3ds) for interior 3d visualization.
archibase_planet
free
Camera
...ase planet
photocamera video camera camera
camera sony t300 black n291010 - 3d model (*.gsm+*.3ds) for interior 3d visualization.
Holder
archibase_planet
free

Holder
...holder
archibase planet
holder toilet paper holder
holder paper n070712 - 3d model (*.gsm+*.3ds) for interior 3d visualization.
archibase_planet
free

Holder
...e planet
holder rack toilet paper holder
holder toilet roll n240715 - 3d model (*.gsm+*.3ds+*.max) for interior 3d visualization.
archibase_planet
free

Holder
...holder
archibase planet
pen holder support prop
pen holder - 3d model for interior 3d visualization.
archibase_planet
free

Holder
...holder
archibase planet
pole post holder
сhurch cross pole holder - 3d model for interior 3d visualization.
archibase_planet
free

Holder
...holder
archibase planet
holder bathroom ware
shower holder - 3d model (*.gsm+*.3ds) for interior 3d visualization.
archibase_planet
free

Holder
...oilet paper holder
holder paper devon&devon; time black n241113 - 3d model (*.gsm+*.3ds+*.max) for interior 3d visualization.
archibase_planet
free

Holder
...holder
archibase planet
holder hanger hanger for towel
holder 7 - 3d model (*.gsm+*.3ds) for interior 3d visualization.
archibase_planet
free

Holder
...holder
archibase planet
holder hanger hanger for towel
holder 3 - 3d model (*.gsm+*.3ds) for interior 3d visualization.
archibase_planet
free

Holder
...holder
archibase planet
holder towel rack towel-horse
holder - 3d model (*.gsm+*.3ds) for interior 3d visualization.
archibase_planet
free

Holder
...lder
archibase planet
holder hanger hanger for towel
holder towel n250912 - 3d model (*.gsm+*.3ds) for interior 3d visualization.
Light
archibase_planet
free

Light
...light
archibase planet
lamp lighting light
light - s2 - 3d model for interior 3d visualization.
archibase_planet
free

Light
...light
archibase planet
light luminaire lighting
light l0465 - 3d model (*.gsm+*.3ds) for interior 3d visualization.
3d_export
$5

lighting
...lighting
3dexport
lighting
3d_export
$5

lighting
...lighting
3dexport
lighting in livingroom
turbosquid
$3

Lighting Tree with Lights
...d model lighting tree with lights for download as max and 3ds on turbosquid: 3d models for games, architecture, videos. (1585507)
archibase_planet
free

Light
...light
archibase planet
luster lighting solution
light - s - 3d model for interior 3d visualization.
archibase_planet
free

Light
...light
archibase planet
luster lamp lighting
light 1 - 3d model for interior 3d visualization.
archibase_planet
free

Lights
...lights
archibase planet
surgical lights surgical lamp
surgical lights (floor) - 3d model for interior 3d visualization.
archibase_planet
free

Light
...light
archibase planet
lighting luminaire candlelight
light l0463 - 3d model (*.gsm+*.3ds) for interior 3d visualization.
3d_export
$18

street light-lighting-light-xia bing
...
3dexport
street light-lighting-light-xia bing<br>max 2015 v-ray 3 max 2015<br>textures<br>all files in zip...