Thingiverse
MPSM V2 Improved Extruder (WK9) by wileykyoto
by Thingiverse
Last crawled date: 3 years ago
WK9 Extruder
MPSM V2 Extruder Replacement.
Wiley Kyoto
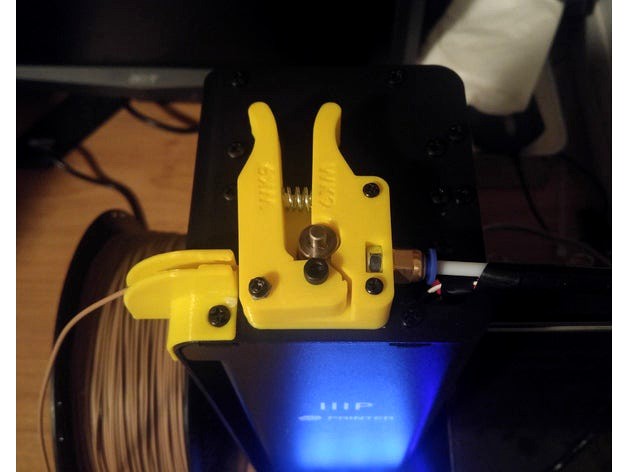
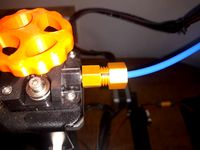
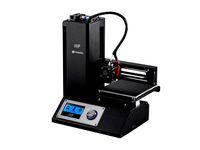
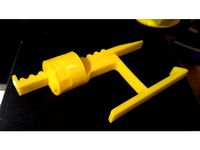
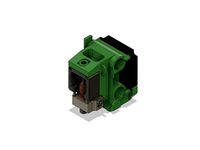
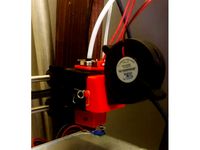
This is an upgraded extruder meant to work with the MPSM V2 stock hardware (mid 2017 - Current). The only exception for parts are the Bowden tube fitting and bearing screw. Part of the reason to upgrade is that the stock Bowden tube fitting isn't a standard part, so when it breaks you'll need an alternative. Also The stock extruder arm is prone to breaking where it holds the bearing in place. This extruder is meant to work with a PC4-M6 Bowden Tube Fitting and an M6 nut, to replace the weird stock fitting. Optionally you can use a bowden fitting with the extruder arm (see WK9_Extruder_Arm_Bowden.stl for this option), if you have a Bowden tube running to a dry box. This extruder is also meant to work with a 10mm long M4 screw, to hold the bearing in place. You can pick up a PC4-M6 fitting online easily and you should be able to find an M6 nut and M4 Screw at your local hardware store. The M4 screw could also be a #8 x 3/8" imperial machine screw.
Stock parts:
M3 Stepper Mounting Screws
Arm Bushing
Spring
Bearing (4x11x4)
Feeder Gear
Needed parts:
PC4-M6 Pneumatic Straight Fitting, for 4mm OD tubing. (x2 if you use WK9_Extruder_Arm_Bowden)
M6x1.0 Nut (x2 if you use WK9_Extruder_Arm_Bowden)
M4 Screw, 10mm long. (or #8 x 3/8" Imperial Machine Screw)
Notes:
I printed this with PLA (Hatchbox - Pantone Yellow C), 0.175 Layer Height, 1.05mm wall thickness (3 shells), 20% infill, no supports, no raft.
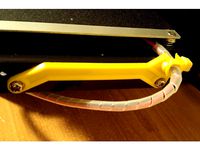
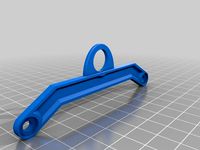
If you just want to print a replacement Arm, the only extra part you'll need is an M4 screw 10mm long.
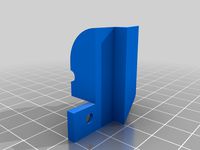
The Extruder Cap (which holds the bearing in place) comes in 4 different tolerances, I
recommend using whichever fits in the tightest, as it helps properly support the bearing. I used the .00mm tolerance version, and it snapped securely in place. You'll want to flip this part over in your slicer (top down)
The Extruder base has a 4mm hole leading up to the slot that takes the M6 nut. This is meant so you can put a small length of PTFE tubing (<20mm), cut with a V shaped point (when looking from above), so that it nestles in between the drive gear and bearing (without touching). This helps guide the filament through the extruder and will allow you to print flexible filaments like TPU.
The Motor Spacer is only if your motor sticks out through the hole in the chassis too much.(Can be an issue on some MP Mini Deltas) Adjust the verticale scale in you slicer to make it only as thick as you need. The part is 2mm thick, so if your motor is sticking out 1mm, set the z scale to 50%. Warning, this may affect the allignment of the extruder gear with the bearing and filament path. You may need to slide the extruder gear farther in or out accordingly.
Acknowledgements:
Shout out to robin7331 and his MPSM Extruder Baseplate V1 for the idea to make a slot for a nut to work with a PC4-M6 fitting.
MPSM V2 Extruder Replacement.
Wiley Kyoto
This is an upgraded extruder meant to work with the MPSM V2 stock hardware (mid 2017 - Current). The only exception for parts are the Bowden tube fitting and bearing screw. Part of the reason to upgrade is that the stock Bowden tube fitting isn't a standard part, so when it breaks you'll need an alternative. Also The stock extruder arm is prone to breaking where it holds the bearing in place. This extruder is meant to work with a PC4-M6 Bowden Tube Fitting and an M6 nut, to replace the weird stock fitting. Optionally you can use a bowden fitting with the extruder arm (see WK9_Extruder_Arm_Bowden.stl for this option), if you have a Bowden tube running to a dry box. This extruder is also meant to work with a 10mm long M4 screw, to hold the bearing in place. You can pick up a PC4-M6 fitting online easily and you should be able to find an M6 nut and M4 Screw at your local hardware store. The M4 screw could also be a #8 x 3/8" imperial machine screw.
Stock parts:
M3 Stepper Mounting Screws
Arm Bushing
Spring
Bearing (4x11x4)
Feeder Gear
Needed parts:
PC4-M6 Pneumatic Straight Fitting, for 4mm OD tubing. (x2 if you use WK9_Extruder_Arm_Bowden)
M6x1.0 Nut (x2 if you use WK9_Extruder_Arm_Bowden)
M4 Screw, 10mm long. (or #8 x 3/8" Imperial Machine Screw)
Notes:
I printed this with PLA (Hatchbox - Pantone Yellow C), 0.175 Layer Height, 1.05mm wall thickness (3 shells), 20% infill, no supports, no raft.
If you just want to print a replacement Arm, the only extra part you'll need is an M4 screw 10mm long.
The Extruder Cap (which holds the bearing in place) comes in 4 different tolerances, I
recommend using whichever fits in the tightest, as it helps properly support the bearing. I used the .00mm tolerance version, and it snapped securely in place. You'll want to flip this part over in your slicer (top down)
The Extruder base has a 4mm hole leading up to the slot that takes the M6 nut. This is meant so you can put a small length of PTFE tubing (<20mm), cut with a V shaped point (when looking from above), so that it nestles in between the drive gear and bearing (without touching). This helps guide the filament through the extruder and will allow you to print flexible filaments like TPU.
The Motor Spacer is only if your motor sticks out through the hole in the chassis too much.(Can be an issue on some MP Mini Deltas) Adjust the verticale scale in you slicer to make it only as thick as you need. The part is 2mm thick, so if your motor is sticking out 1mm, set the z scale to 50%. Warning, this may affect the allignment of the extruder gear with the bearing and filament path. You may need to slide the extruder gear farther in or out accordingly.
Acknowledgements:
Shout out to robin7331 and his MPSM Extruder Baseplate V1 for the idea to make a slot for a nut to work with a PC4-M6 fitting.
Similar models
thingiverse
free

MPSM V2 Extruder (Outdated See Decription) by wileykyoto
...s:
shout out to robin7331 and his mpsm extruder baseplate v1 for the idea to make a slot for a nut to work with a pc4-m6 fitting.
thingiverse
free

M4 Nut Bowden Coupling PC4-M6, PC4-M10 by IgorGratch
...to the m4 nut and securely held there.
for m6 fitting, a hollow m6 bolt must be used (for example, part of the e3dv6 heatbreak).
thingiverse
free

E3D Titan Bowden PC4-M6 Fitting Adapter by antonveretenenko
...s a thread built-in, so you have to adjust xy size compensation in slicer if you can not screw pc4-m6 in (or you can use m6 tap).
thingiverse
free

Super Simple Bowden Extruder V2 by _AlexY
...aring
nema 17 stepper
4x m3x8mm screws
m3x30mm screw
extruder spring
m3 locknut
2x m5x8mm screws + 2x t-nuts for mounting to 2020
thingiverse
free

MPSM bowden tube stress relief
...s on my mpsm pro but should fit a v1 v2 or any after market extruders including the wk9 https://www.thingiverse.com/thing:2756509
thingiverse
free

PC4-M6 adapter for m4 extruder by lessananon1
...apter born out of laziness.
lets you use a more commonly source pc4-m6 in place of the bmg style fitting for a voron m4 extruder.
thingiverse
free
Tapered thread bowden coupling PC4-M6 PC4-M10
...de the printed part where the pc4-m6 or pc4-m10 goes. inside the fitting and i made the stripes that hold the bowden tube firmer.
thingiverse
free

MPSM V2 - Extruder Base with PTFE Tube Support by Feeop042
...arm.
screwing the ptfe tube connector into the m6 nut requires a little pushing to get it started. works best with a 10mm wrench.
thingiverse
free

3Dator Bowden Extruder REMIXED (MK8 GEAR) base mod by MarqKole
...to create a base that takes a pc4-m6 fitting. this captive nut design is also used in the extruders of the velleman vertex k8400.
thingiverse
free

HE3D K200 Extruder bushing / filament guide by beikeland
... ended up having to cut the funnel again with a scalpel to get a good fit, but if the part doesn't help, maybe the idea does.
Wk9
thingiverse
free

Extruder base with filament filter by Scanjo
...filament filter by scanjo thingiverse this is the improved wk9 extruder base by wileykyoto. i mated it up with...
thingiverse
free
monoprice select mini V2 bowden tube stabilizer
...upgraded the bowden extruder with mpsm v2 improved extruder (wk9 by wileykyoto and it works great as well as...
thingiverse
free
MPSM bowden tube stress relief
...v1 v2 or any after market extruders including the wk9 ...
thingiverse
free

Ric's Monoprice Select Mini Buildup by rkolibar
...m200_zbracketface wk9 extruder base and arm1 a. wk9_extruder_arm b. wk9extruder_base c. bowden tube holder (amazon) spinner a. extruder_shaft_spinner_knob switch...
thingiverse
free
MPSM V2 Extruder (Outdated See Decription) by wileykyoto
...extruder replacement. this is outdated, please use the improved wk9 extruder this is an upgraded extruder meant to work...
Wileykyoto
thingiverse
free

Snowflake Ornaments by wileykyoto
...s here:christmas bauble ornamentsfractal tree ornaments
i hope you enjoy making these for your loved ones.
merry xmas
wiley kyoto
thingiverse
free
MPSM Wire Brace by wileykyoto
...ll do just fine.
update 2017-12-14
added a version with the wire brace centered.
added a version with the wire brace on the left.
thingiverse
free
Extruder base with filament filter by Scanjo
...can either print the rest of the parts from wileykyoto#39;s thing, or modify a metal arm as i...
thingiverse
free
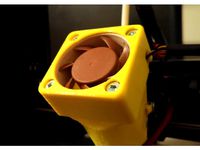
40mm Fan Cover (20mm and 10mm Height) by wileykyoto
...lls. i printed it with a layer height of 0.175mm. i also recommend printing this upside down, so you don't need any supports.
thingiverse
free
MPSM Bed Leveling Utility by wileykyoto
...he beginning. ex "g1 f4800 z1;" sets the feed rate to 4800mm/min before issuing the first move command.
happy printing!
thingiverse
free
Monoprice Select Mini Wire Brace by bradyhuutch
...your makes! the original designs can be found below. wileykyoto https://www.thingiverse.com/thing:2710870 janbbeck:...
thingiverse
free
MPSM V2 Extruder (Outdated See Decription) by wileykyoto
...s:
shout out to robin7331 and his mpsm extruder baseplate v1 for the idea to make a slot for a nut to work with a pc4-m6 fitting.
thingiverse
free
MPSM Fully Adjustable Z Spacer (MP Select Mini) by wileykyoto
...t some point (around 0.7mm on my printer) the limit switch will slip off the end of the spacer and effectively act as 0mm offset.
thingiverse
free
monoprice select mini V2 bowden tube stabilizer
...bowden extruder with mpsm v2 improved extruder (wk9) by wileykyoto and it works great as well as adding capricorn...
Mpsm
thingiverse
free
MPSM Mosquito 2GT
... mosquito 2gt
thingiverse
my adaptation of the mosquito to the mpsm.
printed in petg
1/12/20 added 4010 blower mounting and duct
thingiverse
free
MPSM E3D mount by tekhertz
...mpsm e3d mount by tekhertz
thingiverse
just another e3d mount, fits into original carriage on mpsm v1
thingiverse
free

Best MPSM Post Caitlin by Dr_Joel
...best mpsm post caitlin by dr_joel
thingiverse
for most charming post on the facebook mpsm group.
thingiverse
free

Santa and Sleigh Spinner for MPSM by itsonlym3
...santa and sleigh spinner for mpsm by itsonlym3
thingiverse
topper/spinner for the mpsm and just in time for christmas. ;-)
thingiverse
free

MPSM Vent and single fan by Quadfather818
...and single fan by quadfather818
thingiverse
moved fan from back of mpsm-v2 for heat bed rewire and added to passive cooling vent
thingiverse
free
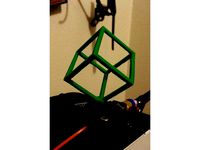
Cube Spinner MPSM by oxamo
...cube spinner mpsm by oxamo
thingiverse
a spinner for the extruder wheel.
thingiverse
free

MPSM Bowden Clip by Rico_3D
...mpsm bowden clip by rico_3d
thingiverse
for hot end and extruder
thingiverse
free
MPSM Bed Rewiring Parts
...mpsm bed rewiring parts
thingiverse
3d printer parts.
thingiverse
free

Gyro Spinner For MPSM by itsonlym3
...gyro spinner for mpsm by itsonlym3
thingiverse
topper/spinner for your extruder.https://youtu.be/swbjup3tcym
thingiverse
free
MPSM Blower - no part duct by jbkuma
...sm that fits stock carriage. no part cooler. i use a separate $9 clip fan for part cooling that is dead silent and works great.
V2
3d_export
free

Lamp v2
...lamp v2
3dexport
lamp v2 with solar panel
3d_export
$5

hammerhead v2
...hammerhead v2
3dexport
razer hammerhead v2 headphones, modeled in cinema 4d, render in corona
3d_export
$5

manometer v2
...manometer v2
3dexport
3d_export
$5

potato v2
...potato v2
3dexport
turbosquid
$52

Lifebuoys v2
...squid
royalty free 3d model lifebuoys v2 for download as fbx on turbosquid: 3d models for games, architecture, videos. (1560870)
turbosquid
$2

Mask v2
...turbosquid
royalty free 3d model mask v2 for download as stl on turbosquid: 3d models for games, architecture, videos. (1527741)
turbosquid
free

Flashlight V2
...d
free 3d model flashlight v2 for download as , obj, and fbx on turbosquid: 3d models for games, architecture, videos. (1663559)
turbosquid
$29

Thanos v2
...
royalty free 3d model thanos v2 for download as ztl and obj on turbosquid: 3d models for games, architecture, videos. (1651077)
turbosquid
$29

Titan v2
...d
royalty free 3d model titan v2 for download as ztl and obj on turbosquid: 3d models for games, architecture, videos. (1540228)
turbosquid
$29

Frieza v2
...
royalty free 3d model frieza v2 for download as ztl and obj on turbosquid: 3d models for games, architecture, videos. (1701238)
Extruder
3ddd
$1

Extruded Chair
...extruded chair
3ddd
extruded , tom dixon
inspired by tom dixon extruded chair
turbosquid
$15

Extruded Table
... extruded table for download as blend, dae, fbx, obj, and stl on turbosquid: 3d models for games, architecture, videos. (1634137)
turbosquid
$2

3D Printer Extruder
...d
royalty free 3d model 3d printer extruder for download as on turbosquid: 3d models for games, architecture, videos. (1537359)
turbosquid
$1

Zombie extruded text
...oyalty free 3d model zombie extruded text for download as obj on turbosquid: 3d models for games, architecture, videos. (1322198)
turbosquid
$4

Extruder conical screw
...el extruder conical screw for download as sldpr, ige, and stl on turbosquid: 3d models for games, architecture, videos. (1524433)
turbosquid
$50

3d PRINTER - Extruder
... available on turbo squid, the world's leading provider of digital 3d models for visualization, films, television, and games.
turbosquid
$15

Extruded Table 2
...xtruded table 2 for download as blend, dae, fbx, obj, and stl on turbosquid: 3d models for games, architecture, videos. (1621846)
turbosquid
$10

Maya Extrude Tool
... available on turbo squid, the world's leading provider of digital 3d models for visualization, films, television, and games.
3d_export
$5

world earth extrude map
...world earth extrude map
3dexport
3ddd
$1

Simply Elegant Extruded Tree Coffee Table Design
...ble by link studios. the silhouette of a tree is visible at one angle, extruded from the surface to create the support structure.
Improved
cg_studio
$49

Robot Z300 (improved version)3d model
...o
.3ds .fbx .max .obj - robot z300 (improved version) 3d model, royalty free license available, instant download after purchase.
3d_export
$39

Robot Z300 improved version 3D Model
...fantasy sci-fi robots bot humanoid droid sci fi materials character
robot z300 improved version 3d model alekrazum 55067 3dexport
3d_export
$75

CV-90 Improved
...nnon. export versions are fitted with hägglunds e-series turrets, armed with either a 30 mm mk44 or a 35 mm bushmaster autocannon
turbosquid
$55

(Important textures coming back soon after improvements)Cuboid gazebo bench area
... available on turbo squid, the world's leading provider of digital 3d models for visualization, films, television, and games.
3d_export
$15

COMPLETE AUDI 80-100 SHIFT LEVER REPAIR KIT WITH IMPROVED BUSHING
...dexport
• sleeve - 1 pc. • elastic band - 1 pc. • hinge - 1 pc. audi 100c3 audi 100 c4 audi 80 b3 (checked) audi 80 b4 (checked)
3d_export
$7

REPAIR KIT FOR GEARSHIFT LEVER AUDI 80-100 IMPROVED
...ar of the gum is excluded. - rusk - 1 pc. - elastic band - 1 pc. audi 100c3 audi 100 c4 audi 80 b3 (checked) audi 80 b4 (checked)
3d_export
$30
cup mask machine front section stereo mask manufacturing machine improved version
...ing rack cad outsourcing list. the drawings are mature drawings that have been produced.<br>drawing version solidworks 2018
3d_export
free
oven - forno
...oven - forno
3dexport
gradually i'm trying to improve my 3d.
3d_export
$75

T-55
...nally, but these improvements made the tank more efficient and lethal. the t-55 was officially adopted by the soviet army in 1958
3d_export
$5

civil registration authorities
...civil registration authorities
3dexport
city wedding square. the model can be used for projects, to improve the project, etc.