Thingiverse
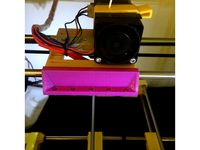
Light ring for webcam by mbrx
by Thingiverse
Last crawled date: 3 years, 1 month ago
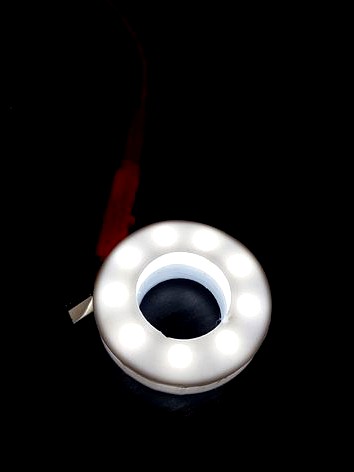
Light ring for mounting on webcameras
The main purpose of a light ring is give a smooth and well defined
illumination for the objects you are capturing. By having the light
come control from a circle around the camera you can make sure that no
visible shadows are cast (from the point of view of the camera).
What you need
To print:
front.stl
back.stl
diffuser.stl (white or semi-transparent plastic)
Consumables:
9 x 5mm LEDs (white)
Power-source: 25 - 30V, <0.1A
Tools:
Pliers
No soldering needed
How to use
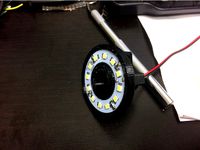
Start by printing the "front" part. Attach 9 x 5mm LED's (preferably
white) by sticking their legs in through the small holes, with the LED
facing the flat side of the ring. Make sure to place all the LED's in
the same direction, eg. let the anode (long leg) always be on the
clockwise side.
Pull out the two closest legs from two diodes on the side with opening
that don't have a diod just below it. Connect all the diods together loosly
by wrapping their legs together so they form a chain around the
light-ring.
(IMPORTANT) Make sure that only connect long-legs to short-legs, never
two legs of the same length to each other.
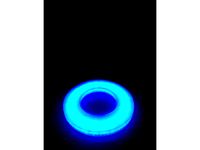
Try attaching the power source to the light ring. The positive voltage
(+) should go to the long leg that is sticking out and negative
voltage (-) to the short leg. Note that if you don't use white leds
then the total voltage should be lower.
If the ring is not lighted up right now you either have missed to
connect some of the legs or have connected some in the opposite
order. It could also be that you have a too weak powersource or that
you have burned up one of the LEDs.
Once the ring is shining ok you can tighten the connection between the
legs using the pliers. Cut away the part sticking out and push the
remainder down so it fits snugly.
Finally, attach the back-side that you printed by pushing it in when
aligned to the two holes, and then rotating 90 degrees. It should stay
attached, if not then you may need to push down some leg that is still
in the way.
The diffuser goes on-top of the LED's and is used to diffuse the light
so avoid sharp glares. Make sure you print it in a light coloured or
semi-transparent plastic. White PETG works well for me.
How to modify
You can change the parameters of the object by opening the file
light_ring.scad using the program "OpenSCAD" that can be downloaded
from the internet.
http://www.openscad.org/
Go to one of the lines containing the parameters:
inner_r = 30/2; //< Radius of hole for camera
outer_r = inner_r + 10; //< Outer radius of center part
pin_r = 1; //< Thickness of LED legs. Increase if holes are too small
pins = 9; //< Number of LEDs
Select which part to render at a time by commenting out all but one of
the parts:
/* Diffuser */
translate([0,0,-30])
diffuser();
/* Front */
front();
/* Back */
translate([0,0,30])
rotate(180,[1,0,0])
back();
Next, press F6 to render it and use "File > Export > Export STL" to
export your STL file.
The main purpose of a light ring is give a smooth and well defined
illumination for the objects you are capturing. By having the light
come control from a circle around the camera you can make sure that no
visible shadows are cast (from the point of view of the camera).
What you need
To print:
front.stl
back.stl
diffuser.stl (white or semi-transparent plastic)
Consumables:
9 x 5mm LEDs (white)
Power-source: 25 - 30V, <0.1A
Tools:
Pliers
No soldering needed
How to use
Start by printing the "front" part. Attach 9 x 5mm LED's (preferably
white) by sticking their legs in through the small holes, with the LED
facing the flat side of the ring. Make sure to place all the LED's in
the same direction, eg. let the anode (long leg) always be on the
clockwise side.
Pull out the two closest legs from two diodes on the side with opening
that don't have a diod just below it. Connect all the diods together loosly
by wrapping their legs together so they form a chain around the
light-ring.
(IMPORTANT) Make sure that only connect long-legs to short-legs, never
two legs of the same length to each other.
Try attaching the power source to the light ring. The positive voltage
(+) should go to the long leg that is sticking out and negative
voltage (-) to the short leg. Note that if you don't use white leds
then the total voltage should be lower.
If the ring is not lighted up right now you either have missed to
connect some of the legs or have connected some in the opposite
order. It could also be that you have a too weak powersource or that
you have burned up one of the LEDs.
Once the ring is shining ok you can tighten the connection between the
legs using the pliers. Cut away the part sticking out and push the
remainder down so it fits snugly.
Finally, attach the back-side that you printed by pushing it in when
aligned to the two holes, and then rotating 90 degrees. It should stay
attached, if not then you may need to push down some leg that is still
in the way.
The diffuser goes on-top of the LED's and is used to diffuse the light
so avoid sharp glares. Make sure you print it in a light coloured or
semi-transparent plastic. White PETG works well for me.
How to modify
You can change the parameters of the object by opening the file
light_ring.scad using the program "OpenSCAD" that can be downloaded
from the internet.
http://www.openscad.org/
Go to one of the lines containing the parameters:
inner_r = 30/2; //< Radius of hole for camera
outer_r = inner_r + 10; //< Outer radius of center part
pin_r = 1; //< Thickness of LED legs. Increase if holes are too small
pins = 9; //< Number of LEDs
Select which part to render at a time by commenting out all but one of
the parts:
/* Diffuser */
translate([0,0,-30])
diffuser();
/* Front */
front();
/* Back */
translate([0,0,30])
rotate(180,[1,0,0])
back();
Next, press F6 to render it and use "File > Export > Export STL" to
export your STL file.
Similar models
thingiverse
free

4xLED Lamp by alanmcruickshank
... push them in quite hard), and then bend and solder the legs together in series. attach the two remaining legs to the 12v supply.
thingiverse
free
Andonstar 2MP 40mm ring light adapter by yaddatrance
... the lid.
printing the lid: flip the lid so the flat side is down (fusion exports it in the orientation of the original assembly)
thingiverse
free

LED Light Threaded Insert for Globe Lithophane
...led push-light (specifics listed in materials needed), the other side to be attached to a cylindrical or globe-shaped lithophane.
thingiverse
free
Neopixel 24 LED ring light diffuser by GLefebvre19
...s diffused light.
there is a "thick" version with wider walls for a more diffused light.
it also makes a cool coaster!
thingiverse
free
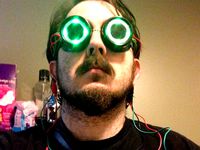
LED insert for steampunk goggles by KT421
...an go to a switch or to an arduino if you're a fancypants.
step 6 (not shown): glue some gears on it and call it steampunk.
cg_trader
$3

STRAP LOOP with PUSH PIN CONNECTION | 3D
.... the two parts snap together very easy and stay together unless you break the pin. i have printed and used this several times.
thingiverse
free
LED Lighting Mount by Aethelstan
...hope you enjoy this trivial thing that was more an exercise in modelling to specific dimensions rather than something i needed :)
thingiverse
free

Digital Clock
...inutes.
the software for the uno is "corrie_clock.tex". open with notepad, copy and past in arduino programmer.
enjoy.
thingiverse
free

Kingsman Knife Shoe by Finley_Redford
...lso seen in the movie).
this designed worked insane when i printed it and the knife was very sharp, good luck and happy printing.
thingiverse
free

Ender 3mm LED lights by wordex125
... supply. i've used 8 white diodes, so that they can utilize 24v. the hook is attached to a connector by m3 screw, up to 12mm.

Webcam
3d_export
$10

webcam
...webcam
3dexport
this is a webcam
archibase_planet
free
Webcam
...planet
webcam web camera camera
webcam camera a4tech pks-730g web n200613 - 3d model (*.gsm+*.3ds) for interior 3d visualization.
3d_ocean
$6
Webcam
...orted to 3ds, dae, obj and fbx there is the c4d file include with materials file this is a webcam microsoft lifecam vx-3000 model
turbosquid
$35

Webcam
... available on turbo squid, the world's leading provider of digital 3d models for visualization, films, television, and games.
turbosquid
$35

webcam
... available on turbo squid, the world's leading provider of digital 3d models for visualization, films, television, and games.
turbosquid
$20

webcam
... available on turbo squid, the world's leading provider of digital 3d models for visualization, films, television, and games.
turbosquid
$5

Webcam
... available on turbo squid, the world's leading provider of digital 3d models for visualization, films, television, and games.
turbosquid
$2

Webcam
... available on turbo squid, the world's leading provider of digital 3d models for visualization, films, television, and games.
turbosquid
free

Webcam
... available on turbo squid, the world's leading provider of digital 3d models for visualization, films, television, and games.
turbosquid
free

Webcam
... available on turbo squid, the world's leading provider of digital 3d models for visualization, films, television, and games.
Ring
3d_export
$5
ring
...ring
3dexport
ring
3d_export
free

ring
...ring
3dexport
ring
3d_export
free

ring
...ring
3dexport
ring
3d_export
free

ring
...ring
3dexport
ring
3d_export
$10
ring
...ring
3dexport
lord of the rings
3d_export
$5

ring
...ring
3dexport
golden ring
3d_export
free
ring
...ring
3dexport
cherub ring
3d_export
$10
ring
...ring
3dexport
3d ring model
3d_export
$5
ring
...ring
3dexport
ring 3d model
3d_export
$5

ring
...ring
3dexport
ring top black...
Light
archibase_planet
free

Light
...light
archibase planet
lamp lighting light
light - s2 - 3d model for interior 3d visualization.
archibase_planet
free

Light
...light
archibase planet
light luminaire lighting
light l0465 - 3d model (*.gsm+*.3ds) for interior 3d visualization.
3d_export
$5

lighting
...lighting
3dexport
lighting
3d_export
$5

lighting
...lighting
3dexport
lighting in livingroom
turbosquid
$3

Lighting Tree with Lights
...d model lighting tree with lights for download as max and 3ds on turbosquid: 3d models for games, architecture, videos. (1585507)
archibase_planet
free

Light
...light
archibase planet
luster lighting solution
light - s - 3d model for interior 3d visualization.
archibase_planet
free

Light
...light
archibase planet
luster lamp lighting
light 1 - 3d model for interior 3d visualization.
archibase_planet
free

Lights
...lights
archibase planet
surgical lights surgical lamp
surgical lights (floor) - 3d model for interior 3d visualization.
archibase_planet
free

Light
...light
archibase planet
lighting luminaire candlelight
light l0463 - 3d model (*.gsm+*.3ds) for interior 3d visualization.
3d_export
$18

street light-lighting-light-xia bing
...
3dexport
street light-lighting-light-xia bing<br>max 2015 v-ray 3 max 2015<br>textures<br>all files in zip...