Thingiverse

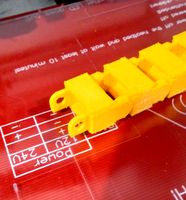
LED Strip Mount for FFCP Cable Tie Screws or Standalone by dewhisna
by Thingiverse
Last crawled date: 3 years, 1 month ago
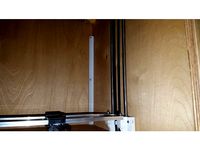
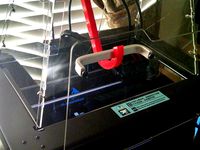
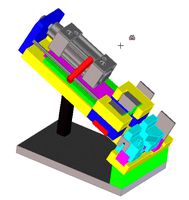
I wanted to add some white LED light strips to my FlashForge Creator Pro and wanted to attach them to the cable tie screws on the vertical supports and at an angle. I found several LED strip mounts online, but nothing quite like I was wanting, so I designed one in OpenSCAD and parameterized it for easy customization.
I am presently using two of these strips on my 2016 FFCP printer, one on each of the front vertical supports or corners. They can easily be mounted on the other two corners as well for even more light, but I figured this would be enough extra light and a good starting point.
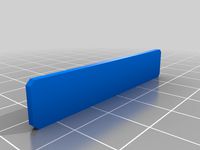
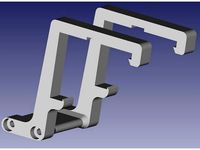
My final design that I used on my printer is rendered in the accompanying .STL files. These were designed to use the standard 30cm 15-LED White Light Strips with 3 LEDs cut off to fit the corners. The parameters for the strip width and spacing in the OpenSCAD file are for that configuration.
Note that these 15-LED strips are wired in groups of 3 LEDs and can be reduced in length by cutting them off in groups of 3. The original 300mm was too long to fit on the corners, but 12-LEDs or 244mm is about perfect.
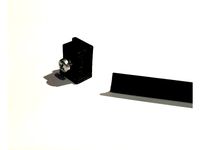
I also wanted them to be mounted at a 45-degree angle, but made that a configurable parameter too. They attach to the three cable tie screws on the vertical supports (or corners) of the printer with 3mm nuts. If you are attaching it to a vertical support that already has cable ties, use some 3mmx12mm or similar stand-offs to clear the cable ties.
I also designed it to be rendered either as a single piece or as a left/right half that can be joined together with glue and/or acetone (if using ABS). The FFCP can print these as a single piece, but just barely and only if you rotate it 60-degrees.
To change the part rendered, just edit the RenderType variable. 0=Full Part, 1=Left Half, and 2=Right Half. The RenderSplit variable determines where the split is to be made (presently at 60%). If changing that, be sure not to split on one of the mounting tongues or it won't work correctly.
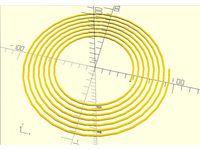
The cut shape when rendering as left/right halves is controlled by the RenderCutMag array and RenderCutCount variable, which must be the number of points in RenderCutMag, minus 1, as it represents the number of actual line segments for the cut.
Supports aren't needed unless you alter the angle to something that requires it. Just flip it over to print flat. And no raft is needed. I did print it at 100% infill to make the long thin mount a bit stronger. Though the infill setting makes little difference in amount of filament used.
This LED Strip Mount isn't limited to the FFCP nor to 3D printers at all. With a little customization, it can be used for mounting LED Strips on nearly anything.
I am presently using two of these strips on my 2016 FFCP printer, one on each of the front vertical supports or corners. They can easily be mounted on the other two corners as well for even more light, but I figured this would be enough extra light and a good starting point.
My final design that I used on my printer is rendered in the accompanying .STL files. These were designed to use the standard 30cm 15-LED White Light Strips with 3 LEDs cut off to fit the corners. The parameters for the strip width and spacing in the OpenSCAD file are for that configuration.
Note that these 15-LED strips are wired in groups of 3 LEDs and can be reduced in length by cutting them off in groups of 3. The original 300mm was too long to fit on the corners, but 12-LEDs or 244mm is about perfect.
I also wanted them to be mounted at a 45-degree angle, but made that a configurable parameter too. They attach to the three cable tie screws on the vertical supports (or corners) of the printer with 3mm nuts. If you are attaching it to a vertical support that already has cable ties, use some 3mmx12mm or similar stand-offs to clear the cable ties.
I also designed it to be rendered either as a single piece or as a left/right half that can be joined together with glue and/or acetone (if using ABS). The FFCP can print these as a single piece, but just barely and only if you rotate it 60-degrees.
To change the part rendered, just edit the RenderType variable. 0=Full Part, 1=Left Half, and 2=Right Half. The RenderSplit variable determines where the split is to be made (presently at 60%). If changing that, be sure not to split on one of the mounting tongues or it won't work correctly.
The cut shape when rendering as left/right halves is controlled by the RenderCutMag array and RenderCutCount variable, which must be the number of points in RenderCutMag, minus 1, as it represents the number of actual line segments for the cut.
Supports aren't needed unless you alter the angle to something that requires it. Just flip it over to print flat. And no raft is needed. I did print it at 100% infill to make the long thin mount a bit stronger. Though the infill setting makes little difference in amount of filament used.
This LED Strip Mount isn't limited to the FFCP nor to 3D printers at all. With a little customization, it can be used for mounting LED Strips on nearly anything.
Similar models
thingiverse
free

Led ramp for Anychubic Mega by Mapessional
...ou can choose whether to bring the cable from the right or left side.
i printed from pla.
please leave a comment or question.
bye
thingiverse
free
LED strip mounting plate
...ounting plate
thingiverse
for mounting led strips on the stack or the stand offs. with double-sided adhesive tape or cable ties.
thingiverse
free
Nylon Wire Tie Anchor Mount - For Cable Support by henryarnold
... you leave the nut out, you can drill a 3 mm hole through the wire tie and run the screw right through the wire tie to retain it.
thingiverse
free
Lithopane Light Box 100x100mm for 5050 SMD LED light strip by warr3ntor
... good cable management it fits.
5050 led tip: when set to white only - they get quite warm on full brightness, so dim them a bit.
thingiverse
free
Cablecover w. LED-Strip for 3D printer by Speedy_67
...tp://www.thingiverse.com/thing:1903237
update:
print laying facedown (led-side) with support for locking nose
prints much faster.
thingiverse
free

45 deg LED Mount by Agabatti
...tes the whole print area completely.
i used super glue to attach the 45 degree mount to the led strips and the lack table stands.
thingiverse
free

IKEA DIODER LED STRIPS - UM mounting kit 45° angle by amano
...can be mounted left or right because there a similar for myself i prefer to mirror them respectively simply...
thingiverse
free

Ikea Skydrag led strip mount for Ender 3 by hornerone
...straight to the psu if you strip the cable.
also added a slider that can slide over the sensor if you want to keep the light off.
thingiverse
free

Cable tie mount w/ Screw hole
...uded a version with a screw hole in the middle incase you want a better fixing.
the hole is suitable for a 3.5mm screw and under.
thingiverse
free

Sidewinder X1 Cable Chain Mount by ChewieTheBAMF
...h this cable chain:https://www.thingiverse.com/thing:3863626?fbclid=iwar3i_vtqpektwwenhxmgsi6oqoy0zdwwgqzfwvawzgokpqew2mvnvksjrhq
Dewhisna
thingiverse
free

K40 Laser calibration tool 2 by dewhisna
...i'm sharing it here in case anyone wants the openscad file to do further customizations without having to start from scratch.
thingiverse
free
Extended Archimedean Spiral Module by dewhisna
...pdate (9-18-2018) : changed the polygon start and end position by $fa so polygon always starts on the correct $fa angle boundary.
thingiverse
free

ArduCam Mount with Bracket by dewhisna
...ell, as is visible in the last picture below. use double-sided tape to hold the cable to the back of the printer out of the way.
thingiverse
free
OctoPi Sleeve Case for FFCP as Spool Holder Mount by dewhisna
...for additional details.
for camera mounts, this octopi case works well with this mount: https://www.thingiverse.com/thing:1763679
thingiverse
free

Power Supply (PSU) Bracket Customizations by dewhisna
...ows for the clip length to be easily altered via new 'extracliplength' variable. see the discussion in the comments tab.
thingiverse
free

The Anti-Gravitator Thru-Hole Version by dewhisna
...check yours with a volt meter before attaching the leads to the board, since reversing the power supply polarity could damage it.
thingiverse
free

TB6600/HY-DIV268N-5A Stepper Driver Case with 40mm Fan by dewhisna
... https://github.com/dewhisna/tb6600stepperdriver and boards can be ordered from https://www.oshpark.com/shared_projects/tkn4x7al.
thingiverse
free

FlashForge 2016 LCD/SDCard/Keypad Interface Board Redesign by dewhisna
...roughly six times out of every ten card insertions. i believe i can safely claim they have completely resolved my sdcard issues.
thingiverse
free

Arducam Hanger for Qidi Tech 1/FFCP by malakid
...length for the arducam 5 megapixels ov5647 camera. from dewhisna i borrowed the arducam casing which was also heavily...
Ffcp
thingiverse
free

FFCP Stepstick cooling tunnel by etet100
...ffcp stepstick cooling tunnel by etet100
thingiverse
ffcp (mightyboard) stepsticks cooling tunnel.
thingiverse
free

FFCP-Touchscreen-Mount
...touchscreen. information about my build can be found here:
https://fraggin-right-github.gitbook.io/ffcp-klipper-dwc-touchscreen/
thingiverse
free
FFCP GoPro Adapter by mianzel
...cp to record your prints, it was design on fusion 360 and can be use with the door open or close.it uses the two screws on front.
thingiverse
free

FFCP filament guide by grimblgrombl
...fcp filament guide. it's designed so that the tubes end in the middle of the "filament spool width". it works good.
thingiverse
free

FFCP DUCT by natewin
... screw hole to be a bit stronger as a 3d printed part.
if you've broken yours this should get you very close to the original.
thingiverse
free

FFCP GoPro compatible mount by kashhatton
... platform.
instead of a gopro, i use a logitech c525 webcam using the mount found here: https://www.thingiverse.com/thing:1554378
thingiverse
free
FFCP camera mount by sparlez
...ffcp camera mount by sparlez
thingiverse
another camera mount. hope it helps someone.
thingiverse
free
Door Holder Opener For FFCP by caseygr
...door holder opener for ffcp by caseygr
thingiverse
hold door open while heat hood is on
thingiverse
free

Rear Face of FFCP V1 top cover by gromo
...by gromo
thingiverse
hi
i draw this rear face of the top cover of my ffcp v1
i used a cnc to make it (online stl to dwg)
thierry
thingiverse
free

Ultra simple spool holder for FFCP (flashforge creator pro) by ben8p
...you to add a piece of pvc pipe and an m10 bold
see: http://www.instructables.com/id/spool-holder-for-flashforge-creator-pro-ffcp/
Standalone
turbosquid
$25

standalone-lamp2
... available on turbo squid, the world's leading provider of digital 3d models for visualization, films, television, and games.
evermotion
$250

V-Ray Standalone 3.0
...nly for the customers from european union.
if you don't have dongle key you must buy it (30 eur). evermotion 3d models shop.
turbosquid
$19
Casino Roulette Standalone Table
... available on turbo squid, the world's leading provider of digital 3d models for visualization, films, television, and games.
turbosquid
$10
Grenade Launcher Standalone M79
... available on turbo squid, the world's leading provider of digital 3d models for visualization, films, television, and games.
3ddd
$1
дверь межкомнатная
...с текстурой. материалы модели и рендер настроены в "octane standalone 1.5". в папке octan есть настроенная...
3d_ocean
$21

Realistic High-End Nespresso Model and Light Setup
.../ .obj the cinema 4d file is formed by standalone elements...
3d_ocean
$7
Realistic High-End Scope Model and Light Setup
.../ .obj the cinema 4d file is formed by standalone elements in...
3ddd
$1

Коттедж из бруса
...в octane. так же в архиве папка для octane standalone 2.03. присутствуют форматы obj и 3ds. есть папка с...
3d_export
$12
bertoia bird ottoman
...function to one of art, the is able to standalone in space. his only furniture line, the collection, has...
3d_ocean
$35
Elevator Lift 3D Model produced by OTIS
...transport. ready to render for: - maxwell render 2.0 standalone or higher - 3ds max 2008 + maxwell...
Tie
archibase_planet
free

Tie
...tie
archibase planet
cravat tie scarf
tie n240308 - 3d model (*.gsm+*.3ds) for interior 3d visualization.
design_connected
$13

Tie
...tie
designconnected
bonaldo tie computer generated 3d model. designed by lipparini, mauro.
3d_export
free

tie
...tie
3dexport
turbosquid
$5

tie
... available on turbo squid, the world's leading provider of digital 3d models for visualization, films, television, and games.
archive3d
free
Tie 3D Model
... model
archive3d
necktie tie cravat
tie - 3d model (*.gsm+*.3ds) for interior 3d visualization.
turbosquid
free
TIE Interceptor
...erceptor
turbosquid
free 3d model tie in for download as fbx on turbosquid: 3d models for games, architecture, videos. (1164790)
archive3d
free

Tie 3D Model
...
archive3d
cravat tie scarf
tie n240308 - 3d model (*.gsm+*.3ds) for interior 3d visualization.
turbosquid
$5
Cartoon tie
...urbosquid
royalty free 3d model cartoon tie for download as on turbosquid: 3d models for games, architecture, videos. (1646820)
turbosquid
free

TIE Bomber
...e bomber
turbosquid
free 3d model tie/sa for download as fbx on turbosquid: 3d models for games, architecture, videos. (1164803)
turbosquid
$6

Bow Tie
...turbosquid
royalty free 3d model bow tie for download as stl on turbosquid: 3d models for games, architecture, videos. (1352382)
Strip
design_connected
$16
Strip
...strip
designconnected
poliform strip chairs computer generated 3d model. designed by carlo colombo.
3ddd
free
Strip Tease
...strip tease
3ddd
strip , tease
кресло strip tease
3d_export
$5
stripping machine
...stripping machine
3dexport
stripping machine
3ddd
$1
Casamania Strip
...strip
стул casamania strip.
дизайнер: fabio novembre.
материал: полиэтилен.
размеры: ширина 59 см, глубина 62 см, высота 93,5 см.
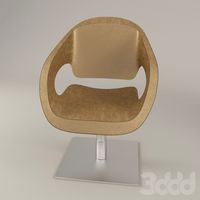
design_connected
$16

Strip leather
...strip leather
designconnected
poliform strip leather chairs computer generated 3d model. designed by carlo colombo.
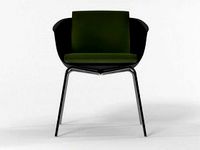
design_connected
$4
Strip Chair
...strip chair
designconnected
castelijn strip chair chairs computer generated 3d model. designed by gijs bakker.
design_connected
$16
Strip Chair
...
designconnected
photo-realistic 3d models of the strip chair from henge for 3d architectural and interior design presentations.
3d_export
$5

led strip
...led strip
3dexport
led strip modelled in inventor.<br>it includes .obj and .fbx model in real-world scale.
3ddd
$1
Ванна aquamass strip
... ванна
http://www.aquamass.com/en/so-creative-so-design/strip/strip
в архиве есть файл 2011 версии
3ddd
free
Strip Chair
...actured by poliform (www.poliform.it).
dimension in cm: 60w_57d_72h
uvw mapped, free texture folder.
file formats: fbx and obj.
Cable
3d_export
free

Cables
...cables
3dexport
cables for your purposes
3d_export
free
cable belt for cable organization
...ze your cables in 3d printers. it will bend only to one direction. the area to put the cables per piece is aprox. 1,6cmx2,6cmx1cm
3d_ocean
$16
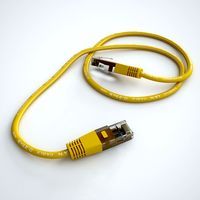
Ethernet Cable
...ethernet cable
3docean
cable computer electronics ethernet internet network connected
ethernet cable 3d model
3d_export
$65

cable
...cable
3dexport
simple rendering of the scene file
turbosquid
$14

Cable
...l cable for download as ma, max, fbx, 3ds, gltf, obj, and stl on turbosquid: 3d models for games, architecture, videos. (1631358)
3ddd
$1
Cable Cover
...cable cover
3ddd
кабель
vertebra passacavo - cable cover
max + vray 2.20.03
3d_export
$15
Cable reel
...without cable. textures 4k 4096x4096 targa, png, jpeg.<br>number of polygons without cable: 2896<br>with cable: 35328
3d_export
$7

short cable
...short cable
3dexport
rubber cord. very detailed. cable thickness: 2.55 mm total length: 55mm
3d_export
$5

USB CABLE
...usb cable
3dexport
turbosquid
$30
Cable Reels
...osquid
royalty free 3d model cable reels for download as fbx on turbosquid: 3d models for games, architecture, videos. (1439507)
Led
3d_export
$5

led
...led
3dexport
the led is cut with all the parts.
3ddd
$1

Monacor / PARL56DMX / LED-320RGBW / LED-345RGBW / LED-300RGB
... прожектор
http://www.monacor.dk/
parl56dmx
led-320rgbw
led-345rgbw
led-300rgb
turbosquid
$10

LED
...led
turbosquid
free 3d model led for download as blend on turbosquid: 3d models for games, architecture, videos. (1691856)
3d_export
$5

led lamp
...led lamp
3dexport
led lamp, brightness animation
3ddd
free

leds-c4
...leds-c4
3ddd
leds-c4
современный торшер
3ddd
free

leds-c4
...leds-c4
3ddd
leds-c4
настольный лампа
turbosquid
$19

LED
... available on turbo squid, the world's leading provider of digital 3d models for visualization, films, television, and games.
turbosquid
$12

Led
... available on turbo squid, the world's leading provider of digital 3d models for visualization, films, television, and games.
turbosquid
free

LED
... available on turbo squid, the world's leading provider of digital 3d models for visualization, films, television, and games.
turbosquid
free

LED
... available on turbo squid, the world's leading provider of digital 3d models for visualization, films, television, and games.
Screws
3d_export
$5
screw
...screw
3dexport
screw
turbosquid
$29

Screw driver and screws
... available on turbo squid, the world's leading provider of digital 3d models for visualization, films, television, and games.
3d_ocean
$2
Screw
... steel twist wood screw
screw 3d model in 2 different materials real world scale rendered with mental ray file formats: .max .obj
3d_ocean
$4
Screw
...n
3d bolt male mechanic metal nut parts prop propeller schraube schraubenmutter screw steel twist
screw 3d model, clean modeling.
turbosquid
$2
screw
...crew
turbosquid
royalty free 3d model screw for download as on turbosquid: 3d models for games, architecture, videos. (1198271)
turbosquid
free
Screw
...screw
turbosquid
free 3d model screw for download as obj on turbosquid: 3d models for games, architecture, videos. (1240851)
3d_ocean
$2
Frame Screw
...frame screw
3docean
construction screw
a frame screw and plug.
turbosquid
$27
screw
...w
turbosquid
royalty free 3d model screw for download as max on turbosquid: 3d models for games, architecture, videos. (1334064)
turbosquid
$20

SCREW
...
turbosquid
royalty free 3d model screw for download as sldas on turbosquid: 3d models for games, architecture, videos. (729733)
turbosquid
$1
Screws
...
turbosquid
royalty free 3d model screws for download as max on turbosquid: 3d models for games, architecture, videos. (1640360)
Mount
3d_export
free

mounting bracket
...mounting plate is the portion of a hinge that attaches to the wood. mounting plates can be used indoors, cabinetry and furniture.
turbosquid
$2

MOUNTING
... available on turbo squid, the world's leading provider of digital 3d models for visualization, films, television, and games.
turbosquid
free

Mounts
... available on turbo squid, the world's leading provider of digital 3d models for visualization, films, television, and games.
turbosquid
free

Mount Fuji
...fuji
turbosquid
free 3d model mount fuji for download as obj on turbosquid: 3d models for games, architecture, videos. (1579977)
3d_export
$5

Headphone mount LR
...headphone mount lr
3dexport
headphone mount l+r
turbosquid
$39

Mount rainier
...quid
royalty free 3d model mount rainier for download as fbx on turbosquid: 3d models for games, architecture, videos. (1492586)
turbosquid
$5

pipe mounting
...quid
royalty free 3d model pipe mounting for download as obj on turbosquid: 3d models for games, architecture, videos. (1293744)
turbosquid
$3

Mounting Tires
...uid
royalty free 3d model mounting tires for download as fbx on turbosquid: 3d models for games, architecture, videos. (1708511)
3d_export
$5

Magnetic GoPro Mount
...pro mount
3dexport
cool magnetic mount for gopro. allows you to mount the camera on flat metal surfaces and get exclusive shots.
turbosquid
$5

Stone Mount
...ty free 3d model stone mount for download as ma, obj, and fbx on turbosquid: 3d models for games, architecture, videos. (1370306)