Thingiverse
Dual Z-axis kit by xsgroup
by Thingiverse
Last crawled date: 3 years, 3 months ago
This kit contains two types of lead screw attachment points, a counterpart for the right X-axis carriage and a timing belt tensioner.
All parts were designed for use on the Tevo Nereus printer, but most of them can be used on other printers based on extruded aluminum profiles.
Further description and list of screws used for assembly and installation is based on installation on Tevo Nereus.
Lead screws and mounting points:
To install a double Z-axis on your printer, the first thing you need is a second lead screw, of course =) You can order one screw identical to the one you already have installed, but I did not take such a risk and ordered two screws of the same length (identical to original), but with a doubled thread pitch, which in theory should increase the positioning accuracy and make the motor work easier when moving, since the load on it will increase.
It should be borne in mind that when using such screws, it is necessary to double the number of steps of the motor and it is very desirable to reduce the speed of movement, which will not affect the printing duration in any way, but will simplify the life of your Z-axis motor during homing and other long movements.
The set includes two types of lead screw attachment points:
for installation on a vertical 20x40 profile - can be used both above and below (part No. 1)
for installation on the horizontal profile of the printer base at the lower point of the lead screw attachment (part No. 2)
Bearing type - 608Z. Please note that the bearing may fit very tightly and the plastic part may need a little sanding.
To install these parts use M4x20 screws with hexagonal sockets and t-nuts.
The upper mounting points must be installed with the bearing down and on the vertical profile strictly UNDER the horizontal upper beam, as this is consistent with the plane of the synchronizing belt and its tensioner.
To fix the second lead screw in the vertical axis (if you are using one motor with belt and tensioner), use 8mm shaft collars or lead screw clampin collars, which will be the best solution.
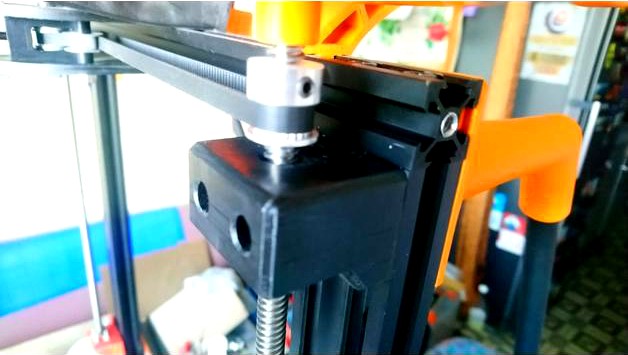
The right X-axis carriage counterpart (part No. 3):
!!!Warning!!! This part is designed for Tevo Nereus and is not guaranteed to be compatible with other printers.
There won't be many words here. I made two small holes in the plate - for easy access to the screws for adjusting the position of the X-axis beam. The bore for the lead screw nut is increased to compensate for the curvature of the screw and to avoid the wobbling effect, so do not tighten the set screws too much...
...also use longer M5 screws, place washers under their nuts, wash your hands, wear masks and stay at home with your printers...
Belt tensioner (part No. 4):
To install it you need the following parts:
GT2 pulley - 20 teeth, 8mm bore - x2
GT2 idler pulley - 20 teeth, 5mm bore - x1
GT2 idler pulley - toothless, 5mm bore - x2
M3x16 screws with nuts - x8
M4x10 screws with t-nuts - x6
M5x35 screws with counter nuts - x3
M5x40 screw, that will need to be modified with a file so that its head fits the part that moves the tension roller. You can get one from the printer, as it still needs to be replaced with longer ones... and a nut - x1
GT2 closed loop belt (810mm for Tevo Nereus) - x1
During the slicing process of this part, you may find that there are no holes on the first layer. This is made to improve printing results. You can cut them easily after printing.
Detailed assembly and setup manual:
I believe that since you have coped with reading this text, you can also cope with the installation and configuration of all the details without much effort. If not, then you don't need this :D
If you want to thank me for the work done with some tips, don't bother, PayPal does not work in Ukraine =)
All parts were designed for use on the Tevo Nereus printer, but most of them can be used on other printers based on extruded aluminum profiles.
Further description and list of screws used for assembly and installation is based on installation on Tevo Nereus.
Lead screws and mounting points:
To install a double Z-axis on your printer, the first thing you need is a second lead screw, of course =) You can order one screw identical to the one you already have installed, but I did not take such a risk and ordered two screws of the same length (identical to original), but with a doubled thread pitch, which in theory should increase the positioning accuracy and make the motor work easier when moving, since the load on it will increase.
It should be borne in mind that when using such screws, it is necessary to double the number of steps of the motor and it is very desirable to reduce the speed of movement, which will not affect the printing duration in any way, but will simplify the life of your Z-axis motor during homing and other long movements.
The set includes two types of lead screw attachment points:
for installation on a vertical 20x40 profile - can be used both above and below (part No. 1)
for installation on the horizontal profile of the printer base at the lower point of the lead screw attachment (part No. 2)
Bearing type - 608Z. Please note that the bearing may fit very tightly and the plastic part may need a little sanding.
To install these parts use M4x20 screws with hexagonal sockets and t-nuts.
The upper mounting points must be installed with the bearing down and on the vertical profile strictly UNDER the horizontal upper beam, as this is consistent with the plane of the synchronizing belt and its tensioner.
To fix the second lead screw in the vertical axis (if you are using one motor with belt and tensioner), use 8mm shaft collars or lead screw clampin collars, which will be the best solution.
The right X-axis carriage counterpart (part No. 3):
!!!Warning!!! This part is designed for Tevo Nereus and is not guaranteed to be compatible with other printers.
There won't be many words here. I made two small holes in the plate - for easy access to the screws for adjusting the position of the X-axis beam. The bore for the lead screw nut is increased to compensate for the curvature of the screw and to avoid the wobbling effect, so do not tighten the set screws too much...
...also use longer M5 screws, place washers under their nuts, wash your hands, wear masks and stay at home with your printers...
Belt tensioner (part No. 4):
To install it you need the following parts:
GT2 pulley - 20 teeth, 8mm bore - x2
GT2 idler pulley - 20 teeth, 5mm bore - x1
GT2 idler pulley - toothless, 5mm bore - x2
M3x16 screws with nuts - x8
M4x10 screws with t-nuts - x6
M5x35 screws with counter nuts - x3
M5x40 screw, that will need to be modified with a file so that its head fits the part that moves the tension roller. You can get one from the printer, as it still needs to be replaced with longer ones... and a nut - x1
GT2 closed loop belt (810mm for Tevo Nereus) - x1
During the slicing process of this part, you may find that there are no holes on the first layer. This is made to improve printing results. You can cut them easily after printing.
Detailed assembly and setup manual:
I believe that since you have coped with reading this text, you can also cope with the installation and configuration of all the details without much effort. If not, then you don't need this :D
If you want to thank me for the work done with some tips, don't bother, PayPal does not work in Ukraine =)
Similar models
thingiverse
free

Anet A8 Improved X-belt Tensioner with GT2 pulley by TecNerd
...printed part. and also two m3x25 screws (better thumb screws) and two more m3 nuts for mounting the part properly to the printer.
thingiverse
free

Z belt tensioner - adjustable by thicc_nugget
... the tensioner on a 2020 aluminum profile and a longer m3 screw, some nuts and (if necessary) some washers to fix the gt2 pulley.
thingiverse
free

K8200/3Drag GT2 X Belt Mount with easy Tension - Upgrade by Area51
...rews
two m3 nuts
assembly as shown on pictures.
for the y axis use k8200/3drag gt2 y belt mount with easy tension - upgrade
thingiverse
free

K8200/3Drag GT2 Y Belt Mount with easy Tension - Upgrade by Area51
...or the x axis use k8200/3drag gt2 x belt mount with easy tension - upgrade
updated: included step files for use in cad programs.
thingiverse
free

GT2(6mm width) Belt Tensioner by gingersoft
...t2(6mm width) belt tensioner by gingersoft
thingiverse
gt2(6mm width) belt tensioner
parts list
:m3x40 screw x1
:m3 nylon nut x1
thingiverse
free
Tevo Tarantula Y Belt Tensioner by Noumcreation
...pcs-gt2-idler-timing-pulley-16-20-tooth-wheel-bore-3-5mm-aluminium-gear-teeth-width/32795078174.html
and 1 5x45/50 screw with nut
thingiverse
free

CR-10 X AXIS BELT TENSIONER by camaroboy383
...and above if left on... this isn't an issue if your printing models smaller than that... you decide..
hope this can be useful
thingiverse
free

Hypercube 300 Single Z-Axis Motor Mount by salfter
...lleys, a 5-mm-bore gt2 pulley, a couple of 3-mm-bore gt2 smooth idlers, a 3-mm-bore toothed idler, and a 1220mm closed-loop belt.
thingiverse
free

Anet A8 Y-Axis Belt Tensioner for GT2 20 Tooth Metal Pulley by Mr_Dabrudda
...ulley with ball bearings bought from ebay on my y-axis.
how to counter-sink a hex nut into a 3d printhttps://youtu.be/qx_bx5um4yg
thingiverse
free

Ender 5 - Belt Tensioner - X-axis
...nside bearing bore without gap (i increased filament flow rate about 4% during printing this part to reach real diameter 8.05mm).
Xsgroup
thingiverse
free

Stop spam by xsgroup
...stop spam by xsgroup
thingiverse
thingiverse, do something already!
thingiverse
free

18650 Container by xsgroup
...18650 container by xsgroup
thingiverse
18650 x 4 container
thingiverse
free

Silica Gel Containers by xsgroup
...silica gel containers by xsgroup
thingiverse
silica gel containers...
thingiverse
free

Lighthouse V1 by xsgroup
...rse
goes in one piece.
there is a second version, which consists of ten separate parts.https://www.thingiverse.com/thing:3071989
thingiverse
free

Screw tray by xsgroup
...se
a simple 100x150mm screw tray. on the bottom it has places for inserting four self stick bumper pads with a diameter of 10mm.
thingiverse
free

Lighthouse by xsgroup
...ote that the plastic may shrink and the parts may not fit together. in that case sandpaper or scaling small parts will help you.)
thingiverse
free

USB SD and MicroSD holder by xsgroup
...usb sd and microsd holder by xsgroup
thingiverse
usb sd and microsd holder with caps compartment
thingiverse
free

Headphones stand by xsgroup
...ing prevents you from using it for other models.)
gathered by gluing.
the base has the necessary clearance for rack installation.
thingiverse
free

Cable Clips by xsgroup
...lation twisted pair cable. additionally, the files section contains two types of clips for mounting on a flat or curved surfaces.
thingiverse
free

Beer can holder by xsgroup
...p
thingiverse
beer can holder for 66 mm dimeter cans.consists of 4 parts connected by glue. has clearances for connecting parts.
Dual
turbosquid
free

Dual Pistols
...ls
turbosquid
free 3d model dual pistols for download as fbx on turbosquid: 3d models for games, architecture, videos. (1320360)
turbosquid
$2

Dual Axe
...urbosquid
royalty free 3d model dual axe for download as fbx on turbosquid: 3d models for games, architecture, videos. (1332372)
turbosquid
$10

Dual Lesaths
... available on turbo squid, the world's leading provider of digital 3d models for visualization, films, television, and games.
3ddd
$1

плитка Dual Bianco (Испания)
...й плитки venis dual (испания). технические качества: устойчивость к стирания, отличная геометрия, отсутствие проблем при укладке.
turbosquid
$35

Dual Mesh Fonts
...ree 3d model dual mesh fonts for download as ma, obj, and fbx on turbosquid: 3d models for games, architecture, videos. (1352989)
turbosquid
$29

Dual Flask with Bungs
...del dual flask with bungs for download as obj, fbx, and blend on turbosquid: 3d models for games, architecture, videos. (1210512)
turbosquid
$19

Dual Socket Plug
...3d model dual socket plug for download as obj, fbx, and blend on turbosquid: 3d models for games, architecture, videos. (1303912)
turbosquid
$13

Dual Adjustable Pulley
... available on turbo squid, the world's leading provider of digital 3d models for visualization, films, television, and games.
turbosquid
$10

Amoi N809 Dual
... available on turbo squid, the world's leading provider of digital 3d models for visualization, films, television, and games.
turbosquid
$5

Dual Turret Tank
... available on turbo squid, the world's leading provider of digital 3d models for visualization, films, television, and games.
Kit
turbosquid
$3

Bathroom Kit Baño kit
... available on turbo squid, the world's leading provider of digital 3d models for visualization, films, television, and games.
turbosquid
$19

Kit
... available on turbo squid, the world's leading provider of digital 3d models for visualization, films, television, and games.
3d_export
$20

Drift Kit
...drift kit
3dexport
turbosquid
$40

BitCoin Kit
...urbosquid
royalty free 3d model bitcoin kit for download as on turbosquid: 3d models for games, architecture, videos. (1519068)
turbosquid
$9

Industrial kit
...osquid
royalty free 3d model industrial kit for download as on turbosquid: 3d models for games, architecture, videos. (1144117)
turbosquid
$6

Kit Vases
...
turbosquid
royalty free 3d model kit vases for download as on turbosquid: 3d models for games, architecture, videos. (1285114)
turbosquid
free

Survival Kit
...rbosquid
royalty free 3d model survival kit for download as on turbosquid: 3d models for games, architecture, videos. (1637721)
turbosquid
$50

Ninja Kit
...rbosquid
royalty free 3d model ninja kit for download as fbx on turbosquid: 3d models for games, architecture, videos. (1672364)
turbosquid
$35

Brushes Kit
...osquid
royalty free 3d model brushes kit for download as max on turbosquid: 3d models for games, architecture, videos. (1216721)
turbosquid
$19

Kit Bedroom
...osquid
royalty free 3d model kit bedroom for download as max on turbosquid: 3d models for games, architecture, videos. (1290049)
Axis
3ddd
$1

Мария Axis
...
3ddd
кухня , классическая , axis
модель кухни.
3d_export
$22

Axis robot 6-axis robotic arm
...ing parts drawings, standard parts purchased parts list, can be produced directly according to the drawings, welcome to download!
3ddd
free

Versatile Axis
...ddd
nexus , плитка
http://bvtileandstone.com/ceramic-porcelain/versatile-axis/
3d_export
$19

robot 2 axis
...robot 2 axis
3dexport
robot 2 axis
turbosquid
$40

Axis R5F
... available on turbo squid, the world's leading provider of digital 3d models for visualization, films, television, and games.
turbosquid
$40

Axis S5F
... available on turbo squid, the world's leading provider of digital 3d models for visualization, films, television, and games.
turbosquid
$30

Axis Athlon
... available on turbo squid, the world's leading provider of digital 3d models for visualization, films, television, and games.
turbosquid
$10

Linear Axis
... available on turbo squid, the world's leading provider of digital 3d models for visualization, films, television, and games.
3d_export
$15

drawing axis
...drawing axis
3dexport
simple rendering of the scene file
3ddd
$1

versatile axis ARC
...versatile axis arc
3ddd
versatile , плитка
versatile axis arc red dot design award
Z
3d_export
$5

nissan z
...nissan z
3dexport
nissan z
3ddd
$1

Vase Z
...vase z
3ddd
vase z
3ddd
$1

полотенцесушить Z
...полотенцесушить z
3ddd
полотенцесушитель
полотенцесушить z
design_connected
free

Z-Chair
...z-chair
designconnected
free 3d model of z-chair designed by karman, aleksei.
design_connected
$11

Z Lamp
...z lamp
designconnected
phillips z lamp computer generated 3d model. designed by kalff, louis.
3d_export
$5

Dragon balls z
...dragon balls z
3dexport
dragon ball z
turbosquid
$20

Fighter Z
...
turbosquid
royalty free 3d model fighter z for download as on turbosquid: 3d models for games, architecture, videos. (1292563)
turbosquid
$9

Pen Z
...pen z
turbosquid
free 3d model pen z for download as obj on turbosquid: 3d models for games, architecture, videos. (1686775)
turbosquid
free

z chair
...z chair
turbosquid
free 3d model z chair for download as max on turbosquid: 3d models for games, architecture, videos. (1410230)
turbosquid
$5

Letter Z
...urbosquid
royalty free 3d model letter z for download as max on turbosquid: 3d models for games, architecture, videos. (1408540)