Thingiverse
DIY - SOLAR BATTERY CHARGER by tarantula3
by Thingiverse
Last crawled date: 3 years ago
Introduction
Hi Everyone, I am back again with this new tutorial.
In this tutorial, I am going to show you how to charge a Lithium 18650 Cell using TP4056 chip utilizing the solar energy or simply the SUN.
Wouldn’t it be really cool if you can charge your mobile phones battery using the sun instead of a USB charger. You can also use this project as a DIY portable power bank.
The total cost of this project excluding the battery is just under $5. The battery will addup another $4 to $5 bucks. So the total cost of the project is some what around $10. All components are available on my website for sale for really good price, the link is in the description below.
https://youtu.be/SPpgMl_TeIc
Step 1: Hardware Requirement
For this project we need:
A 5v Solar Cell (make sure it is 5v and not anything less than that)
A general purpose circuit board
A 1N4007 High Voltage, High Current Rated Diode (for reverse voltage protection). This diode is rated at forward current of 1A with peak reverse voltage rating of 1000V.
Copper Wire
2x PCB Screw Terminal Blocks
A 18650 Battery Holder
A 3.7V 18650 Battery
A TP4056 battery protection board (with or without the protection IC)
A 5 V power booster
Some connecting cables
and general soldering equipments
Step 2: How the TP4056 Work
Looking at this board we can see that it has the TP4056 chip along with few other components of our interest.
There are two LEDs on board one red and one blue. The red one comes on when it is charging and the blue one comes on when the charging is done. Then there is this mini USB connector to charge the battery from an external USB charger. There are also these two points where you can solder your own charging unit. These points are marked as IN- and IN+ We will be utilizing these two point to power this board. The battery will be connected to these two point marked as BAT+ and BAT- (pretty mush self explanatory) The board requires an input voltage of 4.5 to 5.5v to charge the battery
There are two versions of this board available in the market. One with battery discharge protection module and one without it. Both boards offer 1A charging current and then cut off when finished.
Furthermore, the one with protection switches the load off when the battery voltage drops below 2.4V to protect the cell from running at too low (such as on a cloudy day) - and also protects against over-voltage and reverse polarity connection (it will usually destroy itself instead of the battery) however please check you have it connected correctly the first time.
Step 3: Copper Legs
These boards gets really hot so I will be soldering them a bit above the circuit board.
To achieve this I am going to use a hard copper wire to make legs of the circuit board. I will then be sliding the unit on the legs and will solder them all together. I will put 4 copper wires to make 4 legs of this circuit board. You can also use - Male Breakable Pin Headers instead of the copper wire to achieve this.
Step 4: Assembly
The assembly is very simple.
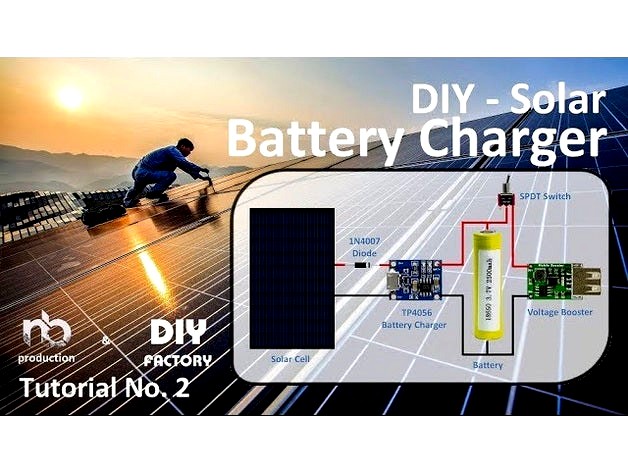
The solar cell is connected to the TP4056 battery charging board's IN+ and IN- respectively. A diode is inserted at the positive end for the reverse voltage protection. Then the BAT+ and BAT- of the board is connected to the +ve and -ve ends of the battery. (That all we need for charging the battery). Now to power an Arduino board we need to boost up the output to 5v. So, we are adding a 5v voltage booster to this circuit. Connect the -ve end of the battery to the IN- of the booster and +ve to IN+ by adding a switch in between. OK, now lets have a look at what I have made. - I have connected the booster board straight to the charger however I will recommend putting a SPDT switch there. So when the device is charging the battery its only charging and not getting used
Solar cells are connected to the input of the lithium battery charger (TP4056), whose output is connected to the 18560 lithium battery. A 5V step-up voltage booster is also connected to the battery and is used to convert from 3.7V dc to 5V dc.
Charging voltage is typically around 4.2V. Voltage booster's input ranges from 0.9 to 5.0V. So it will see around 3.7V at it's input when the battery is discharging, and 4.2V when it's recharging. The output of the booster to the rest of the circuit will keep it's 5V value.
Step 5: Testing
This project will be very helpful to power a remote data logger. As we know, the power supply is always a problem for a remote logger and most of the times there is no power outlet available. A situation like that forces you to use some batteries to power your circuit. But eventually, the battery will die. Question is do you want to go there and charge the battery? Our inexpensive solar charger project will be an excellent solution for a situation like this to power an Arduino board.
This project can also solve the efficiency issue of Arduino when in sleep. Sleep saves battery, however, the sensors and power regulators (7805) will still consume battery in idle mode draining the battery. By charging the battery as we use it, we can solve our problem.
https://youtu.be/SPpgMl_TeIc
Thanks again for watching this video! I hope it helps you. If you want to support me, you can subscribe to my channel and watch my other videos. Thanks, ca again in my next video.
Hi Everyone, I am back again with this new tutorial.
In this tutorial, I am going to show you how to charge a Lithium 18650 Cell using TP4056 chip utilizing the solar energy or simply the SUN.
Wouldn’t it be really cool if you can charge your mobile phones battery using the sun instead of a USB charger. You can also use this project as a DIY portable power bank.
The total cost of this project excluding the battery is just under $5. The battery will addup another $4 to $5 bucks. So the total cost of the project is some what around $10. All components are available on my website for sale for really good price, the link is in the description below.
https://youtu.be/SPpgMl_TeIc
Step 1: Hardware Requirement
For this project we need:
A 5v Solar Cell (make sure it is 5v and not anything less than that)
A general purpose circuit board
A 1N4007 High Voltage, High Current Rated Diode (for reverse voltage protection). This diode is rated at forward current of 1A with peak reverse voltage rating of 1000V.
Copper Wire
2x PCB Screw Terminal Blocks
A 18650 Battery Holder
A 3.7V 18650 Battery
A TP4056 battery protection board (with or without the protection IC)
A 5 V power booster
Some connecting cables
and general soldering equipments
Step 2: How the TP4056 Work
Looking at this board we can see that it has the TP4056 chip along with few other components of our interest.
There are two LEDs on board one red and one blue. The red one comes on when it is charging and the blue one comes on when the charging is done. Then there is this mini USB connector to charge the battery from an external USB charger. There are also these two points where you can solder your own charging unit. These points are marked as IN- and IN+ We will be utilizing these two point to power this board. The battery will be connected to these two point marked as BAT+ and BAT- (pretty mush self explanatory) The board requires an input voltage of 4.5 to 5.5v to charge the battery
There are two versions of this board available in the market. One with battery discharge protection module and one without it. Both boards offer 1A charging current and then cut off when finished.
Furthermore, the one with protection switches the load off when the battery voltage drops below 2.4V to protect the cell from running at too low (such as on a cloudy day) - and also protects against over-voltage and reverse polarity connection (it will usually destroy itself instead of the battery) however please check you have it connected correctly the first time.
Step 3: Copper Legs
These boards gets really hot so I will be soldering them a bit above the circuit board.
To achieve this I am going to use a hard copper wire to make legs of the circuit board. I will then be sliding the unit on the legs and will solder them all together. I will put 4 copper wires to make 4 legs of this circuit board. You can also use - Male Breakable Pin Headers instead of the copper wire to achieve this.
Step 4: Assembly
The assembly is very simple.
The solar cell is connected to the TP4056 battery charging board's IN+ and IN- respectively. A diode is inserted at the positive end for the reverse voltage protection. Then the BAT+ and BAT- of the board is connected to the +ve and -ve ends of the battery. (That all we need for charging the battery). Now to power an Arduino board we need to boost up the output to 5v. So, we are adding a 5v voltage booster to this circuit. Connect the -ve end of the battery to the IN- of the booster and +ve to IN+ by adding a switch in between. OK, now lets have a look at what I have made. - I have connected the booster board straight to the charger however I will recommend putting a SPDT switch there. So when the device is charging the battery its only charging and not getting used
Solar cells are connected to the input of the lithium battery charger (TP4056), whose output is connected to the 18560 lithium battery. A 5V step-up voltage booster is also connected to the battery and is used to convert from 3.7V dc to 5V dc.
Charging voltage is typically around 4.2V. Voltage booster's input ranges from 0.9 to 5.0V. So it will see around 3.7V at it's input when the battery is discharging, and 4.2V when it's recharging. The output of the booster to the rest of the circuit will keep it's 5V value.
Step 5: Testing
This project will be very helpful to power a remote data logger. As we know, the power supply is always a problem for a remote logger and most of the times there is no power outlet available. A situation like that forces you to use some batteries to power your circuit. But eventually, the battery will die. Question is do you want to go there and charge the battery? Our inexpensive solar charger project will be an excellent solution for a situation like this to power an Arduino board.
This project can also solve the efficiency issue of Arduino when in sleep. Sleep saves battery, however, the sensors and power regulators (7805) will still consume battery in idle mode draining the battery. By charging the battery as we use it, we can solve our problem.
https://youtu.be/SPpgMl_TeIc
Thanks again for watching this video! I hope it helps you. If you want to support me, you can subscribe to my channel and watch my other videos. Thanks, ca again in my next video.
Similar models
3dwarehouse
free

Power Cell - LiPo Charger Booster PRT-11231
...der jumper on the back of the pcb). #battery #booster #charger #lipo #lipoly #lithium #polymer #regulator #sfe #sparkfun #voltage
thingiverse
free

CR123A / 16340 Lithium Cell Charger Using TP4056 by kauz
...holder for charging cr123a-sized 16x340mm 3.7v lithium batteries using the commonly available tp4056 charging boards (ebay etc.).
thingiverse
free

Mobile battery charger by c4sfer
...for quick charging with a hobby charger, but i don't really recommend to do this or the % of battery displayed will be wrong.
thingiverse
free

Solar Pannel Power Bank by xDuBx
...solar pannels max size: 110mmx69mm
rocker switch
4x 2,5m screws
hotglue
yes the charge is very low, with the small solar pannels!
grabcad
free

3PCS BMS Charger Module 12V 10A 18650 Lithium Battery
... 18650 lithium battery charging board with protection module cell charging input output pcb protection board
solidworks 2021+step
thingiverse
free

3D printed solar power bank by hserimer
...otection-board-boost-power-module-power-bank-charger-board-p-1357723.html )
18650 3v7 li-ion battery
5v 100ma photovoltaic panel.
thingiverse
free

Game Boy Battery Charger Box
...dapter, https://amzn.to/2xwxbyr
rechargeable battery 3.7v, https://amzn.to/35jicio
donate btc: 1bubceiryeucgrgsgfkuw6eymsbdisgczf
grabcad
free

1S 4056 BMS and USB Type C Connector Module
...nd this design useful, too.
remember to leave me some feedback or even a tip to keep me enthused to make more of these drawings.
thingiverse
free

18650 x 2 Battery Bank by Zalophus
...8f1cxj9swhttps://youtu.be/sgkgih2lwim
zalophus's designhouse: http://zalophus.tistory.com/ and https://zddh.blogspot.com/
thingiverse
free

N in 1 18650 TP4056 Charger by YXC
...harging board (25*19mm).
update:2018/10/01 v2
fits most of tp4056 boards.
fits most of 18650 batteries with protection circuit.
Tarantula3
thingiverse
free

DIY - ARDUINO BASED CAR PARKING ASSISTANT by tarantula3
...lps you. if you want to support me, you can subscribe to my channel and watch my other videos. thanks, ca again in my next video.
thingiverse
free
USING AN LDR SENSOR WITH ARDUINO by tarantula3
.... if you want to support me, you can subscribe to my channel and watch my other videos. thanks, ca again in my next instructable.
thingiverse
free

DRIVING A RELAY WITH AN ARDUINO by tarantula3
...lps you. if you want to support me, you can subscribe to my channel and watch my other videos. thanks, ca again in my next video.
Charger
3d_export
$119

Dodge Charger 2015 3D Model
...fast american 2015
dodge charger 2015 3d model download .c4d .max .obj .fbx .ma .lwo .3ds .3dm .stl swan3dstudios 107290 3dexport
cg_studio
$40

Dodge Charger 19693d model
... blue speed
.dae .fbx .obj .blend - dodge charger 1969 3d model, royalty free license available, instant download after purchase.
cg_studio
$129

Dodge Charger Pro Touring 1968-19693d model
...o .fbx .c4d .3ds - dodge charger pro touring 1968-1969 3d model, royalty free license available, instant download after purchase.
3ddd
$1

Сервировка стола Ralph Lauren
...dinner napkin banded water goblet banded champagne flute leather charger sloane nickel hurricane polys: 596795 verts: 643136 добавлена библиотека...
3ddd
$1

Triangle USB Charger
...triangle usb charger
3ddd
зарядное устройство
triangle usb charger
model : uk md1
3d_ocean
$16

Dodge Charger - General Lee 1969
... polygonal road stylized transport transportation vehicle
low poly stylized version of an iconic dodge charger! hope you like it!
3d_ocean
$8

1974 Dodge Charger - Wheels Of Terror Base
... model is based on the car used in the movie wheels of terror. check my profile for a textured version of the car! for the lat...
3d_ocean
$15

Wheels Of Terror Charger
...d to look like the dodge charger from the movie wheels of terror. for the latest model, visit my website: http://syndicate3d.a...
3d_ocean
$5

Powerbank
...powerbank 3docean adaptor charger phone power powerbank powerbank phone charger models: downloadable model packages containing all necessary texture files....
3d_ocean
$89

Dodge Charger RT 1969
...y, in real units of measurement, qualitatively and maximally close to the original. model formats: - *.max (3ds max 2008 scanl...
Diy
3ddd
$1
Fifti-fifti DIY lamps
...xform.
18 859 полигонов.
в архиве также есть файл макс 2012.http://www.fifti-fifti.net/en/catalog/take-off-light.html
3ddd
$1

Coffee table / Loft
...coffee table / loft 3ddd журнальный detailed model of diy coffee table dimensions: 1200x850x400mm topology: subdivision ready polys: 33060...
3ddd
$1

Handmade LOFT table lamp
...handmade loft table lamp 3ddd diy handmade loft table lamp формат файлов: 3dmax 2014 -...
3ddd
$1

DIY coffee table + decor
... рамка для фото
кофейный столик diy 400х350х600(h) мм. моделился по фото. внимание: материалы - corona.
3d_ocean
$30

Fokker DII Aircraft
...e remnant of the early years of the 20th century . features: - c4d (textured all channels) – 3ds (textured color only) ...
3d_ocean
$18

Caulking gun
...squeeze, apply, sealant, seal, construction, liquid nails, glue, industrial, diy tool, toolbox, building, decorating mastic sealant gun model. model...
3d_export
$8

Modern clock 3D Model
...model 3dexport modern stylish clock interior design mountains simple diy minute hour modern clock 3d model download .c4d .max...
3ddd
$1

Eco DIY Collection, Eduardo Alessi
...стольные
будильник в виде оленя,который благодаря простым инструкциям, можно легко собрать без клея или дополнительных поставок.
3ddd
$1
Industrial Kesbeke lamp
...anne kesbeke. лампа ручной работы, из категории "сделай сам" (diy. в качестве плафона, автор предлагает использовать обычную стеклянную банку,...
3d_export
$19
DIY Pig Decorative Light Lamp 3D Model
...diy pig animal
diy pig decorative light lamp 3d model download .c4d .max .obj .fbx .ma .lwo .3ds .3dm .stl artdyx 104100 3dexport
Solar
3d_ocean
$15

Low poly solar system
... poly solar system planets. created on cinema 4d r14 (render ready). include psd file with postproduction. rotation is animated.
3d_ocean
$6

Hyperrealistic 4k Jupiter
...blender geography globe hyper-realistic jupiter map planet science fiction solar system space world this is a 4k jupiter with...
3d_ocean
$5

Callisto - Realistic HD model
...realistic hd model 3docean callisto moon moons planet planets solar system this model includes high resolution textures and bump...
3d_ocean
$5

Mars - Realistic HD model
...realistic hd model 3docean callisto moon moons planet planets solar system this model includes high resolution textures and bump...
3d_ocean
$6

Jupiter 4k
...blender geography globe hyper-realistic jupiter map planet science fiction solar system space world this is a 4k jupiter with...
3d_export
$12

Jupiter 6k 3D Model
...jupiter 6k 3d model 3dexport jupiter space planet solar system world map globe science fiction blender 6k geography...
3d_ocean
$5

Moon - Realistic HD model
...realistic hd model 3docean callisto moon moons planet planets solar system this model includes high resolution textures and bump...
3d_ocean
$5

Neptune - Realistic HD model
...- realistic hd model 3docean moon moons planet planets solar system this model includes high resolution textures and bump...
3d_ocean
$5

Sun (Sol) - Realistic HD model
...- realistic hd model 3docean moon moons planet planets solar system this model includes high resolution textures and bump...
cg_studio
$10

Outdoor Lamp 013d model
...architecture decorative road city lighting town bulb electric building solar glow flame urban .3ds .max .mb .fbx .c4d -...
Battery
3d_export
$5
Duracell Battery 3D Model
... power electronic blender tv
duracell battery 3d model download .c4d .max .obj .fbx .ma .lwo .3ds .3dm .stl grins 109010 3dexport
3ddd
$1

Gaston Clock
...22.75" x 24.5" h material: wood uses: 1x aa battery (not included) installation: keyhole mount for...
3ddd
$1

The Emily + Meritt Bunny Alarm Clocks Pottery Barn
... x 2.75" deep x 8" high
expertly crafted of metal.
features whimsical detailing.
requires 2 aa batteries; not included.
3d_ocean
$89

Tesla Model S with chassis-interior
...tesla model s with chassis-interior 3docean american auto battery car chassis electric electricity fast interior model new p85...
3d_ocean
$10
Battery maxwell studio set up
...haded and ready to hit render! -maxwell 2.o studio set up -maya file, obj file format and maxwell file -very detail documentation
3d_ocean
$10

Realistic Flashlight Model, Texture, A&D Material
...model, texture, a&d material 3docean 3 d aluminum anodized battery powered bulb cell cgidx emergency flash flash light flash...
3d_ocean
$89
Tesla Roadster 2011
...tesla roadster 2011 3docean 2011-2014 battery bev darkstar eco electric google roadster sport tesla tesla...
3d_ocean
$5
Lithium Cells
...lithium cells 3docean battery button cell coin battery coin cell cr2016 cr2025 cr2032...
3d_ocean
$20
Maglite Mini Flashlight
...maglite mini flashlight 3docean army battery blackout camoflage dark flash flashlight lamp led light maglite...
3d_ocean
$89

Tesla Model S P85
...tesla model s p85 3docean american auto battery car chassis electric electricity fast interior model new p85...