Thingiverse
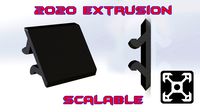
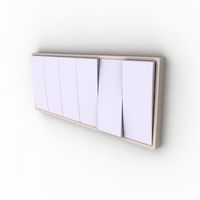
CR-10S4 Round Illuminated Light Switch for 2020 Extrusion by HowardB
by Thingiverse
Last crawled date: 3 years ago
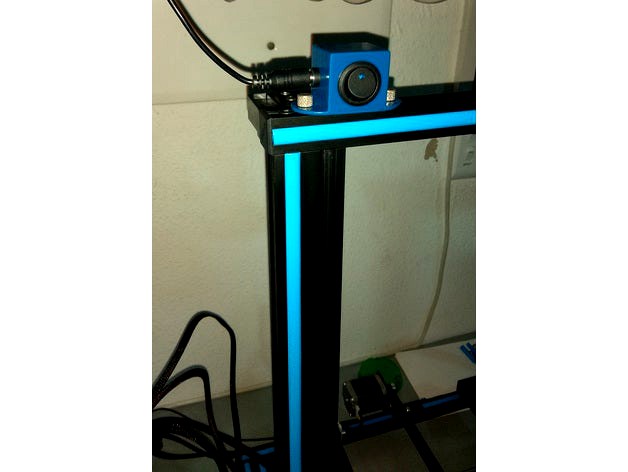
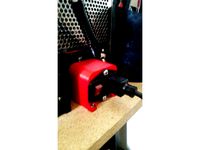
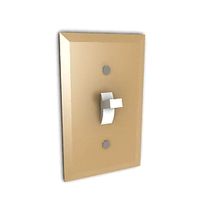
I needed a switch for the LED modules I mounted: https://www.thingiverse.com/thing:2881819
After looking, I remixed mimmim's (https://www.thingiverse.com/thing:2479455) single toggle switch housing to accommodate a round 20mm-holed illuminated 12v switch that pushes in from the front.
Raised the height of the case, shortened the length of the case. I left the depth as is, so the contacts are not exposed at the back, so the depth of the case remains 30mm - it will overhang the 2020 extrusion slightly, or you can offset the screw holes if you want it flush with the front of the 2020 extrusion. The switch hole size was also increased to 20mm.
Printed with the front of the housing on the build plate No support needed.
I purposely did not include a mount hole on the side of the case - initially I was just going to run the wiring down the frame, but found a 2.1mm panel mount female plug socket and decided to use it - I'd already printed the part, so I just drilled a 4mm hole in the left side of the case to mount it; the male 2.1mm power socket plugs straight in.
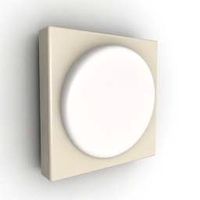
As the switch is illuminated, you need to use all three contacts (2x silver and 1x gold) - see the included wiring diagram for reference. The switch should be orientated so that the gold contact is att he bottom of the housing - I then mounted the side panel mount socket so that the longer contact was towards the bottom gold contact of the switch, bending it carefully downward a bit with long nosed pliers.
I wired as follows, due to the space available inside the printed housing:
"+" of the panel mount socket (short one is positive) soldered to the middle silver contact of the switch.
"-" of the panel mount socket (long one is negative) soldered to the bottom gold contact of the switch.
"-" of the LED light module soldered to the bottom gold contact of the switch.
"+" of the LED light module soldered to the top silver contact of the switch.
The SKP file is also included, if you wish to change the holes, etc.
Turned out well and works great.
After looking, I remixed mimmim's (https://www.thingiverse.com/thing:2479455) single toggle switch housing to accommodate a round 20mm-holed illuminated 12v switch that pushes in from the front.
Raised the height of the case, shortened the length of the case. I left the depth as is, so the contacts are not exposed at the back, so the depth of the case remains 30mm - it will overhang the 2020 extrusion slightly, or you can offset the screw holes if you want it flush with the front of the 2020 extrusion. The switch hole size was also increased to 20mm.
Printed with the front of the housing on the build plate No support needed.
I purposely did not include a mount hole on the side of the case - initially I was just going to run the wiring down the frame, but found a 2.1mm panel mount female plug socket and decided to use it - I'd already printed the part, so I just drilled a 4mm hole in the left side of the case to mount it; the male 2.1mm power socket plugs straight in.
As the switch is illuminated, you need to use all three contacts (2x silver and 1x gold) - see the included wiring diagram for reference. The switch should be orientated so that the gold contact is att he bottom of the housing - I then mounted the side panel mount socket so that the longer contact was towards the bottom gold contact of the switch, bending it carefully downward a bit with long nosed pliers.
I wired as follows, due to the space available inside the printed housing:
"+" of the panel mount socket (short one is positive) soldered to the middle silver contact of the switch.
"-" of the panel mount socket (long one is negative) soldered to the bottom gold contact of the switch.
"-" of the LED light module soldered to the bottom gold contact of the switch.
"+" of the LED light module soldered to the top silver contact of the switch.
The SKP file is also included, if you wish to change the holes, etc.
Turned out well and works great.
Similar models
thingiverse
free

19mm Vandal Resistant Switch Housing With Mounting Tab for 20mm Extrusion by TheMakersWorkbench
...to standard 20mm extrusion using an m5 screw.
link to switch: http://amzn.to/2muctnl
i have included the fusion 360 design file.
thingiverse
free

Rocker Switch Housing for 2020 Extrusion / 20mm Switches by peaberry
...itch into the housing.
if you wanted multiple switches, it would be possible to stack several of these together on the extrusion.
thingiverse
free
Portable Ambient Light LED Powerbank by vmi
...te controller 5v
single 18650 diy powerbank
18650 li-ion battery
22mm switch
wire
soldering iron
glue
heat shrink tube
multimeter
thingiverse
free
Front LED Mount for Emax KnightHawk 250 quad by RotorGator
...l mounting of wire. (yes, i realize i have the wire mounted on the side in the picture, but just reused an already soldered led).
thingiverse
free

Wanhao Duplicator i3 LED Switch Mount by MachinaWolf141
...lds the switch in an easy to access position and that should allow you to thread the wires to the leds on the inside of the case.
thingiverse
free

Led 2020 Switch Mount FT-5 2020, (Or Any Other 2020 Frame) by zastin17
...ts
2x 10-15mm m5 bolt
1x rocker switch http://cdn.sparkfun.com/datasheets/components/switches/rocker%20switch%20right%20angle.pdf
thingiverse
free

LED STRIP mount SECKIT 2020 extrusion by Benno22
...giverse
mount for leds to sk-go or any 2020 extrusion
multi angle so when the bed lowers the leds are still illuminating the bed
thingiverse
free
Dual Switch Case (for 30.5x21.5mm switches) by Jaecko
... also large enough to contain some wire junction terminals.
it is also still small enough to be printed with a vertex nano k8600.
thingiverse
free
Power Supply Plug Module by BajaNaji
...ole and moves the holes further away from the module to allow for drilling into the base without needing to screw in at an angle.
thingiverse
free

Extruder illumination for Flsun QQ-S, QQ by zaharyanouski
...quot;ears" of the backlight housing should be screwed so that the mounting height for the auto-level module does not change.
Howardb
thingiverse
free

Prusa i3 Filament Guide for 5mm Perspex frame by HowardB
...he first print was not very clean, so tweaked the printer hardware to ensure no wobble on the z-axis.
share and rework as needed!
thingiverse
free
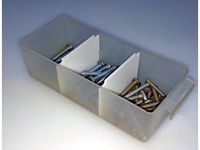
Plastic 16-tray Utility Box Dividers by HowardB
...you wish to change any sizing to fit your trays.
the .stl part is sized at 50mm x 34mm x 1.4mm for my tray sizes.
printed in pla.
thingiverse
free

Twinlock Desk Tray - Replacement Risers by HowardB
...t i would not go beyond 150mm unless you print in abs or petg - so if you want your trays to be further apart, adjust the length!
thingiverse
free

EcoLED Cupboard Light Spacer Mounts by HowardB
...f you wish to remix for your doors or amend the design!
if you need a different size/design, i'll try and help where i can :)
thingiverse
free
Samsung Soundbar Holders (for Samsung TV) by HowardB
...lidly!
a section of the stl file is not very pretty in the preview, but it prints fine on simplify3d.
very happy with the result.
thingiverse
free

Glass Shelf Support Holders for Models/Minifigs Display by HowardB
...eeded for your length of glass/plexi shelf.
the sketchup files are included, if you wish to change the dimensions for your needs.
thingiverse
free

Jumbo Christmas - Mrs Claus by HowardB
...ingiverse.com/thing:3899272
the matching elves, bernard and twinkle, can be found here: https://www.thingiverse.com/thing:2880258
thingiverse
free

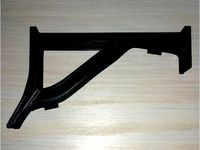
Rockler-Type Center-Offset Marking Tool Remix by murdrrdbypirates
...original design has been kept. all credit goes to howardb i only added things for my personal preferences. remember...
thingiverse
free

Jumbo Christmas - Elves - Bernard and Twinkle by HowardB
...slicer if needed.
please check/feedback whether they work for you - i have not tested and am not too good with meshmixer yet! ;)
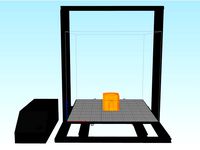
10S4
thingiverse
free
Prusa MK3 vs CR-10S4 Cube Vase Test by rawlogic
.... print with pla. nozzle temp is 215c.
more info about the prusa issue here:https://github.com/prusa3d/prusa-firmware/issues/602
thingiverse
free
CR-10S4 Printer Model for Simplify3d by RobbyMaQ
... 3d printer user group who provided jantzen with the original cr-10 model that both he & i then edited for use in simplify3d.
thingiverse
free

Small Heat Bed Adjustment Knobs for Creality CR-10S4 by MightyJabba
...ere intended for the regular cr-10, so won't show up in searches for the s4, so i'm going ahead and uploading my version.
thingiverse
free
CR-10S4 Build Plate Restraint (BPR) Sleeve by pr0ph3t1c
... model i posted has the incorrect thicknesses which prevent the bpr from sliding between the frame and the bed. sorry about that.
thingiverse
free

CR-10S4 Build Plate Restraint by pr0ph3t1c
...osted had the incorrect thickness so it will not slide through the frame of the cr-10. sorry about that.
tbd
finish documentation
thingiverse
free

EZOut Filament Sensor Mount for the CR-10, CR-10S4/5 by mvansomeren
... abs exhibits.
since creality is always modifying their 3d printers, its possible that this will not fit future upgraded models.
thingiverse
free

Creality CR-10S, CR-10S4 Filament Sensor Upgrade by marivera77
...be a roller switch with a hinge on the arm would be more reliable. find it here: https://www.aliexpress.com/item/32823861655.html
thingiverse
free

Mosaic Palette+ Wheel holder by AllenCoghill
...works with a cr-10 model printer. i have a cr-10s4 leave the sticky back on the velcro and use...
thingiverse
free

CR-10 PanelDue 7i Mount by juanquivilla
...created this basic paneldue 7i display mount for my cr-10s4 after purchasing it with a duet2wifi (awesome upgrade btw!)....
Cr
turbosquid
$15
Creazioni CR-673 CR-4461
... available on turbo squid, the world's leading provider of digital 3d models for visualization, films, television, and games.
3ddd
$1
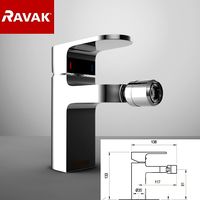
Ravak CR 055.00
...ravak cr 055.00
3ddd
ravak , смеситель
ravak cr 055.00
turbosquid
$100

CR-002
...
turbosquid
royalty free 3d model cr-002 for download as stl on turbosquid: 3d models for games, architecture, videos. (1686037)
3ddd
$1

Ravak CR 012.00
...ravak cr 012.00
3ddd
ravak , смеситель
смеситель ravak cr 012.00
3ddd
free
Консоль CR Currin
...ь , cr currin
консоль cr currin
ширина - 1675 мм
глубина - 510 мм
общая высота - 810 мм
3ddd
$1
CR 39444
...0
диаметр: 100
тип патрона: gu5,3 gu10
количество ламп: 1
мощность: 35w
цвет: золото хрусталь
материал: металл хрусталь exclusive
3d_ocean
$89
Honda CR-Z
...www.youtube.com/watch?v=rrbb4d4lypk ` he honda cr-z‘s exterior styling is formed around a “one-motion wedge” concept with a lo...
3ddd
$1

Creazoni / STEFY CR-8901
...creazoni / stefy cr-8901
3ddd
creazoni
creazioni stefy cr-8901
turbosquid
$60

Chain-CR-001
...squid
royalty free 3d model chain-cr-001 for download as stl on turbosquid: 3d models for games, architecture, videos. (1680536)
turbosquid
$99

Honda CR-Z
... available on turbo squid, the world's leading provider of digital 3d models for visualization, films, television, and games.
Extrusion
turbosquid
free
aluminum extrusion profiles
...free 3d model aluminum extrusion profiles for download as max on turbosquid: 3d models for games, architecture, videos. (1381707)
turbosquid
$5
Cable Cover Extrusion
... available on turbo squid, the world's leading provider of digital 3d models for visualization, films, television, and games.
3d_export
free

30 x 30 extrusion
... x 30 x 40.sldprt<br>30 x 30 x 50.sldprt<br>30 x 30 x 606.sldprt<br>the sketch.sldprt<br>30 x 30 x 40.stl
3d_export
$300
melt-blown fabric extrusion molding machine
...an email to me.<br>designed with solidworks 2017, render with photoview 360<br>**************************************
3d_export
$5

Spaceship - Galaxy Crusher
...with a more ominous twist. it has lots of extrusion and cubes and comes with a whopping 4k texture,...
3d_export
$20
1600 Meltblown cloth production line set drawing CAD
...width of 1600mm. the steel structure frame, feeding host, extrusion screw, heating system, screen changer, metering pump, melting it...
3d_export
$5

one-eyed scary virus
...cinema, the body relief is formed by the standard extrusion noise. the eye texture is...
3d_export
$20

GE TF34 Fan Blade and Nose Cone
...and appropriately sized fillet features are provided.<br>also, a threaded extrusion profile is provided on the fan blade component and...
3d_export
$10
glue injection machine
...injection technology. the ordinary glue injection machine is screw extrusion type, and its instantaneous pressure can reach more than...
3d_export
$1000
bead triangle adhesive laminating machine
...a triangular rubber head with the shape required for extrusion the rear end of the extruder is also provided...
Illuminated
turbosquid
$2
ILLUMINATED
...quid
royalty free 3d model illuminated for download as blend on turbosquid: 3d models for games, architecture, videos. (1406569)
3d_export
$10

illumination
...illumination
3dexport
3d_export
$7

illumination
...illumination
3dexport
3d_ocean
$5
Illuminated Planter
...rld scale. materials and lights included. vray grass material included with displacement and diffuse maps + settings vray rend...
turbosquid
$25

Illuminated Mirrors
...royalty free 3d model illuminated mirrors for download as max on turbosquid: 3d models for games, architecture, videos. (1493182)
3d_export
$5

illuminated mirror
...all mirror. the mirror sheet is divided into sections which are alternately directed at an angle up and down. the design is mine.
3d_ocean
$5
Illuminated Cubes
...at or to hold an object. real world scale. materials and lights included. vray rendered version 2.40.04 no cameras. no background
turbosquid
$3

illuminated column
...illuminated column for download as dwg, sldpr, sldas, and ipt on turbosquid: 3d models for games, architecture, videos. (1213689)
turbosquid
$30

lamps, illumination
... available on turbo squid, the world's leading provider of digital 3d models for visualization, films, television, and games.
turbosquid
$20

illuminated table
... available on turbo squid, the world's leading provider of digital 3d models for visualization, films, television, and games.
Switch
archibase_planet
free
Switch
...switch
archibase planet
switch cluster switch
light switch 1 - 3d model for interior 3d visualization.
archibase_planet
free
Switch
...switch
archibase planet
switches switch
switch 1 - 3d model (*.gsm+*.3ds) for interior 3d visualization.
archibase_planet
free
Switch
...switch
archibase planet
closer button switch cluster switch
switch - 3d model (*.3ds) for interior 3d visualization.
archibase_planet
free
Switch
...switch
archibase planet
switch closer
light switch 2 - 3d model for interior 3d visualization.
archibase_planet
free
Switch
...switch
archibase planet
closer button switch
switch n300808 - 3d model (*.gsm+*.3ds) for interior 3d visualization
archibase_planet
free
Switch
...switch
archibase planet
closer button switch
switch n141108 - 3d model (*.gsm+*.3ds) for interior 3d visualization.
archibase_planet
free

Switch
...switch
archibase planet
cluster switch closer
switch n260609 - 3d model (*.gsm+*.3ds) for interior 3d visualization.
archibase_planet
free

Switch
...switch
archibase planet
button switch closer
switch 2 - 3d model (*.gsm+*.3ds) for interior 3d visualization.
archibase_planet
free

Switch
...switch
archibase planet
button switch closer
switch n070510 - 3d model (*.gsm+*.3ds) for interior 3d visualization.
3d_export
$5

switch
...switch
3dexport
3d model of a low-poly switch
2020
3d_export
$5

cyberpunk 2020
...cyberpunk 2020
3dexport
cyberpunk 2020
3d_export
$5
monster01 2020
...monster01 2020
3dexport
monster01 2020 dxf file rigged in mixamo.
3d_export
$129

explorer 2020
...explorer 2020
3dexport
3d_export
$5

mug 2020
...mug 2020
3dexport
3d_export
$15
3 rims 2020
...3 rims 2020
3dexport
new rims 2020 from inventor
turbosquid
$7

Keepsake of 2020
...ty free 3d model keepsake of 2020 for download as obj and stl on turbosquid: 3d models for games, architecture, videos. (1657350)
3d_export
$35

landrover 2020
...landrover 2020
3dexport
turbosquid
$15
Timeless 2020
...free 3d model timeless 2020 for download as max, obj, and fbx on turbosquid: 3d models for games, architecture, videos. (1433362)
turbosquid
$85

Q8 2020
... free 3d model audi q8 2020 for download as max, obj, and fbx on turbosquid: 3d models for games, architecture, videos. (1559582)
turbosquid
$59

Supra 2020
...ee 3d model supra 2020 for download as max, lwo, obj, and c4d on turbosquid: 3d models for games, architecture, videos. (1404492)
Round
turbosquid
$18
round chairs with round table
...und chairs with round table for download as max, obj, and fbx on turbosquid: 3d models for games, architecture, videos. (1454090)
3d_export
$5
round knob
...round knob
3dexport
round knob
3d_export
$5
Italian round table Millennium Round
...italian round table millennium round
3dexport
3ddd
$1
Round Ottoman
...round ottoman
3ddd
пуф
round ottoman
3ddd
$1

Round pillow
...round pillow
3ddd
подушка
round pillow
3ddd
free
Round bed
...round bed
3ddd
круглая
round bed
3ddd
$1
round table
...round table
3ddd
круглый
round table, стол
3ddd
free
ROUND TABLE
...round table
3ddd
журнальный , круглый
round table
3ddd
$1
Round Table
...round table
3ddd
круглый , кофейный
rounded coffee table
3ddd
$1
Round Rug
...round rug
3ddd
ковер , круглый
useful rounded rug
Light
archibase_planet
free

Light
...light
archibase planet
lamp lighting light
light - s2 - 3d model for interior 3d visualization.
archibase_planet
free

Light
...light
archibase planet
light luminaire lighting
light l0465 - 3d model (*.gsm+*.3ds) for interior 3d visualization.
3d_export
$5

lighting
...lighting
3dexport
lighting
3d_export
$5

lighting
...lighting
3dexport
lighting in livingroom
turbosquid
$3

Lighting Tree with Lights
...d model lighting tree with lights for download as max and 3ds on turbosquid: 3d models for games, architecture, videos. (1585507)
archibase_planet
free

Light
...light
archibase planet
luster lighting solution
light - s - 3d model for interior 3d visualization.
archibase_planet
free

Light
...light
archibase planet
luster lamp lighting
light 1 - 3d model for interior 3d visualization.
archibase_planet
free

Lights
...lights
archibase planet
surgical lights surgical lamp
surgical lights (floor) - 3d model for interior 3d visualization.
archibase_planet
free

Light
...light
archibase planet
lighting luminaire candlelight
light l0463 - 3d model (*.gsm+*.3ds) for interior 3d visualization.
3d_export
$18

street light-lighting-light-xia bing
...
3dexport
street light-lighting-light-xia bing<br>max 2015 v-ray 3 max 2015<br>textures<br>all files in zip...