Thingiverse
CR-10 or Mini to Prusa i3 conversion kit by AeroFredcom
by Thingiverse
Last crawled date: 3 years ago
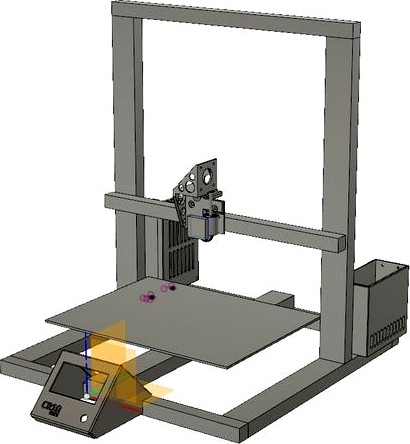
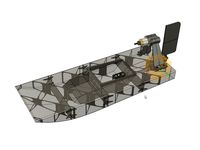
This is a set of files to convert a cr-10 mini to a kind of a Prusa.
Why this mod?
I have 3 machines running like this, did it for the space saving and for the prusa extruder, I want to be able to use the same gcodes on all my machines and having the same physical extruder helps
In the end, if you are brave enough, you will have a cleaner cr10 machine capable of printing any material and with better print quality.
Main Changes
Board moved to back left
PSU moved to back right
lcd moved to front
SSR movet to the base of the psu box.
New prusa mk2 extruder system based on a modified prusa extruder part that will be screwed directly to the CR-10 X L plate. (2 holes and 1 embedded threaded removed)
Heatedbed
On my machines I use PEI directly over the aluminium bed, usually these beds have a depression in the center so a sledge is used, sometimes I use one of those thick bed springs at the center.
Ideally we would use a central screw but it involves drilling the bed and I haven´t had the courage yet.
So, since we have a fixed central point we inser the spring and then lower the other 4 points until the bed is flat and leveled. Then we set the Z endstop height.
Extruder
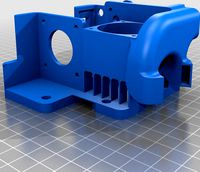
The best extruder is themodded Prusa, I´m including the modded part, the rest you can get from prusa website or guithub, its the MK2S version
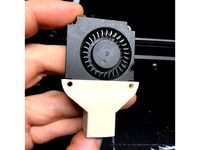
There is another extruder bracket included that will allow you to use the original cr-10 hot end. I gave up that road but still included it here so it might be useful, it works fine with a 50mm radial fan blowing directly into the heatsink, not much refinement has been done on this.
If you are mounting the prusa extrudes the last picture shows the holes used to fix the extruder to the X-Carriage plate on the machine. You will have to use the printed part as a template to make the holes, align by the right side, use a clamp or a vise to secure and drill two 3mm holes.
The bolts will come from behind to the nuts that will be embed in the part.
You will use many of the embed bolts to secure the other extruder parts so don´t be afraid to assemble and disassemble several times until you find the right sequence to do it.
Cooling fans
The SSR will get the air pulled by the PSU fan
The board has no fans, it might be a good idea to install a fun sucking air in the outside of the box although I have printed long hours PLA and haven´t seen any significant temperature increase without the fans
The prusa extruder uses 2 fans, one 30X30mm and one radial 50mm
Board
My minis have the melzi 1.12 if I´m not mistaken. to make this mod work on a 10-s or a 10 you should check if your board will fit the board box.
Wiring
You will need to disassemble your printer, take pictures and take notes, don´t be a jackass!
The cables from the board to the extruder are hold with a thin steel sheet, the old fashioned one used to pass electrical wires inside the walls, its like 0.5mm X 5mm should be easy to find on ebay.
Wires are all reused, you will only need a bit of 16 awg silicone wire to power the board since the PSU will be in the other side of the machine.
Braided nylon sleeves are all reused..
Needed Parts
(That I can remember)
E3D V6 or Lite6 or clone
Prusa pinion tooth e3d also sells them but they are slightly larger than Prusa´s.
30mm bb fan 50mm radial fan
Some long m3 screws 40mm, 25mm and so on
2 springd for the extruder idler
1 PEI sheet?
2 10pin connectors
80cm of 10 conductor flat cable for the lcd
some 16awg silicone wire
spring steel guide for the extruder cable management
some M5 screws and T nuts
Some square M3 nuts
LCD
I use the LCD on my machines because I like the see the temperatures and such but it is not mandatory if you are printing via octoprint. (some people don´t know this)
Firmware
I use stock Marlin.
Conclusions...
I´ve used these printers to print repetitive parts, last time they worked for a week non stop, no problems whatsoever.
The last machines I modded took me one day of work each, there is much soldering, testing, assembling and disassembling...
Change Log
Added the Fusion360 files so anyone can mess around with the designs. Please re share!
Added .factory files and Gcodes for a prusa i3mk2s PET and ABS parts
Added the Prusa extruder holder (without Pinda holder version) This version is stronger, if you are not going to use a bed probe this is better than the other version.
Added a new larger main board box, new lcd box type with adjustable view angle
Why this mod?
I have 3 machines running like this, did it for the space saving and for the prusa extruder, I want to be able to use the same gcodes on all my machines and having the same physical extruder helps
In the end, if you are brave enough, you will have a cleaner cr10 machine capable of printing any material and with better print quality.
Main Changes
Board moved to back left
PSU moved to back right
lcd moved to front
SSR movet to the base of the psu box.
New prusa mk2 extruder system based on a modified prusa extruder part that will be screwed directly to the CR-10 X L plate. (2 holes and 1 embedded threaded removed)
Heatedbed
On my machines I use PEI directly over the aluminium bed, usually these beds have a depression in the center so a sledge is used, sometimes I use one of those thick bed springs at the center.
Ideally we would use a central screw but it involves drilling the bed and I haven´t had the courage yet.
So, since we have a fixed central point we inser the spring and then lower the other 4 points until the bed is flat and leveled. Then we set the Z endstop height.
Extruder
The best extruder is themodded Prusa, I´m including the modded part, the rest you can get from prusa website or guithub, its the MK2S version
There is another extruder bracket included that will allow you to use the original cr-10 hot end. I gave up that road but still included it here so it might be useful, it works fine with a 50mm radial fan blowing directly into the heatsink, not much refinement has been done on this.
If you are mounting the prusa extrudes the last picture shows the holes used to fix the extruder to the X-Carriage plate on the machine. You will have to use the printed part as a template to make the holes, align by the right side, use a clamp or a vise to secure and drill two 3mm holes.
The bolts will come from behind to the nuts that will be embed in the part.
You will use many of the embed bolts to secure the other extruder parts so don´t be afraid to assemble and disassemble several times until you find the right sequence to do it.
Cooling fans
The SSR will get the air pulled by the PSU fan
The board has no fans, it might be a good idea to install a fun sucking air in the outside of the box although I have printed long hours PLA and haven´t seen any significant temperature increase without the fans
The prusa extruder uses 2 fans, one 30X30mm and one radial 50mm
Board
My minis have the melzi 1.12 if I´m not mistaken. to make this mod work on a 10-s or a 10 you should check if your board will fit the board box.
Wiring
You will need to disassemble your printer, take pictures and take notes, don´t be a jackass!
The cables from the board to the extruder are hold with a thin steel sheet, the old fashioned one used to pass electrical wires inside the walls, its like 0.5mm X 5mm should be easy to find on ebay.
Wires are all reused, you will only need a bit of 16 awg silicone wire to power the board since the PSU will be in the other side of the machine.
Braided nylon sleeves are all reused..
Needed Parts
(That I can remember)
E3D V6 or Lite6 or clone
Prusa pinion tooth e3d also sells them but they are slightly larger than Prusa´s.
30mm bb fan 50mm radial fan
Some long m3 screws 40mm, 25mm and so on
2 springd for the extruder idler
1 PEI sheet?
2 10pin connectors
80cm of 10 conductor flat cable for the lcd
some 16awg silicone wire
spring steel guide for the extruder cable management
some M5 screws and T nuts
Some square M3 nuts
LCD
I use the LCD on my machines because I like the see the temperatures and such but it is not mandatory if you are printing via octoprint. (some people don´t know this)
Firmware
I use stock Marlin.
Conclusions...
I´ve used these printers to print repetitive parts, last time they worked for a week non stop, no problems whatsoever.
The last machines I modded took me one day of work each, there is much soldering, testing, assembling and disassembling...
Change Log
Added the Fusion360 files so anyone can mess around with the designs. Please re share!
Added .factory files and Gcodes for a prusa i3mk2s PET and ABS parts
Added the Prusa extruder holder (without Pinda holder version) This version is stronger, if you are not going to use a bed probe this is better than the other version.
Added a new larger main board box, new lcd box type with adjustable view angle
Similar models
thingiverse
free

CR-10 5015 Radial Cooling Fan duct / shroud (original metal case) by sassymaker
...se) by sassymaker
thingiverse
cr-10 cooling fan mod using original metal case for extruder fan.
see photo for print orientation.
thingiverse
free

CR-10S control box dual 40mm fan bracket by Luminum
... to the right, to now blow air directly over all stepper motor drivers, lowering overall temperatures and prolonging driver life.
thingiverse
free

LWBMG with Linear rails for Prusa MK3/s by Fogd
...nding on type of filament
i have printed using this on my own prusa mk3s and went up to 200mm/s and 20jerk on x with maximum acc.
thingiverse
free

RAMBoBox LCD Reloaded by jneilliii
...the rambo board. box isn't tall enough either to clear the wiring and connectors of the lcd panel. back to the drawing board.
thingiverse
free

CR 10 Control Box Backfan Mod by RalphD
... box, undo the fan in the back, add the printed part between fan and box and then screw it back together with some longer screws.
thingiverse
free
Blower Fan Radial Adapter 4010 to 5015 by OderWat
...l while printing.
p.s.: this is the orientation and placement i needed. i don't currently plan do create other version of it.
thingiverse
free

3.5" Touch Screen Mod for Prusa Mk2/2s/3/3s (LCD LEFT)
...t with prusa slicer worked wayyy better than with cura ... with same parameter.. the extruder route was better i thing.
good luck
thingiverse
free

Prusa MK2s 5cm front extruder fan by Kolomanshell
...bit of a firehazard :d
but till now nothing happned, already printed tens of hours with it without anything melting or deforming.
thingiverse
free

CR 10 Direct Drive Extruder Mod Single Part by Unified_3D
...p on the far side of the x-axis i haven't tested it yet but i did make a provision for what i assume will be tight clearance.
thingiverse
free
Anycubic Chiron direct drive modification (almost all factory parts: extruder, v5 hotend, 4010 fan, 5015 radial fan)) by ggrzyk
...ble heat block in heatsink
mount pcb board
mount 4010 fan
connect all wires to pcb board
mount 5015 radial fan with two m4 screws
Aerofredcom
thingiverse
free

Heatbed Spatula by AeroFredcom
...d from the first layer residues.
i prefer the hard edged version, its quicker to print and the scraping edge seams to be better.
thingiverse
free

Bede BD-5J by AeroFredcom
... and the fuselage pieces you can make it 80vm to 1meter span on a prusa i3mk2 printer.
this plane seems interesting, it may fly.
thingiverse
free
Tabletop FM Radio by AeroFredcom
... do this would be with a summing circuit, not big deal:
here:http://www.rane.com/note109.html
its the stereo to mono summing box.
thingiverse
free

Folgertech FT-5 X Carriage adapter for Prusa i3 MK2 Extruder by AeroFredcom
...ess to one or just print them on your ft5 and see what comes out.
print in abs 40% or so of infil and 2 or 3 perimeters and tops.
thingiverse
free

Logitech c270 Prusa i3 MK2 camera mount Follow Y/Z by AeroFredcom
... here.
added: camera_holder.stl 35mm lomger than the original one
added: y_holder.stl is tighter to the printbed aluminium frame
thingiverse
free
RC Airboat Swamp Buggy by AeroFredcom
...ents
video by bob neitzke
https://www.youtube.com/watch?v=xzzk5bv0qcy
upadate log
30.7.2018 added unsplit hulls redone the gcodes
thingiverse
free

RC Flying Wing - The Klingberg Wing by AeroFredcom
...comments, this will help me to improve the design.
video thanks to mikael christensen:https://www.youtube.com/watch?v=sqqavzxcaus
Cr
turbosquid
$15
Creazioni CR-673 CR-4461
... available on turbo squid, the world's leading provider of digital 3d models for visualization, films, television, and games.
3ddd
$1

Ravak CR 055.00
...ravak cr 055.00
3ddd
ravak , смеситель
ravak cr 055.00
turbosquid
$100
CR-002
...
turbosquid
royalty free 3d model cr-002 for download as stl on turbosquid: 3d models for games, architecture, videos. (1686037)
3ddd
$1

Ravak CR 012.00
...ravak cr 012.00
3ddd
ravak , смеситель
смеситель ravak cr 012.00
3ddd
free
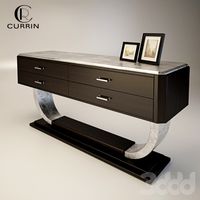
Консоль CR Currin
...ь , cr currin
консоль cr currin
ширина - 1675 мм
глубина - 510 мм
общая высота - 810 мм
3ddd
$1
CR 39444
...0
диаметр: 100
тип патрона: gu5,3 gu10
количество ламп: 1
мощность: 35w
цвет: золото хрусталь
материал: металл хрусталь exclusive
3d_ocean
$89

Honda CR-Z
...www.youtube.com/watch?v=rrbb4d4lypk ` he honda cr-z‘s exterior styling is formed around a “one-motion wedge” concept with a lo...
3ddd
$1

Creazoni / STEFY CR-8901
...creazoni / stefy cr-8901
3ddd
creazoni
creazioni stefy cr-8901
turbosquid
$60
Chain-CR-001
...squid
royalty free 3d model chain-cr-001 for download as stl on turbosquid: 3d models for games, architecture, videos. (1680536)
turbosquid
$99

Honda CR-Z
... available on turbo squid, the world's leading provider of digital 3d models for visualization, films, television, and games.
Conversion
3ddd
$1

Conversation Seat
...шетка
the conversation seat made in englandhttp://www.squintlimited.com/products/the_conversation_seat/gold
+ max 2011
3d_export
$10

Converse 3D Model
...converse 3d model
3dexport
converse shoe pc unix mac
converse 3d model electropainter17075 38067 3dexport
turbosquid
$100

converse-shoe
...quid
royalty free 3d model converse-shoe for download as c4d on turbosquid: 3d models for games, architecture, videos. (1398427)
turbosquid
$10

Conversation Furniture
... available on turbo squid, the world's leading provider of digital 3d models for visualization, films, television, and games.
turbosquid
$7

Converse Allstars
... available on turbo squid, the world's leading provider of digital 3d models for visualization, films, television, and games.
design_connected
$16

Conversation Club Chair
...conversation club chair
designconnected
donghia conversation club chair chairs computer generated 3d model. designed by n/a.
design_connected
$27

Hemicycle Conversation Chair
...rsation chair
designconnected
ligne roset hemicycle conversation chair computer generated 3d model. designed by nigro, philippe.
3d_export
$24

Converse keds 3D Model
...converse keds 3d model
3dexport
converse all star ked shoe clothes sports
converse keds 3d model vermi1ion 26201 3dexport
3ddd
$1

Converse All-Star Shoes
...converse all-star shoes
3ddd
кеды , обувь
converse all-star shoes
design_connected
$18

CONVERSE Jack Purcell Sneakers
...converse jack purcell sneakers
designconnected
converse jack purcell sneakers computer generated 3d model.
I3
3d_export
$10

suv i3
...suv i3
3dexport
suv i3 2013 series
3d_ocean
$89

BMW i3 2012
...y, in real units of measurement, qualitatively and maximally close to the original. model formats: - *.max (3ds max 2008 scanl...
cg_studio
$99

BMW i3 20143d model
...
cgstudio
.3ds .c4d .fbx .lwo .max .obj - bmw i3 2014 3d model, royalty free license available, instant download after purchase.
cg_studio
$99

BMW i3 20123d model
...tudio
.3ds .c4d .fbx .lwo .max .mb .obj - bmw i3 2012 3d model, royalty free license available, instant download after purchase.
cg_studio
$99

BMW i3 20143d model
...tudio
.3ds .c4d .fbx .lwo .max .mb .obj - bmw i3 2014 3d model, royalty free license available, instant download after purchase.
humster3d
$75

3D model of BMW i3 2014
...
buy a detailed 3d model of bmw i3 2014 in various file formats. all our 3d models were created maximally close to the original.
humster3d
$40

3D model of Kitchen Set I3
...uy a detailed 3d model of kitchen set i3 in various file formats. all our 3d models were created maximally close to the original.
3d_ocean
$30

Kitchen set i3
...ensils oven plates shelves sink table ware
kitchen set i3 include 3d models: cooker, oven, sink, cupboards, table, chair, plates.
3d_ocean
$89

BMW i3 2014
...y, in real units of measurement, qualitatively and maximally close to the original. model formats: - *.max (3ds max 2008 scanl...
cg_studio
$99

BMW i3 Concept 20113d model
...i3
.3ds .c4d .fbx .lwo .max .obj - bmw i3 concept 2011 3d model, royalty free license available, instant download after purchase.
Prusa
turbosquid
$2

Frame Filament Guide Clip-On for Prusa Mk3
...rame filament guide clip-on for prusa mk3 for download as stl on turbosquid: 3d models for games, architecture, videos. (1634730)
3d_export
free

prusa i3 mk3s laser mount for opt lasers
...to learn more about the blue laser technology that conceived the cutting and engraving laser heads from opt lasers, please visit:
turbosquid
free

Prusa small printer adapter holder
...er for download as ipt, skp, dwg, dxf, fbx, ige, obj, and stl on turbosquid: 3d models for games, architecture, videos. (1642936)
3d_export
$30

geisha by jonathan adler
...** i did a 3d printing test in the prusa software, you can find it among the attached images.<br>exchange:<br>.blend...
thingiverse
free

Prusa without Prusa (rc2) by madless
...prusa without prusa (rc2) by madless
thingiverse
just the main part of prusa rc2 faceshield, without writing.
enjoy :)
thingiverse
free

Prusa by acejbc
...prusa by acejbc
thingiverse
prusa knob info
m3 8mm screw
thingiverse
free

Prusa house
...prusa house
thingiverse
how prusa house could look like...
thingiverse
free

Prusa Mk2 "Fake Prusa" LCD cover by anraf1001
...r by anraf1001
thingiverse
version of prusa's lcd cover with "fake prusa" instead of "original prusa"
thingiverse
free

Prusa stabilizator by gutiueugen
...prusa stabilizator by gutiueugen
thingiverse
prusa stabilizator
thingiverse
free

Keychain Prusa by rbarbalho
...keychain prusa by rbarbalho
thingiverse
keychain with text prusa.
Kit
turbosquid
$3

Bathroom Kit Baño kit
... available on turbo squid, the world's leading provider of digital 3d models for visualization, films, television, and games.
turbosquid
$19

Kit
... available on turbo squid, the world's leading provider of digital 3d models for visualization, films, television, and games.
3d_export
$20

Drift Kit
...drift kit
3dexport
turbosquid
$40

BitCoin Kit
...urbosquid
royalty free 3d model bitcoin kit for download as on turbosquid: 3d models for games, architecture, videos. (1519068)
turbosquid
$9

Industrial kit
...osquid
royalty free 3d model industrial kit for download as on turbosquid: 3d models for games, architecture, videos. (1144117)
turbosquid
$6

Kit Vases
...
turbosquid
royalty free 3d model kit vases for download as on turbosquid: 3d models for games, architecture, videos. (1285114)
turbosquid
free

Survival Kit
...rbosquid
royalty free 3d model survival kit for download as on turbosquid: 3d models for games, architecture, videos. (1637721)
turbosquid
$50

Ninja Kit
...rbosquid
royalty free 3d model ninja kit for download as fbx on turbosquid: 3d models for games, architecture, videos. (1672364)
turbosquid
$35

Brushes Kit
...osquid
royalty free 3d model brushes kit for download as max on turbosquid: 3d models for games, architecture, videos. (1216721)
turbosquid
$19
Kit Bedroom
...osquid
royalty free 3d model kit bedroom for download as max on turbosquid: 3d models for games, architecture, videos. (1290049)
Mini
turbosquid
$10

Mini Mini Luceplan
...
royalty free 3d model mini mini luceplan for download as max on turbosquid: 3d models for games, architecture, videos. (1227359)
3d_ocean
$39

Mini Cooper
...mini cooper
3docean
cabrioler cooper mini
mini cooper cabrioler
3d_export
$30

Mini lathe
...mini lathe
3dexport
mini lathe
3d_export
$5

mini mouse
...mini mouse
3dexport
mini mouse
3d_export
$5

mini house
...mini house
3dexport
mini house
3d_export
free

Mini Mecha
...mini mecha
3dexport
concept of mini mecha
3d_ocean
$20

Mini Gun
...mini gun
3docean
gatling gun gun machine gun mini gun weapon
model of a mini gatling gun.
3ddd
free

Herve mini
... кофейный , herve
http://www.mobiliavenanti.it/ru/products/hervè-mini
3d_export
$5

mini wall
...mini wall
3dexport
mini wall for living room
3d_export
$5

mini bank
...mini bank
3dexport
mini bank 3d model
10
turbosquid
$25

10
... available on turbo squid, the world's leading provider of digital 3d models for visualization, films, television, and games.
turbosquid
$10

a-10
... available on turbo squid, the world's leading provider of digital 3d models for visualization, films, television, and games.
3ddd
$1

EX 10
...ex 10
3ddd
samsung , фотоаппарат
ex 10
3ddd
$1

Bed 10
...bed 10
3ddd
постельное белье
bed 10
evermotion
$25

Scene 10 Archinteriors vol. 10
...dering design interior
take a look at textured and shadered visualization scene ready to be rendered.. evermotion 3d models shop.
3ddd
$1

Curtains 10
...curtains 10
3ddd
curtains 10
3ds max 2011,fbx + textures
polys: 100355
3ddd
free

PLANTS 10
...plants 10
3ddd
цветок , горшок
plants 10,, with 3 different color planter boxes
turbosquid
$24

Chandelier MD 89310-10+10 Osgona
... chandelier md 89310-10+10 osgona for download as max and fbx on turbosquid: 3d models for games, architecture, videos. (1218762)
design_connected
$29

Nuvola 10
...nuvola 10
designconnected
gervasoni nuvola 10 computer generated 3d model. designed by navone, paola.
design_connected
$22

Kilt 10
...kilt 10
designconnected
zanotta kilt 10 computer generated 3d model. designed by progetti, emaf.