Thingiverse
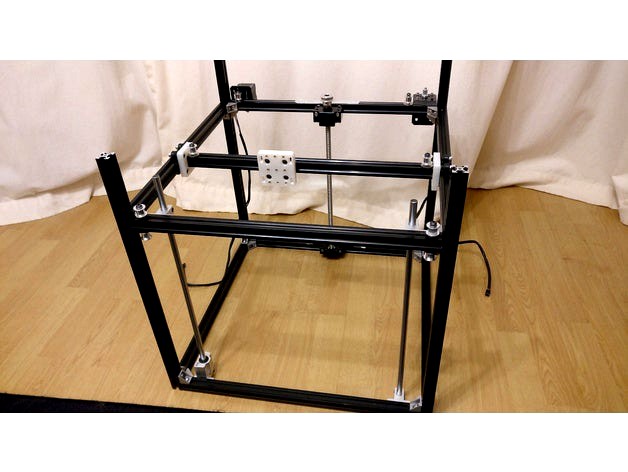
Colin's CoreXY (V-Slot) by zx81
by Thingiverse
Last crawled date: 3 years ago
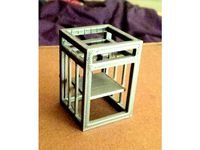
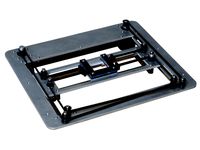
I'm Building a Custom CoreXY printer using V-Slot.
The V-Slot is reasonably priced however the Accessories for it are quite expensive and Will ADD UP! So I am going to design A lot of parts for ABS Printing.
This is an in Progress Thing!
So far it's just a couple of Parts to Join the V-Slot together, The Cube part Has 3x 5mm holes for joining 3 pieces of V-Slot at the top (when you TAP the V-SLot) thus enabling you to make a Square or rectangular Frame, the 3 larger holes are so you can get the Bolt in the cube.
V2 of cube added: Rounded corners, internal countersink for CapHead Bolts
Corner Piece is pretty Self explanatory, M5 10mm Dome head Screws work best.
I've just came across this http://www.thingiverse.com/thing:105900 Which is the open builds versions, I did not copy these designs, however my design and their designs are very similar.
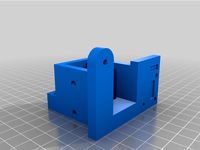
03-07-2016: Added a Nema17 Mount to attach the motor to the vslot, I still have to make a second mount that is higher than the first as I plan to use a "over and under" drive belts rather than the traditional crossed belts. this mount uses 3x M5 Cap head bolts to secure to the vslot and 4x M3 cap head's to attach the nema17
05-7-2016: Added 2nd Nema17 Mount this one is taller to raise the Gear Pulley above the first mount allowing an over under belt system, I may change this model.
06-7-2016: Added V3 of the cube, the previous 2 versions will need to be drilled to allow for a Cap Head bolt, V2 will work ok for button head bolts. V3 is optimised for button head bolts, cap head bolts are a poor choice they would require making the supporting plastic a lot thiner.
09-7-2016: changed the Nema17 Mounts from cap head bolts to button head bolts. I'm using M5 10mm Button head bolts for everything on this build now.
24-7-2016: Added RodFixing, it allows you to fit 10mm Smoth rod to the V-Slot / T-slot Extrusions.
21-11-2016 Added Custom Y-Plates the Y plate is loosely based on the Openbuilds Mini V gantry plate however the hole spacings are designed to do away with the Eccentric spacers, using mini wheels which you can get from your usual Chinese distributors, one orientation will give you a tighter fit than the other orientation (that's what the two squares are for on the top)
20-11-2016 Improved the X and Y gantry Plates, they work much better now
no adjustment or messing about is needed for use with the mini gantry wheels, just
4x m5 25mm bolts
4x m5 standard hex nuts
4x m5 washers
4x mini V wheels
8x m5 lock nuts
it is important to use lock nuts! as the inner diameter of the locking part of the nut is the perfect size to not lock up the mini wheels! put one either end of the wheel the locking part towards the wheel! (so the last lock nut is backwards)
Drill out the 4 holes with a 5mm drill bit to make sure the bolts fit through without being held by the plastic, the nuts on the rear are used to hold the bold straight and in place, if you screw the bolt through the plastic (which is very easy) it is very probable that it will be at a slight angle! (you don't want that) https://youtu.be/fFbzME6J3Ao
The V-Slot is reasonably priced however the Accessories for it are quite expensive and Will ADD UP! So I am going to design A lot of parts for ABS Printing.
This is an in Progress Thing!
So far it's just a couple of Parts to Join the V-Slot together, The Cube part Has 3x 5mm holes for joining 3 pieces of V-Slot at the top (when you TAP the V-SLot) thus enabling you to make a Square or rectangular Frame, the 3 larger holes are so you can get the Bolt in the cube.
V2 of cube added: Rounded corners, internal countersink for CapHead Bolts
Corner Piece is pretty Self explanatory, M5 10mm Dome head Screws work best.
I've just came across this http://www.thingiverse.com/thing:105900 Which is the open builds versions, I did not copy these designs, however my design and their designs are very similar.
03-07-2016: Added a Nema17 Mount to attach the motor to the vslot, I still have to make a second mount that is higher than the first as I plan to use a "over and under" drive belts rather than the traditional crossed belts. this mount uses 3x M5 Cap head bolts to secure to the vslot and 4x M3 cap head's to attach the nema17
05-7-2016: Added 2nd Nema17 Mount this one is taller to raise the Gear Pulley above the first mount allowing an over under belt system, I may change this model.
06-7-2016: Added V3 of the cube, the previous 2 versions will need to be drilled to allow for a Cap Head bolt, V2 will work ok for button head bolts. V3 is optimised for button head bolts, cap head bolts are a poor choice they would require making the supporting plastic a lot thiner.
09-7-2016: changed the Nema17 Mounts from cap head bolts to button head bolts. I'm using M5 10mm Button head bolts for everything on this build now.
24-7-2016: Added RodFixing, it allows you to fit 10mm Smoth rod to the V-Slot / T-slot Extrusions.
21-11-2016 Added Custom Y-Plates the Y plate is loosely based on the Openbuilds Mini V gantry plate however the hole spacings are designed to do away with the Eccentric spacers, using mini wheels which you can get from your usual Chinese distributors, one orientation will give you a tighter fit than the other orientation (that's what the two squares are for on the top)
20-11-2016 Improved the X and Y gantry Plates, they work much better now
no adjustment or messing about is needed for use with the mini gantry wheels, just
4x m5 25mm bolts
4x m5 standard hex nuts
4x m5 washers
4x mini V wheels
8x m5 lock nuts
it is important to use lock nuts! as the inner diameter of the locking part of the nut is the perfect size to not lock up the mini wheels! put one either end of the wheel the locking part towards the wheel! (so the last lock nut is backwards)
Drill out the 4 holes with a 5mm drill bit to make sure the bolts fit through without being held by the plastic, the nuts on the rear are used to hold the bold straight and in place, if you screw the bolt through the plastic (which is very easy) it is very probable that it will be at a slight angle! (you don't want that) https://youtu.be/fFbzME6J3Ao
Similar models
thingiverse
free

Y Gantry fo 20mm Extrusion (Core XY) by zx81
...he bolt through the plastic (which is very easy) it is very probable that it will be at a slight angle! (you don't want that)
thingiverse
free

Openbuilds v-slot X axis for Lulzbot TAZ 6 printers by piercet
...head m5 bolts and nuts 30mm (standard bolts will not fit, need the flat ones. ). longer if you plan to add the cable chain pieces
thingiverse
free

X Gantry Plate for 20mm extrusion by zx81
...hole spacing's are 15mm from the center left and right (or x axis) and 26mm up and down (y axis)
https://youtu.be/ffbzme6j3ao
thingiverse
free

Mini V Gantry to Nema Stepper Adapter - Flex3drive by berencam
...he stepper mounting holes, otherwise you will need to use a lower profile button head bolt for the mini v gantry v roller mounts.
thingiverse
free

Openbuilds v-slot X axis for Lulzbot TAZ 6 printers With integrated Z anti Wobble by piercet
...on picture is provided courtesy kam vedbrat and is used with permission, all rights for the photo remain with him. thank you kam!
thingiverse
free

Delta Carriage for 2020 Aluminum V-Slot® 20x20 Linear Rail by quadcells
...near the top of the carriage for the end stop adjusting bolt and one to lock down the end stop adjusting bolt (see the pictures).
thingiverse
free

2020 Aluminum V-Slot 60 Degree Brackets by quadcells
...al 60 degree brackets will need:
4 m5 10mm button head bolts (could use other type heads).
4 m5 t-nuts
hope this can help others.
thingiverse
free

Nema17 40mm Mount for Root 3 Lite by gerhardbooysen
...mount for the root 3 lite to first connect to the motor with 4x m3x10 bolts and them through gantry plates into m3 nuts inserted.
thingiverse
free

V-Slot Openbuilds Mini Gantry E3D V6 mount W/ 18mm Proximity Sensor by muegen
... for my modified gantry plate. uses the same cap that's supplied in source remix.
update: increased thickness of probe mount.
thingiverse
free
Anet E-10 My carriage mods - V-Slot, Titan Aero, Pinda sensor, Cooler by rings
...8
1 x m3x25
4x 6x7x2mm neodymium magnet
fan duct is a remix, link to the original below:https://www.thingiverse.com/thing:1246425
Zx81
thingiverse
free

Sinclair ZX81 by Amario57
...sinclair zx81 by amario57
thingiverse
model 1:1 computer sinclair zx81
with stickers
thingiverse
free
ZX81 Edge Connector by mcarlson_sb
...it the zx81 (10mm height)
expanded to 23x2 (46 pin)
added channel to outside holes to make bending wire and pulling tight easier.
thingiverse
free

downpipe cover by zx81
...by zx81
thingiverse
broke the old cover trying to access the pipe, can't find a replacement one so designed this.
fits well.
thingiverse
free

ZX81 / Timex Sinclair 1000 Display Stand
...ngs you want!
i have an assortment of matching stands for other computers if you want a consistent look for your display shelves.
thingiverse
free

Bulldog XL Mount by zx81
...r for clearance issues, i've included the sketchup files so you can modify it easily..
the fan bracket needs some improvment.
thingiverse
free

Sinclair ZX81, ZX Spectrum & QL Display Stands by Tom_DD
...128k toastrack
zx spectrum +2/+2ab
zx spectrum +3 with and without gotek (extra 5mm on base to give clearance for rotary knob)
ql
thingiverse
free

RJ4JP Test Fitting by zx81
...y carriage assembly around the drylin bushings.
please be aware this is not designed to be a drop-in replacement lmu10uu bearings
thingiverse
free

Spool Arm for P3Steel by zx81
...all tab with the hole in it and made the arm thicker, the screw now goes through the center of the arm with a m3 nut in the back!
thingiverse
free
X carriage for J head Hotend with inductive proximity sensor E3D / Hexagon by zx81
...ends also, you will have to glue the fan on as there wasn't enough space to put screw holes i might fix this at a later time.
thingiverse
free
X Gantry Plate for 20mm extrusion by zx81
...hole spacing's are 15mm from the center left and right (or x axis) and 26mm up and down (y axis)
https://youtu.be/ffbzme6j3ao
Colin
turbosquid
$14
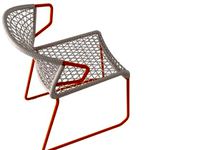
chair bar colin
... available on turbo squid, the world's leading provider of digital 3d models for visualization, films, television, and games.
turbosquid
$29

Colin Reid Still Life with Books
... available on turbo squid, the world's leading provider of digital 3d models for visualization, films, television, and games.
3d_export
$15

Colin Cab Barbara Barry Baker Chair 3D Model
...r sofa
colin cab barbara barry baker chair 3d model download .c4d .max .obj .fbx .ma .lwo .3ds .3dm .stl raziel3d 106811 3dexport
design_connected
$10

Capiton
...capiton computer generated 3d model. designed by garros, emilie colin ...
3ddd
$1

Zen Art
..., picture , камень , камни , ветки работы colin and linda mckie & linda...
3ddd
$1

Baker_Colin Cab Swivel Chair_No. 6712C-SW
... colin cab swivel
the barbara barry collection
detailed dimensions
width: 84 cm
depth: 99.06 cm
height: 80 cm
thingiverse
free

colin by summer3D
...colin by summer3d
thingiverse
colin's house
thingiverse
free

colin castle by summer3D
...colin castle by summer3d
thingiverse
colin's castle
thingiverse
free

Robot by Colin by SCISPD
...robot by colin by scispd
thingiverse
designed by 3rd grader, colin!
part of our 2d to 3d project.
thingiverse
free

Colin Butgereit by Staff
...colin butgereit by staff
thingiverse
Corexy
thingiverse
free

CoreXY by Kaz_tech
...corexy by kaz_tech
thingiverse
this is the model of corexy platform. i separately put the parts on this place.
thingiverse
free

corexy plotter by tjwan
...corexy plotter by tjwan
thingiverse
parts for corexy mill inspired by http://der-frickler.net/technik/corexyportal
thingiverse
free
ScribbleJ CoreXY Beta by ScribbleJ
...j/corexy-v1https://github.com/scribblej/corexy-v1#corexy-beta
full gallery of development photos here: http://imgur.com/a/donun
thingiverse
free
CoreXY Emblem by emkajot
...by emkajot
thingiverse
an emblem for your corexy printer.
size: 100mm x 38mm x 2mm.
update: added a version with a proper mount.
thingiverse
free

SolidCore CoreXY Carriage by shanehooper
...olidcore 3d printer. this design could be used in other corexy 3d printers.
also see:https://3ddistributed.com/corexy-3d-printer/
thingiverse
free
CoreXY 3D Printer Model by ReginaFabricam
...bricam
thingiverse
this is an original design of a corexy printer.https://www.tinkercad.com/things/jggr9qk4s4p-3d-printer-corexy
thingiverse
free

coreXY Upper structure Left
...corexy upper structure left
thingiverse
my customized corexy 3d printer upper left parts
thingiverse
free
CoreXY by frankie
...ing machines, etc. the design is described in greater detail at http://www.corexy.com . a video is at http://vimeo.com/40914530 .
thingiverse
free

Endstop block for CoreXY carriage by svkeulen
...endstop block for corexy carriage by svkeulen
thingiverse
endstop for corexy carriage
thingiverse
free
X carriage for the CoreXY MGN12 by hackerbijay
...x carriage for the corexy mgn12 by hackerbijay
thingiverse
x carriage for the corexy frame
Slot
3d_export
$5
slot handle
...slot handle
3dexport
slot handle
archibase_planet
free
Slot machine
...ase planet
slot machine slot-machine playing machine
slot machine n260311 - 3d model (*.gsm+*.3ds) for interior 3d visualization.
archibase_planet
free

Slot machine
... machine slot-machine one-armed bandit
slot machine novomatic gaminator n240911 - 3d model (*.3ds) for interior 3d visualization.
3d_export
$5

narrow slot handle
...narrow slot handle
3dexport
narrow slot handle
turbosquid
$15

Slot Machine
...oyalty free 3d model slot machine for download as max and fbx on turbosquid: 3d models for games, architecture, videos. (1710861)
turbosquid
$25

Slot Machine
... free 3d model slot machine for download as max, obj, and fbx on turbosquid: 3d models for games, architecture, videos. (1649555)
turbosquid
$25

Coin Slots
... available on turbo squid, the world's leading provider of digital 3d models for visualization, films, television, and games.
turbosquid
$11

Slotted spoon
... available on turbo squid, the world's leading provider of digital 3d models for visualization, films, television, and games.
turbosquid
$5

Slot Sofa
... available on turbo squid, the world's leading provider of digital 3d models for visualization, films, television, and games.
turbosquid
$3

slotted spoon
... available on turbo squid, the world's leading provider of digital 3d models for visualization, films, television, and games.
V
design_connected
$16
V Chair
...v chair
designconnected
v chair computer generated 3d model.
design_connected
$11
V Hanglamp
...v hanglamp
designconnected
arturo alvarez v hanglamp computer generated 3d model. designed by alvarez, arturo .
turbosquid
$25

Borbet V
...v
turbosquid
royalty free 3d model borbet v for download as on turbosquid: 3d models for games, architecture, videos. (1381618)
turbosquid
free

Saturn V
...rn v
turbosquid
free 3d model saturn v for download as blend on turbosquid: 3d models for games, architecture, videos. (1651098)
turbosquid
$40

V motor
...turbosquid
royalty free 3d model v motor for download as max on turbosquid: 3d models for games, architecture, videos. (1379483)
turbosquid
$7

V for Van
...rbosquid
royalty free 3d model v for van for download as max on turbosquid: 3d models for games, architecture, videos. (1695889)
turbosquid
$5

Letter v
...urbosquid
royalty free 3d model letter v for download as max on turbosquid: 3d models for games, architecture, videos. (1408535)
turbosquid
$5

Letter v
...urbosquid
royalty free 3d model letter v for download as max on turbosquid: 3d models for games, architecture, videos. (1408534)
turbosquid
$15

BonePile V
...oyalty free 3d model bonepile v for download as blend and obj on turbosquid: 3d models for games, architecture, videos. (1546310)
turbosquid
$2

FONT V
...quid
royalty free 3d model font v for download as ma and obj on turbosquid: 3d models for games, architecture, videos. (1549450)