Thingiverse
Bolt-On Bowden Mount For a Stock Monoprice Maker Select V2.1, Wanhao Duplicator i3 by ModifiedDesigns3D
by Thingiverse
Last crawled date: 3 years ago
Update 1-11-17 - Push fittings are adding slop. Use compression style fittings, but don't over compress as it will tighten the tubing around the filament.
Update 3-12-17 - I originally designed the extruder mount as an open design. Its been pretty cool for me to watch the filament feed, and easy to clean stringies and such without dismantling the whole thing. And to load filament I was using a pair of mini needle nose pliers from Harbor Freight. After I changed the rolls 10x in a day, I found this too impractical. So good news!! I added in sort of guide rails for quicker filament changes!
Your 3d printer does so much for you! So do it a favor and take a little weight off its shoulders!
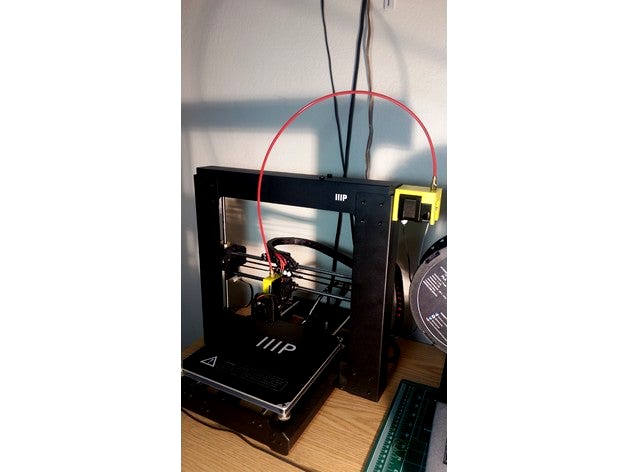
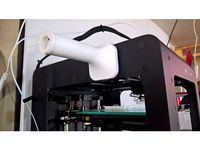
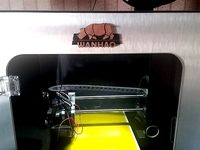
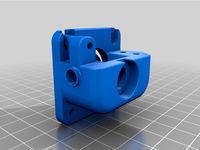
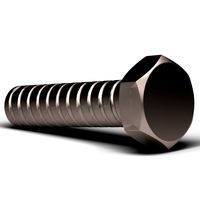
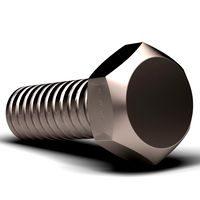
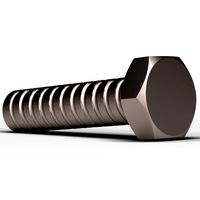
I introduce to you, a bolt-on Bowden system I built for my completely (as of now) stock Monoprice Maker Select V2.1 (and this will inherently work for the Wanhao Duplicator I3).
Get rid of that moving mass, lessen your vibration, increase your quality, print faster!
Parts and Instructions
Parts List (pretty simple)
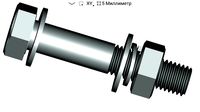
Bolts -
M3-0.5x8mm (x2 to attach the motor mount to the Z-frame)
M3-0.5x10mm (x2 to mount the motor to the motor mount)
The original motor mount bolts M3-0.5x(mine were 37mm) can be used. I bought 40mm is what i used. If you want to be safe you can use a 45mm length which will allow room for a nyloc.
I got all the nuts and bolts by walking into Home Depot, in their small bolts bin.
Tubing-
You can use pretty much whatever tubing you want, Seems the 3d community uses 1/8" PTFE, but I didn't have any laying around or wanted to wait for shipping. At work I did have access to 5/32" O.D. Synflex tubing which works great!!
The mount holes are designed to accept 1/8" NPT fittings.
So whatever tubing you decide to use, make sure they have 1/8" pipe threads.
I'm currently using 24" of tubing, 28 might be ideal?
You might have done some Googling by now and asking yourself.
How do I get my hands on some Synflex without buying a 500' roll?
Call or walk into any number of your local heavy duty diesel repair dealerships/ repair shops (Freightliner/Kenworth/Volvo/Peterbuilt). You can buy it by the foot and some shops have multiple colors. They should have both tubing and fittings! make sure you get push fittings. Maybe if you're lucky you will come across some freebee scrap trimmings or clean used pieces! Some parts departments are open 24h, so don't be afraid to call in the middle of the night!
Assembly (a little more complicated but simple)
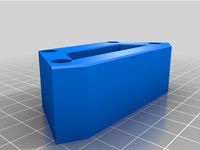
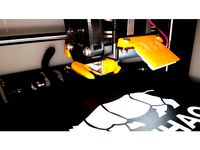
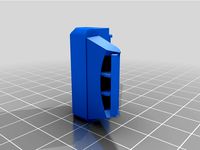
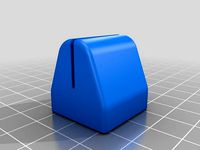
Print your parts!! lol there is a left and right motor mount for either side of the gantry (note: the left side print will orientate the extruder lever to the back).
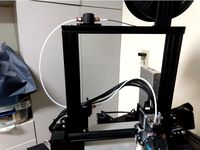
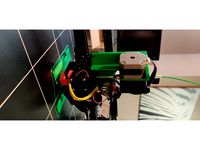
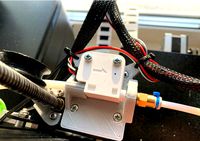
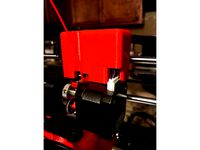
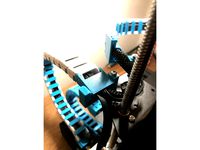
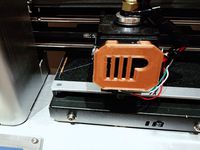
The Extruder mount will swap your fan to the right side. Makes everything nice and centered (but you can mirror this piece if you require a different view). Clean your printed pieces, insert the fitting into the motor mount. Wait to install the extruder mount fitting
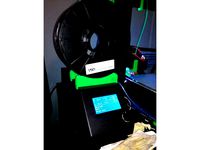
Install the motor mount on the 2 existing upper bolt holes. Use two 8mm bolts(any longer and the Z-carriage will contact).
Unclip your extruder motor connector. (take some pics so you know where each wire is connected!!!!!).
Using the eye-side of a needle, insert into the top wire side of the connector to free the lock tab, and pull the wire and needle out at once.
Take a small piece of scotch tape and wrap the wire connectors. Align the wires together and flat keeping the shape of the ribbon, using a small piece of scotch or packing tape (smooth tape) not bulky. This prevent the edges of the connectors catching as you pull them through the cable chain.
Gently pull the extruder motor wire/s back through the chain. Keep the chain straight wherever the taped connectors are as they don't like to bend. Also you only need to pull the wire ribbon it out of the X-axis chain.
Un mount your extruder motor and install to your motor mount with two 10mm bolts.
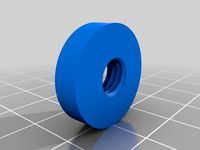
Select your bolt sizes you plan to use and attach the extruder mount. Place your push fitting over the hole and start to screw it in by hand while looking thru the center of the fitting. Align it so the filament port is at the furthest bottom of the fitting opening or barely visible.
Tubing - Use the corner of a razor blade and taper the inside of one side (like a funnel) and insert that side into the motor mount and the other side into the extruder mount.
Calibrate! Raise your extruder slowly to the top, verify your clearance and you can print the full 180mm. If your bed is leveled on the high end of the z-stop, you will loose clearance.
Viola!!
Pictures explaining the install are found here
https://www.facebook.com/ModifiedDesigns3D/photos/?tab=album&album_id=1878180105751362
For the most part, this is a finished model. Ill see if I can squeeze in the last few mm for those that have their bed calibrated on the high end. Comment or send a message so I know how much as my printer clears the whole 180mm.
Update 3-12-17 - I originally designed the extruder mount as an open design. Its been pretty cool for me to watch the filament feed, and easy to clean stringies and such without dismantling the whole thing. And to load filament I was using a pair of mini needle nose pliers from Harbor Freight. After I changed the rolls 10x in a day, I found this too impractical. So good news!! I added in sort of guide rails for quicker filament changes!
Your 3d printer does so much for you! So do it a favor and take a little weight off its shoulders!
I introduce to you, a bolt-on Bowden system I built for my completely (as of now) stock Monoprice Maker Select V2.1 (and this will inherently work for the Wanhao Duplicator I3).
Get rid of that moving mass, lessen your vibration, increase your quality, print faster!
Parts and Instructions
Parts List (pretty simple)
Bolts -
M3-0.5x8mm (x2 to attach the motor mount to the Z-frame)
M3-0.5x10mm (x2 to mount the motor to the motor mount)
The original motor mount bolts M3-0.5x(mine were 37mm) can be used. I bought 40mm is what i used. If you want to be safe you can use a 45mm length which will allow room for a nyloc.
I got all the nuts and bolts by walking into Home Depot, in their small bolts bin.
Tubing-
You can use pretty much whatever tubing you want, Seems the 3d community uses 1/8" PTFE, but I didn't have any laying around or wanted to wait for shipping. At work I did have access to 5/32" O.D. Synflex tubing which works great!!
The mount holes are designed to accept 1/8" NPT fittings.
So whatever tubing you decide to use, make sure they have 1/8" pipe threads.
I'm currently using 24" of tubing, 28 might be ideal?
You might have done some Googling by now and asking yourself.
How do I get my hands on some Synflex without buying a 500' roll?
Call or walk into any number of your local heavy duty diesel repair dealerships/ repair shops (Freightliner/Kenworth/Volvo/Peterbuilt). You can buy it by the foot and some shops have multiple colors. They should have both tubing and fittings! make sure you get push fittings. Maybe if you're lucky you will come across some freebee scrap trimmings or clean used pieces! Some parts departments are open 24h, so don't be afraid to call in the middle of the night!
Assembly (a little more complicated but simple)
Print your parts!! lol there is a left and right motor mount for either side of the gantry (note: the left side print will orientate the extruder lever to the back).
The Extruder mount will swap your fan to the right side. Makes everything nice and centered (but you can mirror this piece if you require a different view). Clean your printed pieces, insert the fitting into the motor mount. Wait to install the extruder mount fitting
Install the motor mount on the 2 existing upper bolt holes. Use two 8mm bolts(any longer and the Z-carriage will contact).
Unclip your extruder motor connector. (take some pics so you know where each wire is connected!!!!!).
Using the eye-side of a needle, insert into the top wire side of the connector to free the lock tab, and pull the wire and needle out at once.
Take a small piece of scotch tape and wrap the wire connectors. Align the wires together and flat keeping the shape of the ribbon, using a small piece of scotch or packing tape (smooth tape) not bulky. This prevent the edges of the connectors catching as you pull them through the cable chain.
Gently pull the extruder motor wire/s back through the chain. Keep the chain straight wherever the taped connectors are as they don't like to bend. Also you only need to pull the wire ribbon it out of the X-axis chain.
Un mount your extruder motor and install to your motor mount with two 10mm bolts.
Select your bolt sizes you plan to use and attach the extruder mount. Place your push fitting over the hole and start to screw it in by hand while looking thru the center of the fitting. Align it so the filament port is at the furthest bottom of the fitting opening or barely visible.
Tubing - Use the corner of a razor blade and taper the inside of one side (like a funnel) and insert that side into the motor mount and the other side into the extruder mount.
Calibrate! Raise your extruder slowly to the top, verify your clearance and you can print the full 180mm. If your bed is leveled on the high end of the z-stop, you will loose clearance.
Viola!!
Pictures explaining the install are found here
https://www.facebook.com/ModifiedDesigns3D/photos/?tab=album&album_id=1878180105751362
For the most part, this is a finished model. Ill see if I can squeeze in the last few mm for those that have their bed calibrated on the high end. Comment or send a message so I know how much as my printer clears the whole 180mm.
Similar models
thingiverse
free
Ender 3 BTT Smart Sensor & Direct Drive Filament path mounts by skrutch
...r the extruder replacement piece could be for a closed filament system. feeding from the filament box to the direct drive system.
thingiverse
free

QU-BD MBE Filament Tube Holder Extruder Side by tanks47
...arriage. it includes a mount for wiring etc. on the side. you will need an m3 bolt with nut if you wish to clamp down the tubing.
thingiverse
free

Robo R2 BMG Extruder mount by Waggster
...ng the red and blue wires over on the extruder motor connector. you just lift the white tab and the pin pulls out.. really easy.
thingiverse
free

Tevo Flexible Filament Extruder Upgrade by B-Cup
...to the stepper motor is 3mm.
the roller is 13mm in diameter. it is the one that came with the tevo.
have fun and happy printing!
thingiverse
free
Chiron direct extruder - Heatsink duct, drag chain mounts and beefed up base mount by cana3dprint
...gets bolted into the old stepper motor mount location on the right side of the frame. 4x m4 x8mm bolts and nuts will be required.
thingiverse
free
Simple filament runout sensor mount for Ender 3 Pro with direct extruder by qnub
...r.
from the input side if the mount you can insert 6mm tube from dryer or just put filament directly or through my filament guide
thingiverse
free

BondTech BMG Filament Tube Guide by kendel3d
...ment into your extruder. it will go right down to your geared pulleys every time without even having to touch the quick release.
thingiverse
free
Wire Cover/cable shroud for Wanhao Duplicator i3/ Maker select V2 (Flexion Extruder capable) by wallys440
...r a cleaner look. can be fitted without being bolted with some double stick tape.
requires minor supports over build plate only.
thingiverse
free

Dry Box by StealShot
...b!! place the filament guides so that when the extrude pulls on the filament, that i does not put to much strain on the filament.
thingiverse
free
Ender 3 - End Mount for CableChain
... is much better than having the cable chain suspended in mid-air.
i leave all files so you can mofify them to your liking.
enjoy!
Modifieddesigns3D
thingiverse
free
Monoprice Maker Select, wanhao i3 Y-bar alignment by ModifiedDesigns3D
...ect, wanhao i3 y-bar alignment by modifieddesigns3d
thingiverse
update - use version 2
https://www.thingiverse.com/thing:2739587
thingiverse
free

Clock Numbers, Roman Numerals by ModifiedDesigns3D
...rst sketchup model. so i figured i would share them with the world. they are quite large at full scale!! so scale them as needed.
thingiverse
free

Coil Spring Pen Holder by ModifiedDesigns3D
...ecause of the overhang angle. i used really heavy supports and was printed at .07mm layer height on my monoprice maker select v2.
thingiverse
free

Funny Bunny - Meme Rabbit by ModifiedDesigns3D
...know this bunny was in so many color combinations. lets see what you got.
ill work on making an easier print.i will update this!
thingiverse
free
Bow Stabilizer by ModifiedDesigns3D
...w how to make a customizable version you can drop a comment on the arrow shaft size you need and i can upload an stl with a +.2mm
thingiverse
free

Multiple Colors, Switching Filaments by ModifiedDesigns3D
...ng on making my printer beep out some cool tunes. so when i get time in between projects. ill be posting them to my page as well.
thingiverse
free

X-34 LandWhoopster by ModifiedDesigns3D
...es------
added a top plate to accommodate an eachine e010 - i don't have this flight controller, so it is a work in progress.
thingiverse
free

XYZ 20mm Calibration Cube With Holes by ModifiedDesigns3D
...ruder e-steps issue, over/under pumping, giving thick/thin walls which can give you a constant outside/inside dimensional issues.
thingiverse
free

Extended Spool Holder With Bearings, Frictionless by ModifiedDesigns3D
... spacer goes between the red/green pieces, don't over tighten the nut.
remove your old spool holder and install your new one!
thingiverse
free
12 DOF Humanoid walking legs Bi-Ped by ModifiedDesigns3D
...date the stl. this monstrosity was designed in sketch-up so if maybe you want the save file to continue the project, let me know.
Monoprice
thingiverse
free

Display frame for Monoprice MP10
...display frame for monoprice mp10
thingiverse
display frame for monoprice mp10
thingiverse
free

Bridge covers Monoprice MP10
...bridge covers monoprice mp10
thingiverse
bridge covers monoprice mp10
thingiverse
free
Monoprice Coin by Peyton_Guyot
...monoprice coin by peyton_guyot
thingiverse
print this!
thingiverse
free
Voxel Monoprice spool holder by avalero
...voxel monoprice spool holder by avalero
thingiverse
voxel monoprice spool holder
thingiverse
free
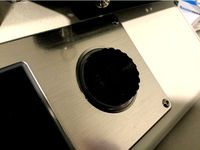
Monoprice select mini knob by BramRausch
...monoprice select mini knob by bramrausch
thingiverse
this is a replacement knob for the monoprice select mini.
thingiverse
free

Monoprice 3d printer hook by dmitriyf
...monoprice 3d printer hook by dmitriyf
thingiverse
this is an attachment to monoprice select 3d printer v2
thingiverse
free
monoprice ultimate spool mount by death4u
...older by danmannert to monoprice ultimate 3d printer. it clips into the slot on the top of the printer for the optional enclosue.
thingiverse
free
Monoprice Mini Delta Foot
...a foot for a monoprice mini delta. it helps to increase airflow under the printer. it also helps to reduce the volume of the fan.
thingiverse
free
Monoprice Select Mini Fan Guard
...y fan protection. this is an essential upgrade.
used it on the monoprice select mini pro (from www.3dprinthings.be).
perfect fit!
thingiverse
free

Monoprice Cable Tie Mount
... but had to cut down the straps a bit to make them work. designed a quick mount that fits the full strap, item 6457 on monoprice.
Wanhao
thingiverse
free
Wanhao Logo Plate / Wanhao Logo Schild by JMDesigns
...wanhao logo plate / wanhao logo schild by jmdesigns
thingiverse
wanhao logo plate / wanhao logo schild
thingiverse
free
Wanhao logo by nebtio
...wanhao logo by nebtio
thingiverse
wanhao logo
thingiverse
free
Wanhao keychain by Rein3003
...wanhao keychain by rein3003
thingiverse
a keychain with the logo of wanhao
thingiverse
free
Wanhao Di3 v2 Light / Wanhao Di3 v2 Beleuchtung by JMDesigns
...wanhao di3 v2 light / wanhao di3 v2 beleuchtung by jmdesigns
thingiverse
wanhao di3 v2 light / wanhao di3 v2 beleuchtung
thingiverse
free
TUSH For Wanhao by wtmi1992
...tush for wanhao by wtmi1992
thingiverse
the ultimate spool holder, modified for the top of the wanhao control box. fits snug.
thingiverse
free
fanduct wanhao d12 by theopoilmek
...fanduct wanhao d12 by theopoilmek
thingiverse
fanduct pour wanhao d12
thingiverse
free
Wanhao i3 Marlin by johan21
...wanhao i3 marlin by johan21
thingiverse
marlin for wanhao i3 rampsboard 1.4.
thingiverse
free
Wanhao Duplicator i3 by imagineering4
...wanhao duplicator i3 by imagineering4
thingiverse
these are the stl files for the improvements to the wanhao duplicator i3, v2
thingiverse
free

Wanhao D6 filament guard
...wanhao d6 filament guard
thingiverse
this is a filament guard for wanhao d6 machine to avoid the filament unrolling
thingiverse
free
Wanhao Duplicator i3 Model by Hilde3D
...wanhao duplicator i3 model by hilde3d
thingiverse
wanhao duplicator i3 model
Duplicator
turbosquid
$10

duplicate
...
turbosquid
royalty free 3d model duplicate for download as on turbosquid: 3d models for games, architecture, videos. (1566034)
turbosquid
$20

Wonderful duplicate kids room
...ul duplicate kids room for download as skp, 3ds, fbx, and obj on turbosquid: 3d models for games, architecture, videos. (1609462)
archive3d
free

Copier 3D Model
...hine duplicating machine
copier n160808 - 3d model (*.gsm+*.3ds) for interior 3d visualization.
3d_export
$30

connect four set
...ate objects that can be disassembled. includes one red and one black checker which can be duplicated to the standard 42 checkers.
3ddd
$1
Черепица
...del
- put it in your scene and duplicate
- level of detail can be edited
- open with 3ds max 2010-2013 or import in your program.
3d_export
$27

Dividing Cell / Ovule 3D Model
...al microbe blob ovum fiction science ovule duplication divide dividing
dividing cell / ovule 3d model duchampmodels 9691 3dexport
3d_ocean
$16

Folding Chair
...tubing. designed to be good low poly at a distance and mesh smooth pretty well and light weight for duplicating a lot. package...
3d_export
$8
wooden fence
... one post separate so the fence can be duplicated and extended. created in blender 3.0 file format fbx with texture painted maps.
3d_export
$8
wooden fence
... one post separate so the fence can be duplicated and extended. created in blender 3.0 file format fbx with texture painted maps.
3d_ocean
$2

DNA Strands Of 5 Types
... strands that can be multiplied and can be made long chains by duplicating them and can be easily applied materials and textures.
Bowden
turbosquid
$199

Vintage Ben Bowden Spacelander bike
... available on turbo squid, the world's leading provider of digital 3d models for visualization, films, television, and games.
3ddd
$1

Manooi Artica
...and pendants in various sizes and forms. suspension: galvanized bowden - dia. 1,5 mm. bulb: max 60 w -...
thingiverse
free
Remix Compact Bowden extruder - m6 bowden couplers and bowden tube pass-through
...ouplers and bowden tube pass-through
thingiverse
remix compact bowden extruder - m6 bowden couplers and bowden tube pass-through
thingiverse
free

Bowden Extruder
...bowden extruder
thingiverse
i have created bowden extruder for flsun delta 3d printer.
thingiverse
free

bowden 3mm by spee_D
...bowden 3mm by spee_d
thingiverse
for bowden 3mm
thingiverse
free
Bowden Tube Cutter
...bowden tube cutter
thingiverse
bowden tube cutter
thingiverse
free
Customizable Bowden Clip
...customizable bowden clip
thingiverse
customizable bowden clip
thingiverse
free
Bowden Oiler by fcheshire
...bowden oiler by fcheshire
thingiverse
inline bowden oiler
thingiverse
free

Bowden adapter by helkaroui
...bowden adapter by helkaroui
thingiverse
this is a fixed bowden adapter
thingiverse
free

Adventure3 Bowden Clip
...adventure3 bowden clip
thingiverse
adventure3 bowden clip
I3
3d_export
$10

suv i3
...suv i3
3dexport
suv i3 2013 series
3d_ocean
$89

BMW i3 2012
...y, in real units of measurement, qualitatively and maximally close to the original. model formats: - *.max (3ds max 2008 scanl...
cg_studio
$99

BMW i3 20143d model
...
cgstudio
.3ds .c4d .fbx .lwo .max .obj - bmw i3 2014 3d model, royalty free license available, instant download after purchase.
cg_studio
$99

BMW i3 20123d model
...tudio
.3ds .c4d .fbx .lwo .max .mb .obj - bmw i3 2012 3d model, royalty free license available, instant download after purchase.
cg_studio
$99

BMW i3 20143d model
...tudio
.3ds .c4d .fbx .lwo .max .mb .obj - bmw i3 2014 3d model, royalty free license available, instant download after purchase.
humster3d
$75

3D model of BMW i3 2014
...
buy a detailed 3d model of bmw i3 2014 in various file formats. all our 3d models were created maximally close to the original.
humster3d
$40

3D model of Kitchen Set I3
...uy a detailed 3d model of kitchen set i3 in various file formats. all our 3d models were created maximally close to the original.
3d_ocean
$30

Kitchen set i3
...ensils oven plates shelves sink table ware
kitchen set i3 include 3d models: cooker, oven, sink, cupboards, table, chair, plates.
3d_ocean
$89

BMW i3 2014
...y, in real units of measurement, qualitatively and maximally close to the original. model formats: - *.max (3ds max 2008 scanl...
cg_studio
$99

BMW i3 Concept 20113d model
...i3
.3ds .c4d .fbx .lwo .max .obj - bmw i3 concept 2011 3d model, royalty free license available, instant download after purchase.
Stock
turbosquid
$19

Stocks
... available on turbo squid, the world's leading provider of digital 3d models for visualization, films, television, and games.
3d_ocean
$7

Christmas Stockings
...christmas stockings
3docean
christmas gift holiday present sock stocking
sock and 2 gift.
turbosquid
$30

Christmas Stocking
...
royalty free 3d model christmas stocking for download as fbx on turbosquid: 3d models for games, architecture, videos. (1660476)
turbosquid
$2

sexy stockings
...uid
royalty free 3d model sexy stockings for download as max on turbosquid: 3d models for games, architecture, videos. (1350546)
turbosquid
$2

sexy stockings
...uid
royalty free 3d model sexy stockings for download as max on turbosquid: 3d models for games, architecture, videos. (1354968)
turbosquid
$2

sexy stockings
...uid
royalty free 3d model sexy stockings for download as max on turbosquid: 3d models for games, architecture, videos. (1351029)
turbosquid
$3
Iron Stocks
...yalty free 3d model iron stocks for download as blend and obj on turbosquid: 3d models for games, architecture, videos. (1596546)
turbosquid
$6

Prison Stocks
...free 3d model prison stocks for download as obj, c4d, and fbx on turbosquid: 3d models for games, architecture, videos. (1454023)
turbosquid
$29

Christmas Stocking
...del christmas stocking for download as 3ds, obj, c4d, and fbx on turbosquid: 3d models for games, architecture, videos. (1344671)
turbosquid
$5
Medieval Stocks
... model medieval stocks for download as 3ds, obj, c4d, and fbx on turbosquid: 3d models for games, architecture, videos. (1291222)
Select
3ddd
$1

TUBADZIN SELECT
...max 2014, 2011.
fbx 2014, 2013, 2011,
obj
_____________________________________http://www.tubadzin.pl/en/collection/324
3ddd
$1
Плитка Selection
... supergres , плитка
плитка selection - supergres ceramiche
turbosquid
$15
Christmas Selection
...royalty free 3d model christmas selection for download as fbx on turbosquid: 3d models for games, architecture, videos. (1696333)
turbosquid
$39

Vases selection
... available on turbo squid, the world's leading provider of digital 3d models for visualization, films, television, and games.
turbosquid
free

SELECTIVE RACKING SYSTEM
...yalty free 3d model selective racking system for download as on turbosquid: 3d models for games, architecture, videos. (1282512)
turbosquid
$10
Hansgrohe ShowerTablet Select
...ee 3d model hansgrohe showertablet select for download as max on turbosquid: 3d models for games, architecture, videos. (1336955)
turbosquid
$29
Chill selectional sofa
...odel chill selectional sofa for download as max, obj, and fbx on turbosquid: 3d models for games, architecture, videos. (1465691)
3ddd
free

Lunaria - Nova, ASA Selection
... asa selection , dried flowers
ветка лунарии в вазе nova, asa selection
3ddd
$1
inno SELECT SLIM chair
...inno select slim chair
3ddd
inno
high detailed inno select slim chair
turbosquid
$29

Select Chaise Lounge
... available on turbo squid, the world's leading provider of digital 3d models for visualization, films, television, and games.
V2
3d_export
free

Lamp v2
...lamp v2
3dexport
lamp v2 with solar panel
3d_export
$5

hammerhead v2
...hammerhead v2
3dexport
razer hammerhead v2 headphones, modeled in cinema 4d, render in corona
3d_export
$5

manometer v2
...manometer v2
3dexport
3d_export
$5

potato v2
...potato v2
3dexport
turbosquid
$52

Lifebuoys v2
...squid
royalty free 3d model lifebuoys v2 for download as fbx on turbosquid: 3d models for games, architecture, videos. (1560870)
turbosquid
$2

Mask v2
...turbosquid
royalty free 3d model mask v2 for download as stl on turbosquid: 3d models for games, architecture, videos. (1527741)
turbosquid
free

Flashlight V2
...d
free 3d model flashlight v2 for download as , obj, and fbx on turbosquid: 3d models for games, architecture, videos. (1663559)
turbosquid
$29

Thanos v2
...
royalty free 3d model thanos v2 for download as ztl and obj on turbosquid: 3d models for games, architecture, videos. (1651077)
turbosquid
$29

Titan v2
...d
royalty free 3d model titan v2 for download as ztl and obj on turbosquid: 3d models for games, architecture, videos. (1540228)
turbosquid
$29

Frieza v2
...
royalty free 3d model frieza v2 for download as ztl and obj on turbosquid: 3d models for games, architecture, videos. (1701238)
Bolt
3d_export
$2
bolt
...
bolt - a fastener in the form of a rod with an external thread, usually with a hex head wrench, forming a connection with a nut.
3d_export
$5

bolted ring
...bolted ring
3dexport
bolted ring
3d_export
$5
royal bolt
...royal bolt
3dexport
royal bolt
turbosquid
$10
Bolt
...lty free 3d model bolt for download as max, c4d, obj, and fbx on turbosquid: 3d models for games, architecture, videos. (1681373)
turbosquid
$10
Bolt
...lty free 3d model bolt for download as max, c4d, obj, and fbx on turbosquid: 3d models for games, architecture, videos. (1680879)
turbosquid
$10

Bolt
...lty free 3d model bolt for download as max, c4d, obj, and fbx on turbosquid: 3d models for games, architecture, videos. (1680869)
turbosquid
$10

Bolt
...lty free 3d model bolt for download as max, c4d, obj, and fbx on turbosquid: 3d models for games, architecture, videos. (1680866)
turbosquid
$10
Bolt
...lty free 3d model bolt for download as max, c4d, obj, and fbx on turbosquid: 3d models for games, architecture, videos. (1680860)
turbosquid
$10

Bolt
...lty free 3d model bolt for download as max, c4d, fbx, and obj on turbosquid: 3d models for games, architecture, videos. (1680480)
turbosquid
$13
bolt
... available on turbo squid, the world's leading provider of digital 3d models for visualization, films, television, and games.
Mount
3d_export
free

mounting bracket
...mounting plate is the portion of a hinge that attaches to the wood. mounting plates can be used indoors, cabinetry and furniture.
turbosquid
$2

MOUNTING
... available on turbo squid, the world's leading provider of digital 3d models for visualization, films, television, and games.
turbosquid
free

Mounts
... available on turbo squid, the world's leading provider of digital 3d models for visualization, films, television, and games.
turbosquid
free

Mount Fuji
...fuji
turbosquid
free 3d model mount fuji for download as obj on turbosquid: 3d models for games, architecture, videos. (1579977)
3d_export
$5

Headphone mount LR
...headphone mount lr
3dexport
headphone mount l+r
turbosquid
$39

Mount rainier
...quid
royalty free 3d model mount rainier for download as fbx on turbosquid: 3d models for games, architecture, videos. (1492586)
turbosquid
$5

pipe mounting
...quid
royalty free 3d model pipe mounting for download as obj on turbosquid: 3d models for games, architecture, videos. (1293744)
turbosquid
$3

Mounting Tires
...uid
royalty free 3d model mounting tires for download as fbx on turbosquid: 3d models for games, architecture, videos. (1708511)
3d_export
$5

Magnetic GoPro Mount
...pro mount
3dexport
cool magnetic mount for gopro. allows you to mount the camera on flat metal surfaces and get exclusive shots.
turbosquid
$5

Stone Mount
...ty free 3d model stone mount for download as ma, obj, and fbx on turbosquid: 3d models for games, architecture, videos. (1370306)
Maker
3d_ocean
$17

Coffee Maker
...coffee maker
3docean
breakfast coffee drip electric maker morning
detailed coffee maker and a plug.
3ddd
$1

coffee maker
...coffee maker
3ddd
кофемашина
coffee maker
3d_export
$10

chapati maker
...chapati maker
3dexport
it is a indian traditional chapati maker
archibase_planet
free
Coffee maker
...aker
archibase planet
percolator coffee-machine coffee maker
coffee maker - 3d model (*.gsm+*.3ds) for interior 3d visualization.
archibase_planet
free
Coffee maker
...aker
archibase planet
percolator coffee-machine coffee maker
coffee maker - 3d model (*.gsm+*.3ds) for interior 3d visualization.
archibase_planet
free

Coffee maker
...aker
archibase planet
percolator coffee-machine coffee maker
coffee maker - 3d model (*.gsm+*.3ds) for interior 3d visualization.
archibase_planet
free

Сoffee maker
...er
archibase planet
coffee maker percolator coffee-machine
сoffee maker n020112 - 3d model (*.3ds) for interior 3d visualization.
archibase_planet
free

Coffee maker
...aker
archibase planet
coffee maker percolator coffee-machine
coffee maker - 3d model (*.gsm+*.3ds) for interior 3d visualization.
3ddd
$1

Juice Maker
...juice maker
3ddd
соковыжималка
fully detailed kenwood juice maker
archibase_planet
free

Coffee maker
...hibase planet
coffee maker percolator coffee-machine
coffee maker n140611 - 3d model (*.gsm+*.3ds) for interior 3d visualization.
1
turbosquid
$69

armchairs(1)(1)
... available on turbo squid, the world's leading provider of digital 3d models for visualization, films, television, and games.
turbosquid
$15

ring 1+1
... available on turbo squid, the world's leading provider of digital 3d models for visualization, films, television, and games.
turbosquid
$10

chair(1)(1)
... available on turbo squid, the world's leading provider of digital 3d models for visualization, films, television, and games.
turbosquid
$8

Chair(1)(1)
... available on turbo squid, the world's leading provider of digital 3d models for visualization, films, television, and games.
turbosquid
$2

RING 1(1)
... available on turbo squid, the world's leading provider of digital 3d models for visualization, films, television, and games.
turbosquid
$1

house 1(1)
... available on turbo squid, the world's leading provider of digital 3d models for visualization, films, television, and games.
turbosquid
$1

Table 1(1)
... available on turbo squid, the world's leading provider of digital 3d models for visualization, films, television, and games.
turbosquid
$59

Formula 1(1)
...lty free 3d model formula 1 for download as max, fbx, and obj on turbosquid: 3d models for games, architecture, videos. (1567088)
design_connected
$11

No 1
...no 1
designconnected
sibast no 1 computer generated 3d model. designed by sibast, helge.
turbosquid
$2

desert house(1)(1)
...3d model desert house(1)(1) for download as 3ds, max, and obj on turbosquid: 3d models for games, architecture, videos. (1055095)