Thingiverse
X-34 LandWhoopster by ModifiedDesigns3D
by Thingiverse
Last crawled date: 3 years ago
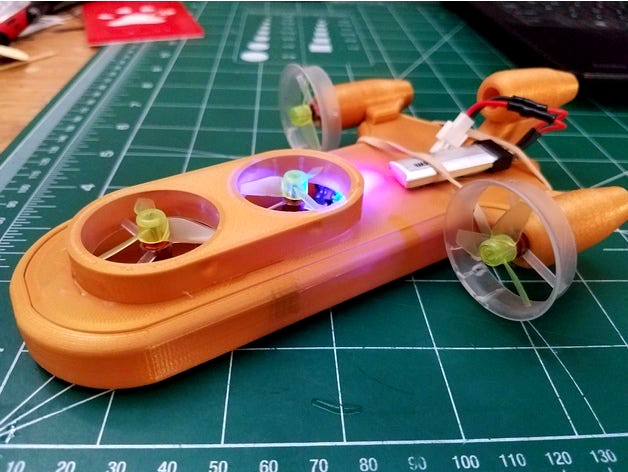
Meet the LandWhoopster! A cross between the Tiny Whoop and the Landspeeder.
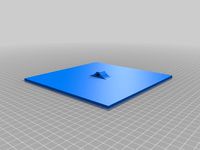
After a few prototypes I finally got a v1 I feel comfortable releasing. Some of the orientations are not ideal to just import and slice. The engines need to be positioned with the rear side down (skinny side) and the top plate should be flat side down. Designed to be printed without supports, however the engines may need a brim.
-Parts needed -
A working Tiny Whoop as sacrifice for the drone gods! I designed the LandWhoopster around the Blade Inductrix frame I had. It will need to be cut up - keeping the motor sleeve and propeller guards intact - like pictured.
My motors were Lumenier 19000kv Motors. Im unsure how it will handle with lower rated motors.
The mainboard mounts were created for my Beecore. I am unsure the shape of other boards, so I hope there is no contact issues. If there is, contact me and I can design different top plates. Re use the shock rubbers and mainboard screws.
m2x5 screws, you will need 2. In a lot of my projects I use laptop screws. Kits can be found on Amazon. Size isn't too important, There is plenty of room to drill and use what you have at hand. I use a 1/16th drill bit I got from Home Depot, to predrill the holes for the m2 screws.
Hot glue, super glue, 1 #32 rubber band,
-Assembly Instructions-
Print Parts as mentioned.
Know what motor is going where, test fit all the pieces before gluing anything.
I used Gorilla Super Glue and mounted the engines to the top plate. Make sure they are straight before the glue completely dries. Glue the center motor on the main hull.
Fish the wires through the engine holes. Before you slide it all the way in, put just a dab of hot glue like pictured. Not too much, so you can twist it to break it free for easy re use.
Put 2 motors in the motor mount with a couple dabs of hot glue will keep them secure. Then glut the assembly to the top plate.
Secure the flight controller. Connect the 4 motor wires and feed the battery connector through the top.
Attach the top plate assembly, use a rubber band to secure the batter and viola!
Please stay tuned! I plan on creating an updated v2. I hope to shave off a little more weight, better battery mounting, FPV mounting, and possibly where an existing frame doesn't need to be harvested,
------Updates------
Added a Top Plate to accommodate an Eachine E010 - I don't have this flight controller, so it is a work in progress.
Similar models
thingiverse
free
Tiny Whoop Gate by Imozeb
...tiny whoop gate by imozeb
thingiverse
custom tiny whoop gate. requires hot glue for assembly.
thingiverse
free

Tiny Whoop Hovercraft - 3 motors version V2 by Flowr
...of bottom just by resizing z dimension in slicer
you will need 3x m2 screws (can't be longer than your bottom height + 1.7mm)
thingiverse
free

Stepper motor mount for gauge by jmurphyca
...stepper motor mount for gauge by jmurphyca
thingiverse
i used a dab of hot glue to help hold it on.
thingiverse
free

Makerfire Armor90 tilted camera mount by ease
...makerfire armor90 tilted camera mount by ease
thingiverse
i used small dabs of hot glue to secure the camera and rx.
thingiverse
free

Tiny Whoop Mini AOI Camera Mount by egenjohn
... in petg it weighs in at 0.75g. i use a couple of small dabs of hot glue to hold the camera in place.
camera tilt is 10 degrees.
thingiverse
free

Tiny Whoop Camera Mount by Multimechanica
...sired length and slide it in both sides. i've attached this on the eachine e010 with two small dabs of hot glue either side.
thingiverse
free

Tiny whoop camera mount 20 degree (For Boldclash F01 size camera/vtx) by vector242
...r the dipole equipped boldclash f01 camera. it wont work with the more common sized micro cameras. but it could be remixed... : )
thingiverse
free

QX90C whoop replacement by kweidner
... even clean up the print before flight.
you may have to slightly sand the motor holes depending on how clean your printer prints.
thingiverse
free
NEMA Stepper Motor Mount by Raptorfx
... the stepper motor for the extruder to the ground plate of my printer. used hot glue to mount it, but also m3 screws can be used.
thingiverse
free
Eachine E010 fc mount plate for Tiny Whoover by TIRO1985
...ingiverse
mounting plate for the eachine e010 flight controller
glue it in place en use the original screws for mounting the fc.
Modifieddesigns3D
thingiverse
free
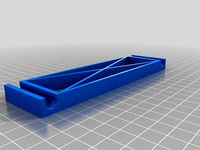
Monoprice Maker Select, wanhao i3 Y-bar alignment by ModifiedDesigns3D
...ect, wanhao i3 y-bar alignment by modifieddesigns3d
thingiverse
update - use version 2
https://www.thingiverse.com/thing:2739587
thingiverse
free

Clock Numbers, Roman Numerals by ModifiedDesigns3D
...rst sketchup model. so i figured i would share them with the world. they are quite large at full scale!! so scale them as needed.
thingiverse
free

Coil Spring Pen Holder by ModifiedDesigns3D
...ecause of the overhang angle. i used really heavy supports and was printed at .07mm layer height on my monoprice maker select v2.
thingiverse
free

Funny Bunny - Meme Rabbit by ModifiedDesigns3D
...know this bunny was in so many color combinations. lets see what you got.
ill work on making an easier print.i will update this!
thingiverse
free
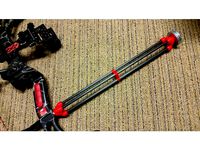
Bow Stabilizer by ModifiedDesigns3D
...w how to make a customizable version you can drop a comment on the arrow shaft size you need and i can upload an stl with a +.2mm
thingiverse
free
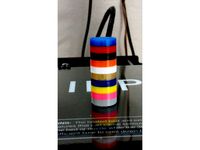
Multiple Colors, Switching Filaments by ModifiedDesigns3D
...ng on making my printer beep out some cool tunes. so when i get time in between projects. ill be posting them to my page as well.
thingiverse
free

XYZ 20mm Calibration Cube With Holes by ModifiedDesigns3D
...ruder e-steps issue, over/under pumping, giving thick/thin walls which can give you a constant outside/inside dimensional issues.
thingiverse
free

Extended Spool Holder With Bearings, Frictionless by ModifiedDesigns3D
... spacer goes between the red/green pieces, don't over tighten the nut.
remove your old spool holder and install your new one!
thingiverse
free
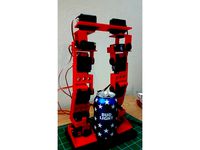
12 DOF Humanoid walking legs Bi-Ped by ModifiedDesigns3D
...date the stl. this monstrosity was designed in sketch-up so if maybe you want the save file to continue the project, let me know.
34
3ddd
free

Bed 34
...bed 34
3ddd
постельное белье
bed 34. i hope you like it.thank you!
3d_export
$7

sexy lady 34
...sexy lady 34
3dexport
sexy lady 34
3d_export
$20
machinemg-34-with-lafette
...machinemg-34-with-lafette
3dexport
machine(mg-34-with-lafette)
turbosquid
$20

Curtains 34
...osquid
royalty free 3d model curtains 34 for download as max on turbosquid: 3d models for games, architecture, videos. (1334169)
turbosquid
$6

Bedcloth 34
...osquid
royalty free 3d model bedcloth 34 for download as max on turbosquid: 3d models for games, architecture, videos. (1522723)
3ddd
$1

Blitz 1746-34
...blitz 1746-34
3ddd
blitz
люстра blitz, артикул 1746-34
3d_export
free

dreawer 34
...dreawer 34
3dexport
my canal :
turbosquid
$100

Sukhoi 34
...lty free 3d model sukhoi 34 for download as max, obj, and fbx on turbosquid: 3d models for games, architecture, videos. (1300999)
turbosquid
$49

TOZ 34
...oyalty free 3d model toz 34 for download as max, obj, and fbx on turbosquid: 3d models for games, architecture, videos. (1388142)
turbosquid
$19

Sofa 34
...yalty free 3d model sofa 34 for download as max, obj, and fbx on turbosquid: 3d models for games, architecture, videos. (1503054)