Thingiverse

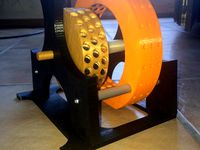
Bedini SG style motor (mechanical components) by MrCadillacsts
by Thingiverse
Last crawled date: 3 years, 1 month ago
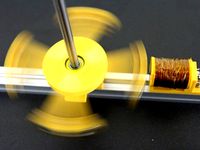
Here is a easy and fast to print model of an Bedini SG motor.
You have to get some additional parts for a successful assembly of this kit.
2 x Ball bearing 15 x 10 x 4 mm (typical outer wheel bearing of front axle of an Axial RC model). You should get these bearings at your local RC Store.
22 x Screw 3 x 12 mm (special thread for plastic). Also used on Axial RC cars, so you should find these screws also in your local RC store.
24 neodynum magnets 8mm in diameter, 5mm in hight (you only need 8 if you use the 8 magnet rotor).
some welding rods for the iron core of the coil
250m of 0.2mm magnet wire and 250m of 0.3mm magnet wire
the components to built the elctronic circuit (can be found on Internet)
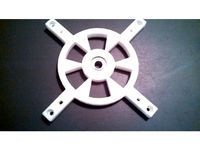
these parts have to print more than once:
2 x rotor_stand.stl
2 x connector.stl
4 x rubber_feet.stl
Assembly tips:
glue together the upper and lower part of the coil. Complete your coil by adding the iron core and the coil wires. Screw your finished coil to the part mounting_plate.stl.
Place the part center_rod.stl in the midlle hole of part rotor_xx_magnets.stl then screw on the hubs. Also add the magnets (maybe you have to grind the holes with a Dremel to fit the magnets properly)
After that you have to press the ball bearings into the parts rotor-stand.stl. Screw one rotor_stand.stl to the mounting plate (bearing faces towards the rotor). Add the rotor. Screw on the parts connector.st (connects the 2 rotor stands) and the second rotor stand.
The parts rubber_feet.stl will be glued to the lower side of the mounting plate.
Add your bedini circuit and start the motor!!
Have fun with this kit!!!
You have to get some additional parts for a successful assembly of this kit.
2 x Ball bearing 15 x 10 x 4 mm (typical outer wheel bearing of front axle of an Axial RC model). You should get these bearings at your local RC Store.
22 x Screw 3 x 12 mm (special thread for plastic). Also used on Axial RC cars, so you should find these screws also in your local RC store.
24 neodynum magnets 8mm in diameter, 5mm in hight (you only need 8 if you use the 8 magnet rotor).
some welding rods for the iron core of the coil
250m of 0.2mm magnet wire and 250m of 0.3mm magnet wire
the components to built the elctronic circuit (can be found on Internet)
these parts have to print more than once:
2 x rotor_stand.stl
2 x connector.stl
4 x rubber_feet.stl
Assembly tips:
glue together the upper and lower part of the coil. Complete your coil by adding the iron core and the coil wires. Screw your finished coil to the part mounting_plate.stl.
Place the part center_rod.stl in the midlle hole of part rotor_xx_magnets.stl then screw on the hubs. Also add the magnets (maybe you have to grind the holes with a Dremel to fit the magnets properly)
After that you have to press the ball bearings into the parts rotor-stand.stl. Screw one rotor_stand.stl to the mounting plate (bearing faces towards the rotor). Add the rotor. Screw on the parts connector.st (connects the 2 rotor stands) and the second rotor stand.
The parts rubber_feet.stl will be glued to the lower side of the mounting plate.
Add your bedini circuit and start the motor!!
Have fun with this kit!!!
Similar models
thingiverse
free

Bedini-Type 6-Pole Magnet Motor by Syrus54
...the size to fit the application.
item is not for sale, royalty free.
[ do not sell nor re-distribute my work ]
you're welcome
grabcad
free

electric coil
...e little hole is perfect for 2mm dual cable. the rotor for the bedini is in my library. the hole is perfect for a 12mm iron core.
thingiverse
free

electric coil by Syngenta
...e little hole is perfect for 2mm dual cable. the rotor for the bedini is in my library. the hole is perfect for a 12mm iron core.
thingiverse
free
Let's make your own Bedini Motor by arnoldkorea
...e spindle)
1 x m3 bolt (m3x50)
8 x m3 bolt (m3x20)
12 x m3 nut
make your own bedini motor circuit and play with fun !!
thingiverse
free
Magnet Beam Pulse Motor for Quarter Inch or 8mm Shaft by Cotton80
...his is optional.
the circuit and wire is up to you.
10:24 pm est 02/02/2017: reworked the motor brace to make it easier to print
thingiverse
free

Bedini rotor by Syngenta
...dermagnet-200-x-200-x-30-mm-n45-nickel-m3-senkloch::511.html
(german shop)
coils and other rotors for a bedini are in my library.
grabcad
free

Bedini rotor
...dermagnet-200-x-200-x-30-mm-n45-nickel-m3-senkloch::511.html
(german shop)
coils and other rotors for a bedini are in my library.
grabcad
free

bedini rotor
...ni are in my library. the holes are perfect for 20mm 6mm thick ring magnets.the cover is put onto the magnets for safety reasons.
thingiverse
free
Bedini rotor by Syngenta
...ni are in my library. the holes are perfect for 20mm 6mm thick ring magnets.the cover is put onto the magnets for safety reasons.
thingiverse
free
Magnetically Levitated Bedini/Cole Window Pulse Motor by Cotton80
...45
https://www.youtube.com/watch?v=p0tj8u7_qmi
the rotor was redesigned so that the magnets are no longer exposed on the outside.
Mrcadillacsts
thingiverse
free
Magnetmotor by MrCadillacsts
... this model you have the ability to make your own research.
if someone found the right pattern, please let me know!!!!
have fun!!
thingiverse
free
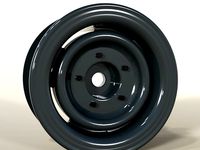
1.55 Landrover style rim by MrCadillacsts
...
this is "work in progress" because i think i have to add more material around the 12mm hex.
better pics coming soon!!!
thingiverse
free

2.2 HD Crawler rim by MrCadillacsts
...es on this wheels!!!
positioning the parts on printerbed (of your slicing software) is necessary.
now, have fun with that thing!!
thingiverse
free

1.9 Scale Truck Rim for narrow tires by MrCadillacsts
...e total width of rim ist 21mm.
for easier assembly, apply some oil on tire to rim surfaces.
hubcap is also included in database!!
thingiverse
free
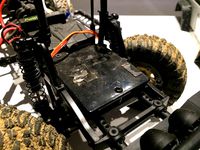
Chassis mount for Steering Servo SCX10 Chassis by MrCadillacsts
... be necessary), have fun!!!!
use pla or abs for printing (standard settings)
ps: the wheels are also available on youmagine.com
thingiverse
free

Chevy LS3 engine block for use with 540 style electric motor 1:10 by MrCadillacsts
...
you can find the remaining components for the construction of the complete engine here:https://www.thingiverse.com/thing:2866808
thingiverse
free

Chevy SB Receiverbox for Axial Wraith by MrCadillacsts
...s.com/de/3d-druckvorlagen/3d-druckbares-rc-zubehoer/upgradekits-fuer-die-chevy-smallblock-receiverbox/
have fun with this kit!!!!
thingiverse
free

scx10 panhard (trackbar) brackets by danman24
...brackets by danman24 thingiverse this is an addon for mrcadillacsts chassis mounted servo mount thing that enables you to...
thingiverse
free

Ford 427 Cobra Desktop Scale Model 1:5 by MrCadillacsts
...ed boxer engine, visit my homepage
at https://www.printable-3d-models.com/de/3d-druckbarer-bausatz-vw-kaefer-bus-buggy-motor.html
Bedini
thingiverse
free
Bedini rotor by Syngenta
...ni are in my library. the holes are perfect for 20mm 6mm thick ring magnets.the cover is put onto the magnets for safety reasons.
thingiverse
free

ReDesign3DP Bedini Motor V1 by redesign3dp
...redesign3dp bedini motor v1 by redesign3dp
thingiverse
redesigned bedini motor
thingiverse
free

Bedini Rotor round by Syngenta
...ngenta
thingiverse
this is the round version of my bedini rotor. magnets with 20mm diameter and 7mm in depth fit into the holes.
thingiverse
free
Bedini rotor by Syngenta
...dermagnet-200-x-200-x-30-mm-n45-nickel-m3-senkloch::511.html
(german shop)
coils and other rotors for a bedini are in my library.
thingiverse
free

Optical Tachometer for Bedini 3-pole Kit by liquidbuddha
...istor, with 5mm led plastic holders (both from radio shack). there is a small channel for wires, for the back side led or sensor.
thingiverse
free
Let's make your own Bedini Motor by arnoldkorea
...e spindle)
1 x m3 bolt (m3x50)
8 x m3 bolt (m3x20)
12 x m3 nut
make your own bedini motor circuit and play with fun !!
thingiverse
free
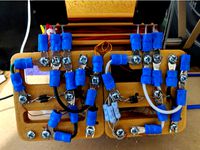
Bedini SSG Solderless Circuit by Cotton80
...elp reduce print time and still remains functional.
i also added a stencil for those who may want to put your circuit on a board.
thingiverse
free
Bedini-Type 6-Pole Magnet Motor by Syrus54
...the size to fit the application.
item is not for sale, royalty free.
[ do not sell nor re-distribute my work ]
you're welcome
thingiverse
free
electric coil by Syngenta
...by syngenta thingiverse this coil is perfect for a bedini pulse motor, the little hole is perfect for 2mm...
Sg
3ddd
$1
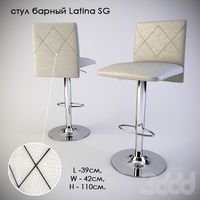
Latina SG
...latina sg
3ddd
барный
стул барный latina sg
3ddd
$1

SGS / OZ
...sgs / oz
3ddd
sgs
http://www.ceramicagsg.com/washbasins-and-shower-tray-oz/washbasin-oz.html
3d_export
$5

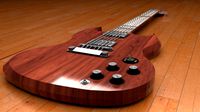
electric guitar sg
...electric guitar sg
3dexport
3d model electric guitar sg.
design_connected
$18

SG Padded Vases
...sg padded vases
designconnected
smallaccents sg padded vases computer generated 3d model.
turbosquid
$21
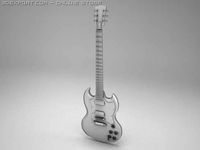
Gibson SG
... available on turbo squid, the world's leading provider of digital 3d models for visualization, films, television, and games.
turbosquid
free

Gibson SG
... available on turbo squid, the world's leading provider of digital 3d models for visualization, films, television, and games.
3ddd
$1
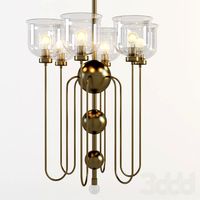
Suffolk | SG-1260
...g-1260
3ddd
urban electric
the urban electric
suffolk sg-1260
lustrehttp://www.urbanelectricco.com/mobile/suffolk.html
3ddd
$1

Kolarz Maschera 0228.62.SG
...kolarz maschera 0228.62.sg
3ddd
kolarz
бра kolarz maschera 0228.62.sg
3ddd
$1

Kolarz Maschera 0228.16.SG
...kolarz maschera 0228.16.sg
3ddd
kolarz , maschera
kolarz maschera 0228.16.sg
3d_export
$78
Gibson SG 3D Model
...ort
guitar music play gibson sg rock jazz electric pickup sound instrument string
gibson sg 3d model eric apanowicz 2196 3dexport
Components
design_connected
$20

Butterfly Components
...rfly components
designconnected
b&b italia butterfly components computer generated 3d model. designed by urquiola, patricia.
turbosquid
$33

Kitchen Components
...
royalty free 3d model kitchen components for download as max on turbosquid: 3d models for games, architecture, videos. (1309298)
turbosquid
$4

Cyl component
...id
royalty free 3d model cyl component for download as blend on turbosquid: 3d models for games, architecture, videos. (1390103)
turbosquid
$12

Ev3 Component
...oyalty free 3d model ev3 component for download as ma and obj on turbosquid: 3d models for games, architecture, videos. (1378651)
turbosquid
$133

room components
... available on turbo squid, the world's leading provider of digital 3d models for visualization, films, television, and games.
turbosquid
$9

Component Shelf
... available on turbo squid, the world's leading provider of digital 3d models for visualization, films, television, and games.
turbosquid
$5
road component
... available on turbo squid, the world's leading provider of digital 3d models for visualization, films, television, and games.
turbosquid
$1
Electronic components
... available on turbo squid, the world's leading provider of digital 3d models for visualization, films, television, and games.
3d_export
$15
SMD electronic components
...smd electronic components
3dexport
smd electronic components<br>verts 7.322<br>faces 12.728
3d_export
$13

SMD electronic components
...smd electronic components
3dexport
smd electronic components<br>verts 6.251<br>faces 10.674
Mechanical
3d_export
$50
Mechanism
...mechanism
3dexport
mechanism -------- animation is present only in the blender file.
3d_export
$5

mechanics
...mechanics
3dexport
turbosquid
$50

mechanic
... available on turbo squid, the world's leading provider of digital 3d models for visualization, films, television, and games.
3ddd
$1
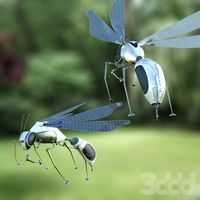
Mechanical Wasp
...mechanical wasp
3ddd
робот
mechanical wasp
3d_export
$20
Mechanical tail
...mechanical tail
3dexport
mechanical tail<br>four-part movement
3d_export
$5

mechanical ballista
...mechanical ballista
3dexport
a mechanical ballista useful for medieval or fantasy games does not contain animations
turbosquid
$59

Mechanical Part
...id
royalty free 3d model mechanical part for download as c4d on turbosquid: 3d models for games, architecture, videos. (1410833)
turbosquid
$50

Mechanical Spider
...royalty free 3d model mechanical spider for download as blend on turbosquid: 3d models for games, architecture, videos. (1599864)
turbosquid
$45

Mechanical Pencil
...royalty free 3d model mechanical pencil for download as blend on turbosquid: 3d models for games, architecture, videos. (1503379)
turbosquid
$35

Mechanical fish
...id
royalty free 3d model mechanical fish for download as max on turbosquid: 3d models for games, architecture, videos. (1152530)
Motor
archibase_planet
free

Motor
...base planet
motor motor engine engine electric motor
motor wagner n250213 - 3d model (*.gsm+*.3ds) for interior 3d visualization.
archibase_planet
free

Motor
...motor
archibase planet
motor motor engine engine
motor n151112 - 3d model (*.gsm+*.3ds) for interior 3d visualization.
archibase_planet
free

Motor
...motor
archibase planet
motor motor engine engine
motor n150615 - 3d model (*.gsm+*.3ds+*.max) for interior 3d visualization.
turbosquid
$15

Motor
...otor
turbosquid
royalty free 3d model motor for download as on turbosquid: 3d models for games, architecture, videos. (1639404)
3d_ocean
$5

Electric motor
...electric motor
3docean
car electric engine industry motor phase train vehicle
an electric motor enjoy!
3d_ocean
$18

Electric Motor
...electric motor
3docean
electric motor engine machine mover parts
3d model electric motor for hoist crane
turbosquid
$29

Motor
... available on turbo squid, the world's leading provider of digital 3d models for visualization, films, television, and games.
turbosquid
$5

Motor
... available on turbo squid, the world's leading provider of digital 3d models for visualization, films, television, and games.
3d_export
$5

electric motor
...electric motor
3dexport
electric motor use for industrial purposes
3d_export
$5

servo motor
...tor
3dexport
it's a simple part of servo motor 0.75kw for used in machines assembly to show specified motor in own project.
Style
3ddd
$1

style
...style
3ddd
манекен , одежда
style
3ddd
$1

BM Style
...bm style
3ddd
bm style
кресло bm style с материалами и тестурами
3d_export
$5
style handle
...style handle
3dexport
style handle
3d_export
$6

new style
...new style
3dexport
new style room
turbosquid
$1

style
... available on turbo squid, the world's leading provider of digital 3d models for visualization, films, television, and games.
3d_export
$5

Roman style
...roman style
3dexport
roman style architecture house
3ddd
$1

Ceppi Style
...ceppi style
3ddd
ceppi style
качественная модель классического стола ceppi style с текстурами и материалами v-ray
3ddd
$1

Kolo Style
...kolo style
3ddd
kolo
умывальник kolo style, арт. l21950
3ddd
$1
Banos Style
... style
производитель banos
модель style
в архиве присутствует дополнительная версия с материалами для corona
3ddd
$1

Кухня Free-style
...кухня free-style
3ddd
free-style
кухня free-style