Thingiverse
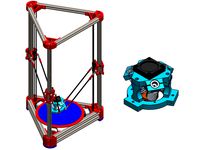
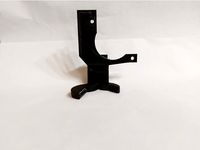
Anycubic Predator Enclosure for effector with 5015 fans by angrycannibal
by Thingiverse
Last crawled date: 3 years, 3 months ago
If you have nothing that sticks out from the sides of the effector like large fans, don't bother with my version, it will just make your printer larger than it needs to be.
If you have any fitment issues with my design or any problems, let me know, it's not that hard to make changes, and I don't mind spending a few minutes to make a minor change.
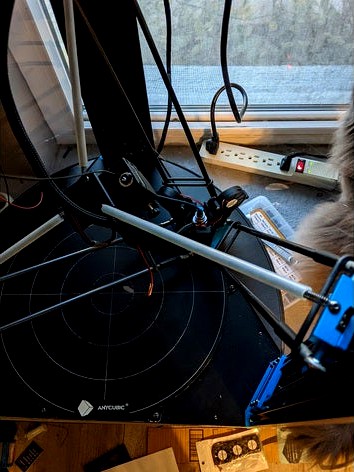
The reason I remixed the design is because I needed a bit more space to accommodate my effector with 5015 fans mounted to it. So I added about 23mm of extra clearance to the sides. In my case I didn't need to change the door, however I am remixing NCNFN3D_Arts design to use less filament have fewer parts, less support and just be generally easier to print, I'll probably have it ready sometime toward the middle or end of December 2020.
It looks like you may be able to use 3mm thick plexi, but 2mm is probably safer and just easier to deal with. I personally used 1.524mm(.06") cast acrylic, but extruded is easier to work with. The slots are about 3- 3.5mm wide, depending on how you slice/print it
Instructions are nearly the same as the original authors, except the plexi for the sides will need to be about 51cm wide plus or minus a couple mm. The width is not as critical as the height, which cannot be over 875mm, and I wouldn't go below 874mm or everything will not fit tightly.
I didn't bother exporting the mirrored parts for now. You will need to mirror each part in the slicer. It's pretty straight forward, you'll need 4 bottom pieces, 2 original and 2 mirrored, 2 or 4 top pieces and/or 2 or 4 filter pieces depending if you don't want a filter/fans or if you want two sides with filters/fans each will need a mirrored piece.
General disclaimer: Modify you're printer at your own risk, you may be shortening the lifespan of the electronics in your printer, or even end up creating a fire hazard, though doing this mod probably a lot better than sticking the entire printer in a plywood box as I have seen fairly often...
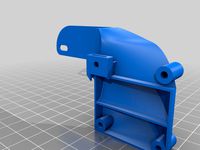
Updates: Realized after printing the top piece that I forgot to account for the fact that the metal plates stick out about a mm. I just made some extra clearance with a belt sander to fix mine and I fixed and have uploaded the new versions. Also made the top fan/filter part a bit thicker to match the other top piece, fitment should remain the same.
Added a fan and filter enclosure similar to the original authors. The print quality on mine is terrible because on of my printer arms almost came completely loose, somehow the print didn't fail so decided to just keep them and clean them up a bit rather than throw away a quarter roll of filament and re-print them. The filter housing in particular isn't that easy to print even if your printer isn't falling apart, it's basically a overhang, bridging and retraction torture test, so take it slow and make sure everything is tuned or it may fail.
The filter housing uses 70mm fans and a Roomba filter in addition to the activated carbon filter. I also opted for a speed controller instead of a simple switch because they are fused and the fans I bought are really loud and powerful. I'm using 24v .3a 70x25mm fans, which may be overkill.
These are the speed controllers I opted to use: https://www.amazon.com/gp/product/B07XC5J4GL/ref=ppx_yo_dt_b_asin_title_o04_s00?ie=UTF8&psc=1
The Roomba HEPA filters(you will need to cut off the tabs): https://www.amazon.com/gp/product/B0813SQPKW/ref=ppx_yo_dt_b_search_asin_title?ie=UTF8&psc=1
The activated carbon filter(I used 3 layers there is 12mm of clearance for the pre filter): https://www.amazon.com/gp/product/B07CKWC1M6/ref=ppx_yo_dt_b_search_asin_title?ie=UTF8&psc=1
The 70mm fans I'm using: https://www.amazon.com/gp/product/B07K2W6SVN/ref=ppx_yo_dt_b_search_asin_title?ie=UTF8&psc=1
Instructions for how to put it together are similar to the original authors, just add roomba filters with the tab cut off in the middle, use the carbon filter as a pre filter, and exchange the switch with a speed controller. Also you shouldn't be attempting this if you're not sure how to wire up a pair of fans, this can end badly if you do something dumb.
If you have any fitment issues with my design or any problems, let me know, it's not that hard to make changes, and I don't mind spending a few minutes to make a minor change.
The reason I remixed the design is because I needed a bit more space to accommodate my effector with 5015 fans mounted to it. So I added about 23mm of extra clearance to the sides. In my case I didn't need to change the door, however I am remixing NCNFN3D_Arts design to use less filament have fewer parts, less support and just be generally easier to print, I'll probably have it ready sometime toward the middle or end of December 2020.
It looks like you may be able to use 3mm thick plexi, but 2mm is probably safer and just easier to deal with. I personally used 1.524mm(.06") cast acrylic, but extruded is easier to work with. The slots are about 3- 3.5mm wide, depending on how you slice/print it
Instructions are nearly the same as the original authors, except the plexi for the sides will need to be about 51cm wide plus or minus a couple mm. The width is not as critical as the height, which cannot be over 875mm, and I wouldn't go below 874mm or everything will not fit tightly.
I didn't bother exporting the mirrored parts for now. You will need to mirror each part in the slicer. It's pretty straight forward, you'll need 4 bottom pieces, 2 original and 2 mirrored, 2 or 4 top pieces and/or 2 or 4 filter pieces depending if you don't want a filter/fans or if you want two sides with filters/fans each will need a mirrored piece.
General disclaimer: Modify you're printer at your own risk, you may be shortening the lifespan of the electronics in your printer, or even end up creating a fire hazard, though doing this mod probably a lot better than sticking the entire printer in a plywood box as I have seen fairly often...
Updates: Realized after printing the top piece that I forgot to account for the fact that the metal plates stick out about a mm. I just made some extra clearance with a belt sander to fix mine and I fixed and have uploaded the new versions. Also made the top fan/filter part a bit thicker to match the other top piece, fitment should remain the same.
Added a fan and filter enclosure similar to the original authors. The print quality on mine is terrible because on of my printer arms almost came completely loose, somehow the print didn't fail so decided to just keep them and clean them up a bit rather than throw away a quarter roll of filament and re-print them. The filter housing in particular isn't that easy to print even if your printer isn't falling apart, it's basically a overhang, bridging and retraction torture test, so take it slow and make sure everything is tuned or it may fail.
The filter housing uses 70mm fans and a Roomba filter in addition to the activated carbon filter. I also opted for a speed controller instead of a simple switch because they are fused and the fans I bought are really loud and powerful. I'm using 24v .3a 70x25mm fans, which may be overkill.
These are the speed controllers I opted to use: https://www.amazon.com/gp/product/B07XC5J4GL/ref=ppx_yo_dt_b_asin_title_o04_s00?ie=UTF8&psc=1
The Roomba HEPA filters(you will need to cut off the tabs): https://www.amazon.com/gp/product/B0813SQPKW/ref=ppx_yo_dt_b_search_asin_title?ie=UTF8&psc=1
The activated carbon filter(I used 3 layers there is 12mm of clearance for the pre filter): https://www.amazon.com/gp/product/B07CKWC1M6/ref=ppx_yo_dt_b_search_asin_title?ie=UTF8&psc=1
The 70mm fans I'm using: https://www.amazon.com/gp/product/B07K2W6SVN/ref=ppx_yo_dt_b_search_asin_title?ie=UTF8&psc=1
Instructions for how to put it together are similar to the original authors, just add roomba filters with the tab cut off in the middle, use the carbon filter as a pre filter, and exchange the switch with a speed controller. Also you shouldn't be attempting this if you're not sure how to wire up a pair of fans, this can end badly if you do something dumb.
Similar models
thingiverse
free

Air Filter
...00?ie=utf8&psc=1
all that is needed extra are bolts to hold the duct to the fan. i just used old bolts i found in the garage.
thingiverse
free

Sega Twister Fan topper mod by toyotaboy02
...iously need the standard sega / stern 3 pin connector (i don't remember if it's male or female coming out of the backbox)
thingiverse
free
12 Function Deep Dish Button Box by coyoteyz13
..._title_o03_s00?ie=utf8&psc=1
https://www.amazon.com/gp/product/b07vhcb1q4/ref=ppx_yo_dt_b_search_asin_title?ie=utf8&psc=1
thingiverse
free
Hand Mixer by OM3
...e?ie=utf8&psc=1
power supplyhttps://www.amazon.com/gp/product/b01461mogq/ref=ppx_yo_dt_b_search_asin_title?ie=utf8&psc=1
thingiverse
free

HEPA filter for Prusa Enclosure V2
... levels , but you can definitely hear the fan. i use rubber bands to keep the filter cover in place.step file included. have fun!
thingiverse
free

Light-Duty Vice by tmt0727
...gc96/ref=ppx_yo_dt_b_search_asin_title?ie=utf8&psc=1
you need a grease, 1x nut 1x washer, 2x washers and small 2x wood screws
thingiverse
free

Dog Clamp by tmt0727
...le?ie=utf8&psc=1
1/4-20 t-nuthttps://www.amazon.com/gp/product/b01msvu3wf/ref=ppx_yo_dt_b_search_asin_title?ie=utf8&psc=1
thingiverse
free

Binary Fidget Spinner
...e=utf8&psc=1
center bearing:
https://www.amazon.com/gp/product/b000fdrq1s/ref=ppx_yo_dt_b_search_asin_title?ie=utf8&psc=1
thingiverse
free

activated carbon mat filter by JustinX
...tf8&psc=1
protective grille: https://www.amazon.de/gp/product/b06x1f9mck/ref=ppx_yo_dt_b_asin_title_o05_s00?ie=utf8&psc=1
thingiverse
free

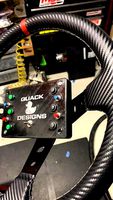
Speed Control Box by mmiller1444
...00?ie=utf8&psc=1
banana plugshttps://www.amazon.com/gp/product/b07c7kbz3s/ref=ppx_yo_dt_b_search_asin_title?ie=utf8&psc=1
Angrycannibal
thingiverse
free
Channel lock pliers I modified for compression fittings by angrycannibal
...hem.
i made a version with the original scaling (35mm) and a scaled down version(26mm) specifically for my compression fittings.
thingiverse
free

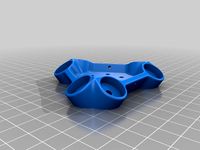
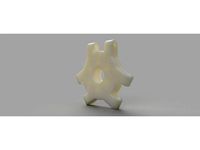
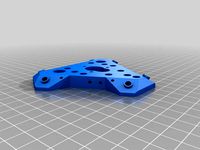
Predator Dragon 5015 Effector by angrycannibal
...at next to see how it performs, but i'll probably just go with some blue abs or the overture nylon again on the next version.
thingiverse
free

Predator Magball Carriage adapter 76MM by angrycannibal
... to screw for the spring attaches to the adapter, really it should be fine, but i feel there should be a bit more material there.
thingiverse
free

Duet 2 mounting plate for Anycubic Predator with fixed hole spacing (No Text ) by angrycannibal
... matter, since the changes are completely unnecessary and the difference is barely perceptible i'm calling it the ocd version
thingiverse
free

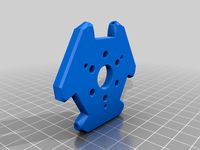
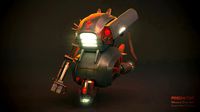
E3D Compatible Effectors for Anycubic Predator(eventually will make a version for a dragon hotend too) by angrycannibal
... the nozzle protrude just a couple mm below the effector since the effector will be the fan duct, to give me a bit more z height.
Effector
3d_ocean
$5

Radial Sound Effector
...e spheres will expand with your song. fully customisable, change the color, the size of the spheres or even put in different s...
3d_ocean
$12

3D Customizable Puzzle Set (16x10)
...mograph compatible (you can effect the pieces with mograph effector) - included also a non-mograph version with...
thingiverse
free
Effector by olo2000pm
...effector by olo2000pm
thingiverse
effector
thingiverse
free
CERAMBOT-Effector
...cerambot-effector
thingiverse
cerambot-effector
thingiverse
free

modulize effector by candyasdf
...ulize effector by candyasdf
thingiverse
mount things on effector with m3 screws
effector radius : 25.4mm
rod arm distance : 40mm
thingiverse
free
Delta Effector by zavier
...delta effector by zavier
thingiverse
delta effector with radial fan 50 and bltouch
thingiverse
free
D810 Effector by WhiteTiger13
...d810 effector by whitetiger13
thingiverse
this is d810 effector for d810 without autocalibration, and also cap for it.
thingiverse
free
Effector for Delta Printer
...effector for delta printer
thingiverse
effector for delta printer (3 color)
using diamond hotend
thingiverse
free
Delta effector magnetic by fpassos
...delta effector magnetic by fpassos
thingiverse
effector for e3dv6 hotend. i needed put the spheres (10mm) on the effector.
thingiverse
free
End Effector Gripper
...end effector gripper
thingiverse
end effector gripper
for a robotic arm
uses mg995 servo motor
5015
3ddd
$1

Скамья RUGIANO - COPERTINA BRONZA, 5015/130GL
...a bronza, 5015/130gl
3ddd
rugiano , скамья
скамья rugiano - copertina bronza, 5015/130gl
3d_export
$15

3d hair style for girl v94
...: 4811 - edges : 9836 - faces : 5015 - tris : 9642 - uvs : 5364 file...
thingiverse
free

5015 fan duct
...5015 fan duct
thingiverse
5015 fan duct
thingiverse
free

5015 Fan Guard
...5015 fan guard
thingiverse
5015 fan guard
3dfindit
free

294-5015
...294-5015
3dfind.it
catalog: wago
thingiverse
free
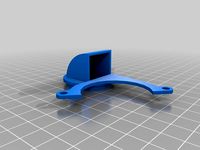
40MM to 5015 Adapter by 360alaska
...by 360alaska
thingiverse
this will adapt a 5015 fan to a 40mm fan mount. the 5015 fan mounts at a right angle and rotates fully.
thingiverse
free
Chiron 5015 blower by DK_Davis
...chiron 5015 blower by dk_davis
thingiverse
anycubic chiron 5015 blower
thingiverse
free

single 5015 to 50mnm by Kyledavis417
...single 5015 to 50mnm by kyledavis417
thingiverse
single 5015 to 50mm for tevo controller box
thingiverse
free
Cetus 3D 5015 Duct
...cetus 3d 5015 duct
thingiverse
twisted 5015 fan duct for cetus 3d mk2
thingiverse
free

Dual 5015 to 50mm by Kyledavis417
...dual 5015 to 50mm by kyledavis417
thingiverse
dual 5015 fan adapter for tevo tornado controller box
Predator
3d_export
$15

predator
...predator
3dexport
predator
3d_export
$18

predator
...predator
3dexport
turbosquid
$9

Predator
...r
turbosquid
royalty free 3d model predator for download as on turbosquid: 3d models for games, architecture, videos. (1322726)
3d_export
free

predator shuriken
...predator shuriken
3dexport
predator shuriken
turbosquid
$10
Predator
...d
royalty free 3d model predator for download as 3ds and obj on turbosquid: 3d models for games, architecture, videos. (1152845)
3d_export
$6
predator mask
...predator mask
3dexport
predator mask lowpoly
turbosquid
$299
Predator
... available on turbo squid, the world's leading provider of digital 3d models for visualization, films, television, and games.
3d_export
$5

mask predator
...mask predator
3dexport
an incredible mask, very detailed. based on predator. any questions write me please
3d_export
$17

MQ-1B Predator
...mq-1b predator
3dexport
mq-1b predator
3d_ocean
$5

Predator
...plane poly predator remote texture uav vehicle
ready to be used in production ready situation including all the major 3d formats.
Anycubic
thingiverse
free

anycubic filament holder
...anycubic filament holder
thingiverse
anycubic filament holder
thingiverse
free

Cableholder Anycubic Mega
...cableholder anycubic mega
thingiverse
cableholder anycubic mega
thingiverse
free

AnyCubic Toolholder by WildManPrinting
...anycubic toolholder by wildmanprinting
thingiverse
anycubic i3 mega toolholder that clips on the side of the spool a-frame.
thingiverse
free

AnyCubic Funnel by phana007
...anycubic funnel by phana007
thingiverse
funnel for anycubic resin and also a reducer for a normal soda bottle.
thingiverse
free

Anycubic Kossel PID calibration
...ir mount:
kossel raspberry camera ir mount
extruder pid calibration.
simple extruder temperature calibration of your 3d printer.
thingiverse
free

anycubic mega i3
...anycubic mega i3
thingiverse
anycubic i3 mega/mega s led 30mm 10-14v 6500k
thingiverse
free

Handle for anycubic by cruiser7
...handle for anycubic by cruiser7
thingiverse
its easier to handle the cover of the anycubic mono x and wash&care
thingiverse
free

anycubic predator Printbed by Lihyon
...anycubic predator printbed by lihyon
thingiverse
anycubic predator printbed
thingiverse
free

Anycubic Predator Triggers by marcelcountry
...anycubic predator triggers by marcelcountry
thingiverse
anycubic predator triggers
thingiverse
free

support anycubic cable by sarpdental
...support anycubic cable by sarpdental
thingiverse
support anycubic cable
Enclosure
3d_export
free

electrical enclosure
...l enclosure where electrical devices like (relays, contactors, busbars ) are kept in order to protect from hazardous environment.
turbosquid
$100

GPU Enclosure
...yalty free 3d model gpu enclosure for download as obj and stl on turbosquid: 3d models for games, architecture, videos. (1381061)
3d_export
$5

Electrical Enclosure
...ed. also has tower lights attaced on the top.<br>file format that are available:<br>.step<br>.obj<br>.stl
archive3d
free

Enclosure 3D Model
...closure 3d model
archive3d
shower enclosure-acquarius- 3d model for interior 3d visualization.
archive3d
free

Enclosure 3D Model
...enclosure 3d model
archive3d
shower enclosure-omega- 3d model for interior 3d visualization.
archive3d
free

Enclosure 3D Model
...enclosure 3d model
archive3d
shower enclosure-vega - 3d model for interior 3d visualization.
archive3d
free

Enclosure 3D Model
...enclosure 3d model
archive3d
shower enclosure-zenith - 3d model for interior 3d visualization.
turbosquid
$20

shower enclosure
... available on turbo squid, the world's leading provider of digital 3d models for visualization, films, television, and games.
turbosquid
$14

Dumpster Enclosure
... available on turbo squid, the world's leading provider of digital 3d models for visualization, films, television, and games.
turbosquid
$25

3d printer enclosure
... model 3d printer enclosure for download as ipt, skp, and fbx on turbosquid: 3d models for games, architecture, videos. (1634310)
Fans
3d_export
$5

fan
...fan
3dexport
fan 3d model, table fan, fan, electric fan, ventilator
archibase_planet
free

Fan
...fan
archibase planet
fan large fan
fan out n260707 - 3d model for interior 3d visualization.
archibase_planet
free

Fan
...fan
archibase planet
fan ceiling fan ventilator
fan stealth n300615 - 3d model (*.gsm+*.3ds) for interior 3d visualization.
3d_export
$15

fan
...fan
3dexport
is an ancient fan
3ddd
$1

Fan-C-Fan by marco gallegos
...n-c-fan by marco gallegos
3ddd
вентилятор , marco gallegos
fan-c-fan by marco gallegos
3d_export
$10

fan
...fan
3dexport
a detailed fan designed for home or space blowing is now available for only 19.99!
turbosquid
$1

Fan
...fan
turbosquid
free 3d model fan for download as on turbosquid: 3d models for games, architecture, videos. (1427865)
turbosquid
$14

Fan
...fan
turbosquid
royalty free 3d model fan for download as on turbosquid: 3d models for games, architecture, videos. (1415642)
3ddd
$1

Светильник Fan
...светильник fan
3ddd
fan , italamp
светильник fan, производитель italamp
turbosquid
$25

Fan
...fan
turbosquid
royalty free 3d model fan for download as c4d on turbosquid: 3d models for games, architecture, videos. (1483246)