Thingiverse

5015 Radial Fan Adapter for A5S - JGAurora (JGMaker) by _Isaiah_
by Thingiverse
Last crawled date: 4 years, 1 month ago
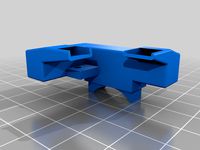
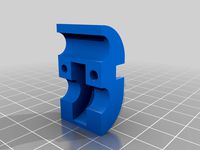
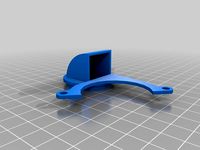
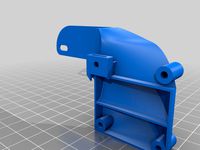
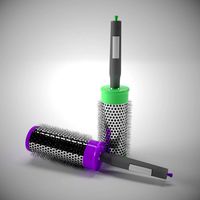
The JGAurora (now rebranded JGMaker) A5S is a great printer, and I'm very happy with almost every aspect of it. However, one place where it definitely leaves something to be desired is in the stock part cooling system. While it worked OK for most things, there came a time when I was trying to print a model with steeply overhanging points and the stock cooling just wouldn't cut it. I designed this adapter to allow a standard 5015 radial fan (24 volt, 0.1 amp) to be mounted in place of the stock fan, and it works far better than the original. Enjoy!
Notes:
Make sure to print this with ABS so that it can withstand the heat from the nozzle!
I'm currently using adapter V1.2. This adapter is a vast improvement over the stock fan and duct, and greatly reduces cooling issues. However, I've never been totally satisfied with the airflow pattern. It blows more air toward the front of the printer, whereas ideally the air should spread out evenly toward the front and back. I tweaked the design slightly and printed version 1.3, but I never got around to testing it because version 1.2 already works almost perfectly. I'm posting V1.3 in case anyone wants to try it, but I want to make it clear that V1.3 has not yet been tested. I do plan to test it myself sometime if no one else tests it first, but as of this writing (3/21/20) I haven't. If you decide to try it, please let me know how well it works and what sort of air distribution you get.
I very carefully measured all around my printer (A5S) to make sure that this adapter wouldn't run into anything over the entire extent of the build volume, so no worries on that count for owners of the A5S. I can't guarantee that for owners of the A5 or A3S, though. Also, the A5S uses a 24 volt, 0.1 amp fan, but it's possible other printers require a different voltage or amperage. If anyone tries it on one of those machines, please let me know how it goes so that I can inform others here.
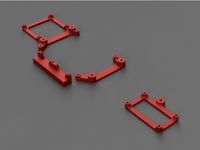
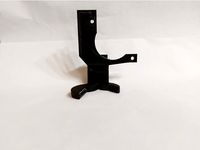
This adapter is designed to print without supports. In reality, however, I found that one part tends to get rather wobbly as it's printing before it's connected to the rest, so I added a custom piece of support material just to steady that part. I've uploaded versions both with and without this support, so you can choose whichever you like.
Don't forget to read the installation instructions! (below)
Installation Instructions:
For the installation you'll need:
The allen wrenches supplied with your printer
A wire cutter and stripper
A soldering iron
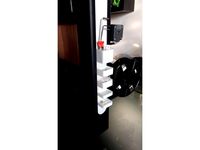
Step 1: Remove the stock air duct from the bottom of the hotend. It's a white plastic piece held in place by one screw underneath.
Step 2: You'll need to remove the black metal plate that's over the two fans on the back of the hotend. It's held in place by two or three screws on the sides. Once you have those out, you can begin pulling the plate off, but be careful! The stock part cooling fan is screwed onto this plate, so you won't be able to fully remove it right away. Pull it off enough to expose the part cooling fan wires. Cut these wires close to the fan, and finish removing the metal plate. Make sure to leave enough wire behind to work with so that you won't have to do any extensive rewiring.
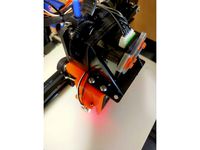
Step 3: Take a 24V 100mA 5015 radial fan and place it into the adapter. I included holes in the adapter to correspond to the mounting holes in the fan itself, but I found that it isn't necessary to further secure the fan. Slide the fan's wires through the adapter's wire guides (see photos), and trim off any excess.
Step 4: Solder the new fan's wires to the old fan wires in the hotend. Make sure to get the polarity right, or you'll burn out your fan! Once you've got the fan connected, carefully put the adapter and fan into place and screw it down with three screws in the sides.
Notes:
Make sure to print this with ABS so that it can withstand the heat from the nozzle!
I'm currently using adapter V1.2. This adapter is a vast improvement over the stock fan and duct, and greatly reduces cooling issues. However, I've never been totally satisfied with the airflow pattern. It blows more air toward the front of the printer, whereas ideally the air should spread out evenly toward the front and back. I tweaked the design slightly and printed version 1.3, but I never got around to testing it because version 1.2 already works almost perfectly. I'm posting V1.3 in case anyone wants to try it, but I want to make it clear that V1.3 has not yet been tested. I do plan to test it myself sometime if no one else tests it first, but as of this writing (3/21/20) I haven't. If you decide to try it, please let me know how well it works and what sort of air distribution you get.
I very carefully measured all around my printer (A5S) to make sure that this adapter wouldn't run into anything over the entire extent of the build volume, so no worries on that count for owners of the A5S. I can't guarantee that for owners of the A5 or A3S, though. Also, the A5S uses a 24 volt, 0.1 amp fan, but it's possible other printers require a different voltage or amperage. If anyone tries it on one of those machines, please let me know how it goes so that I can inform others here.
This adapter is designed to print without supports. In reality, however, I found that one part tends to get rather wobbly as it's printing before it's connected to the rest, so I added a custom piece of support material just to steady that part. I've uploaded versions both with and without this support, so you can choose whichever you like.
Don't forget to read the installation instructions! (below)
Installation Instructions:
For the installation you'll need:
The allen wrenches supplied with your printer
A wire cutter and stripper
A soldering iron
Step 1: Remove the stock air duct from the bottom of the hotend. It's a white plastic piece held in place by one screw underneath.
Step 2: You'll need to remove the black metal plate that's over the two fans on the back of the hotend. It's held in place by two or three screws on the sides. Once you have those out, you can begin pulling the plate off, but be careful! The stock part cooling fan is screwed onto this plate, so you won't be able to fully remove it right away. Pull it off enough to expose the part cooling fan wires. Cut these wires close to the fan, and finish removing the metal plate. Make sure to leave enough wire behind to work with so that you won't have to do any extensive rewiring.
Step 3: Take a 24V 100mA 5015 radial fan and place it into the adapter. I included holes in the adapter to correspond to the mounting holes in the fan itself, but I found that it isn't necessary to further secure the fan. Slide the fan's wires through the adapter's wire guides (see photos), and trim off any excess.
Step 4: Solder the new fan's wires to the old fan wires in the hotend. Make sure to get the polarity right, or you'll burn out your fan! Once you've got the fan connected, carefully put the adapter and fan into place and screw it down with three screws in the sides.
Similar models
thingiverse
free

JGAurora A5S 5015 blower mount
...ttps://www.thingiverse.com/thing:3981128
i printed this with pla, 0.2mm slices, 50% infill with supports touching baseplate only.
thingiverse
free

JGAurora A5 5015 fan and 3010 or 4010 fan by Alexis3D
...is3d
thingiverse
replace the insufficient axial cooling fans with effective 5015 radial fan.
the use of two 5015 is too noisy...
thingiverse
free

JGAurora A5 TMC2130 cooling fan duct by heindaddel
...addel
thingiverse
designed for the use of a 5015 24v radial fan, 4mm space underneath for internal wiring.
added xy-only version
thingiverse
free

JGAurora A5 Fan shroud by frozen1ce
...ghten the adapter's screw
be sure the duct does not hit any other components when x axis is at 0, and you're ready to go.
thingiverse
free

Sovol Sv01 5015 radial part cooling duct by trohn_javolta
...sure the airflow isn't that great but i just printed a bridging test and it turned out quite good.... if that says anything..
thingiverse
free

HotEnd Carriage / Bowden Mount for JGAURORA A5 by tesla_uss
...40x40 blower fan
24v 5015 blower cooling fan
microswitch
some screws and nuts
mportant! support only "touching build".
thingiverse
free

Geeetech Fang Cooling by ymohamed
...at the hard way)
hardware:
-40x40mm fan with screws (4x m3)
-5015 fan
--screw (1x m5) can be found in geeetech's spare screws
thingiverse
free

Vespid: V6 hotend + 5015 fan cooling + Orbiter v1.5 direct drive + stock Creality BLTouch mount hotend assembly compatible with Ender 3 v2 by GrouchyHedgehog
...tend, but there's plenty of room in the fan shroud for a dragon.
i print in cura 0.1mm layer height with supports and a brim.
thingiverse
free

Universal Radial Fan 5015 for hotend by nirvana93
...radial fan 5015 for hotend by nirvana93
thingiverse
universal radial fan 5015 for hotend
you need m3 screws to mount the output
thingiverse
free

JGAurora A5 Part Cooling Duct- and Tube Mount by CarstenD
...ct (not recommented) or any other of your liking. i prefer the one shown in the images: https://www.thingiverse.com/thing:2788702
Jgmaker
thingiverse
free
jgmaker magic fanduct
...jgmaker magic fanduct
thingiverse
jgmaker magic fanduct
thingiverse
free

JGMaker Magic Y-Axis Drag Chain Brackets by drewmcintire
...g chain on the jgmaker magic. they are compatible with the drag chain by @diogosantos88 https://www.thingiverse.com/thing:3715002
thingiverse
free
JGMaker Artist-D Mellow BMG by Artsiom
...0625
https://www.thingiverse.com/thing:4823742
https://www.thingiverse.com/thing:4828331
update: step & f3d files were added.
thingiverse
free
JGMaker Magic SKR 1.3 Adapters
...tps://www.thingiverse.com/thing:3655968
2) watch this thingy's video.
then, if you still want to tackle this project - enjoy!
thingiverse
free

JGAurora/JGMaker A6 Mainboard Replacement STL files by DaHai8
... to a more user friendly mainboard and firmware.
please see my youtube video on how these are used.
https://youtu.be/yzken7_nima
thingiverse
free

Filler adapter for JGMaker Artist-D by YuTR0N
...filler adapter for jgmaker artist-d by yutr0n
thingiverse
m4 screw is needed
2021/03/29
not
only m4 screw but also nut!
thingiverse
free
Direct extruder and BL touch mounter for JGmaker magic by Tyatarou
...or this mounter.
you can also mount bltouch, but you need to change the motherboard or add parts.
i replaced it with skr mini e3.
thingiverse
free

JGMaker Magic Fan 4010 / 5015 by Randaleklaus
...- en24032
m3 - 4
for 5015_blower bulid:
screws - iso4762
m3x6 - 6
m3x10 - 2
m3x16 - 2
m3x20 - 4
nuts - en24032
m3 - 4
thingiverse
free

JGMaker Magic Fan Duct Dual 5015 by sirhcwolf
...olf
thingiverse
dual 5015 fan duct for the jg maker magic. works with stock shroud and https://www.thingiverse.com/thing:4426539
thingiverse
free
JGMaker Artist-D Mellow BMG by Link08500
...on :
the fans duct for the extruder 2 you must make a mirror.
please don't used the old version!
i have remove the old older.
Isaiah
thingiverse
free

isaiah N by summer3D
...isaiah n by summer3d
thingiverse
j
thingiverse
free

Hacker Scouts - ISAIAH - Guild 005 by parachutefactory
... isaiah - guild 005 by parachutefactory
thingiverse
a kinect scan of hacker scouts member isaiah from guild #005, las vegas, nm.
thingiverse
free

Bible Scripture Isaiah 41:10 by sjej
...ur god; i will strengthen you, i will help you, i will uphold you with my righteous hand" (isaiah 41:10). please post makes.
thingiverse
free

mini by isaiahf
...mini by isaiahf
thingiverse
mini by isaiah [created on 3dtin]
thingiverse
free

iPhone X Replica by funmun
...designed with exact dimensions from apple developer. merry christmas! isaiah ...
sketchfab
$5

Bird King
...- buy royalty free 3d model by isaiah paul (@isaiah989) ...
thingiverse
free

Stand for "Myst Rocket - Remodeled" by mistic100
...the myst rocket - remodeled for 3d printing by isaiah it is designed by the original pier in the...
thingiverse
free
SW Dengar Character "Lowish Poly" by Jace1969
...sw dengar character "lowish poly" by jace1969 thingiverse hi isaiah this was all i could find in amongst my...
thingiverse
free

Friendly articulated snail with 8 different shells by Nebetbastet
...mix between two designs: the friendly articulated slug by isaiah for the body of the snail the realistic garden...
thingiverse
free

Friendly (and sleepy) Articulated Cat by Rollerpaw
...by rollerpaw thingiverse i love the joint design in isaiah 's friendly slug but unfortunately i'm afraid of slugs....
Jgaurora
thingiverse
free
accessorio JGAURORA by raffaelemobile
...accessorio jgaurora by raffaelemobile
thingiverse
stampato con jgaurora a3s riempimento 10% pareti 0.8
thingiverse
free
JGAurora Filament Guide by coogle
...jgaurora filament guide by coogle
thingiverse
a simple filament guide for the jgaurora printer
thingiverse
free
JGAURORA A5 z stabilizer
...jgaurora a5 z stabilizer
thingiverse
jgaurora a5 z stabilizer
roller size 22mm
thingiverse
free

LED Light for JGAurora A5
...led light for jgaurora a5
thingiverse
a light for jgaurora a5 made with led stripes and l-profile as a holder.
thingiverse
free

spring guid Jgaurora A5 by delichoc45
...spring guid jgaurora a5 by delichoc45
thingiverse
guide ressort jgaurora a5
thingiverse
free
JGAurora A5 side toolbox by P_Erhard
...jgaurora a5 side toolbox by p_erhard
thingiverse
toolboxes that clip into the side of the jgaurora a5 frame.
thingiverse
free
JGAURORA A5s Display Cover by nethunter27
...jgaurora a5s display cover by nethunter27
thingiverse
this is a jgaurora a5s displaycover.....from my printer,and my design!
thingiverse
free

Calibration Tool for JGAurora A1
...oon...
visit our jgaurora mkii upgrades group here at thingiverse:https://www.thingiverse.com/groups/jgaurora-mk2-upgrades/things
thingiverse
free
SKR mount for JGAURORA A5S
... hold the skr 1.3 control board to the posts in the jgaurora a5s chassis. holds a 40x10 fan for airflow across driver heatsinks.
thingiverse
free

m8 bowden connector for jgaurora a5 by death4u
...coupler for on the extruder of my jgaurora a5 broke. the original design had m6 and m10 couplers but the jgaurora a5 needed a m8.
A5S
turbosquid
$50

A5
... available on turbo squid, the world's leading provider of digital 3d models for visualization, films, television, and games.
3ddd
$1

Slipper Bath A5
...slipper bath a5
3ddd
toto
slipper bath a5
3ddd
$1

Slipper Bath A5
...slipper bath a5
3ddd
toto , ванна
slipper bath a5
turbosquid
$130

A5 Coupé
...urbosquid
royalty free 3d model a5 coupé for download as max on turbosquid: 3d models for games, architecture, videos. (1689937)
turbosquid
$29

Audi A5
... available on turbo squid, the world's leading provider of digital 3d models for visualization, films, television, and games.
turbosquid
free

Audi A5
... available on turbo squid, the world's leading provider of digital 3d models for visualization, films, television, and games.
3d_ocean
$89

Audi A5 Convertible
...erman german interior interior luxury luxury sport sport vehicle vehicle
audi a5 convertible – high detailed model with interior.
3d_export
$50

Audi A5 3D Model
...audi a5 3d model
3dexport
audi a5 s5 sline
audi a5 3d model teduk 33305 3dexport
3d_ocean
$89

Audi A5 Coupe
...iled germany germany hight hight luxury luxury photorealistic photorealistic sedan sedan
audi a5 coupe 2010 hight detailed model.
3ddd
free

Masiero ve942/a5
...masiero ve942/a5
3ddd
masiero , ottocento
бра masiero ve942/a5
l 45 cm
h 40 cm
5015
3ddd
$1

Скамья RUGIANO - COPERTINA BRONZA, 5015/130GL
...a bronza, 5015/130gl
3ddd
rugiano , скамья
скамья rugiano - copertina bronza, 5015/130gl
3d_export
$15

3d hair style for girl v94
...: 4811 - edges : 9836 - faces : 5015 - tris : 9642 - uvs : 5364 file...
thingiverse
free

5015 fan duct
...5015 fan duct
thingiverse
5015 fan duct
thingiverse
free

5015 Fan Guard
...5015 fan guard
thingiverse
5015 fan guard
3dfindit
free

294-5015
...294-5015
3dfind.it
catalog: wago
thingiverse
free
40MM to 5015 Adapter by 360alaska
...by 360alaska
thingiverse
this will adapt a 5015 fan to a 40mm fan mount. the 5015 fan mounts at a right angle and rotates fully.
thingiverse
free
Chiron 5015 blower by DK_Davis
...chiron 5015 blower by dk_davis
thingiverse
anycubic chiron 5015 blower
thingiverse
free

single 5015 to 50mnm by Kyledavis417
...single 5015 to 50mnm by kyledavis417
thingiverse
single 5015 to 50mm for tevo controller box
thingiverse
free
Cetus 3D 5015 Duct
...cetus 3d 5015 duct
thingiverse
twisted 5015 fan duct for cetus 3d mk2
thingiverse
free

Dual 5015 to 50mm by Kyledavis417
...dual 5015 to 50mm by kyledavis417
thingiverse
dual 5015 fan adapter for tevo tornado controller box
Radial
3d_ocean
$5

Radial engine
...dial engine
3docean
engine radial
this is a radial engine used by the old airplanes. it is made in autodesk inventor and autocad.
3d_export
$5
radial engine
...ne , clearly shows how a radial engine works and all the parts present in it for a student or an engineer to have a glans on it .
3d_export
$5

shaft radial bearing
...shaft radial bearing
3dexport
shaft radial bearing
turbosquid
$7

Radial engine
...bosquid
royalty free 3d model radial engine for download as on turbosquid: 3d models for games, architecture, videos. (1672376)
turbosquid
$7

Radial Tyre
...osquid
royalty free 3d model radial tyre for download as max on turbosquid: 3d models for games, architecture, videos. (1433150)
turbosquid
$60

Radial engine
... available on turbo squid, the world's leading provider of digital 3d models for visualization, films, television, and games.
turbosquid
$35

VOITH RADIAL PROPELLER
...alty free 3d model voith radial propeller for download as max on turbosquid: 3d models for games, architecture, videos. (1338129)
3d_export
$20

radial engine assembly
...radial engine assembly
3dexport
turbosquid
$4
Radial Hair Brush
... 3d model radial hair brush for download as max, obj, and fbx on turbosquid: 3d models for games, architecture, videos. (1183870)
turbosquid
$39

Wheel ATS Radial
... available on turbo squid, the world's leading provider of digital 3d models for visualization, films, television, and games.
Adapter
3d_export
$10
Adapter 3D Model
...adapter 3d model
3dexport
adapter
adapter 3d model mur 20260 3dexport
archive3d
free

Adapter socket 3D Model
...dapter socket adapter
adapter socket n090211 - 3d model (*.3ds) for interior 3d visualization.
turbosquid
$400

cell adaptation
...
royalty free 3d model cell adaptation for download as blend on turbosquid: 3d models for games, architecture, videos. (1701655)
archive3d
free
Adapter 3D Model
...ups pc equipment
adapter extron n180813 - 3d model (*.gsm+*.3ds) for interior 3d visualization.
turbosquid
$5

usb adapter
...royalty free 3d model usb adapter for download as ige and stl on turbosquid: 3d models for games, architecture, videos. (1582234)
turbosquid
$15
Power adapter
...free 3d model power adapter for download as max, obj, and fbx on turbosquid: 3d models for games, architecture, videos. (1510024)
turbosquid
$8
USB adapter
...e 3d model usb adapter for download as max, fbx, obj, and dwg on turbosquid: 3d models for games, architecture, videos. (1713542)
turbosquid
$30

adapter.3ds
... available on turbo squid, the world's leading provider of digital 3d models for visualization, films, television, and games.
turbosquid
$15

Nokia Adapter
... available on turbo squid, the world's leading provider of digital 3d models for visualization, films, television, and games.
turbosquid
$15
Universal adapter
... available on turbo squid, the world's leading provider of digital 3d models for visualization, films, television, and games.
Fan
3d_export
$5

fan
...fan
3dexport
fan 3d model, table fan, fan, electric fan, ventilator
archibase_planet
free

Fan
...fan
archibase planet
fan large fan
fan out n260707 - 3d model for interior 3d visualization.
archibase_planet
free

Fan
...fan
archibase planet
fan ceiling fan ventilator
fan stealth n300615 - 3d model (*.gsm+*.3ds) for interior 3d visualization.
3d_export
$15

fan
...fan
3dexport
is an ancient fan
3ddd
$1

Fan-C-Fan by marco gallegos
...n-c-fan by marco gallegos
3ddd
вентилятор , marco gallegos
fan-c-fan by marco gallegos
3d_export
$10

fan
...fan
3dexport
a detailed fan designed for home or space blowing is now available for only 19.99!
turbosquid
$1

Fan
...fan
turbosquid
free 3d model fan for download as on turbosquid: 3d models for games, architecture, videos. (1427865)
turbosquid
$14

Fan
...fan
turbosquid
royalty free 3d model fan for download as on turbosquid: 3d models for games, architecture, videos. (1415642)
3ddd
$1

Светильник Fan
...светильник fan
3ddd
fan , italamp
светильник fan, производитель italamp
turbosquid
$25

Fan
...fan
turbosquid
royalty free 3d model fan for download as c4d on turbosquid: 3d models for games, architecture, videos. (1483246)