Thingiverse
Zen Meteor by WorstCat
by Thingiverse
Last crawled date: 3 years ago
NEWEST UPDATE: 17 DEC 2019 - I added a great little threaded portion to the back end of the pistol FC group piece. There are some pretty sweet thread-in quick-disconnect sling cups made by Grovtec that I've decided to go with. Full-steel, and accepts the standard QD sling format of connector. This thing is big enough that you'll want a sling to take up the weight!
07 Dec 2019 - My fellow high caliber enthusiasts - I regret to inform you that I will not be doing any more development on this project... BECAUSE IT IS DONE. I have a few very small tweaks aimed at minimizing the hand-sanding that I've had to do, so hold off on starting any prints until Monday or Tuesday (DEC 9 or 10). But otherwise...the damn thing is finished, and it is beautiful. I printed the receiver with 7 shells, alternating an extra shell with each layer, and 50% infill. IT TOOK 143 HOURS TO PRINT...but damn was it worth it. Check the comments section for a new post with pics.
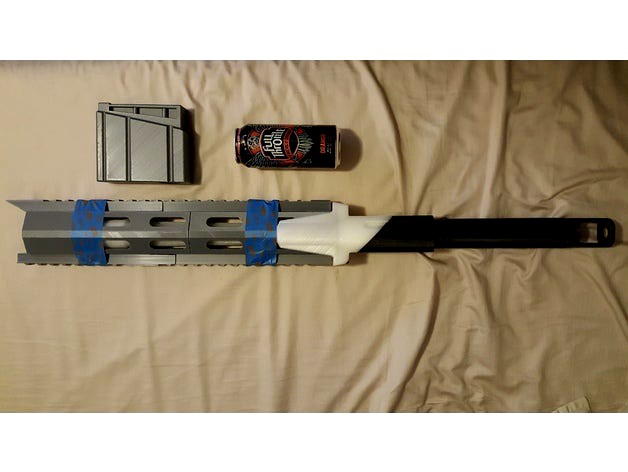
Fully assembled it is 58" long, just under 5 feet so it should be good to go at most CONs.
ALSO, I am doing a few edits to some pieces to make them more robust once assembled, and trying to add some functionality. For example, I am going to be adding a QD sling swivel section at the back of the FC group (a perfect spot for a single point ambi setup). I should be getting that hardware on Monday, so I'll be able to measure it and tweak the models accordingly. Also, the scope and components are no longer 10 times larger than they are supposed to be.
I'm elated, exhausted, and thankful. 'Been a heck of a development arc, but I am glad to finally field this thing as the beast it was meant to be. And it was all printed on a CR-10. Boosh! So grab a brew, chill out, and pour one out for the homies at Pearl Harbor in 1941.
01 DEC 2019 - trying the receiver again - updated pics in comment section.
25 NOV 2019 - Okay, so 89 hours and 11 minutes into the receiver print...it failed. Painful, but still a learning springboard. The receiver group is just too large as one full piece, even though I really wanted to make that work for the strength of the model. I am happy to say that the scrollwork on the receiver sides really came out nice - definitely glad I took the time to add it in. But, this time I separated the grip from the receiver and added some keying to lock the handle, buttstock, and receiver together when they are all assembled. If I had to guess as to what happened, I think my filament broke inside the extruder, and only caught the feed gear several layers later...which was just too late. Ahh well, getting some better filament and going at this pig again!
23 NOV 2019 - Alright fam...I'm 2 days into a 7 day 13 hour print with the Zen Meteor receiver group. This thing is big, and all the sexy ZM scrollwork on the sides of the receiver is there and looking crisp. Like many things I do - I'm over-engineering it. .16 layer height and 6 walls, alternating an extra wall every other layer, with something like a 60% infill. Will post pics of what happens, come what may!
06 JAN 2019 - Alright Peepspeeps, I'm just about done setting up my new CR-10 S4. Printing the receiver group should be happening Soon (tm), but it looks like it will take over 1kg of filament to print in one piece with the necessary (read - over engineered) level of shells and infill. I'm apprehensive to jump into that without my geared extruder installed just so I can have the peace of mind of not missing layers due to filament slippage. So I want to have this started tomorrow, with the finished receiver posted next week - but we'll see. I'm also backed up against an extended trip I'll be taking through March, so that is a thing. Also, I've decided not to modify how the buttstock and receiver come together - looks like it should be plenty strong enough!
UPDATE: 06 Aug 2017 - For all of you mamma-jammas that printed the forend parts of the rail system (like I did) and DON'T have the benefit of the extension shank that is now on the forward forend piece, I'm making a bolt on addition that will mimic it. Its pretty awesome and actually uses the flutes in the barrel to lock in the bolts that are in the piece. I'm getting an M5 x .8 drill and tap, and plan on using M5 x 25mm socket head screws (locked into place with super glue). KEEP IN MIND that the barrel will still have to be sanded, painted, sealed...DONE...(whatever that means to you) before you do this install because it will positively engage the barrel via the fluting and will be irreversible after gluing.
04 Aug 2017 - Zen Meteor rifle scope (hollow), scope mount pieces, and a fully assembled single piece solid scope.
First things first:
All credit for the IP of this work goes to Bungie and ActiVision; thank you for giving us this great game.
Next thing:
THIS IS NOT YOUR DAD'S MODEL TRAIN SET. I've re-meshed this thing from zilch; from sneezes, air pie, and trodden dreams. It WILL require hand fitment and a robust understanding of construction techniques.
With that out of the way, here it is Fam - Zen Meteor - essentially an anti-material rifle for the gunpowder hedonists in all of us. It is a true 1:1 scale of the weapon in Destiny, and as such imposes several challenges to the would-be builder. As you can see this is a work in progress - I still have to mesh out the scope, and then go through a build iteration and post best practices for assembly. Before I get these out, if you have any questions, please hit me up in PM's and we can rap there.
CHALLENGE #1: It's Big.
*** It's REALLY big. It is also somewhat slender over that length, so there are critical parts and part junctures that NEED a lot of strength. Handling, showing, transporting this thing to and from CONs, cosplay parties, etc, will test its structural integrity. I've tried to engineer some good joints into this thing, and have a little more work to do on some pieces to give the design as much engineering cajones as it can possibly have. Also, it will take a LOT of material to print. Lastly, you may notice that the individual pieces themselves are large, too. That is because I have a 300x300x400 build area to work from, and I intend to use the whole thing. I will NOT be re-slicing these things so it can be built on an 200x200x200 printer.
CHALLENGE #2: It's Long.
*** Building this thing for strength and handling comes at a cost, and that is time. The forend (minus the rails) took 76 hours to print. The receiver takes 100 (when you use the shells and infill that I believe is required. Even if you are more conservative on your shells and infill, I kept the pieces as large as I could to print the biggest assemblies I was able to (so the size alone will still make longer prints than you may be use to). This is primarily due to my leaning toward threaded steel rods through the receiver to join the barrel, forend, and receiver together. Doing this pretty much dictates that building it in halves is a no-go because a tensioned threaded fastener would burst the center seam apart (or it would be trying to). Ultimately, it is going to take so long to sand this thing, prime it, paint it, weather it...and attempt to get it screen accurate...I just accepted the longer print times for the extra robustness it would provide.
CHALLENGE #3: Asssembly.
*** The order in which you build this thing MATTERS, particularly when you get to the gas block, the forward and aft halves of the forend, the rails, barrel, and receiver. Since I'm still tweaking things I DON'T have a definite build strategy though I have some ideas. I'll post the 'tried and true' method when I finalize all stages of assembly, but one thing that is immediately apparent up front is that the rear barrel (the pretty one with all the fluting on it and the sweet taper) will need to be sanded, painted, sealed, weathered, DONE before you put the forend together over it! And before you put the forend together, at very least the insides of the forend will have to be finished So there is a definite order of operations that should be followed - I just haven't put anything down as gospel yet.
Ultimately, the size of this build alone make it pretty ambitious. Please give feedback with any problems you run into - I'll try to be responsive about making any changes that need to be made in the files. As an aside, I was considering not releasing this because I like having unique things and benefitting form my work, but the community of makers and the coolness that is 3D printing is why I put all this work out in the first place. So here it is - the thing that I cut my teeth on learning Fusion 360, and breaking in my 3D printer.
07 Dec 2019 - My fellow high caliber enthusiasts - I regret to inform you that I will not be doing any more development on this project... BECAUSE IT IS DONE. I have a few very small tweaks aimed at minimizing the hand-sanding that I've had to do, so hold off on starting any prints until Monday or Tuesday (DEC 9 or 10). But otherwise...the damn thing is finished, and it is beautiful. I printed the receiver with 7 shells, alternating an extra shell with each layer, and 50% infill. IT TOOK 143 HOURS TO PRINT...but damn was it worth it. Check the comments section for a new post with pics.
Fully assembled it is 58" long, just under 5 feet so it should be good to go at most CONs.
ALSO, I am doing a few edits to some pieces to make them more robust once assembled, and trying to add some functionality. For example, I am going to be adding a QD sling swivel section at the back of the FC group (a perfect spot for a single point ambi setup). I should be getting that hardware on Monday, so I'll be able to measure it and tweak the models accordingly. Also, the scope and components are no longer 10 times larger than they are supposed to be.
I'm elated, exhausted, and thankful. 'Been a heck of a development arc, but I am glad to finally field this thing as the beast it was meant to be. And it was all printed on a CR-10. Boosh! So grab a brew, chill out, and pour one out for the homies at Pearl Harbor in 1941.
01 DEC 2019 - trying the receiver again - updated pics in comment section.
25 NOV 2019 - Okay, so 89 hours and 11 minutes into the receiver print...it failed. Painful, but still a learning springboard. The receiver group is just too large as one full piece, even though I really wanted to make that work for the strength of the model. I am happy to say that the scrollwork on the receiver sides really came out nice - definitely glad I took the time to add it in. But, this time I separated the grip from the receiver and added some keying to lock the handle, buttstock, and receiver together when they are all assembled. If I had to guess as to what happened, I think my filament broke inside the extruder, and only caught the feed gear several layers later...which was just too late. Ahh well, getting some better filament and going at this pig again!
23 NOV 2019 - Alright fam...I'm 2 days into a 7 day 13 hour print with the Zen Meteor receiver group. This thing is big, and all the sexy ZM scrollwork on the sides of the receiver is there and looking crisp. Like many things I do - I'm over-engineering it. .16 layer height and 6 walls, alternating an extra wall every other layer, with something like a 60% infill. Will post pics of what happens, come what may!
06 JAN 2019 - Alright Peepspeeps, I'm just about done setting up my new CR-10 S4. Printing the receiver group should be happening Soon (tm), but it looks like it will take over 1kg of filament to print in one piece with the necessary (read - over engineered) level of shells and infill. I'm apprehensive to jump into that without my geared extruder installed just so I can have the peace of mind of not missing layers due to filament slippage. So I want to have this started tomorrow, with the finished receiver posted next week - but we'll see. I'm also backed up against an extended trip I'll be taking through March, so that is a thing. Also, I've decided not to modify how the buttstock and receiver come together - looks like it should be plenty strong enough!
UPDATE: 06 Aug 2017 - For all of you mamma-jammas that printed the forend parts of the rail system (like I did) and DON'T have the benefit of the extension shank that is now on the forward forend piece, I'm making a bolt on addition that will mimic it. Its pretty awesome and actually uses the flutes in the barrel to lock in the bolts that are in the piece. I'm getting an M5 x .8 drill and tap, and plan on using M5 x 25mm socket head screws (locked into place with super glue). KEEP IN MIND that the barrel will still have to be sanded, painted, sealed...DONE...(whatever that means to you) before you do this install because it will positively engage the barrel via the fluting and will be irreversible after gluing.
04 Aug 2017 - Zen Meteor rifle scope (hollow), scope mount pieces, and a fully assembled single piece solid scope.
First things first:
All credit for the IP of this work goes to Bungie and ActiVision; thank you for giving us this great game.
Next thing:
THIS IS NOT YOUR DAD'S MODEL TRAIN SET. I've re-meshed this thing from zilch; from sneezes, air pie, and trodden dreams. It WILL require hand fitment and a robust understanding of construction techniques.
With that out of the way, here it is Fam - Zen Meteor - essentially an anti-material rifle for the gunpowder hedonists in all of us. It is a true 1:1 scale of the weapon in Destiny, and as such imposes several challenges to the would-be builder. As you can see this is a work in progress - I still have to mesh out the scope, and then go through a build iteration and post best practices for assembly. Before I get these out, if you have any questions, please hit me up in PM's and we can rap there.
CHALLENGE #1: It's Big.
*** It's REALLY big. It is also somewhat slender over that length, so there are critical parts and part junctures that NEED a lot of strength. Handling, showing, transporting this thing to and from CONs, cosplay parties, etc, will test its structural integrity. I've tried to engineer some good joints into this thing, and have a little more work to do on some pieces to give the design as much engineering cajones as it can possibly have. Also, it will take a LOT of material to print. Lastly, you may notice that the individual pieces themselves are large, too. That is because I have a 300x300x400 build area to work from, and I intend to use the whole thing. I will NOT be re-slicing these things so it can be built on an 200x200x200 printer.
CHALLENGE #2: It's Long.
*** Building this thing for strength and handling comes at a cost, and that is time. The forend (minus the rails) took 76 hours to print. The receiver takes 100 (when you use the shells and infill that I believe is required. Even if you are more conservative on your shells and infill, I kept the pieces as large as I could to print the biggest assemblies I was able to (so the size alone will still make longer prints than you may be use to). This is primarily due to my leaning toward threaded steel rods through the receiver to join the barrel, forend, and receiver together. Doing this pretty much dictates that building it in halves is a no-go because a tensioned threaded fastener would burst the center seam apart (or it would be trying to). Ultimately, it is going to take so long to sand this thing, prime it, paint it, weather it...and attempt to get it screen accurate...I just accepted the longer print times for the extra robustness it would provide.
CHALLENGE #3: Asssembly.
*** The order in which you build this thing MATTERS, particularly when you get to the gas block, the forward and aft halves of the forend, the rails, barrel, and receiver. Since I'm still tweaking things I DON'T have a definite build strategy though I have some ideas. I'll post the 'tried and true' method when I finalize all stages of assembly, but one thing that is immediately apparent up front is that the rear barrel (the pretty one with all the fluting on it and the sweet taper) will need to be sanded, painted, sealed, weathered, DONE before you put the forend together over it! And before you put the forend together, at very least the insides of the forend will have to be finished So there is a definite order of operations that should be followed - I just haven't put anything down as gospel yet.
Ultimately, the size of this build alone make it pretty ambitious. Please give feedback with any problems you run into - I'll try to be responsive about making any changes that need to be made in the files. As an aside, I was considering not releasing this because I like having unique things and benefitting form my work, but the community of makers and the coolness that is 3D printing is why I put all this work out in the first place. So here it is - the thing that I cut my teeth on learning Fusion 360, and breaking in my 3D printer.
Similar models
thingiverse
free

Uriel's Gift 10-22 remix by coppertop_01
...ope rings are too low with the design of the stock)
i'll get updated photos up when i complete the print and finish the part.
thingiverse
free

Desert Eagle .50AE
...ecoil springs, and slide locking lever...are going to be nuts! but i'm up for the challenge! so we'll see how it works.
thingiverse
free

Sparton 300 Helmet by Jace1969
...ened the shells a bit more. if you have a go at printing this please post some picks cheers jace. unproven print so good luck ; )
thingiverse
free

Daedric Battleaxe from Skyrim by dmaccallum
... with 4 shells and 10% infill. i'm sure you could get away with 2 shells but i am now about printing things slow and strong.
thingiverse
free

Quanum DIY Goggles V1 Go-Pro Head Mount by Rhodizzle
... to use some printed studs from https://www.thingiverse.com/thing:639956 to attach it. i'll post pictures once it's done.
thingiverse
free

Photo Scanner for iPhone 5 by Tooraj
... platform. so next i'll be slicing it in pieces, but you can have the whole thing in one piece, if you have a bigger printer.
thingiverse
free

Locking Picatinny Sling Mounts by Messinger91
...that can fit into the rail locking hole. i have no idea what size screws will work, but i'm sure there's a wide variety.
thingiverse
free

Tridimensional Chess Board by Jetrocket09
... it together. you'll need some glue to assemble it. i have not yet printed it, so i'm not 100% sure how it will turn out.
thingiverse
free

I Love You Ornament (Star Wars Inspired)
...ek@gmail.com and i'll send you the files direct.
iheartstarwars
dec. 10 2019 - added stl files for those that print this way!
thingiverse
free

Skyrim Logo (Flat) by Napa39
...t the original files.
thanks so much for everyone's support in this lonely project. i hope to get back into designing things.
Worstcat
thingiverse
free

Hunter Knife Handle Scales by WorstCat
...munity writ large for some really helpful, friendly people that have made 3d printing accessible and enjoyable! thanks everyone!
thingiverse
free
Creality CR-10 E3D Titan Extruder Mount (59Ncm) by WorstCat
...ed to use (just like lucashayes original) 4x m3 nuts, and 4x m3 x 6mm, or m3 x 8mm machine screws for this mount to work for you.
thingiverse
free

PGM Hecate II by WorstCat
...d top rail dimensions to scale better with new receiver. working on buttstock next!
9 jun 18: enlarged trigger area of receiver.
thingiverse
free

Creality CR-10 E3D Titan Extruder Mount Raised by Desterly
...of the creality cr-10 e3d titan extruder mount by worstcat base height increased by 10mm to allow clearance for...
Meteor
3d_ocean
$3

Meteor
...meteor
3docean
asteroid galaxy meteor rock space star
3d model of spase meteorite.
turbosquid
$15
Meteor
... available on turbo squid, the world's leading provider of digital 3d models for visualization, films, television, and games.
turbosquid
$45

Samson Meteor
...quid
royalty free 3d model samson meteor for download as fbx on turbosquid: 3d models for games, architecture, videos. (1646235)
3d_export
$15
Meteor 3D Model
...meteor 3d model
3dexport
meteor sky landscape 3d lowpoly nextgen space brake broken
meteor 3d model potyek 34848 3dexport
turbosquid
$6

Meteor character
...ty free 3d model meteor character for download as dae and obj on turbosquid: 3d models for games, architecture, videos. (1587879)
3ddd
$1

Seguin / meteor galbe
...uin , топка , франция
топка seguin meteor galbe
turbosquid
$20

Cartoon Meteor
... available on turbo squid, the world's leading provider of digital 3d models for visualization, films, television, and games.
turbosquid
$15

meteor 01
... available on turbo squid, the world's leading provider of digital 3d models for visualization, films, television, and games.
turbosquid
$5

Keris Meteor
... available on turbo squid, the world's leading provider of digital 3d models for visualization, films, television, and games.
turbosquid
$5
meteor 001c.blend
... available on turbo squid, the world's leading provider of digital 3d models for visualization, films, television, and games.
Zen
design_connected
$11

Zen
...zen
designconnected
willisau zen computer generated 3d model. designed by fumagalli, marco.
3ddd
$1

Zen table
... willisau
manufacturer:
willisau, switzerland
www.willisauag.ch
designer:
marco fumagalli
3ddd
$1

Urban Zen Collection
...an zen collection
3ddd
urban zen , donna karan
коллекция мебели urban zen
от donna karan
turbosquid
$19

Console Zen
...y free 3d model console zen for download as max, obj, and fbx on turbosquid: 3d models for games, architecture, videos. (1170612)
turbosquid
$13

Zen Vase
...ty free 3d model zen vase for download as obj, fbx, and blend on turbosquid: 3d models for games, architecture, videos. (1266686)
turbosquid
$2

Zen Garden
... available on turbo squid, the world's leading provider of digital 3d models for visualization, films, television, and games.
3ddd
$1

ZEN / ALF UNO S.P.A
...zen / alf uno s.p.a
3ddd
zen , угловой
итальянский диван zen фабрики alf uno s.p.a
3ddd
$1

MARIONI - ZEN
...i | коллекция zen
столик
h. x l. x p. cm 60x80x80
присутствует файл для cinema 4d с настроенными материалами для corona render.
3ddd
free

Objet Insolite ZEN
...n
3ddd
objet insolite , zen
никелированнaя бра
общая высота : 20 см
общая ширина : 25 см
turbosquid
$18
Only you Zen
...squid
royalty free 3d model only you zen for download as max on turbosquid: 3d models for games, architecture, videos. (1372551)