Thingiverse

Z axis calibration help by BuildJustForFun
by Thingiverse
Last crawled date: 3 years, 1 month ago
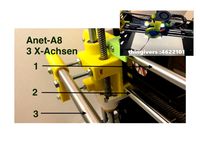
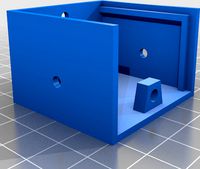
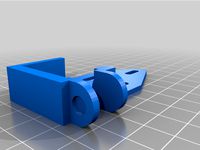
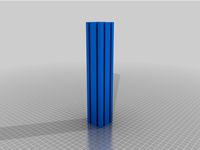
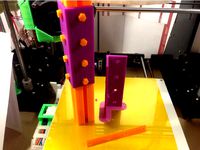
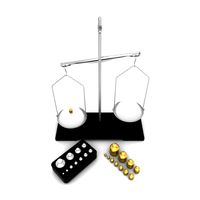
After some prints and test i have found out that the Z-axis is no more synchronize. That is not a surprise because we have two stepper Motors for the Z-axis and after some time they are no more synchronize. For that reason I misplaced the Hotbet. After some settings with the caliper and folding rule I was dissatisfied and make this small helping Thing. You need only a folding rule and dissected it.
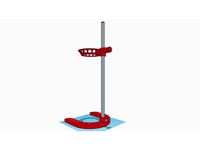
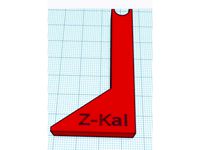
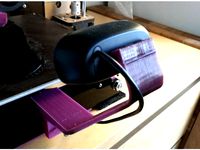
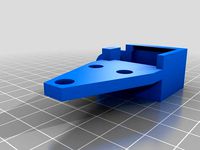
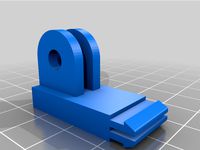
I have dissected the folding rule at 10,5 cm (you can let it be longer if you want) and insert it in the Holder. Assemble it, finish. Now I can check the z axis before the Print.
If you have a problem or an improvement for this thing please let me now it.
Nach einigen Druckvorgänge und Tests ist mir aufgefallen das die Z-Achse nicht mehr richtig eingestellt ist. Ist nicht verwunderlich da es sich um zwei Schrittmotoren handelt und diese sich mit der Zeit einfach verstellen. Dadurch habe ich mir das Duckbett ebenfalls verstellt. Nach einigen Versuchen mit Schieblehre und Zollstock hatte ich es leid und habe diese einfach Hilfe konstruiert. Man benötigt nur einen Zollstock den man einfach zersägt.
Ich habe den Zollstock bei 10,5 cm (kann auch länger gelassen werden) abgesägt und in den Halter gesteckt. Montiert Fertig. So kann ich vor jedem Druck die Z Achse kontrollieren.
Schreibt wenn es noch was zu verbessern gibt.
It is very easy to Control and adjustment the Z-axis with this.
Here the approach:
Step 1:
In the Printer menu to the function “Quick Settings” Menu to the “Home All”
Check if the Z-axis is on both sides at the same level.
If it is everything is ok. You only need to do is the bed Leveling.
Step 2:
If the Z-axis is not on the Same level than go in the “Quick Settings” Menu to the “Disable Stepper”.
Now turn only the on the right threaded rod to adjustment the Z-axis to the same level like the left (the side of the Z-axis end switch) one.
If the Z-axis end switch on the right side than only adjust on the left threaded rod.
Test the level with the “Quick Settings” Menu to the “Home All”.
If it is everything is ok. You only need to do is the bed Leveling.
If the Z-axis is not on the Same level repeat Step 2.
With this little Thing you don't need to adjust the Z-axis end switch.
Die es ist ganz einfach die Z Achse zu kontrollieren und einzustellen.
Hier die Anleitung:
Schritt 1:
Im Drucker Menü zur Funktion “Quick Settings” hier zu “Home All”
Prüfen ob die Z-Achse auf beiden Seiten gleich ist.
Ist alles in Ordnung dann muss nur noch das Druckbett eingestellt werden.
Schritt 2:
Sind die beiden Seiten der Z-Achse nicht auf gleicher Höhe gehe im Druckermenü auf “Quick Settings“ und anschließend auf den Menüpunkt “Disable Stepper“.
Jetzt an der rechten Gewindestange so lange drehen bis die linke Seite (Endschalter der Z-Achse) mit der rechten wieder gleich ist.
Sollte der Z-Achsen Endschalter auf der rechten Seite sein dann muss man an der linken Gewindestange drehen.
Testen ob die Einstellung so in Ordnung ist mit der Funktion “Home All“.
Ist die Einstellung immer noch nicht in Ordnung wiederhole Schritt 2.
Ist alles in Ordnung dann muss nur noch das Druckbett eingestellt werden.
Mit dieser kleinen Einstellhilfe muss der Endschalter der Z-Achse nicht verstellt werden.
Similar models
thingiverse
free
Anet A8 3x X-Achse by JoHuVo
...r konstruiert, der mit 4 flachen luftdüsen nur auf das bauteil bläst. der neue lüfter bekommt eine neue seite und auch ein video.
thingiverse
free
Halter für Resinfilter by RalfK74
... mit sekundenkleber eingeklebt.
bei problemen, fragen oder fehlern in den dateien bitte gerne einen kommentar schreiben. danke!
thingiverse
free
FLSUN i3 Motormount auf Z - Achse by Majoda
...i mir hat sich der wulst beim hochfahren der z achse wesenlich verbessert.
viel spaß beim drucken und bei der nutzung.
lg. majoda
thingiverse
free
Ätzbehälter by MachWas
... was ausdrucken werde.
den ausdruck mache ich mit hdglass von formfutura.
dies ist ein projekt von und für: machwas-makerspace.ch
thingiverse
free
Volksfräse Kabelbox Z-Achse by Goodcat
...abelung füt den y-ini beherbergen soll. zur befestigung der deckel habe ich so gewindeinserts genommen die man einschmelzen kann.
thingiverse
free
Anet A8 Z-Spindel Kalibrierung by hthuering
...ert die einstellung der linken und rechten z-achse auf die gleiche höhe.
help calibrating left and right z-axis to the same high.
thingiverse
free
Anet A8 Front Cam Holder Logitech C270 by kolbersde
... auch hier reingesteckt werden. die kamera ist beweglich, hält aber ihre gewünschte position.
video: https://youtu.be/bdeg4gtzsdy
thingiverse
free
Halter für Endschalter z-Achse Anycubic i3 Mega & Anycubic Mega-X by SirThommes
...s weiter ab, so das er auch wirklich das gehäuse trifft.
man kann natürlich auch zwei u.scheiben unterlegen. passt dann auch ;-).
thingiverse
free
AM8 Left Side Y Chain by Phobos2k
... war der lochabstand nicht korrekt.
hatte das projekt für längere zeit auf eis gelegt daher ist mir das nicht früher aufgefallen.
thingiverse
free
Kerzenhalter Challenge! by Benjamin_Lau
...uren werden dann gefräst.
die zeichnung bitte an lau.benjamin@gmx.de senden
ich wünsche allen eine entspannte weihnachtszeit :)
Buildjustforfun
thingiverse
free
Anet_A8_Cabel_Chain_Y_Hotbed_Version2 by BuildJustForFun
...anet_a8_cabel_chain_y_hotbed_version2 by buildjustforfun
thingiverse
anet_a8_cabel_chain_y_hotbed_version2
thingiverse
free
Shaft and Nut by BuildJustForFun
...em or an improvement for this thing please let me now it.
my things shot be free for everybody, i hope that is the right license.
thingiverse
free

Modular Profil 204040 System Profils by BuildJustForFun
...ustforfun
thingiverse
hello everybody
here are the modular profil 204040 systems profils.
2020-02-18 upload
from 5mm till 300mm.
thingiverse
free
Modular Profil 4040 System Profils by BuildJustForFun
...djustforfun
thingiverse
hello everybody
here are the modular profil 4040 systems profils.
2020-02-18 upload
from 5mm till 300mm.
thingiverse
free
Modular Profil 2040 System Profils by BuildJustForFun
...djustforfun
thingiverse
hello everybody
here are the modular profil 2040 systems profils.
2020-02-17 upload
from 5mm till 300mm.
thingiverse
free
Modular Profil 6060 System Profils by BuildJustForFun
...djustforfun
thingiverse
hello everybody
here are the modular profil 6060 systems profils.
2020-02-19 upload
from 5mm till 300mm.
thingiverse
free

Modular Profil 3060 System Profils by BuildJustForFun
...djustforfun
thingiverse
hello everybody
here are the modular profil 3060 systems profils.
2020-02-19 upload
from 5mm till 300mm.
thingiverse
free
Modular Profil 306060 System Profils by BuildJustForFun
...ustforfun
thingiverse
hello everybody
here are the modular profil 306060 systems profils.
2020-02-20 upload
from 5mm till 300mm.
thingiverse
free
Modular Profile 3030 Systems Holder by BuildJustForFun
...se let me now it.
hey i have a problem with the license.
my things shot be free for everybody but which license is the right one?
thingiverse
free
Modular Mounting System to the Car Vent Gravity Phone Holder by BuildJustForFun
...o,
here my adaper for the modular mounting system to the car vent gravity phone holder.
https://www.thingiverse.com/thing:3268454
Calibration
turbosquid
$15

DEFIBRILLATOR CALIBRATORS
... available on turbo squid, the world's leading provider of digital 3d models for visualization, films, television, and games.
turbosquid
$3
Calibration Test Benches
...libration test benches for download as 3ds, obj, c4d, and fbx on turbosquid: 3d models for games, architecture, videos. (1355804)
turbosquid
$79

Tag Heuer Monaco Calibre 11
...free 3d model tag heuer monaco calibre 11 for download as max on turbosquid: 3d models for games, architecture, videos. (1634427)
turbosquid
$50

Smith & Wesson 50 Calibre Magnum
... available on turbo squid, the world's leading provider of digital 3d models for visualization, films, television, and games.
3d_export
$10
Laboratory Calibration Weight Set 1 3D Model
... 3d model
3dexport
laboratory lab science equipment weight set
laboratory calibration weight set 1 3d model bessoo 88084 3dexport
3d_export
$15
Laboratory Scale and Calibration Weight Set 3D Model
...port
laboratory lab science equipment weight set scale
laboratory scale and calibration weight set 3d model bessoo 88203 3dexport
3d_export
$5
3D printer filament calibration tool 3D Model
...ernier
3d printer filament calibration tool 3d model download .c4d .max .obj .fbx .ma .lwo .3ds .3dm .stl locoman 107942 3dexport
3d_export
$59

tag heuer link calibre 16 watch
...built to real-world scale. units used: centimeters. model is 18 centimeters tall.<br>scene objects are organized by groups.
3d_export
free
laser height reference calibration tool opt lasers
...ind out more about the engraving and cutting laser heads, this item was designed to work with, take a look at the following page:
3d_export
$99

Patek Philippe White Gold Calibre 89
...br>please note: this 3d model like all my other models cannot be used as nft, as is or modified<br>thank you for reading
Axis
3ddd
$1

Мария Axis
...
3ddd
кухня , классическая , axis
модель кухни.
3d_export
$22

Axis robot 6-axis robotic arm
...ing parts drawings, standard parts purchased parts list, can be produced directly according to the drawings, welcome to download!
3ddd
free

Versatile Axis
...ddd
nexus , плитка
http://bvtileandstone.com/ceramic-porcelain/versatile-axis/
3d_export
$19

robot 2 axis
...robot 2 axis
3dexport
robot 2 axis
turbosquid
$40

Axis R5F
... available on turbo squid, the world's leading provider of digital 3d models for visualization, films, television, and games.
turbosquid
$40

Axis S5F
... available on turbo squid, the world's leading provider of digital 3d models for visualization, films, television, and games.
turbosquid
$30

Axis Athlon
... available on turbo squid, the world's leading provider of digital 3d models for visualization, films, television, and games.
turbosquid
$10

Linear Axis
... available on turbo squid, the world's leading provider of digital 3d models for visualization, films, television, and games.
3d_export
$15

drawing axis
...drawing axis
3dexport
simple rendering of the scene file
3ddd
$1

versatile axis ARC
...versatile axis arc
3ddd
versatile , плитка
versatile axis arc red dot design award
Z
3d_export
$5

nissan z
...nissan z
3dexport
nissan z
3ddd
$1

Vase Z
...vase z
3ddd
vase z
3ddd
$1

полотенцесушить Z
...полотенцесушить z
3ddd
полотенцесушитель
полотенцесушить z
design_connected
free

Z-Chair
...z-chair
designconnected
free 3d model of z-chair designed by karman, aleksei.
design_connected
$11

Z Lamp
...z lamp
designconnected
phillips z lamp computer generated 3d model. designed by kalff, louis.
3d_export
$5

Dragon balls z
...dragon balls z
3dexport
dragon ball z
turbosquid
$20

Fighter Z
...
turbosquid
royalty free 3d model fighter z for download as on turbosquid: 3d models for games, architecture, videos. (1292563)
turbosquid
$9

Pen Z
...pen z
turbosquid
free 3d model pen z for download as obj on turbosquid: 3d models for games, architecture, videos. (1686775)
turbosquid
free

z chair
...z chair
turbosquid
free 3d model z chair for download as max on turbosquid: 3d models for games, architecture, videos. (1410230)
turbosquid
$5

Letter Z
...urbosquid
royalty free 3d model letter z for download as max on turbosquid: 3d models for games, architecture, videos. (1408540)
Help
3d_export
$5

Woman offering help
...woman offering help
3dexport
woman offering help
3ddd
$1

COUPLE STATUE man help
...couple statue man help
3ddd
статуэтка
couple statue man help
turbosquid
free

help wanted biplane banner.blend
... available on turbo squid, the world's leading provider of digital 3d models for visualization, films, television, and games.
turbosquid
$7
German soldier ww2 help wounded G5
... 3d model german soldier ww2 help wounded g5 for download as on turbosquid: 3d models for games, architecture, videos. (1687738)
turbosquid
$3
Uttermost Helping Hand Nickel Plated Bookends
... available on turbo squid, the world's leading provider of digital 3d models for visualization, films, television, and games.
3d_export
$45

3d Printable May I Help YOu sign STL OBJ 3D Model
...ntable sign may help you mall airport public sidnaique
3d printable may i help you sign stl obj 3d model sidnaique 48477 3dexport
3d_export
free

Diamond Ring
...in 3d, please contact, i will be glad to help ...
3d_export
$15

police badge photorealistic pbr low-poly
...support, or questions? contact me, i'll be happy to help ...
3ddd
$1
Door
...door 3ddd двери hope it help ...
3d_export
$15

Prototype version of the robot assistant
...a person in a variety of tasks, both in helpng in the garden and in armed...