Thingiverse

Yet Another PowerSpec/MakerBot/FlashForge/CTC Glass Bed Corner Brace by The_Desdichado
by Thingiverse
Last crawled date: 3 years ago
Background:
I have a PowerSpec 3D Pro printer (original model) and switched to glass bed printing a couple of years ago. Ever since, I have been searching for a glass bed corner brace/bracket that held the glass firmly and didn't eventually fail after (what I felt was) an unreasonable time frame. If a glass bed corner brace has been designed for use with the PowerSpec 3D Pro or any of the various MakerBot Replicator clones, and it's been uploaded to Thingiverse, chances are I've tried it. With no disrespect to any of the designers of these braces, they just didn't seem to work for me. They'd all melt, or crack, or deform to the point that the glass was not securely held in what I believed was too short an interval of time. This search lead me to design this brace.
My three major principles in designing this object were:
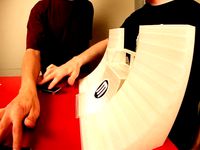
High degree of ease and speed in swapping the glass plates out.
Achieving a design that provided increased surface area for contact with the edges of the glass plate; I've had an issue with the designs that use the end of an M3 socket screw to hold the glass in place, wherein the glass ended up chipping when I used one of this design.
Achieving a design with the ability to securely hold an oversized or undersized glass plate. My six glass plates were sourced from only two different glass companies, and unfortunately not one of is the same size as any of the others.
The Components:
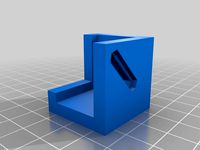
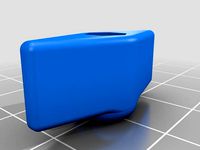
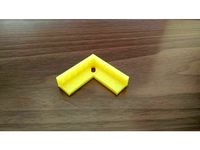
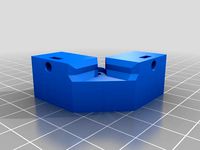
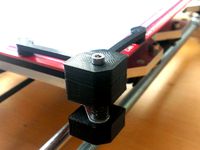
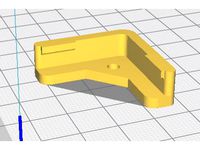
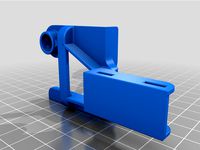
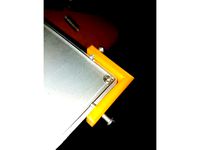
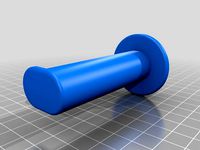
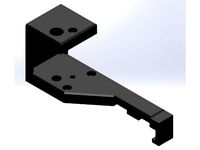
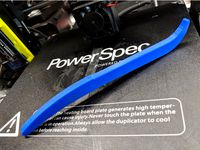
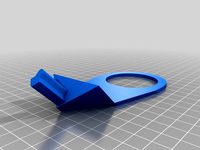
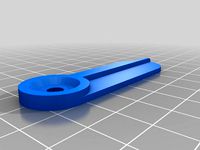
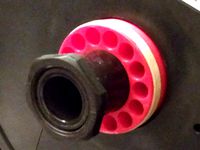
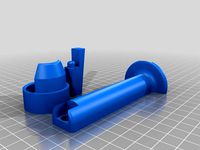
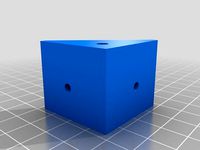
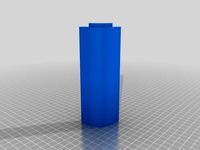
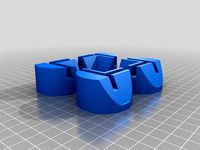
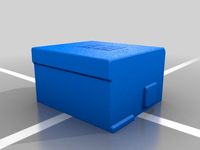
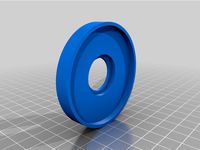
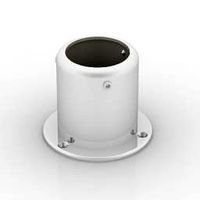
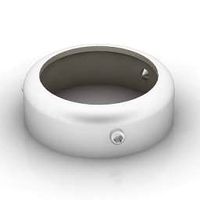
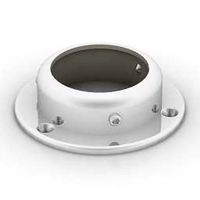
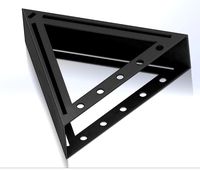
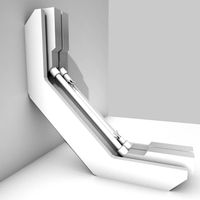
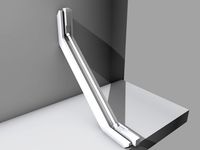
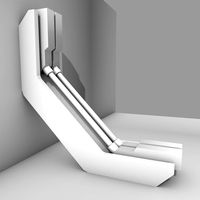
There are four printed components; the support bracket, left and right side slides, and the thumbscrew. For a complete corner, you will need:
(1) Support bracket
(1) Left slide
(1) Right slide
(2) Thumbscrews
Additional components:
(2) M3 x 35mm Hex socket head cap screws
(4) M3 Hex Nuts
(2) 7/32" x 11/16" Compression springs (Optional; however I find the corner brace functions much better with the springs included. Optional Substitution: The original corner braces were created using compression springs cannibalized from a number of dead ballpoint pens I had lying around.)
(1) Original countersunk screw and nut from your aluminum build platform. I upgraded the nut to a nylon lock nut that I purchased at Home Depot in their specialty hardware section.
(1) Metal washer for use with the original countersunk screw and nut. (Optional, but it is my belief that the use of a washer between the support bracket and the nylon nut will greatly extend the life of these corner braces).
Assembly Instructions:
I specifically omitted the mounting hole for attaching the support bracket to the aluminum build platform, as the holes on my build platform are not uniform. Prior to assembling each corner, I handheld the support bracket in place and used a #33 or .113" drill bit to drill a hole in each bracket.
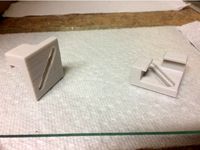
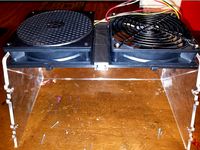
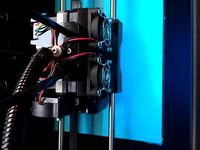
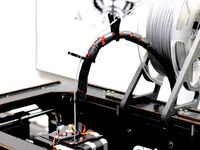
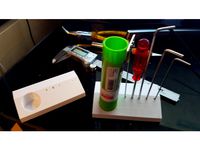
I have included a number of photos detailing how the components relate to one another. If you have questions regarding the assembly, just drop me a line in the comments and I'll do what I can to help.
Results of Testing and Use:
I have been using four of these braces on my printer since I designed them in January of this year. I revised the design slightly in February, and replaced the originals on the printer with the updated parts. The originals worked extremely welly up until I swapped them out, and the new parts have been on the printer for not quite three months, and they're working even better. I've done alot of printing lately, in both ABS and PLA, using these corner braces, with build platform temps between 50-110 degrees Celsius. Four braces are probably overkill, but unfortunatly, redundancy is hardwired in my DNA.
I have a PowerSpec 3D Pro printer (original model) and switched to glass bed printing a couple of years ago. Ever since, I have been searching for a glass bed corner brace/bracket that held the glass firmly and didn't eventually fail after (what I felt was) an unreasonable time frame. If a glass bed corner brace has been designed for use with the PowerSpec 3D Pro or any of the various MakerBot Replicator clones, and it's been uploaded to Thingiverse, chances are I've tried it. With no disrespect to any of the designers of these braces, they just didn't seem to work for me. They'd all melt, or crack, or deform to the point that the glass was not securely held in what I believed was too short an interval of time. This search lead me to design this brace.
My three major principles in designing this object were:
High degree of ease and speed in swapping the glass plates out.
Achieving a design that provided increased surface area for contact with the edges of the glass plate; I've had an issue with the designs that use the end of an M3 socket screw to hold the glass in place, wherein the glass ended up chipping when I used one of this design.
Achieving a design with the ability to securely hold an oversized or undersized glass plate. My six glass plates were sourced from only two different glass companies, and unfortunately not one of is the same size as any of the others.
The Components:
There are four printed components; the support bracket, left and right side slides, and the thumbscrew. For a complete corner, you will need:
(1) Support bracket
(1) Left slide
(1) Right slide
(2) Thumbscrews
Additional components:
(2) M3 x 35mm Hex socket head cap screws
(4) M3 Hex Nuts
(2) 7/32" x 11/16" Compression springs (Optional; however I find the corner brace functions much better with the springs included. Optional Substitution: The original corner braces were created using compression springs cannibalized from a number of dead ballpoint pens I had lying around.)
(1) Original countersunk screw and nut from your aluminum build platform. I upgraded the nut to a nylon lock nut that I purchased at Home Depot in their specialty hardware section.
(1) Metal washer for use with the original countersunk screw and nut. (Optional, but it is my belief that the use of a washer between the support bracket and the nylon nut will greatly extend the life of these corner braces).
Assembly Instructions:
I specifically omitted the mounting hole for attaching the support bracket to the aluminum build platform, as the holes on my build platform are not uniform. Prior to assembling each corner, I handheld the support bracket in place and used a #33 or .113" drill bit to drill a hole in each bracket.
I have included a number of photos detailing how the components relate to one another. If you have questions regarding the assembly, just drop me a line in the comments and I'll do what I can to help.
Results of Testing and Use:
I have been using four of these braces on my printer since I designed them in January of this year. I revised the design slightly in February, and replaced the originals on the printer with the updated parts. The originals worked extremely welly up until I swapped them out, and the new parts have been on the printer for not quite three months, and they're working even better. I've done alot of printing lately, in both ABS and PLA, using these corner braces, with build platform temps between 50-110 degrees Celsius. Four braces are probably overkill, but unfortunatly, redundancy is hardwired in my DNA.
Similar models
thingiverse
free
Flashforge Dreamer / PowerSpec Ultra Glass Bed Spring Loaded Corner Bracket by craiger711
...racket -> second nut.
i will be posting pictures of the assembled part once i print it and assemble it, waiting on the spring.
thingiverse
free
M3 Thumbscrew by juntti99
...w by juntti99
thingiverse
couldn't find a thumbscrew that i liked for the glass plate mounts on my printer so i made my own.
thingiverse
free
Glass/ Mirror L Corner Bracket for Heatbed by Electroniacs
...r heat beds that have a ~3mm screw.
the force from the spring keeps the bracket in place but for extra support you can use a nut.
thingiverse
free
3mm glass bracket for Flashforge and clones by unsunghero48
...r the printed bracket after the new 15mm print bed screw has been placed with it's new bolt and original nut 1 per unit made)
thingiverse
free
Corner brackets - heatbed / glass plate by eivind
... or tighten the m3 screws to lower or raise the corners.
this part could easily be customized to fit larger or smaller springs.
thingiverse
free

tevo black widow corner bed bracket with spring support by Jrsemporium40
...ou may have trouble depending what your hot end setup is... print takes about 17mins and is well worth it... used abs for heat...
thingiverse
free
Glass Bed Corner Holders by Aerlith_Kinspirit
...ws on my maker select with screws 4 mm longer to allow an easier time leveling. i did not replace the screws on the select plus.
thingiverse
free
Voxelab Aquila glass bed corner supports and heated bed cable\corner support by Raybonz1
...e\corner support with added bracing and deeper spring pocket. installed and tested and running.. looks like we're good to go!
thingiverse
free
FFCP Glass Bed Bracket by golgimaster
...d. these brackets are secured with the original screws in the bed corners and i used the two extra wingnuts my printer came with.
thingiverse
free
Glass Bed Bracket for Anet A8 by Tobi97l
...think it was a failure. i just didn't do enough testing. version two is already usable but i would download the newest model.
Powerspec
thingiverse
free
Spool holder for Powerspec Ultra by Medfordj
...older for the powerspec ultra printer and should fit the ctc dual. works well , print vertically with extra shell and top layers.
thingiverse
free
Filament Monitor Brackets for Flashforge Creator Powerspec 3D Pro by ChuckNorr15
...reator pro / powerspec 3d pro filament montior designed by aaron tunell.
these original brackets do not fit the powerspec 3d pro.
thingiverse
free
Tramming Tool for PowerSpec, Wanhao, MonoPrice Duplicator i3 by reactron
...tor i3 by reactron
thingiverse
tool to assist in tramming the bed on a duplicator i3. included gcode file is for a powerspec i3.
thingiverse
free
Dropcam PowerSpec 3D Pro Corner Mount by Madss
... i just made it fit to the powerspec 3d pro enclosure. the credit remains with the original author. you can use it on any corner.
thingiverse
free
PowerSpec Ultra top panel for 120mm fans by kboyer36
...m pc fans. this provides improved air circulation and cooling allowing you to safely print pla plastic without removing the hood.
thingiverse
free

Legitamate Corner Brackets 3mm Plate Creator powerspec
...tamate corner brackets 3mm plate creator powerspec
thingiverse
these worked for me after fiddling with a bunch of other designs.
thingiverse
free
Wire saver for PowerSpec Ultra 3D Printer by jkcnet
...ific stress point. this design locks the conduit into an open tube to completely isolate the wires from the movement of the head.
thingiverse
free
Latch for PowerSpec 3D Pro by aich75013
...th a smaller hole. my screw head went through the original design.
copied from: http://www.thingiverse.com/thing:655519/#remixes
thingiverse
free
52mm spool hub for PowerSpec 3D Pro (FlashForge Creator Pro) by aalbinger
...ed for the 30mm spool tubes on my powerspec 3d pro and added a spool end to match. i super glued the spool end into the bushing.
thingiverse
free
PowerSpec Leveler by Rps96
...s, which simplify3d does extremely well, very easy to remove.
very happy with it, and thanks to maker311 for the original design.
Ctc
turbosquid
$4

CTC Railroad Telephone
... available on turbo squid, the world's leading provider of digital 3d models for visualization, films, television, and games.
turbosquid
$7
Onibus Ciferal Padron Briza Volvo B58e CTC Azul
...briza volvo b58e ctc azul for download as blend, fbx, and obj on turbosquid: 3d models for games, architecture, videos. (1692482)
3dfindit
free
CTC
...ctc
3dfind.it
catalog: rcm
thingiverse
free

CTC by apone4
...ctc by apone4
thingiverse
modifica per ctc montaggio e3d
thingiverse
free
Filiamenthalter CTC by e2mars
...filiamenthalter ctc by e2mars
thingiverse
filiamenthalter ctc makebot
thingiverse
free
CTC's Feet by zion_taron
...ctc's feet by zion_taron
thingiverse
feet to ctc printers
thingiverse
free
CTC Abdeckung by Einstein77
...ctc abdeckung by einstein77
thingiverse
abdeckung für die hinteren bohrungen im gehäuse des ctc
thingiverse
free
CTC Corner caps by KyoFR
...ctc corner caps by kyofr
thingiverse
corner caps ctc
thingiverse
free
FILAMENT GUIDE CTC by HugoNogier
...filament guide ctc by hugonogier
thingiverse
filament guide ctc
thingiverse
free
CTC Bizer Fusshalter by FPV57
...ctc bizer fusshalter by fpv57
thingiverse
haltewinkel für gummifüsse ctc
Flashforge
thingiverse
free

Flashforge Logo
...flashforge logo
thingiverse
flashforge logo
thingiverse
free

flashforge logo by morive3d
...flashforge logo by morive3d
thingiverse
this is a flashforge stamphttps://www.youtube.com/channel/ucu6ge9qrju9cpgg6wrlxkqw
thingiverse
free

Flashforge Glass Bed by olo2000pm
...flashforge glass bed by olo2000pm
thingiverse
flashforge glass bed
thingiverse
free
Toolbox for FlashForge Finder by Gringo1970
...toolbox for flashforge finder by gringo1970
thingiverse
smal toolbox for flashforge finder
thingiverse
free
Flashforge / Dremel lid by Disco_Rob
...flashforge / dremel lid by disco_rob
thingiverse
lid extension for the flashforge dreamer
thingiverse
free

Flashforge Dreamer Filamentguide by PeterS1
...de for flashforge dreamer / dremel idea. you need also flashforge dreamer lid spacer (http://www.thingiverse.com/thing:1219953)
thingiverse
free
Flashforge creator legs by cybadigitals
...flashforge creator legs by cybadigitals
thingiverse
these legs gives a clearance of 25mm for flashforge creator series
thingiverse
free
Flashforge Inventor/Dreamer by Iprintr7
...orge inventor/dreamer by iprintr7
thingiverse
this is my first thingiverse project and is a model of the flashforge 3d printer
thingiverse
free

Flashforge Filiment Guide by russellscanlan
...flashforge filiment guide by russellscanlan
thingiverse
my design to feed filament through the door on a flashforge adventure 3
thingiverse
free
Flashforge Winder Adapter by newky2k
...winder adapter by newky2k
thingiverse
adapters for the flashforge 0.5 kg spools to the for the filament spool winder by ssinnott
Brace
archive3d
free
Bracing 3D Model
...
holder bracing strengthening
bracing 4 - 3d model (*.gsm+*.3ds) for interior 3d visualization.
archive3d
free
Bracing 3D Model
...
bracing strengthening holder
bracing 2 - 3d model (*.gsm+*.3ds) for interior 3d visualization.
turbosquid
$5

brace PARIS
...osquid
royalty free 3d model brace paris for download as max on turbosquid: 3d models for games, architecture, videos. (1284415)
archive3d
free
Bracing 3D Model
...older fastening strengthening
bracing 1 - 3d model (*.gsm+*.3ds) for interior 3d visualization.
archive3d
free
Bracing 3D Model
...older fastening strengthening
bracing 3 - 3d model (*.gsm+*.3ds) for interior 3d visualization.
turbosquid
$20
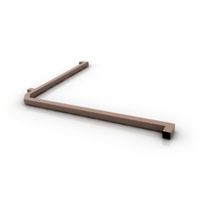
Corner Brace Bracket
...oyalty free 3d model corner brace bracket for download as stl on turbosquid: 3d models for games, architecture, videos. (1322777)
turbosquid
$10

Craftsman Handtools - Brace
... available on turbo squid, the world's leading provider of digital 3d models for visualization, films, television, and games.
turbosquid
$2
Degree Brace 4
...el degree brace 4 for download as 3ds, max, obj, c4d, and fbx on turbosquid: 3d models for games, architecture, videos. (1205705)
turbosquid
$1
Degree Brace 3
...el degree brace 3 for download as 3ds, max, obj, c4d, and fbx on turbosquid: 3d models for games, architecture, videos. (1205719)
turbosquid
$1
Degree Brace 2
...el degree brace 2 for download as 3ds, max, obj, c4d, and fbx on turbosquid: 3d models for games, architecture, videos. (1205714)
Makerbot
thingiverse
free

MakerBot Mixtape by MakerBot
...t.com/makerbot-mixtape.html
designed by john b., matt k. and john d.
a collaborative project with playbutton
www.playbutton.com
thingiverse
free

MakerBot Nameplate by MakerBot
...plicator. this was seen in episode 5 of season 2 of makerbot tv http://www.youtube.com/watch?v=k815gaeelw8
created by todd blatt
thingiverse
free

Makerbot Mixtape Heart by MakerBot
... about a makerbot mixtape in a heart!
made by using the makerbot mixtape negative file
designed by john briscella and matt kroner
thingiverse
free

MakerBot Gnome by MakerBot
...at details that were not lost.
for more information on the makerbot digitizer desktop 3d scanner, visit makerbot.com/digitizer.
thingiverse
free
Makerbot Skate Park by MakerBot
...makerbot skate park by makerbot
thingiverse
a complete fingerboarding skate park.
thingiverse
free
MakerBot BotStep17 REVE by MakerBot
...esigned by harry mulliken.
this is part of the makerbot replicator, which you can find at http://www.thingiverse.com/thing:18813
thingiverse
free
Makerbot Mixtape Negative by MakerBot
...ngiverse
now your can make a makerbot mixtape out of almost any thing on thingiverse.
designed by john briscella and matt kroner
thingiverse
free
MakerBot Man Cupid by MakerBot
...piece at once and get moving parts right off the build plate.
available in the makerbot store gumball machine for a limited time!
thingiverse
free

MakerBot Pendant by MakerBot
...39;t go wrong sporting this necklace! wear it with pride. both dualstrusion and one color models are available.
created by todd
thingiverse
free
MakerBot Dynamo by MakerBot
...
and if a led not exciting enough for you, just think of all the other wonderful things you can power, one hand crank at a time.
Corner
archibase_planet
free
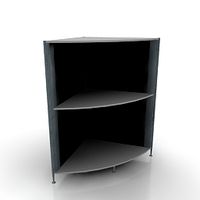
Corner
...corner
archibase planet
nook corner
corner n030708 - 3d model (*.gsm+*.3ds) for interior 3d visualization.
archibase_planet
free
Corner
...corner
archibase planet
corner post rack
fp corner wh - 3d model (*.gsm+*.3ds) for interior 3d visualization.
3ddd
$1
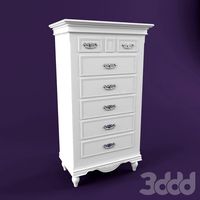
Country Corner
...country corner , комод , прованс
country corner
3ddd
$1
Corner 8140
... corner
corner 8140 - 16,5 x 17,4 (cm)
corner 8141 - 16,5 x 29,5 (cm)
corner 8142 - 16,5 x 41,5 (cm)
corner 8143 - 28 x 28 (cm)
archibase_planet
free
Corner
...corner
archibase planet
seat easy chair furniture
havanna corner - 3d model (*.gsm+*.3ds) for interior 3d visualization.
3ddd
$1

Country corner
... country corner , romance
рамка country corner, romance,
артикул cc0141
3ddd
$1

Country corner
...country corner
3ddd
country corner , журнальный
country corner pbth размеры 169*69*49
3d_export
$5

Corner
...corner
3dexport
3ddd
$1
Table-Corner
...table-corner
3ddd
круглый
table,corner
3ddd
$1

Table,Corner
...table,corner
3ddd
журнальный
table,corner
Another
turbosquid
$15
ANOTHER BATHROOM
...quid
royalty free 3d model another bathroom for download as on turbosquid: 3d models for games, architecture, videos. (1171460)
turbosquid
$24

Another World
... available on turbo squid, the world's leading provider of digital 3d models for visualization, films, television, and games.
turbosquid
$39
Another Red Curb
...ee 3d model another red curb for download as ma, obj, and fbx on turbosquid: 3d models for games, architecture, videos. (1182913)
turbosquid
$9
Another Deberenn Sofa
...model another deberenn sofa for download as max, obj, and fbx on turbosquid: 3d models for games, architecture, videos. (1497850)
turbosquid
$2
Another picnic table
... model another picnic table for download as max, obj, and fbx on turbosquid: 3d models for games, architecture, videos. (1426381)
turbosquid
$15

door to another world
...oor to another world for download as 3ds, obj, fbx, and blend on turbosquid: 3d models for games, architecture, videos. (1334842)
3d_export
free

another hacksaw
...another hacksaw
3dexport
. . . 3d model of a hacksaw. 3d model files: - 3ds max 2017 (scanline) - obj (low poly) . . .
turbosquid
$12
Another Country Side Table
... another country side table for download as max, obj, and fbx on turbosquid: 3d models for games, architecture, videos. (1496053)
turbosquid
$29
Furniture - "Another country" modern sofa
...another country" modern sofa for download as obj and c4d on turbosquid: 3d models for games, architecture, videos. (1186189)
3d_ocean
$29

Another Tron Light Cycle with the Rider and Trail
...ther tron light cycle with the rider and the light trail. high quality 3d model,all the materials and lights are included. the...
Bed
3ddd
$1

bed
...bed
3ddd
bed , постельное белье
bed
3ddd
$1

bed
...bed
3ddd
bed , постельное белье
bed
3ddd
$1

bed
...bed
3ddd
bed , постельное белье
bed
3ddd
$1

bed
...bed
3ddd
bed , постельное белье
bed
3ddd
$1

bed
...bed
3ddd
bed , постельное белье
bed
3ddd
$1

bed
...bed
3ddd
bed , постельное белье
bed
3ddd
free

bed
...bed
3ddd
bed , постельное белье
bed
3ddd
free

bed
...bed
3ddd
bed , постельное белье
bed
3ddd
$1

Bed
...bed
3ddd
bed , постельное белье , постель
bed
3d_export
$7

bed adairs bed
...rs bed
3dexport
bed adairs bed in modern style. if you want a smoother surface, please turn on turbosmooth in the modifier list.
Glass
archibase_planet
free
Glasses
...glasses
archibase planet
glass wine-glass liqueur-glass
glasses- 3d model for interior 3d visualization.
archibase_planet
free

Glass
...archibase planet
glass cocktail glass tall wine glass martini glass
glass - 3d model (*.gsm+*.3ds) for interior 3d visualization.
archibase_planet
free

Glass
...glass
archibase planet
glass wine-glass glass-ware
glass n030209 - 3d model (*.gsm+*.3ds) for interior 3d visualization.
archibase_planet
free

Glass
...glass
archibase planet
glass-ware glass glass ware
glass n141109 - 3d model (*.gsm+*.3ds) for interior 3d visualization.
3d_ocean
$2
Glass
...liquid container low-poly glass nice glass obj r15 water glass
3d model of a beautiful glass. created the model in cinema 4d r15.
archibase_planet
free
Glass
...glass
archibase planet
glass tall wine glass wine-glass
glass n300514 - 3d model (*.gsm+*.3ds) for interior 3d visualization.
archibase_planet
free

Glass
...glass
archibase planet
glass wine-glass tall wine glass
glass n091210 - 3d model (*.gsm+*.3ds) for interior 3d visualization.
archibase_planet
free
Glass
...glass
archibase planet
glass tall wine glass glass-ware
glass n081011 - 3d model (*.gsm+*.3ds) for interior 3d visualization.
3d_ocean
$9
glasses
...glasses
3docean
glasses
max glasses v-ray
archibase_planet
free
Glass
...glass
archibase planet
glass-ware glass
glass - 3d model (*.gsm+*.3ds) for interior 3d visualization.