Thingiverse

Yamaha Tracer dash relay mount by PeterLindquist
by Thingiverse
Last crawled date: 2 years, 11 months ago
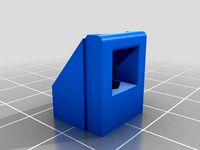
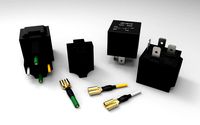
Created for my 2019 Yamaha Tracer GT. This allows an easy and secure installation of a 12v relay (or other similar gadget) under/behind the dash. This location is shielded from the elements as well as you can achieve on a motorcycle and is about the safest place to stash electronic bits aside from under the seat (which is limited at best).
Parts list:
(1) 30a 12v relay w/mount bracket
(3) M5 stainless nuts
(1) M5x16 stainless bolt
(1) M5x25 stainless bolt
(1) set of two pieces printed mount plates (ABS or PETG recommended @ 50% infill)
First, insert two nuts into the recesses in the #1 mount plate. On the FLAT face of that plate, attach the relay mount using the 5x25mm bolt and tighten securely. (You are presumed to have all your wiring connections/terminations in place already) Fit this plate into the Yamaha dash bracket from the INSIDE, with the bolt facing outward. Slip plate #2 over the exposed bolt and loosely attach the remaining nut onto the bolt, this will hold all pieces in place while you: Insert the 5x16mm bolt through the OUTSIDE plate and tighten. Now using an 8mm wrench. go back and tighten the nut on bolt #1. I used a drop of light thread sealer on both bolts just to insure everything stays in place until I say different! Attach relay to base, confirm power outlets are wired properly, insert fuse to power everything and turn on your key. Congrats!
Similar models
thingiverse
free

USB Camera Mount for Prusa MK3 by Nate456789
...d into the channel.
then tighten the bolt.
mount your bracket using m3 bolts 29mm and nuts. mount the camera using a 1/4 20 bolt.
thingiverse
free

ECUMaster Black Mount by Enraged
...remove the ecu whenever you need to.
not printed yet, so currently untested. fusion360 model included if you choose to modify it.
thingiverse
free
x axis Belt Tensioner by lonnie77
... fan mount with the new mount. attach the belt and secure with wire ties. tighten cap screw as needed. align pulley on the motor.
thingiverse
free

Anet A8 30 Amp Power Supply Mount by Carrington_Hong
...f the frame. also be careful not to tighten the bolts through the frame too much as it could lead to cracking the acrylic frame.
thingiverse
free

6x9 Acrylic stereo
...connected and don't hear anything,, try twisting the knobs.
if everything works,, then unplug it,, mount the rear and enjoy!!
thingiverse
free

Creality CR10s V2 Standalone all in one unit conversion by CdRsKuLL
... and fan shroud in place. finally, secure the lid in place.
i printed this all in pla, only required supports for the psu mount.
thingiverse
free

3 Wheel X carriage attachment and X belt adjuster for the Tarrantula by jimwooly
...place the 20mm bolt and ensure all 3 wheels are making contact with the v channel.
9) the remaining assemble is straght foreward.
thingiverse
free

Gopro Hero 4, Vertical Stereo Bracket by Djfx
...e standard gopro hand-tightened mounting bolt. there is also a slot on the bottom where you can glue in a nut for a tripod mount.
thingiverse
free

AUTO-VOX CS-2 Wireless Backup Camera mounting plate for RV. by wt4y
...nut, flat washer and lock washer. the hex head on the bolt is "captured" so it will not rotate when tightening the nut.
thingiverse
free

Well Plate Microscope Mount by codyfell
...s split in the center to allow easy attachment to the well plate and can be tightened using a 2mm bolt/nut (twist ties work too).
![Creator Pro Dual- glass clip [slim & simple] by PeterLindquist](/t/8135287.jpg)
Tracer
turbosquid
$10

Overwatch - tracer gun
...y free 3d model overwatch - tracer weapon for download as fbx on turbosquid: 3d models for games, architecture, videos. (1174321)
3d_export
$5

overwatch tracer
...overwatch tracer
3dexport
this modeling was done by a student. i worked hard on it, so please use it well.
turbosquid
$8

Bowling Ball Fire Tracer
...all fire tracer for download as blend, dae, fbx, stl, and obj on turbosquid: 3d models for games, architecture, videos. (1544013)
3d_export
$10

tracer - mach t
...mach t
3dexport
format includes<br>.max<br>.obj<br>.fbx<br>polys : 11.263.881<br>verts : 5.684.683
3d_export
$5

tracer - mach t
...max<br>.obj<br>.fbx<br>.mtl<br>.stl<br>.blend<br>polys : 3.172.755<br>verts : 1.605.905
3d_export
$5

tracer - mach t boom
...ncludes<br>.max<br>.obj<br>.fbx<br>.stl<br>.blend<br>polys : 244.063<br>verts : 122.592
3d_ocean
$9

Dictaphone
...dictaphone 3docean dictaphone lfh 632 philips voice tracer philips voice tracer lfh 632 enregistreur –...
3d_export
$5

Starfish 3D Model
...toys toyshop trace traceability traceable traced traceless tracer tracers tracer traces trachea tracheal tracheostomy starfish 3d model mimicmwb 25093...
3d_export
$75

Sporting Club 01 3D Model
...modelled with 3dsmax, standard materials and rendered with light tracer ...
3d_ocean
$10

Tree with nice leaf
...polygon leaf model create by lines. max default rendering.(light tracer maps are...
Dash
turbosquid
$69

Dash
... available on turbo squid, the world's leading provider of digital 3d models for visualization, films, television, and games.
turbosquid
$2

Dash Cryptocurrency
...3d model dash cryptocurrency for download as ma, obj, and fbx on turbosquid: 3d models for games, architecture, videos. (1302492)
turbosquid
$15

Dash edge
...el dash edge for download as max, max, max, max, fbx, and obj on turbosquid: 3d models for games, architecture, videos. (1528891)
turbosquid
$9

dash black coin
...id
royalty free 3d model dash black coin for download as max on turbosquid: 3d models for games, architecture, videos. (1461814)
turbosquid
$9

dash gold coin
...uid
royalty free 3d model dash gold coin for download as max on turbosquid: 3d models for games, architecture, videos. (1461812)
turbosquid
$9

Fitting Dash DSKM30 WATERWORKS
...el fitting dash dskm30 waterworks for download as max and fbx on turbosquid: 3d models for games, architecture, videos. (1467812)
turbosquid
$5

Geometry Dash Icon 1
...l geometry dash icon 1 for download as c4d, fbx, obj, and 3ds on turbosquid: 3d models for games, architecture, videos. (1584830)
turbosquid
$4

Geometry Dash Icon 7
...l geometry dash icon 7 for download as c4d, 3ds, fbx, and obj on turbosquid: 3d models for games, architecture, videos. (1587439)
turbosquid
$4

Geometry Dash Icon 2
...l geometry dash icon 2 for download as c4d, 3ds, fbx, and obj on turbosquid: 3d models for games, architecture, videos. (1585266)
turbosquid
$4

Geometry Dash Icon 6
...l geometry dash icon 6 for download as c4d, 3ds, fbx, and obj on turbosquid: 3d models for games, architecture, videos. (1587397)
Relay
turbosquid
$50
Relay Spaceship
... model relay spaceship for download as skp, 3ds, dae, and obj on turbosquid: 3d models for games, architecture, videos. (1655800)
3ddd
$1
Scavolini / Grand Relais
...scavolini / grand relais
3ddd
scavolini
scavolini модель grand relais дизайн gianni pareschi
3ddd
$1
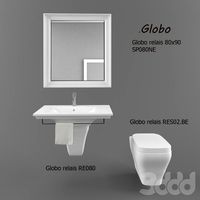
Сантехника Globo Relais
... унитаз , зеркало
сантехника globo relais
умывальник,зеркало,унитаз.
3d_export
$8
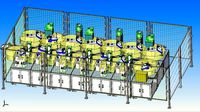
relay automatic assembly line
...relay automatic assembly line
3dexport
relay automatic assembly line
3ddd
free
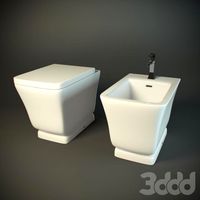
Унитаз и биде Relais
... биде , унитаз
унитаз art.re001 bi и биде art.re009 bi
turbosquid
free

Relay 8 pin
... available on turbo squid, the world's leading provider of digital 3d models for visualization, films, television, and games.
cg_studio
$110
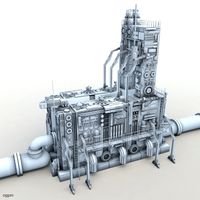
Power relay station3d model
...el
cgstudio
.3ds .fbx .max .obj - power relay station 3d model, royalty free license available, instant download after purchase.
3ddd
$1
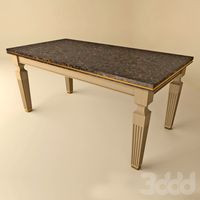
Стол обеденный -Scavolini- Grand Relais
...s
3ddd
обеденный , scavolini
обеденный стол scavolini - grand relais, в трёх расцветках.
3d_export
$10
relay jd1912 12v 40a with connector
...lowing bodies: 1. relay jd1912 12v 40a - 1 piece; 2. connector housing - 1 piece; 3. terminal with a part of the wire - 4 pieces.
3ddd
free

Globo Relais furnitures
... , раковина
раковина с консолью st070.ne
зеркалоsp070.bi
стакан re0381x
мыльница re0391x
Yamaha
3ddd
$1

YAMAHA
...yamaha
3ddd
барабан
ударная установка yamaha
3ddd
free

Электропианино Yamaha
... пианино , электропианино
электропианино yamaha
3ddd
$1

мотоцикл yamaha
...мотоцикл yamaha
3ddd
yamaha , мотоцикл
мотоцикл yamaha
3ddd
free

Guitar Yamaha
...guitar yamaha
3ddd
гитара , yamaha
шестиструнная гитара фирмы yamaha
3d_export
$5

yamaha 660r
...yamaha 660r
3dexport
motorcycle yamaha 660r. hightdetailed 3d model
3ddd
free

электронное пианино yamaha
...электронное пианино yamaha
3ddd
yamaha , пианино
электронное пианино yamaha + текстура
3ddd
$1

Yamaha CRX-140 OR
...yamaha crx-140 or
3ddd
yamaha , музыкальный центр
музыкальный центр yamaha + пульт
3ddd
free

YAMAHA RX-830
...yamaha rx-830
3ddd
ресивер , yamaha
ресивер yamaha rx-830, модель в формате fbx!
3ddd
$1

Yamaha NS-F700
... акустика , yamaha
акустическая система yamaha ns-f700 в трех цветах
3ddd
free

Ресивер Yamaha
...адняя стенка сделана "постольку-поскольку", ибо она почти никогда не нужна, а лишние полигоны кушают лишнюю оперативку.
Mount
3d_export
free

mounting bracket
...mounting plate is the portion of a hinge that attaches to the wood. mounting plates can be used indoors, cabinetry and furniture.
turbosquid
$2

MOUNTING
... available on turbo squid, the world's leading provider of digital 3d models for visualization, films, television, and games.
turbosquid
free

Mounts
... available on turbo squid, the world's leading provider of digital 3d models for visualization, films, television, and games.
turbosquid
free

Mount Fuji
...fuji
turbosquid
free 3d model mount fuji for download as obj on turbosquid: 3d models for games, architecture, videos. (1579977)
3d_export
$5

Headphone mount LR
...headphone mount lr
3dexport
headphone mount l+r
turbosquid
$39

Mount rainier
...quid
royalty free 3d model mount rainier for download as fbx on turbosquid: 3d models for games, architecture, videos. (1492586)
turbosquid
$5

pipe mounting
...quid
royalty free 3d model pipe mounting for download as obj on turbosquid: 3d models for games, architecture, videos. (1293744)
turbosquid
$3

Mounting Tires
...uid
royalty free 3d model mounting tires for download as fbx on turbosquid: 3d models for games, architecture, videos. (1708511)
3d_export
$5

Magnetic GoPro Mount
...pro mount
3dexport
cool magnetic mount for gopro. allows you to mount the camera on flat metal surfaces and get exclusive shots.
turbosquid
$5

Stone Mount
...ty free 3d model stone mount for download as ma, obj, and fbx on turbosquid: 3d models for games, architecture, videos. (1370306)