Thingiverse

XYZ Printing daVinci Jr 1.0 - HeatBed 110w 9A @ 12V by kr15_uk
by Thingiverse
Last crawled date: 3 years ago
!!! YOU WILL BE DEALING WITH POISONOUS CHEMICALS SO I'M NOT RESPONSIBLE IF YOU KILL YOURSELF OF PEOPLE/ANIMALS AROUND YOU.
!!! DIY HEATBED COULD BE FIRE HAZARD IF NOT DONE CORRECTLY SO I'M NOT RESPONSIBLE IF YOU BURN DOWN YOUR HOUSE OR SO.
IF YOU DO NOT HAVE EXPERIENCE WITH PCB ETCHING AND ELECTRONICS - DON'T DO THIS! OR GET SOMEONE WHO HAS TO DO THIS FOR YOU.
DIY heatbed for Jr.
***Yes you can buy silicone heaters and stick them to the bottom of the glass but usually that requires some drilling/cutting into the metal base of the bed to get wires routed through.
With this solution you'll only lose 2mm of Z height if done correctly.
!!! Just to set things clear - this isn't step by step tutorial. More like brief description.
If you don't understand what I'm talking about then maybe this project isn't for you!
You'll need:
PCB Clad 165x200mm - Jr glass is 165x165, you can get ones which are 165mm wide already of eBay. You need 1x side to be 200 to cut little tab which will stick out so you can solder wires to it.
All chemicals etc for PCB etching. (Deliberately not mentioning what exactly)
Small handsaw.
Soldering iron
16-18AWG wire
12v PSU - AT LEAST 9AMP
Temperature control board
Relay.
Sharpie
Process is very simple.
Print SVG on regular 2D laser printer (laser printer is a MUST)
Transfer print to PCB clad via iron method.
Fix up imperfections with Sharpie
Draw freehand with Sharpie extension traces for the power input so it sticks out a bit on the right hand side of your Jr bed.
Etch!
I had my thermistor cartridge simply capton taped to on side. Not perfect but good enough for me.
But... You could do freehand traces on the bottom of the clad to get thermistor nicely in the middle with traces going out on the side underneath the power in (that's of course if you have double sided PCB clad)
I've covered all surface with capton tape to give it some kind of a insulation.
Wiring.
I've used cheapest available 12v temp controller board of eBay + ATX PC PSU to power it up.
And relay was wired to Jr exhaust fan to make it somewhat automated. That also ensured the bed is switched off automatically when print is done.
I hope all this makes sense.
P.S.: I'll try to find my heatbed and post some actual photos of it.
I've stopped using it only because Jr is no more. Cannibalised for parts.
Similar models
thingiverse
free

PCB Heatbead for Home Etching by triffid_hunter
...my bed up to 140â°c before, and didn't want to take it higher for fear of cracking my glass or damaging the fr4 pcb material.
thingiverse
free

Dell A870P Power Supply to Bench Supply Cover by ktelep
...power supply on, you'll need to short the bottom and third from the bottom pins all the way on the right hand side to ground.
thingiverse
free

Simple Metal Sharpie Adapter by joeyballard
...lver/gold). you can print on thick objects with a flat surface. you can make pcbs if you have some copper clad and etching fluid.
thingiverse
free

Relay Housing for PSU Control
...the ac wires to one side while the control wires are soldered to a pcb and then lead out through a different hole in the housing.
thingiverse
free

Ender 3_PSU Cover Mod
...owever the pcb shows 40w, strange i know...)
https://fr.aliexpress.com/item/33042313383.html?spm=a2g0s.9042311.0.0.27426c37v0ybdo
grabcad
free

relay 12v pcb
...relay 12v pcb
grabcad
relevador de 12v para pcb
thingiverse
free

Printrbot Jr. Heated Aluminum Bed by Alaster
...thightly fix to each other, without any play in the drill holes, the resulting stress could crack and/or destroy the whole setup.
thingiverse
free

XYZ daVinci Jr - RepRapDiscount Smart Controller LCD 2004 by kr15_uk
...e. switch i had in my component draw already.
didn't bothered to trace usb cable hence all prints i did was from the sd card.
thingiverse
free

XYZ daVinci Jr - E3D V6/Lite6 Mount by kr15_uk
...his is that 1st i need to redesign x axis mount at the right. it not going to cary extra stepper early without sagging even more.
thingiverse
free

Quilted Heatbed by Legot
...
currently, the design below gets between 70c and 90c (under glass) when pulling ~5.79a @12v when etched onto 2oz/in copper clad.
Kr15


110W
3ddd
$1

Galimberti Nino_Norma
...nino , norma galimberti nino norma dimensions: 880h x 110w x 40d...
3d_sky
$8

Galimberti Nino_Norma
...galimberti nino norma galimberti nino norma dimensions: 880h x 110w x 40d...
thingiverse
free

PCB heated print bed by josefprusa
...area you can select what resistance you want 1.3ohms (110w at 12v) or 21ohms you dont need any steel...
3dbaza
$3

TILAN chandelier (139307)
...cm<br>m 85 × 52 cm<br>l 135 × 58 cm (110w<br>ceiling mount 46 × 42 cm<br>polys: 6 459<br>verts: 7...
thingiverse
free

Shower caddy mirror holder by schuy
...will secure the mirror in just fine. measures outside: 110w x 78h x 5.5d and accommodates mirror size: 107w...
3dbaza
$3

7471xx Saturno Lightstar Pendant Chandelier (103930)
...lightstar pendant chandelier 3d model<br>747122 - brass<br>747144 - chrome<br>led 110w 9900lm<br>xyz: 700x577x1198 mm<br>polys: 9,700<br>verts: 10,379<br>subdivision ready<br>recommended opensubdiv iterations:<br>0 -...
thingiverse
free

Suzo Happ arcade PSU cover
...is a cover for the suzo happ power pro 110w arcade power supply. it has a 48x28mm opening on...
thingiverse
free

OctoPi Enclosure for TAZ 6 by dkrider
...thanks to the following for the useful cad files: https://cad.onshape.com/documents/db1314645041f433a24b6dc3/w/6aee9c13ac54c11d09e02da0/e/b7de97fc974a48bdc73dd85bhttps://grabcad.com/library/raspberry-pi-3-model-b-reference-design-rpi-raspberrypi-raspberry-pi-solidworks-cad-assembly-1https://grabcad.com/library/iec-320-c14-receptacle-panel-mount-1https://grabcad.com/library/qualtec-738w-x201-plug-snap-adaptor-outlet-110w1https://grabcad.com/library/sainsmart-2-channel-relay-module-1 note that this design is or entertainment purposes only....
cg_trader
$299

JCB hydradig 110w
...dradig 110w
cg trader
3d model jcb hydradig 110w jcb loader, available formats obj, fbx, c4d, stl, ready for 3d animation and ot
9A
3ddd
free

ITALUX LISA MX09080-9A
...italux lisa mx09080-9a
3ddd
italux
светильник подвесной, фирмы italux . модель - lisa. номер по каталогу - mx09080-9a
humster3d
$75

3D model of 9A-91
...ster3d
buy a detailed 3d model of 9a-91 in various file formats. all our 3d models were created maximally close to the original.
3ddd
free

Бра - mathieu lustrerie 995036-9A
...бра - mathieu lustrerie 995036-9a
3ddd
mathieu lustrerie
бра - mathieu lustrerie 995036-9a
моделил по фото, не 100% сходство
turbosquid
$9

Classic Bed `141209`9A
... available on turbo squid, the world's leading provider of digital 3d models for visualization, films, television, and games.
turbosquid
free

Magazine (9a-91 VSK-94)
... available on turbo squid, the world's leading provider of digital 3d models for visualization, films, television, and games.
3d_export
$50

Carbine assault rifle 9a-91 3D Model
...91 carbine kbp
carbine assault rifle 9a-91 3d model download .c4d .max .obj .fbx .ma .lwo .3ds .3dm .stl ronin3ds 103000 3dexport
3ddd
$1

sarri hydria 835852/9a
...lys: 216,746
verts: 220,554
краткое описание коллекции:
возможно заказать в другом размере: 835852/6a - h 98 cm, d 92 cm, 6 ламп
3ddd
$1

Люстра Illuminati Aquarius MD1100331-9A
...ti aquarius md1100331-9a
3ddd
illuminati
размеры: диаметр - 53 см, высота - 60 см. количество ламп - 9х25 вт. материалы - corona.
3d_export
$65

MQ-9 Reaper US Border Security
...mq-9 reaper us border security 3dexport the turboprop-powered, multi-mission mq-9a remotely piloted aircraft (rpa) was developed with ga-asi funding...
3ddd
$1

Люстра ILLUMINATI Corso
...corso 3ddd illuminati , corso итальянская люстра illuminati (corso md103204-9a. описание - 9*g9, d:500,...
Davinci
3ddd
$1

Torre DaVinci 03W
...: davinci 03w
dimensions:
730mm x 575mm x h770mmhttp://www.torre.it/products/contract/chairs-armchairs/da-vinci-03-112
3ddd
$1

Torre DaVinci 04W
...l: davinci 04
dimensions:
730mm x 575mm x h855mmhttp://www.torre.it/products/contract/chairs-armchairs/da-vinci-04-112
turbosquid
$9

Davinci Coin gold coin
...alty free 3d model davinci coin gold coin for download as max on turbosquid: 3d models for games, architecture, videos. (1495584)
turbosquid
$5

DaVinci Single Coffee Table
...free 3d model davinci single coffee table for download as max on turbosquid: 3d models for games, architecture, videos. (1540607)
3d_export
$10

Italdesign Davinci Asphalt 9
...at your discretion. instead of textures, blender materials are used, and the color of any part can be changed at your discretion.
3ddd
$1

Cattelan Italia / DaVinci
...75 см
глубина: 75 см
ширина: 140 см
схематичное изображениеhttp://www.ib-gallery.ru/off-line/mebel_file/25949/file.png
3d_export
$7

092 armchair davinci
...t includes four balls with different color materials (gray, brown, light brown, natural wood). on the end there is real plywood))
3d_export
$10

davinci machine
...aterials are logically named<br>the main format is in 3ds max 2009.<br>satisfcation garranteed..<br>thank you !
3ddd
free

Настенная мозаика DaVinci
...ерация turbosmooth), и простые кубики с фаской - 9000 полигонов.
габариты модели, шхвхг: 50см*50см*1,5см
размер ячейки: 2см*2см
3d_export
$29
Cryptex New 3D Model
...cryptex new 3d model 3dexport cryptex davinci da vinci code criptex enigma mystery riddle game device...
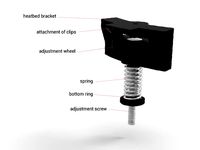
Heatbed
thingiverse
free

HeatBed by moreken
...heatbed by moreken
thingiverse
heatbed for my printer3d "moredelta"
thingiverse
free

heatbed (double heatbed) holder by Vo_Van_163
... bigger size than work desk. this holder - is good solution for me/ and also this is a good solution for double hotbed regulation
thingiverse
free
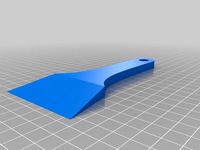
Heatbed Spatula by Brabus453
... spatula by brabus453
thingiverse
heatbed spatula
this is a simple spatula to scrape the heatbed from the first layer residues.
thingiverse
free
Heatbed Mount for round Heatbeds by OliverReinecke
...y bottom board to fix the heatbed-mount. but of coursse there are lots of alternatives to do this... its up to you. hope it helps
thingiverse
free
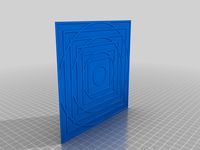
Heatbed plane test
...eds ... this simple object allows to see where the bonding of the object and the flatness of the heatbed might not be optimal ...
thingiverse
free
Heatbed Knob by Sp0nge
...heatbed knob by sp0nge
thingiverse
craftbot plus heatbed knob
print it in abs and put a nut inside.
thingiverse
free

Heatbed cable cover
... the heatbed when i placing the pei sheet.
so i designed this small cover, it clips right down over the +/- screws on the heatbed
thingiverse
free

Heatbed Mosfet controller by oscar_diciomma
...heatbed mosfet controller by oscar_diciomma
thingiverse
heatbed mosfet controller
thingiverse
free

Parametric Heatbed Clamp by verglor
...y verglor
thingiverse
minimalistic heatbed clamps that do not get in way of nozzle.
can be customized for any heatbed thickness.
thingiverse
free

Heatbed support
...ail
heatbed size 328mm
use m5x10 with washers or m5x8 for the 20x20 profile
m4 for heatbed
can be use with wells of 45mm of diam.
Jr
3ddd
$1

Estilo JR
...estilo jr
3ddd
jori , estilo
кресло: estilo jr-7060
бренд:jori
3ddd
$1

Acne JR Bear
...acne jr bear
3ddd
медведь
авторская мягкая игрушка - круглый мишка acne jr
turbosquid
$30

Robot Jr
... 3d model robot jr for download as ma, c4d, max, fbx, and obj on turbosquid: 3d models for games, architecture, videos. (1697456)
turbosquid
$49

Les Paul Jr.
... available on turbo squid, the world's leading provider of digital 3d models for visualization, films, television, and games.
turbosquid
$15

Mega Machine Jr
... available on turbo squid, the world's leading provider of digital 3d models for visualization, films, television, and games.
turbosquid
$15

Bathroom Set JR
... available on turbo squid, the world's leading provider of digital 3d models for visualization, films, television, and games.
turbosquid
$30

Les Paul Jr Guitar
... available on turbo squid, the world's leading provider of digital 3d models for visualization, films, television, and games.
3ddd
$1

Floyd Mayweather Jr. bed
... постельное белье
floyd mayweather jr. bed
размеры: x 187см, y 238см, z 132см.
polys: 504 020
verts: 507 851
3d_export
$15

Mega Machine Jr 3D Model
...mega machine jr 3d model
3dexport
car toy wheel photorealistic racing vray model
mega machine jr 3d model eiwari 87383 3dexport
3ddd
$1

Kuppersbusch EDG 6260 JR Steamer
... пароварка
kuppersbusch edg 6260 jr steamer
hot chili edition
polys:45675
verts:48094
пароварка
Xyz
turbosquid
$7

Rusty Metal Letter XYZ
...etras de metal oxidado for download as 3ds, obj, c4d, and fbx on turbosquid: 3d models for games, architecture, videos. (1454094)
turbosquid
$9

XYZ Glass Tube Font - Letras de cristal
...nt - letras de cristal for download as c4d, 3ds, fbx, and obj on turbosquid: 3d models for games, architecture, videos. (1547160)
3d_export
$8
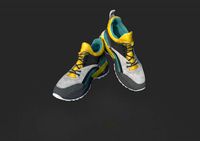
sci-fi sneakers
...located in scene xyz=0,0,0<br>.:::formats:::.<br>.obj / located in scene in xyz0,0,0 .fbx 2006 / located in scene in xyz=0,0,0 .mb...
3d_export
$18
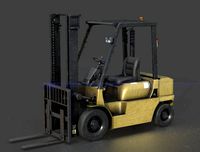
forklift
...maya .:::formats:::. .obj / multiformat located in scene in xyz0,0,0 .fbx / autodesk fbx200611 / located in scene inxyz=0,0,0...
3d_export
$15
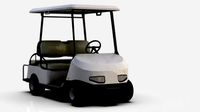
golf cart
...autodesk maya .obj / multiformat located in scene in xyz0,0,0 .fbx / autodesk fbx200611 / located in scene inxyz=0,0,0...
3d_export
$10
Birdhouse
...autodesk maya .obj / multiformat located in scene in xyz0,0,0 .fbx / autodesk fbx200611 / located in scene inxyz=0,0,0...
3d_export
$8
tower crane
...** .:::formats:::.** -.obj / multiformat located in scene in xyz0,0,0 -.fbx / autodesk fbx200611 / located in scene inxyz=0,0,0...
3d_export
$15

wooden pier
.../ 3ds max 2016 / located in scene in xyz0,0,0<br>.:::textures::::.<br>handled painted textures.<br>x3 - 4096x4096 / .jpg<br>-color<br>-nrm<br>-bump<br>thanks for...
3d_export
$10
wooden pier winter
.../ 3ds max 2016 / located in scene in xyz0,0,0<br>.:::textures::::.<br>handled painted textures.<br>x3 - 4096x4096 / .jpg<br>-color<br>-nrm<br>-bump<br>thanks for...
3d_export
$5

camping wood table winter
...in xyz=0,0,0<br>.blend / blender 2,79b located in scene in xyz0,0,0<br>1 material<br>.:::textures:::.<br>x2 texture 4096x4096 .jpg (snow, wood)<br>-color<br>-normal map<br>-bump...
12V
turbosquid
$6
12v battery
...royalty free 3d model 12v battery for download as max and fbx on turbosquid: 3d models for games, architecture, videos. (1355531)
3ddd
$1
Dolce Porte / Venezia 12V
...
3ddd
dolce porte , дверь
багетные межкомнатные двери dolce porte , полотно 2000х800 mm.
3d_export
$15
Aquacomputer Aquastream XT USB 12V Pump 3D Model
...
water cooling pomp aquacomputer aquastream xt computer
aquacomputer aquastream xt usb 12v pump 3d model mackandco 37582 3dexport
3d_export
$10
relay jd1912 12v 40a with connector
...lowing bodies: 1. relay jd1912 12v 40a - 1 piece; 2. connector housing - 1 piece; 3. terminal with a part of the wire - 4 pieces.
3d_export
$5

CHC3512CB fan
...chc3512cb fan 3dexport solidworks 3d model of chc3512cb 35mm 12v fan for...
3ddd
free
Люстра Quasar
...sizes: *38 x e 5/8 12v/1.2w 1 x gy6.35 12v75w l 76 x e 5/8 6v/1.2w 1 x gy6.35...
3ddd
$1
MW-LIGHT Федерика
...379013512 высота 34 см диаметр 55 см 12х20w g4 12v рекомендуемая площадь освещения: 16 кв....
3ddd
$1
ILFARI. TEARS FROM MOON H34
...munsters описание: 34 x g4 | 10w max. | 12v включительно светильники 4 x led 3.2w | 2700k |...
3ddd
$1

ILFARI. TEARS FROM MOON H22
...munsters описание: 22 x g4 | 10w max. | 12v включительно светильники 3 x led 3.2w | 2700k |...
3ddd
$1

Lightstar / Boogie Vetro OP
...источники света: 1x50wmax gu5,3 (mr16) (лампой не комплектуется) напряжение: 12v220v диаметр: 80мм высота: 70мм диаметр врезного отверстия: 55мм глубина...
Uk
turbosquid
$40

UK sockets
... available on turbo squid, the world's leading provider of digital 3d models for visualization, films, television, and games.
turbosquid
$39

Uk Map
... available on turbo squid, the world's leading provider of digital 3d models for visualization, films, television, and games.
turbosquid
free

UK Spitfire
... available on turbo squid, the world's leading provider of digital 3d models for visualization, films, television, and games.
turbosquid
free

UK Flag
... available on turbo squid, the world's leading provider of digital 3d models for visualization, films, television, and games.
3ddd
$1

Диван Chesterfield UK flag
...диван chesterfield uk flag
3ddd
chesterfield
диван chesterfield uk flag
cg_studio
$15

UK Phonebooth3d model
...phonebooth3d model
cgstudio
.lws .lwo - uk phonebooth 3d model, royalty free license available, instant download after purchase.
turbosquid
$39

Woman Shoe UK
...quid
royalty free 3d model woman shoe uk for download as max on turbosquid: 3d models for games, architecture, videos. (1462477)
turbosquid
$1

UK Pound Symbol
...id
royalty free 3d model uk pound symbol for download as fbx on turbosquid: 3d models for games, architecture, videos. (1560784)
turbosquid
$19

Manhole Covers UK
...y free 3d model manhole covers uk for download as max and max on turbosquid: 3d models for games, architecture, videos. (1575421)
3d_ocean
$10

UK Road Signs
... hexagonal, triangle and double circle signs. each model is separate and named accordingly. these models are perfect for an ar...
0
turbosquid
$12

Calligraphic Digit 0 Number 0
...hic digit 0 number 0 for download as max, obj, fbx, and blend on turbosquid: 3d models for games, architecture, videos. (1389318)
3d_export
$6

set-0
...set-0
3dexport
turbosquid
$6

hedge 0
...yalty free 3d model hedge 0 for download as max, obj, and fbx on turbosquid: 3d models for games, architecture, videos. (1450353)
turbosquid
$5

Nuber 0
...oyalty free 3d model nuber 0 for download as ma, obj, and fbx on turbosquid: 3d models for games, architecture, videos. (1564674)
turbosquid
$22

0.jpg
... available on turbo squid, the world's leading provider of digital 3d models for visualization, films, television, and games.
turbosquid
free

Steam Locomotive Fowler 4F 0-6-0
... available on turbo squid, the world's leading provider of digital 3d models for visualization, films, television, and games.
turbosquid
$10

Liquid Number 0
... model liquid number 0 for download as c4d, 3ds, fbx, and obj on turbosquid: 3d models for games, architecture, videos. (1689919)
turbosquid
$45

Dragon360_perspShape_tmp.0.jpg
... available on turbo squid, the world's leading provider of digital 3d models for visualization, films, television, and games.
turbosquid
$8

Rocks Debris 0
... available on turbo squid, the world's leading provider of digital 3d models for visualization, films, television, and games.
3d_export
$18

wood-guardrail-fence 0
...wood-guardrail-fence 0
3dexport
wood-guardrail-fence 0<br>3ds max 2015
1
turbosquid
$15

ring 1+1
... available on turbo squid, the world's leading provider of digital 3d models for visualization, films, television, and games.
turbosquid
$10

chair(1)(1)
... available on turbo squid, the world's leading provider of digital 3d models for visualization, films, television, and games.
turbosquid
$8

Chair(1)(1)
... available on turbo squid, the world's leading provider of digital 3d models for visualization, films, television, and games.
turbosquid
$2

RING 1(1)
... available on turbo squid, the world's leading provider of digital 3d models for visualization, films, television, and games.
turbosquid
$1

Table 1(1)
... available on turbo squid, the world's leading provider of digital 3d models for visualization, films, television, and games.
turbosquid
$1

house 1(1)
... available on turbo squid, the world's leading provider of digital 3d models for visualization, films, television, and games.
turbosquid
$59

Formula 1(1)
...lty free 3d model formula 1 for download as max, fbx, and obj on turbosquid: 3d models for games, architecture, videos. (1567088)
design_connected
$11

No 1
...no 1
designconnected
sibast no 1 computer generated 3d model. designed by sibast, helge.
turbosquid
$2

desert house(1)(1)
...3d model desert house(1)(1) for download as 3ds, max, and obj on turbosquid: 3d models for games, architecture, videos. (1055095)
turbosquid
$50
door 1 darkwood 1
... available on turbo squid, the world's leading provider of digital 3d models for visualization, films, television, and games.
Printing
design_connected
$27

...print
designconnected
moroso print computer generated 3d model. designed by wanders, marcel.
3ddd
free

Eichholtz Prints
...- eichholtz print central station i
13 - eichholtz print central station ii
14 - eichholtz print marisa
15 - eichholtz print tish
3ddd
$1

Eichholtz Prints
...print abstract - set of 2
10 - eichholtz print orange abstract
11 - eichholtz print buddha right
12 - eichholtz print buddha left
turbosquid
$1

... available on turbo squid, the world's leading provider of digital 3d models for visualization, films, television, and games.
3ddd
free

Eichholtz Prints
...of 4
2 - print dunbar 2 set of 4
3 - print guadeloupe 1 set of 4
4 - print guadeloupe 2 set of 4
5 - print giles
6 - print trett
3ddd
$1

Eichholtz Prints
...nt tutti frutti
3 - eichholtz prints watson - set of 2
4 - eichholtz prints antique nautilus - set of 2
5 - eichholtz print tiara
3d_export
$5

Monster for printing
...monster for printing
3dexport
monster 3d model printing
3ddd
free

printed rug
...printed rug
3ddd
ковер
very creative printed rug
3ddd
free

Eichholtz Prints
...иал: бумага
габариты (вхш): 72 x 62 см
описание: print sweetmeat - постер в деревянной раме.
3 - prints varsity set of 2
арти
3ddd
free

Art Print Posters
...art print posters
3ddd
прованс
art print posters by patrician prints