Thingiverse
X-Axis Motor Mount, Strengthened by rebeltaz
by Thingiverse
Last crawled date: 3 years ago
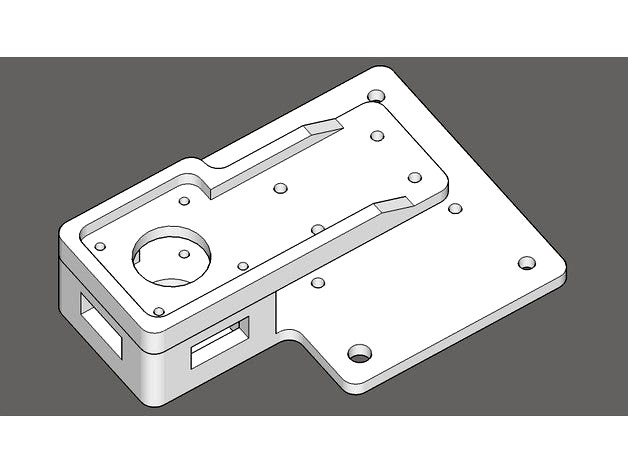
The standard equipment on the Tevo Tarantula leaves quite a bit to be desired. I noticed that the stock x-axis motor mount was flexing when I would tension the belt, so I decided to create a more sturdy mount for that motor. I have seen a couple of versions of this here on Thingiverse, but my design is more solid and, in all probability, like most of my designs, over-engineered.
To install this, you will need the following hardware:
8x m4 x 10mm screws (4 of which come with the standard mount)
8x m4 T-slot nuts (4 of which come with the standard mount)
4x m3 x 35mm screws
7x 4mm washers (you cannot fit a washer on one of the eight m4 screws)
4x m3 washers
2x 5mm nylon spacers (one of which is used on the standard mount)
Installation should be obvious from the CAD drawing and is similar to the standard mount with the exception of the front plate. All four m3 screws go through both halves of the mount into the stepper motor. The idler pulley is sandwiched between the two halves of the mount with a 5mm nylon spacer on either side of the pulley. The m4 screws go through the plates so that the t-slot nuts are on the inside, with washers between the screw and the plates.
There are two "top" plates here. Version 1 is the strongest, but I found that it interfered with the mounting of the oldham coupler and the z-axis drive rod, so I modified that to version 2. You may want to print the v2 top plate if you think your rod is going to get in the way :)
I went through four designs when modeling the top plate, so in the photos of this installed, I have not yet replaced the (intermediary) v2 plate with the (final) v2 - I simply removed the two outer mounting screws, so... go by the CAD drawing and not the actual photographs.
In the photo I've uploaded of my test tower, you can the vast improvements with each modification I've made. From left to right, the first tower is prior to my latest upgrades. The second tower is after installing the no-sanding oldham coupler (not my design). The third tower is after installing this upgraded motor mount.
Similar models
thingiverse
free

Z-Motor holder with precision Z-Axis calibration for Velleman K8200 / 3Drag by akkenoth
...m3 nut and 4x m3 washer to mount microswitch to plate
to mount z endstop screw block you can use original screw, washers and nut.
thingiverse
free

Prusa i3 X-Axis Tensioner by BillyKalfus1
...rew pulls the tensioner closer to the back of the axis mount, pulling the pulleys back, and increasing the tension in the x-axis.
thingiverse
free

Simple water pump
... m4 nuts
2x m4 washers
12 x m2 washers
2 x m3 screws with washers for the motor mount
2 x m2 screws x12m to lock the motor shaft
thingiverse
free

EQ5 Goto Nema17 Motor Bracket Set by curly_cz
...tor
4x m3 washer for din912 for motor screws (optional)
4x m3x10 countersunk for connector cover
m4 nut for brace
m4x25 for brace
thingiverse
free

Ender 3 Pro X-axis end-stop switch mounting plate by unixgin
...self)
2x m3 nuts to secure the end-stop (if you feel like the m3 threaded into the plastic wont be enough, this is optional imo)
thingiverse
free

X Belt tensioner for Tevo Tarantula by Banholm
...same as the y belt tensioner and has a similar design. i've tested it and it works perfectly. there's...
thingiverse
free

Wanhao i3 Plus Y Axis Stiffening Brackets - Pulley and Stepper Motor Mounts by jinner
... any tensioners as the blets don't stretch over time and there are may reports of broken tensioners.
fusion 360 file included
thingiverse
free

Clamp-On CNC for Taig Lathe by NickAmes
... set-screw)
4x m3x10 screws (to mount stepper to stepper plate)
project website: http://www.fetchmodus.org/projects/clamp-on-cnc/
thingiverse
free

Anycubic Mega Zero Stepper Motor Mount for Flexible Z Couplers by djos_1475
...crews:
1st stepper motor:
2x 20mm m4 screws
2x 16mm m3 screws
2nd stepper motor:
2x 12mm m4 screws
2x m4 t-nuts
2x 16mm m3 screws
thingiverse
free

Pollux v2 Hexacopter with 10° forward angled Motors by iwandi
...e/aqqpwvtu-34
angled mounts for other multicopter
zmr-250 10 degree tilted motor mounts http://www.thingiverse.com/thing:564897
Rebeltaz
thingiverse
free

Like.... Prohibited by rebeltaz
...ngiverse
this logo prohibits the use of the overused word "no" in selected areas. designed specifically for toecheese.
thingiverse
free

Ammo Tags by rebeltaz
... 65x39mm with an overall thickness of 2.4mm, including the extruded text. the hole is 3mm diameter to allow for attaching a cord.
thingiverse
free

Haven Tattoo Design Medallion by rebeltaz
...v show will recognize this as the tattoo design worn by the the guard - those who are troubled and those sworn to protect them.
thingiverse
free

Pez Candy by rebeltaz
...ry much pez relater here on thingiverse. i'm not very good at organic modeling, so i thought... why not a piece of pez candy?
thingiverse
free

Brinkmann GrillMaster Replacement Knob by rebeltaz
...er :)
this is a replacement knob for a brinkmann grillmaster 810-2545-c barbecue grill , although it could possibly other models.
thingiverse
free

Test Barrel by rebeltaz
... test their print settings....
for dimensional tests, the barrel should measure 13mm tall, 10mm around with 10.5mm diameter rings
thingiverse
free

MSP430 TI Launchpad Carrier by rebeltaz
...e 3d printer, so i built this out of wood. i have now modeled this for 3d printing. hopefully someone else will find this useful.
thingiverse
free

Calibration Sphere by rebeltaz
...k walls are meant to be printed with a 0.4mm nozzle. printing at 40mm/sec takes just under an hour and uses about 4g of filament.
thingiverse
free

Quick and Easy Gift Tags by rebeltaz
...
large scale multi piece snowman
noel holiday candle train
quick and easy gift tags
christmas tree stand stabilizer
cindy lou who
thingiverse
free

Veni Vidi Vici - Targa Italiana by rebeltaz
... and sicily, this is inscribed with the latin phrase "veni, vidi, vici" meaning "i came; i saw; i conquered."
Strengthened
archive3d
free
Bracing 3D Model
...
holder bracing strengthening
bracing 4 - 3d model (*.gsm+*.3ds) for interior 3d visualization.
archive3d
free
Bracing 3D Model
...
bracing strengthening holder
bracing 2 - 3d model (*.gsm+*.3ds) for interior 3d visualization.
archive3d
free
Bracing 3D Model
...older fastening strengthening
bracing 1 - 3d model (*.gsm+*.3ds) for interior 3d visualization.
archive3d
free
Bracing 3D Model
...older fastening strengthening
bracing 3 - 3d model (*.gsm+*.3ds) for interior 3d visualization.
3ddd
free

Walk in tub 32х38
...x 38"(h) color: white faucet included acrylic shell / strengthened with a fiberglass backing safety action return double seal...
3d_ocean
$89

Subaru Impreza WRX STI 2006
...2003 fhi has been strengthening its support of the subaru world rally team (swrt), which takes part in the fia world rally cha...
3ddd
$1

Maestrale Desk & Eva Chair by Zanotta
...2268 chromium plated steel legs. body in integral polyurethane strengthened with a steel insert in the shade of white...
3d_export
$6

maestrale desk eva chair by zanotta
...eva 2268<br>chromium plated steel legs. body in integral polyurethane strengthened with a steel insert in the shade of white...
3d_export
$8

French WWI Model 1916 Trench Dagger
...br>dimensions (lxwxh): 28.18x2.54x7.86.<br>textures: 4096x4096, base, metallic, ao, normal, roughness + unreal 4 packed.
3d_export
$5

lawn lattice braer meba
...quot;<br>in the archive files:<br>3dsmax 2017,<br>3dsmax 2014,<br>3dsmax 2011,<br>fbx,<br>obj
Axis
3ddd
$1

Мария Axis
...
3ddd
кухня , классическая , axis
модель кухни.
3d_export
$22

Axis robot 6-axis robotic arm
...ing parts drawings, standard parts purchased parts list, can be produced directly according to the drawings, welcome to download!
3ddd
free

Versatile Axis
...ddd
nexus , плитка
http://bvtileandstone.com/ceramic-porcelain/versatile-axis/
3d_export
$19

robot 2 axis
...robot 2 axis
3dexport
robot 2 axis
turbosquid
$40

Axis R5F
... available on turbo squid, the world's leading provider of digital 3d models for visualization, films, television, and games.
turbosquid
$40

Axis S5F
... available on turbo squid, the world's leading provider of digital 3d models for visualization, films, television, and games.
turbosquid
$30

Axis Athlon
... available on turbo squid, the world's leading provider of digital 3d models for visualization, films, television, and games.
turbosquid
$10

Linear Axis
... available on turbo squid, the world's leading provider of digital 3d models for visualization, films, television, and games.
3d_export
$15

drawing axis
...drawing axis
3dexport
simple rendering of the scene file
3ddd
$1

versatile axis ARC
...versatile axis arc
3ddd
versatile , плитка
versatile axis arc red dot design award
Motor
archibase_planet
free

Motor
...base planet
motor motor engine engine electric motor
motor wagner n250213 - 3d model (*.gsm+*.3ds) for interior 3d visualization.
archibase_planet
free

Motor
...motor
archibase planet
motor motor engine engine
motor n151112 - 3d model (*.gsm+*.3ds) for interior 3d visualization.
archibase_planet
free

Motor
...motor
archibase planet
motor motor engine engine
motor n150615 - 3d model (*.gsm+*.3ds+*.max) for interior 3d visualization.
turbosquid
$15

Motor
...otor
turbosquid
royalty free 3d model motor for download as on turbosquid: 3d models for games, architecture, videos. (1639404)
3d_ocean
$5

Electric motor
...electric motor
3docean
car electric engine industry motor phase train vehicle
an electric motor enjoy!
3d_ocean
$18

Electric Motor
...electric motor
3docean
electric motor engine machine mover parts
3d model electric motor for hoist crane
turbosquid
$29

Motor
... available on turbo squid, the world's leading provider of digital 3d models for visualization, films, television, and games.
turbosquid
$5

Motor
... available on turbo squid, the world's leading provider of digital 3d models for visualization, films, television, and games.
3d_export
$5

electric motor
...electric motor
3dexport
electric motor use for industrial purposes
3d_export
$5

servo motor
...tor
3dexport
it's a simple part of servo motor 0.75kw for used in machines assembly to show specified motor in own project.
Mount
3d_export
free

mounting bracket
...mounting plate is the portion of a hinge that attaches to the wood. mounting plates can be used indoors, cabinetry and furniture.
turbosquid
$2

MOUNTING
... available on turbo squid, the world's leading provider of digital 3d models for visualization, films, television, and games.
turbosquid
free

Mounts
... available on turbo squid, the world's leading provider of digital 3d models for visualization, films, television, and games.
turbosquid
free

Mount Fuji
...fuji
turbosquid
free 3d model mount fuji for download as obj on turbosquid: 3d models for games, architecture, videos. (1579977)
3d_export
$5

Headphone mount LR
...headphone mount lr
3dexport
headphone mount l+r
turbosquid
$39

Mount rainier
...quid
royalty free 3d model mount rainier for download as fbx on turbosquid: 3d models for games, architecture, videos. (1492586)
turbosquid
$5

pipe mounting
...quid
royalty free 3d model pipe mounting for download as obj on turbosquid: 3d models for games, architecture, videos. (1293744)
turbosquid
$3

Mounting Tires
...uid
royalty free 3d model mounting tires for download as fbx on turbosquid: 3d models for games, architecture, videos. (1708511)
3d_export
$5

Magnetic GoPro Mount
...pro mount
3dexport
cool magnetic mount for gopro. allows you to mount the camera on flat metal surfaces and get exclusive shots.
turbosquid
$5

Stone Mount
...ty free 3d model stone mount for download as ma, obj, and fbx on turbosquid: 3d models for games, architecture, videos. (1370306)