Thingiverse
WW2 Tank Minesweeper "Sherman Crab" by Adi13
by Thingiverse
Last crawled date: 4 years, 4 months ago
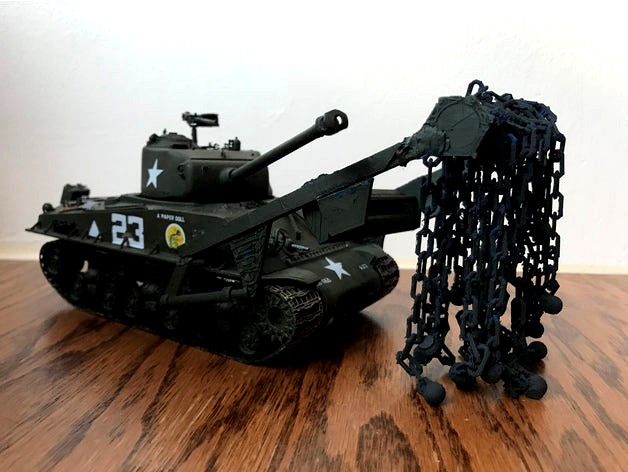
This is a 1/35 model of a WW2 American Minesweeping flail. Known as the "Sherman Crab". When deployed, it was is attached to the front of a 75mm short gun Sherman tank and spins 24 chains with small weights on the ends. These weights detonate mines in front of the tank, clearing the way for infantry or other tanks.
This minesweeper is meant for 1/35 scale models of WW2 Shermans but can be modified to suit other minesweeping tanks. It is meant for 75mm short barrel Shermans but I have attached it to a 76mm long barrel Sherman in the photo above. Even so, the sidehull (the attachment point between the tank and flail) dimensions are exactly the same.I apologise for the chain, it is a bit large for the 1/35 scale but will it will not move properly (like a chain!) if printed smaller!
The project requires:
-A soldering iron (or crazy glue, although the iron is more effective) x1
-Mk1 Sidearm x2
-Mk2 Hydraulics x2
-Mk3 Detail x2
-Mk4 Inner Spinner x1
-Mk5 Outer spinner x1
-Mk6 Flail Chain x24
-Mk7 Spinner Cap x1
-Mk0 Mine Shield x1
-Tamiya xf-62 and x-1 (optional)
Start by soldering the end of one the sidearm to the inner spinner (make sure the brick on the end of the sidearm is on the far side from the spinner)
The solder the hydraulics to the sidearm. Make sure the hydraulics are attached to the sidearm at two points (refer to the images)
Print 24 of the Flail Chains and make a small cut (with a hobby nipper or knife) in the last link of the chain (farthest from the ball) on each of them
Use the cut to slide the last link Flail Chains to the hooks on the surface of the Outer Spinner
Slide the Outer Spinner (now with chains) over the Inner Spinner (which is now attached to the sidearm)
Insert the Spinner Cap into the opening on the open end of the Inner Spinner (which now has the outter spinner over it)
Repeat step 1 using the Spinner Cap and another sidearm (Mk1.5), and repeat step 2 with a new hydraulics and the sidearm mentioned before in this step
Solder the Mine Shield between the two sidearms, but make sure that it is close enough to the spinner so that it allows space for the sidearms to attach to the hull of the actual tank, but far enough from the spinner so that it looks realistic.
All done! Attach the Minesweeper to the tank and admire your model!
As I always say, a model looks best when painted! I recommend Tamiya x-1 (black) for the Outer Spinner along with all the Chain Flails, and Tamiya xf-62 (olive drab) for everything else! Now if you don't want to purchase a model tank or just want a difficult 3d printing project, I recommend printing one of the many M4 Sherman models on this very website!
Here is a particularly good one!https://www.thingiverse.com/thing:2318834/files
If you have any problem printing this, or any of my other projects, don't hesitate to message me!