Thingiverse

WLToys A959/979 Outcast Parts
by Thingiverse
Last crawled date: 4 years, 3 months ago
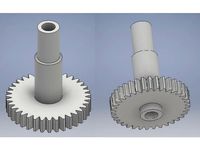
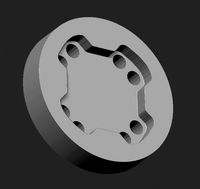
Update: I added the long awaited drive shaft extender for use with the plastic stock driveshaft. I included a tight and loose fitting version for use with the 90mm chassis extender plate in this thing. The tight version may require a bit of rotary tool massaging on the plastic stock drive shaft (Took me 5min) but the fit ends up being really good. Be sure to measure your gap before you print and stretch the part accordingly. The pockets are 12.5mm so it should work fine as long as everything is fitted reasonably well when you do your mods, but , you know, measure twice, print once.
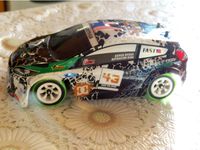
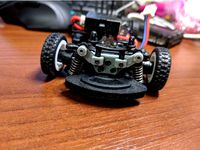
This is a chassis extender and body mounts to allow using an Arrma Outcast 4S body with the WLToys A959/979 RC Car. You need to cut the chassis and the drive shaft, so use caution. I used some M3 screws to attach the chassis halves to the extender and added a wood brace across the top to stiffen it up a bit. Despite doing my test runs with PLA, there has been no breakage despite quite a few crashes (One body post sheered off in a head-on, but I think that drilling the holes for clips weakened it). I ran the stock electronics first and then have tried a few brushless setups without any breakage. The fastest has been a 2845 motor using the A959/979-B gearing, but that only got about 50 kph. It doesn't handle too bad and strangely got worse after I added the stiffener. I haven't modded the center drive shaft yet but my plan is to make a 3D printed coupler so I'll post that when I get around to making it.
Link to the car running: https://www.youtube.com/watch?v=ERNCA6yfuoQ
You'll need to drill holes for body clips or alter the STL files with holes of your choosing. 3D Builder in Windows 10 is pretty easy to figure out if you don't have any other software.
You will also need some touring car wheels and tires. I bought a set for less than 10 bucks off Ebay (pictured).
Steps:
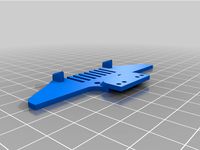
Print parts.
Cut chassis/brace/center drive shaft in half (I did it without taking anything apart but if that scares you, use your own judgement).
Line up chassis halves and mark extender piece for holes (I test fitted everything using two sided tape).
Drill holes 1 size smaller than the screws you're using and assemble.
Drill holes for clips in body mounts (or use velcro).
Add a brace to the top of the chassis if desired (I used some dollar store wood planks).
Jerry Rig your drive shaft if you don't want to run in 2WD.
As always, proceed at you own risk. I offer no promises or warranty.
Wrench to drive or drive to wrench?
This is a chassis extender and body mounts to allow using an Arrma Outcast 4S body with the WLToys A959/979 RC Car. You need to cut the chassis and the drive shaft, so use caution. I used some M3 screws to attach the chassis halves to the extender and added a wood brace across the top to stiffen it up a bit. Despite doing my test runs with PLA, there has been no breakage despite quite a few crashes (One body post sheered off in a head-on, but I think that drilling the holes for clips weakened it). I ran the stock electronics first and then have tried a few brushless setups without any breakage. The fastest has been a 2845 motor using the A959/979-B gearing, but that only got about 50 kph. It doesn't handle too bad and strangely got worse after I added the stiffener. I haven't modded the center drive shaft yet but my plan is to make a 3D printed coupler so I'll post that when I get around to making it.
Link to the car running: https://www.youtube.com/watch?v=ERNCA6yfuoQ
You'll need to drill holes for body clips or alter the STL files with holes of your choosing. 3D Builder in Windows 10 is pretty easy to figure out if you don't have any other software.
You will also need some touring car wheels and tires. I bought a set for less than 10 bucks off Ebay (pictured).
Steps:
Print parts.
Cut chassis/brace/center drive shaft in half (I did it without taking anything apart but if that scares you, use your own judgement).
Line up chassis halves and mark extender piece for holes (I test fitted everything using two sided tape).
Drill holes 1 size smaller than the screws you're using and assemble.
Drill holes for clips in body mounts (or use velcro).
Add a brace to the top of the chassis if desired (I used some dollar store wood planks).
Jerry Rig your drive shaft if you don't want to run in 2WD.
As always, proceed at you own risk. I offer no promises or warranty.
Wrench to drive or drive to wrench?
Similar models
thingiverse
free

WLToys A979/A959/A969 Suspension Arms
...th your wltoys: https://www.youtube.com/watch?v=ernca6yfuoq
as always, use at your own risk.
drive to wrench or wrench to drive?
thingiverse
free

WLtoys a959 979 suspension preload clip by MTFPV
...port needed.
can be printed out within 4 min per clip.
this is a remix from wltoys 10428 shock clip
by erics89 february 01, 2021
thingiverse
free

RC Lancia Delta S4
...a959, also i have mz gs1004 buggy which very similar with wltoys. original chassis cutted in the middle and...
thingiverse
free

Diff lock for WlToys A959/979/949 by Kharakhorin
...a959/979/949 by kharakhorin
thingiverse
my stock differential is broken and i has designed this simple diff lock to replace him.
thingiverse
free

rubicon short for wltoys vortex A959/979 by rossitamiya
...rubicon short for wltoys vortex a959/979 by rossitamiya
thingiverse
enjoy it......
thingiverse
free

Traxxas Summit GoPro Rack by SgtWoody
...and there are four posts that extend down to the body where you can drill holes and use m3 hardware to stiffen the mount further.
thingiverse
free

shaft for WLtoys A959, A969, A979 A959 by Pelesepefe
...shaft for wltoys a959, a969, a979 a959 by pelesepefe
thingiverse
yes
thingiverse
free

Arrma Outcast 4S Chassis Brace Extender to Kraton 4S Length by WrenchToDrive
...possibly bend more than compress), so do what you think will work best.
use at your own risk.
wrench to drive or drive to wrench?
thingiverse
free

Wltoys A959 Snow/Sand Wheel (7mm hex) by kryuchok
...wltoys a959 snow/sand wheel (7mm hex) by kryuchok
thingiverse
wheels for wltoys a959 on snow or sand.
7mm hex (stock).
thingiverse
free

Wltoys 70mm extention kit by emil2rs1
...stealt, but think any 1:10 axel cup should fit)
you will also need two 5 x 10 x 4 bearigs
hope you can get some use out of it. :)
A959
thingiverse
free
shaft for WLtoys A959, A969, A979 A959 by Pelesepefe
...shaft for wltoys a959, a969, a979 a959 by pelesepefe
thingiverse
yes
thingiverse
free

Strong Wheel holder for a959
...strong wheel holder for a959
thingiverse
strong wheel holder for a959
thingiverse
free

A959 Aerodynamic Nose And Shell
...a959 aerodynamic nose and shell
thingiverse
an aerodynamic shell for an wltoys a959 or a959b.
thingiverse
free

A959 A979 Diff Cup by pee581
...a959 a979 diff cup by pee581
thingiverse
a959 a979 diff cup
thingiverse
free

Wing for WL Toys A959 by rossitamiya
...wing for wl toys a959 by rossitamiya
thingiverse
wing replacement for wl toys a959
thingiverse
free

Camera support FPV for WLtoys A959, A959-B by GTDrone
...drone
thingiverse
parts used for the conception :
fpv camera - eachine 1000tvl
vtx - eachine tx801
cable - xh2.54 3p plug female
thingiverse
free

Wltoys A959 Aerodynamic pack 1 by Yeps
...wltoys a959 aerodynamic pack 1 by yeps
thingiverse
wltoys a959 aerodynamic pack
thingiverse
free

beadlock for wltoys a959 by rossitamiya
...beadlock for wltoys a959 by rossitamiya
thingiverse
enjoy it!
thingiverse
free

A959 A979 Expander Body Post by pee581
...a959 a979 expander body post by pee581
thingiverse
a959 a979 expander body post
thingiverse
free

wltoys a959 bumper by djfilton
...wltoys a959 bumper by djfilton
thingiverse
reinforced shock
Outcast
3d_export
free

The warlock is an outcast
...the warlock is an outcast
3dexport
thingiverse
free

Outcast by airdronez
...outcast by airdronez
thingiverse
outcast
thingiverse
free

outcast by lamerhouse
...outcast by lamerhouse
thingiverse
outcast
thingiverse
free

Malifaux Outcasts Marker by Altner
...malifaux outcasts marker by altner
thingiverse
a marker with outcasts symbol on it.
thingiverse
free

ARRMA OUTCAST 4S WING
... and a wall width of 2.8, with a 15% infill... this makes the winglets and base solid.. firmer tpu is the best for this...
enjoy!
thingiverse
free

Arrma Outcast grill (calandre Arrma) by somethingsbyj
...arrma outcast grill (calandre arrma) by somethingsbyj
thingiverse
this is arrma oucast 6s grill with 22mm light
thingiverse
free

ARRMA OUTCAST / KRATON 4S HUB NUT COVER
...ses over the 8mm hub nut.. fit should be snug.. made to look like an old manual locking hub...
print upright with support
enjoy!
thingiverse
free

outcast necromancer by rockgnome
...efore prining !!!!!!!!
aditional mini for cot warhammerquest
remix of wizard from hq and evil necromancer from wizards of morcar
thingiverse
free

Roof Skid Rail for Outcast 6S and others by sebcbien
...dimensions
if you need other dimensions, please do not hesitate to ask me.
screw i use: m4 x 9 (filet) / m4 x 11,8 (total length)
thingiverse
free

Arrma Outcast Spring Perch by Rbsmakn
...e part that drove me to buying my first 3d printer and introduced me to cad. this $10 piece of plastic and several days downtime.
979
3d_export
$50

3D Home 979 3D Model
... chair furniture texture table lamp apartment rug carpet restaurant hotel sitting
3d home 979 3d model richard3015 47443 3dexport
3d_export
$16

reeds in a rusty flowerpot for the interior 979
...pa pot houseplants exotic plants tropical plants pennisetum alopecuroides scirpus - reeds tussock - grass ornamental grass fescue
3d_export
$7

bathroomset108
...vray and corona formats: 3ds max 2015, fbx polys: 979 ...
3ddd
$1

Caprigo / Fresco 120
.../ fresco 120 3ddd caprigo 65292 polys 1204 х 979 х 510 мм модель по...
3ddd
$1

Шоколадный торт
...2016 и 2013 версий макса + obj polys: 234 979 ...
3d_export
$9

Skullgate
...polygon. ...............2991. vertices. skull_gate_lod_1................3623 polygon. ................1842. vertices. skull_gate_lod_2.................1897 polygon. ................979 vertices. 4096 * 4096 texture obj,fbx,blend format model. uv...
3d_export
$9

Skullgate
...polygon. ...............2991. vertices. skull_gate_lod_1................3623 polygon. ................1842. vertices. skull_gate_lod_2.................1897 polygon. ................979 vertices. 4096 * 4096 texture obj,fbx,blend format model. uv...
3d_export
$9

Skullgate
...polygon. ...............2991. vertices. skull_gate_lod_1................3623 polygon. ................1842. vertices. skull_gate_lod_2.................1897 polygon. ................979 vertices. 4096 * 4096 texture obj,fbx,blend format model. uv...
3d_export
$9

Skullgate
...polygon. ...............2991. vertices. skull_gate_lod_1................3623 polygon. ................1842. vertices. skull_gate_lod_2.................1897 polygon. ................979 vertices. 4096 * 4096 texture obj,fbx,blend format model. uv...
3d_export
$9

Skullgate
...polygon. ...............2991. vertices. skull_gate_lod_1................3623 polygon. ................1842. vertices. skull_gate_lod_2.................1897 polygon. ................979 vertices. 4096 * 4096 texture obj,fbx,blend format model. uv...
Wltoys
3ddd
free

Квадрокоптер Cyclone
...квадрокоптер cyclone 3ddd квадрокоптер , cyclone , wltoys квадрокоптер cyclone. текстуры в комплекте. модель с...
thingiverse
free
Wltoys K989 drift
...wltoys k989 drift
thingiverse
wltoys k989
thingiverse
free

Wltoys A979 Stand
...wltoys a979 stand
thingiverse
wltoys a979 stand
thingiverse
free

wltoys k989 Wing by NBdesigns
...wltoys k989 wing by nbdesigns
thingiverse
wltoys k989 wing
thingiverse
free

Wheel WLtoys A979 by Mitka
...wheel wltoys a979 by mitka
thingiverse
wheel wltoys a979
thingiverse
free

Connector - Wltoys by AndreChies
...ile included for customization.
peça para carro rc. conector do wltoys offroad 1:12.
arquivo freecad incluso para personalização.
thingiverse
free
WLtoys k989 suspension bracket
...wltoys k989 suspension bracket
thingiverse
spare suspension bracket for wltoys k989 1/28 rc car
thingiverse
free

Wltoys 12428 Bumper protection by Afterhender
...wltoys 12428 bumper protection by afterhender
thingiverse
bumper protection for wltoys 12428
thingiverse
free
f949 main gear wltoys by driekes1984
...f949 main gear wltoys by driekes1984
thingiverse
the main gear of the wltoys f949
thingiverse
free
Wltoys K989 by burtendco
...wltoys k989 by burtendco
thingiverse
diffuseur rc car
Parts
3d_export
$5
Parts
...parts
3dexport
parts
3d_export
$5
Part
...part
3dexport
part
3d_export
$5

Part
...part
3dexport
machine part
3d_export
$65

Part
...part
3dexport
simple rendering of the scene file
3d_export
$65

Part
...part
3dexport
simple rendering of the scene file
3d_export
$30

fan part
...fan part
3dexport
this is a part of fan of pedastal
3d_export
$10
machine parts
...machine parts
3dexport
3d part modeling work ,contact for 3d work
turbosquid
$59

Mechanical Part
...id
royalty free 3d model mechanical part for download as c4d on turbosquid: 3d models for games, architecture, videos. (1410833)
turbosquid
$17
Road parts
...bosquid
royalty free 3d model road parts for download as 3ds on turbosquid: 3d models for games, architecture, videos. (1192967)
turbosquid
$9

Cutter Parts
...squid
royalty free 3d model cutter parts for download as stl on turbosquid: 3d models for games, architecture, videos. (1220010)