Thingiverse
Whoop Hoops (Micro Quadcopter air gates) by stylesuxx
by Thingiverse
Last crawled date: 3 years ago
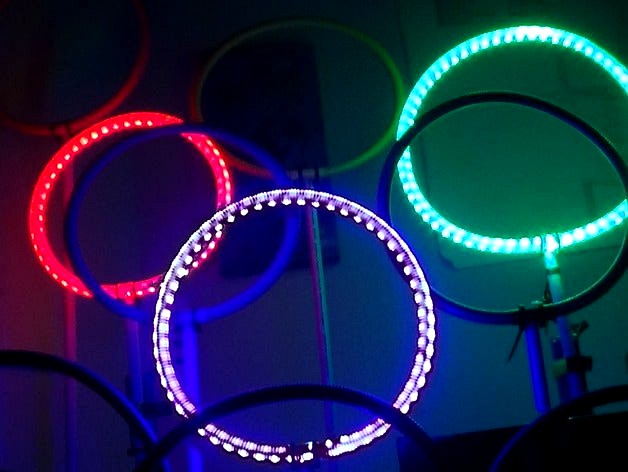
Whoop Hoops
Customizable, illuminatable micro quadcopter air gate system.
The goal was to build air gates, or hoops for that matter, for my brushed mini quad, keeping the following design goals in mind:
as cheap as possible
mountable to different surfaces
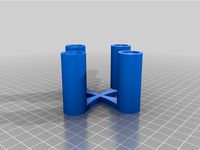
3D printed connectors
colorful
optional battery powered illumination
easily transportable
After a trip to the hardware store, I decided to use the following base materials:
Electric flexible tubing (16mm outer diameter, comes in a spool of 10m)
Electric tubing (16mm outer diameter, comes in a length of 3m)
Zip ties
Duckt Tape
For optional illumination I decided to use the following parts from BangGood:
12V LED strips - with protective coating
XT60 connectors - unfortunately I could not find a pack with only male connectors
Battery Buzzer - to not over discharge your batteries
Battery Straps - to secure the battery
As power source I decided to use my old 2200mAh 3 cell Lipo packs, not in the best condition, but good enough to power a LED strip. You can basically use any 3s Lipo, just make sure to attach a battery buzzer to not over discharge them.
To paint the once I am not illuminating, I use spray cans I had lying around. Use some flashy colors for best visibility.
Printing
The attaches STL's are the customizers default and suitable for EN16 tubing.
I highly recommend printing one part of each and make a test fitting with your base material - adjust in the customizer until it fits your tolerances and material, then print the parts in batch:
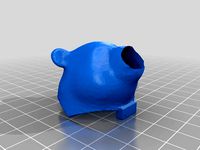
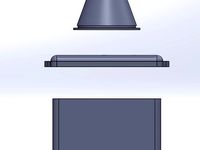
Decide on how many hoops you would like to build, print as many Connectors.
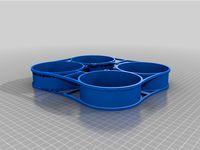
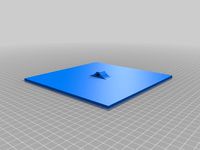
Print as many battery trays as you need if you decide to go with illumination.
If you do not want to use wooden bases, print as many surface mounts as you need, try to keep the dowel short, or they will break easily when too much leverage is applied.
Assembly
Cut your flexible tubing to length. With EN16 you can make hoops with around 120cm circumference, I like them at 90cm circumference, so about 28cm in diameter. Longer than 120cm and they tend to sag bit, and get more elliptical.
If you want to illuminate your hoop, it is now time to put the LED's in there. I like to use the kind that has the protective covering (so I do not risk to short them out in case they should move in the tubing) and stick them back to back, so the hoop is illuminated equally.
Comparison with and without coating. Slightly more expensive with coating, but they offer pretty good short out protection since all the contacts are covered.Stuck back to back for best illumination
Cut a small flap into the tubing so that the wire can stick out, and fixate the tube with a bit of tape.
Spray paint the hoops - if you like - I use montana spray paint, it dries very quickly and has great coverage, but basically any spray paint will do it. Use colors that are well visible in your designated flying area.
After painting, zip tie them around the connector.
Now cut your dowel - in my case the EN16 tube - to length. Attach the battery tray, if needed, and pop on the hoop. The fit with mine is pretty tight, but you could of course use some glue for a more permanent fit.
Wooden Base
If you do not want to duck tape your hoops to chairs or tables, you can make simple wood bases. I use scrap wood that I drilled a matching hole for my EN16 tube and glue that to a bigger, flat piece of scrap board for some stability.
Customizable, illuminatable micro quadcopter air gate system.
The goal was to build air gates, or hoops for that matter, for my brushed mini quad, keeping the following design goals in mind:
as cheap as possible
mountable to different surfaces
3D printed connectors
colorful
optional battery powered illumination
easily transportable
After a trip to the hardware store, I decided to use the following base materials:
Electric flexible tubing (16mm outer diameter, comes in a spool of 10m)
Electric tubing (16mm outer diameter, comes in a length of 3m)
Zip ties
Duckt Tape
For optional illumination I decided to use the following parts from BangGood:
12V LED strips - with protective coating
XT60 connectors - unfortunately I could not find a pack with only male connectors
Battery Buzzer - to not over discharge your batteries
Battery Straps - to secure the battery
As power source I decided to use my old 2200mAh 3 cell Lipo packs, not in the best condition, but good enough to power a LED strip. You can basically use any 3s Lipo, just make sure to attach a battery buzzer to not over discharge them.
To paint the once I am not illuminating, I use spray cans I had lying around. Use some flashy colors for best visibility.
Printing
The attaches STL's are the customizers default and suitable for EN16 tubing.
I highly recommend printing one part of each and make a test fitting with your base material - adjust in the customizer until it fits your tolerances and material, then print the parts in batch:
Decide on how many hoops you would like to build, print as many Connectors.
Print as many battery trays as you need if you decide to go with illumination.
If you do not want to use wooden bases, print as many surface mounts as you need, try to keep the dowel short, or they will break easily when too much leverage is applied.
Assembly
Cut your flexible tubing to length. With EN16 you can make hoops with around 120cm circumference, I like them at 90cm circumference, so about 28cm in diameter. Longer than 120cm and they tend to sag bit, and get more elliptical.
If you want to illuminate your hoop, it is now time to put the LED's in there. I like to use the kind that has the protective covering (so I do not risk to short them out in case they should move in the tubing) and stick them back to back, so the hoop is illuminated equally.
Comparison with and without coating. Slightly more expensive with coating, but they offer pretty good short out protection since all the contacts are covered.Stuck back to back for best illumination
Cut a small flap into the tubing so that the wire can stick out, and fixate the tube with a bit of tape.
Spray paint the hoops - if you like - I use montana spray paint, it dries very quickly and has great coverage, but basically any spray paint will do it. Use colors that are well visible in your designated flying area.
After painting, zip tie them around the connector.
Now cut your dowel - in my case the EN16 tube - to length. Attach the battery tray, if needed, and pop on the hoop. The fit with mine is pretty tight, but you could of course use some glue for a more permanent fit.
Wooden Base
If you do not want to duck tape your hoops to chairs or tables, you can make simple wood bases. I use scrap wood that I drilled a matching hole for my EN16 tube and glue that to a bigger, flat piece of scrap board for some stability.
Similar models
thingiverse
free

Baloon stick tiny whoop gate
...you could just use colored duct tape or something similar to accomplish the...
thingiverse
free

FPV Gates for Whoops and Micros (customizable) by stylesuxx
... mounting option
string mounts
shopping list:
round - 20mmx3mm magnets
wooden sticks
white base coat spray paint
neon spray paint
thingiverse
free

Tiny Whoop Gate by DavidJohnson
...tiny whoop gate by davidjohnson
thingiverse
a base to make gates for tiny whoop using a coat hanger.
thingiverse
free

Tiny Whoop Hula Hoop Gate Holder
...both holders to accept hula hoops (plus a plug if your hula hoop has a flat end) and to accept the 1/2 in tubing for the tripods.
thingiverse
free

tiny whoop gates by MadeByNozzle
..., we suggest you print these ~3% lager so it is easier to connect to the pieces. you can use hot glue to make the gate permanent.
thingiverse
free

Tiny Whoop Racing Gate Base by bshurn
...unt of double sided tape to secure them to the floor. they will standup without tape but will tip over if you bump into the gate.
thingiverse
free

Tiny Whoop Gate base - 1010 Extrusion by StorageJarett
... from amazon into a loop.
i included here a 90 degree connector from biolumo as well.https://www.thingiverse.com/thing:1113062
thingiverse
free

XT30 Power Bank by stylesuxx
...input to be on one and output on the other side. the parts should hold together well enough so you can easily glue them together.
thingiverse
free

1S Lipo Box by darren_bergen
...kness of the wall are just over 0.4mm between batteries, the outside wall is 0.8mm.
i can create other sizes if people so desire.
thingiverse
free

Whoop Fitness Band Battery Pack Charging Base Dock by vicpylon
...ck is ready to use.
if you are planning on buying a whoop, use this link for a free month of service!
http://whoop-referral.com/
Stylesuxx
thingiverse
free

CCCamp15 Keychain by stylesuxx
...cccamp15 keychain by stylesuxx
thingiverse
chaos communication camp 2015 logo as a keychain.
thingiverse
free

Acrobrat - Front Bumpers by stylesuxx
...acrobrat - front bumpers by stylesuxx
thingiverse
simple front bumpers for ummagawd's acrobrat frame.
thingiverse
free

Customizer bug? by stylesuxx
...izer?
calculated values not properly applied.
preview is rendering ok as image, but costomizer does not show any of the cubes,...
thingiverse
free

Abalone replacement Ball by stylesuxx
...abalone replacement ball by stylesuxx
thingiverse
print two (or n*2) of those, glue them together and sand them down.
thingiverse
free

Tevo Tarantula Filament Runout Sensor Enclosure of stylesuxx without screws by nitro974
... enclosure of stylesuxx without screws by nitro974
thingiverse
screwless version of the very good filament sensor from stylesuxx
thingiverse
free

Customizable Pinning Tray by stylesuxx
... the slots, roundness of the tray and size of the slot for the cylinder.
the attached stl is a rendering of the default settings.
thingiverse
free

Customizable Atomizer Stand by stylesuxx
... print with just one row and one column to make sure your atomizers fit. after that you can print the stand in your desired size.
thingiverse
free

Acrobrat - Front Cover (customizable) by stylesuxx
...d. you can customize the cam hole diameter and position.
the attached stl is an export of the default settings of the customizer.
thingiverse
free

Customizable Cylindrical Box by stylesuxx
...games.
the customizer will generate three stl's for you. one of the container, one of the lid and one with both, to show off.
thingiverse
free

Buzzer Mounting Bracket by stylesuxx
...te a bracket fitting the following components:
frame
buzzer
for good measure i would recommend to glue the buzzer to the bracket.
Whoop
thingiverse
free
whoop by MichaelJFPV
...whoop by michaeljfpv
thingiverse
whoop
thingiverse
free
Tiny Whoop holder for 2 whoops by d2000
...tiny whoop holder for 2 whoops by d2000
thingiverse
tiny whoop holder for 2 whoop mini drones and battery
thingiverse
free
Whoop frame by Brassekongo
...whoop frame by brassekongo
thingiverse
a tiny whoop frame
thingiverse
free

Whoop frame by Brassekongo
...whoop frame by brassekongo
thingiverse
my first whoop frame.
thingiverse
free
WHOOPS 4
...
whoops is another
big cinewhoop as addon for hyperlite tooth fairy race frame 4"
first flight https://youtu.be/xm9afwiiass
thingiverse
free
Tiny Whoop 65mm by binaryfpv
...tiny whoop 65mm by binaryfpv
thingiverse
tiny whoop 65mm
thingiverse
free
V-Tail Whoop by Mystereon
...v-tail whoop by mystereon
thingiverse
v-tail whoop .. wip
thingiverse
free
Tiny Whoop Case by 3DRCStore
...tiny whoop case by 3drcstore
thingiverse
tiny whoop case for transport.
thingiverse
free
Tiny Whoop Calibration Base
...tiny whoop calibration base
thingiverse
a base usefull to calibrate your tiny whoop
thingiverse
free
Tiny Whoop Gate by Imozeb
...tiny whoop gate by imozeb
thingiverse
custom tiny whoop gate. requires hot glue for assembly.
Quadcopter
3d_export
$5
quadcopter
...quadcopter
3dexport
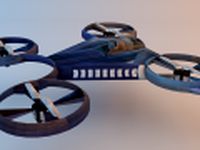
futuristic quadcopter design.<br>original design davidflo 77
turbosquid
$19
quadcopter
...lty free 3d model quadcopter for download as max, ma, and obj on turbosquid: 3d models for games, architecture, videos. (1591426)
turbosquid
$25
QuadCopter
... available on turbo squid, the world's leading provider of digital 3d models for visualization, films, television, and games.
3d_export
$5
Quadcopter 3D Model
...quadcopter 3d model
3dexport
quadcopter studio shaders
quadcopter 3d model vortex333 93968 3dexport
3d_export
$5
Quadcopter 3D Model
...quadcopter 3d model
3dexport
quadcopter aircraft helicopter
quadcopter 3d model greatghost 94019 3dexport
3d_export
$18
passenger quadcopter
... a multicopter is an aircraft built according to a helicopter scheme, with three or more rotors. previews rendered with redshift.
turbosquid
$159
Quadcopter Animated.
... available on turbo squid, the world's leading provider of digital 3d models for visualization, films, television, and games.
turbosquid
$19
Drone Quadcopter
... available on turbo squid, the world's leading provider of digital 3d models for visualization, films, television, and games.
turbosquid
$12
Drone Quadcopter
... available on turbo squid, the world's leading provider of digital 3d models for visualization, films, television, and games.
3d_export
$29

Quadcopter
...
questions about the continuation of the collection or the model can be asked here:<br>https://www.artstation.com/evgen_beg
Hoops
archibase_planet
free

Hoop
...hoop
archibase planet
basketball hoop
basketball hoop - 3d model for interior 3d visualization.
turbosquid
$15

Hoops
... available on turbo squid, the world's leading provider of digital 3d models for visualization, films, television, and games.
3d_ocean
$7

Basketball Hoop
...op
3docean
ball basketball basketball hoop
basketball hoop .ma and .obj model warning: basketball is not included to the project.
design_connected
$18

Hoop armchair
...hoop armchair
designconnected
living divani hoop armchair computer generated 3d model. designed by levy, arik.
3ddd
$1

AXO Light HOOPS
...axo light hoops
3ddd
axo light , hoops
axo light ceiling lamp, hoops series
archive3d
free

Hoop 3D Model
...op 3d model
archive3d
basketball hoop
basketball hoop - 3d model for interior 3d visualization.
3ddd
$1

AXO Light HOOPS
...ght hoops
3ddd
axo light , hoops
современный светильник axo light hoops. модель sphoops4
3d_ocean
$9

Basketball Hoop
... sport team
basketball hoop with structure created with cinema 4d r15 formats included: 3ds – c4d r15 – obj – max 2013 – fbx 2012
archive3d
free

Hoop 3D Model
...
basketball hoop basket sport equipment
indoor basketball hoop - 3d model for 3d visualization.
turbosquid
$25

Basketball Hoop
...id
royalty free 3d model basketball hoop for download as max on turbosquid: 3d models for games, architecture, videos. (1361692)
Gates
archibase_planet
free
Gate
...gate archibase planet gate gates garage gate gate 1 - 3d model (*.gsm+*.3ds) for...
archibase_planet
free
Gate
...gate archibase planet gate garage gate gates gate 2 - 3d model (*.gsm+*.3ds) for exterior 3d...
archibase_planet
free
Gate
...gate archibase planet gate garage gate gates gate garage n050214 - 3d model (*.gsm+*.3ds) for interior...
archibase_planet
free
Gates
...gates
archibase planet
gates gate
gates - 3d model (*.gsm+*.3ds) for interior 3d visualization.
archibase_planet
free

Gate
...gate archibase planet gate gates barrier gate - 3d model (*.gsm+*.3ds) for exterior 3d...
archibase_planet
free
Gate
...gate archibase planet gate gates barrier gate n210114 - 3d model (*.3ds) for exterior...
archibase_planet
free
Gate
...gate archibase planet gate gates barrier gate n180914 - 3d model (*.gsm+*.3ds) for exterior...
archibase_planet
free
Gate
...gate archibase planet gate gates fence gate n050814 - 3d model (*.gsm+*.3ds) for exterior...
archibase_planet
free
Gates
...gates
archibase planet
gate gates fencing
gates n120708 - 3d model (*.gsm+*.3ds) for interior 3d visualization.
archibase_planet
free

Gates
...gates
archibase planet
gate gates fencing
gates n140708 - 3d model (*.gsm+*.3ds) for interior 3d visualization.
Micro
3ddd
$1
Micro
...micro
3ddd
автобус
turbosquid
$80
MICRO
...ty free 3d model micro for download as max, c4d, obj, and fbx on turbosquid: 3d models for games, architecture, videos. (1700743)
3ddd
$1
JBL Micro Wireless
... micro , колонка , плеер
jbl micro wireless
turbosquid
$10
Suppressor Micro
...quid
royalty free 3d model suppressor micro for download as on turbosquid: 3d models for games, architecture, videos. (1380433)
turbosquid
$20
Micro Meter
...osquid
royalty free 3d model micro meter for download as fbx on turbosquid: 3d models for games, architecture, videos. (1350448)
turbosquid
$7
NIghtstand Micro
...d
royalty free 3d model nightstand micro for download as max on turbosquid: 3d models for games, architecture, videos. (1248117)
3ddd
$1
Micro wind turbine
...micro wind turbine
3ddd
турбина
micro wind turbine for your green building projects
turbosquid
$29
Micro Speakers
... available on turbo squid, the world's leading provider of digital 3d models for visualization, films, television, and games.
turbosquid
$29
Micro Servo.max
... available on turbo squid, the world's leading provider of digital 3d models for visualization, films, television, and games.
turbosquid
$20

Micro cells
... available on turbo squid, the world's leading provider of digital 3d models for visualization, films, television, and games.
Air
3ddd
$1
Calligaris air
...calligaris air
3ddd
air , calligaris
cтул calligaris air
3ddd
$1
Air freshener
...air freshener
3ddd
air freshener , освежитель
air freshener
design_connected
$16
Air
...air
designconnected
flexform air lounge chairs computer generated 3d model. designed by antonio citterio.
turbosquid
$250
Heat pump air air
... available on turbo squid, the world's leading provider of digital 3d models for visualization, films, television, and games.
3d_export
$5
air
...air
3dexport
3ddd
$1
Кухня AIR
...кухня air
3ddd
air , мария
кухня air фабрики "мария"
3ddd
$1
Лампа AIR
...лампа air
3ddd
boconcept , air
настольная лампа air, boconcept. в50½xø32см
3d_export
$40
air deflector
...air deflector
3dexport
air deflector
3d_export
$15
air purifier
...air purifier
3dexport
air purifier
3d_export
$5

macbook air
...macbook air
3dexport
macbook air