Thingiverse

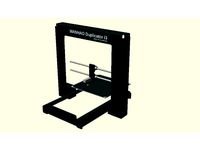
Wanhao Duplicator i3 LED Light Bar by rasarmg
by Thingiverse
Last crawled date: 3 years, 1 month ago
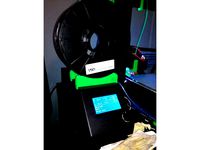
Wanted a way to video record overnight 3D prints without leaving the room lights on. Since I had several Harbor Freight 3-1/2 in. 9 LED Mini Flashlights laying around, I decided to put them to use in this LED light bar design for my Monoprice Maker Select 3D printer (rebranded Wanhao Duplicator i3).
The required non-printed parts:
Six LED flashlights (often free at Harbor Freight).
Four 2mm small screws (can be replaced by glue).
Some small insulated wire to power the LEDs.
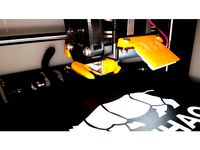
There are two light bar configurations: One that focuses all six LED downward in parallel (straight), and another that focuses each to a separate area of the Wanhao Duplicator' print bed when rear mounted (wanaho_rm).
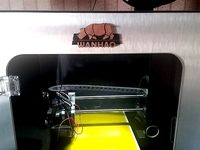
Each configuration includes brackets for mounting the light bar in front (fm) of the the gantry, in view, or behind it (rm), hidden from view. The photos above of my installation show an example of the wanaho_rm mounted in the rear.
It should not take much effort to create a mounting bracket for other printers...
The measured operating power of the resulting light bar is 1.8 watts! So it should not impact your power bill if it runs continuously:)
Designs
Choose which lamp design bar and mounting configuration you prefer and print the required parts.
Although rendered STL models have been provided for each part with each configuration (see stl-models.zip), only two files are required from the list below to print all the parts needed to assemble a light bar.
wanhao_rm-build_plate_1o2.stl
wanhao_rm-build_plate_2o2_Xm.stl
straight-build_plate_1o2.stl
straight-build_plate_2o2_Xm.stl
For front or rear light bar mounting, replace Xm with fm or rm respectively in the second build plate.
The required non-printed parts:
Six LED flashlights (often free at Harbor Freight).
Four 2mm small screws (can be replaced by glue).
Some small insulated wire to power the LEDs.
There are two light bar configurations: One that focuses all six LED downward in parallel (straight), and another that focuses each to a separate area of the Wanhao Duplicator' print bed when rear mounted (wanaho_rm).
Each configuration includes brackets for mounting the light bar in front (fm) of the the gantry, in view, or behind it (rm), hidden from view. The photos above of my installation show an example of the wanaho_rm mounted in the rear.
It should not take much effort to create a mounting bracket for other printers...
The measured operating power of the resulting light bar is 1.8 watts! So it should not impact your power bill if it runs continuously:)
Designs
Choose which lamp design bar and mounting configuration you prefer and print the required parts.
Although rendered STL models have been provided for each part with each configuration (see stl-models.zip), only two files are required from the list below to print all the parts needed to assemble a light bar.
wanhao_rm-build_plate_1o2.stl
wanhao_rm-build_plate_2o2_Xm.stl
straight-build_plate_1o2.stl
straight-build_plate_2o2_Xm.stl
For front or rear light bar mounting, replace Xm with fm or rm respectively in the second build plate.
Similar models
thingiverse
free

Wanhao Duplicator i3 v2.1 Rear LED Mount by masterblume
...wanhao duplicator i3 v2.1 rear led mount by masterblume
thingiverse
wanhao duplicator i3 v2.1 rear led mount
thingiverse
free

Wanhao Duplicator i3 LED strip (IKEA) mount by Rothestar
...iverse
overhead light on the wanhao duplicator i3.
this bracket is a clip on bracket for the led lightstrip from ikea (ledberg).
thingiverse
free

Wanhao Duplicator i3 led bar by vlad127
...lad127
thingiverse
wanhao duplicator i3 led light. plug into extruder fan. hot end fan: http://www.thingiverse.com/thing:1246425
thingiverse
free

CR-10s Harbor Freight Light Bracket by rossireplicas
...or freight led light bar on a creality cr-10s. i printed this with .2mm layer height and 32% infill for strength. no supports.
thingiverse
free

Harbor Freight Four-Hed LED Light Brackets
...able to light up the build plate quite well. the brackets are very simple. just needed to print two of them to mount the light.
thingiverse
free

Power Strip Brackets for Harbor Freight Workbench by theCoolTinkerMan
...n be spaced to suit the length of the power strip that needs to be mounted as these power strips come in shorter lengths as well.
thingiverse
free

LED strip mount for the Wanhao Duplicator i3 fan bracket by tahustvedt
...t. i stuck some 12 v led strip in the opening and soldered a wire with connectors to connect it in parallel with the hot end fan.
thingiverse
free

Wanhao i3 LED strip mount by wim3d
...l 5630 led strip to the extruder of a wanhao duplicator i3.
i used the power (60 ma) from the extruder fan. a switch is included
thingiverse
free

Wanhao Duplicator i3 V2.1 Rear Mounted 60mm Cooling Fan Duct by morge86
... fan duct for your wanhao duplicator i3 v2.1. it is also adjustable and requires 3x m4x16 socket cup screw and one m4 nut. enjoy!
thingiverse
free

Support Led Duplicator i3 by BeStRiPeR
...port led duplicator i3 by bestriper
thingiverse
is a support for the led that i have mounted on my printer wanhao duplicator i3
Rasarmg
thingiverse
free

Webcam tripod mount by rasarmg
...mp; cd tmp
$ wget https://git.io/setup-omdl.bash
$ chmod +x setup-omdl.bash
$ ./setup-omdl.bash --branch v0.6.1 --yes --install
thingiverse
free

Parts to repurpose HP t610 thin client into internet router by rasarmg
...to allow proper case ventilation for 24/7 operation.
wanted to minimize hacking the original case so this is what i came up with.
thingiverse
free

omdl - An OpenSCAD Mechanical Design Library by rasarmg
...dated to github version v0.3
2016-12-02: initial release version v0.2
the current release .scad source is in the .zip archive.
thingiverse
free

A Parametric Reel / Spool by rasarmg
...& cd tmp
$ wget https://git.io/setup-omdl.bash
$ chmod +x setup-omdl.bash
$ ./setup-omdl.bash --branch v0.2 --yes --install
thingiverse
free

PCI-E 1x Riser Card Bracket by rasarmg
...mp; cd tmp
$ wget https://git.io/setup-omdl.bash
$ chmod +x setup-omdl.bash
$ ./setup-omdl.bash --branch v0.6.1 --yes --install
thingiverse
free

HP MicroServer N40L 4-bay 2.5in SSD mount / Bracket by rasarmg
...mp; cd tmp
$ wget https://git.io/setup-omdl.bash
$ chmod +x setup-omdl.bash
$ ./setup-omdl.bash --branch v0.6.1 --yes --install
thingiverse
free

PCI Bracket Generator by rasarmg
...mp; cd tmp
$ wget https://git.io/setup-omdl.bash
$ chmod +x setup-omdl.bash
$ ./setup-omdl.bash --branch v0.6.1 --yes --install
thingiverse
free

Quad HP-USB video adapter monitor post mount by rasarmg
...mp; cd tmp
$ wget https://git.io/setup-omdl.bash
$ chmod +x setup-omdl.bash
$ ./setup-omdl.bash --branch v0.6.1 --yes --install
thingiverse
free

Polytope play made easy by rasarmg
...mp; cd tmp
$ wget https://git.io/setup-omdl.bash
$ chmod +x setup-omdl.bash
$ ./setup-omdl.bash --branch v0.6.1 --yes --install
Wanhao
thingiverse
free
Wanhao Logo Plate / Wanhao Logo Schild by JMDesigns
...wanhao logo plate / wanhao logo schild by jmdesigns
thingiverse
wanhao logo plate / wanhao logo schild
thingiverse
free
Wanhao logo by nebtio
...wanhao logo by nebtio
thingiverse
wanhao logo
thingiverse
free
Wanhao keychain by Rein3003
...wanhao keychain by rein3003
thingiverse
a keychain with the logo of wanhao
thingiverse
free
Wanhao Di3 v2 Light / Wanhao Di3 v2 Beleuchtung by JMDesigns
...wanhao di3 v2 light / wanhao di3 v2 beleuchtung by jmdesigns
thingiverse
wanhao di3 v2 light / wanhao di3 v2 beleuchtung
thingiverse
free
TUSH For Wanhao by wtmi1992
...tush for wanhao by wtmi1992
thingiverse
the ultimate spool holder, modified for the top of the wanhao control box. fits snug.
thingiverse
free
fanduct wanhao d12 by theopoilmek
...fanduct wanhao d12 by theopoilmek
thingiverse
fanduct pour wanhao d12
thingiverse
free
Wanhao i3 Marlin by johan21
...wanhao i3 marlin by johan21
thingiverse
marlin for wanhao i3 rampsboard 1.4.
thingiverse
free
Wanhao Duplicator i3 by imagineering4
...wanhao duplicator i3 by imagineering4
thingiverse
these are the stl files for the improvements to the wanhao duplicator i3, v2
thingiverse
free

Wanhao D6 filament guard
...wanhao d6 filament guard
thingiverse
this is a filament guard for wanhao d6 machine to avoid the filament unrolling
thingiverse
free
Wanhao Duplicator i3 Model by Hilde3D
...wanhao duplicator i3 model by hilde3d
thingiverse
wanhao duplicator i3 model
Duplicator
turbosquid
$10

duplicate
...
turbosquid
royalty free 3d model duplicate for download as on turbosquid: 3d models for games, architecture, videos. (1566034)
turbosquid
$20

Wonderful duplicate kids room
...ul duplicate kids room for download as skp, 3ds, fbx, and obj on turbosquid: 3d models for games, architecture, videos. (1609462)
archive3d
free
Copier 3D Model
...hine duplicating machine
copier n160808 - 3d model (*.gsm+*.3ds) for interior 3d visualization.
3d_export
$30
connect four set
...ate objects that can be disassembled. includes one red and one black checker which can be duplicated to the standard 42 checkers.
3ddd
$1
Черепица
...del
- put it in your scene and duplicate
- level of detail can be edited
- open with 3ds max 2010-2013 or import in your program.
3d_export
$27

Dividing Cell / Ovule 3D Model
...al microbe blob ovum fiction science ovule duplication divide dividing
dividing cell / ovule 3d model duchampmodels 9691 3dexport
3d_ocean
$16

Folding Chair
...tubing. designed to be good low poly at a distance and mesh smooth pretty well and light weight for duplicating a lot. package...
3d_export
$8
wooden fence
... one post separate so the fence can be duplicated and extended. created in blender 3.0 file format fbx with texture painted maps.
3d_export
$8
wooden fence
... one post separate so the fence can be duplicated and extended. created in blender 3.0 file format fbx with texture painted maps.
3d_ocean
$2

DNA Strands Of 5 Types
... strands that can be multiplied and can be made long chains by duplicating them and can be easily applied materials and textures.
I3
3d_export
$10

suv i3
...suv i3
3dexport
suv i3 2013 series
3d_ocean
$89

BMW i3 2012
...y, in real units of measurement, qualitatively and maximally close to the original. model formats: - *.max (3ds max 2008 scanl...
cg_studio
$99

BMW i3 20143d model
...
cgstudio
.3ds .c4d .fbx .lwo .max .obj - bmw i3 2014 3d model, royalty free license available, instant download after purchase.
cg_studio
$99

BMW i3 20123d model
...tudio
.3ds .c4d .fbx .lwo .max .mb .obj - bmw i3 2012 3d model, royalty free license available, instant download after purchase.
cg_studio
$99

BMW i3 20143d model
...tudio
.3ds .c4d .fbx .lwo .max .mb .obj - bmw i3 2014 3d model, royalty free license available, instant download after purchase.
humster3d
$75

3D model of BMW i3 2014
...
buy a detailed 3d model of bmw i3 2014 in various file formats. all our 3d models were created maximally close to the original.
humster3d
$40

3D model of Kitchen Set I3
...uy a detailed 3d model of kitchen set i3 in various file formats. all our 3d models were created maximally close to the original.
3d_ocean
$30

Kitchen set i3
...ensils oven plates shelves sink table ware
kitchen set i3 include 3d models: cooker, oven, sink, cupboards, table, chair, plates.
3d_ocean
$89

BMW i3 2014
...y, in real units of measurement, qualitatively and maximally close to the original. model formats: - *.max (3ds max 2008 scanl...
cg_studio
$99

BMW i3 Concept 20113d model
...i3
.3ds .c4d .fbx .lwo .max .obj - bmw i3 concept 2011 3d model, royalty free license available, instant download after purchase.
Led
3d_export
$5

led
...led
3dexport
the led is cut with all the parts.
3ddd
$1

Monacor / PARL56DMX / LED-320RGBW / LED-345RGBW / LED-300RGB
... прожектор
http://www.monacor.dk/
parl56dmx
led-320rgbw
led-345rgbw
led-300rgb
turbosquid
$10

LED
...led
turbosquid
free 3d model led for download as blend on turbosquid: 3d models for games, architecture, videos. (1691856)
3d_export
$5

led lamp
...led lamp
3dexport
led lamp, brightness animation
3ddd
free

leds-c4
...leds-c4
3ddd
leds-c4
современный торшер
3ddd
free

leds-c4
...leds-c4
3ddd
leds-c4
настольный лампа
turbosquid
$19

LED
... available on turbo squid, the world's leading provider of digital 3d models for visualization, films, television, and games.
turbosquid
$12

Led
... available on turbo squid, the world's leading provider of digital 3d models for visualization, films, television, and games.
turbosquid
free

LED
... available on turbo squid, the world's leading provider of digital 3d models for visualization, films, television, and games.
turbosquid
free

LED
... available on turbo squid, the world's leading provider of digital 3d models for visualization, films, television, and games.
Bar
archibase_planet
free
Bar
...bar
archibase planet
bar bar rack
bar 2 - 3d model for interior 3d visualization.
archibase_planet
free
Bars
...bars
archibase planet
horizontal bar parallel bars
parallel bars - 3d model for interior 3d visualization.
3d_export
$10

bar
...bar
3dexport
modern bar
3d_export
$10
bar
...bar
3dexport
modern bar
3d_export
$10

bar
...bar
3dexport
modern bar
3d_export
$10
bar
...bar
3dexport
modern bar
3d_export
$10

bar
...bar
3dexport
modern bar
3d_export
$10
bar
...bar
3dexport
modern bar
3d_export
$10

bar
...bar
3dexport
modern bar
3d_export
$10
bar
...bar
3dexport
modern bar
Light
archibase_planet
free

Light
...light
archibase planet
lamp lighting light
light - s2 - 3d model for interior 3d visualization.
archibase_planet
free

Light
...light
archibase planet
light luminaire lighting
light l0465 - 3d model (*.gsm+*.3ds) for interior 3d visualization.
3d_export
$5

lighting
...lighting
3dexport
lighting
3d_export
$5

lighting
...lighting
3dexport
lighting in livingroom
turbosquid
$3

Lighting Tree with Lights
...d model lighting tree with lights for download as max and 3ds on turbosquid: 3d models for games, architecture, videos. (1585507)
archibase_planet
free

Light
...light
archibase planet
luster lighting solution
light - s - 3d model for interior 3d visualization.
archibase_planet
free

Light
...light
archibase planet
luster lamp lighting
light 1 - 3d model for interior 3d visualization.
archibase_planet
free

Lights
...lights
archibase planet
surgical lights surgical lamp
surgical lights (floor) - 3d model for interior 3d visualization.
archibase_planet
free

Light
...light
archibase planet
lighting luminaire candlelight
light l0463 - 3d model (*.gsm+*.3ds) for interior 3d visualization.
3d_export
$18

street light-lighting-light-xia bing
...
3dexport
street light-lighting-light-xia bing<br>max 2015 v-ray 3 max 2015<br>textures<br>all files in zip...