Thingiverse
Wanhao Duplicator 6 Offset Fan Direct Cooling Duct ("The Magnum") by Reflector
by Thingiverse
Last crawled date: 4 years, 6 months ago
Edit: SuperMagnum is out. It is The Magnum with a few changes, primarily significantly larger ducts. I recommend using The Magnum when you're printing the Supermagnum since it has some fairly hefty bridges due to the big flat ceilings on the bigger ducts.https://www.thingiverse.com/thing:2448555
Also there's a prototype Centrifugal SuperMagnum if you're into mounting your blowers perpendicular. In 40x40x20mm flavor.https://www.thingiverse.com/thing:2452863
When you feel personally offended, start to literally shake and feel like committing a homicide-suicide when someone tells you their pronouns are bridge, cantilever and they call their "thing" "The Gap" then you might have psychological problems that are a little too far for this duct to solve. For those that just feel deeply suicidal when they're trying to print with the stock duct on the D6 and still have those urges to grab for the sharpest object on the desk when you're using a duct that uses stock fan in the standard configuration, then this might make some of those urges go away. If you can make that print with a 11" ("28cm") bridge to show them who really has "The Gap" then maybe some of those weird personal issues will go away. Or maybe its time check into a soft padded room if you need to use your printer in a competitive fashion over complex psychological issues like that.
Heavy, heavy sarcasm aside (And still some more to come)...
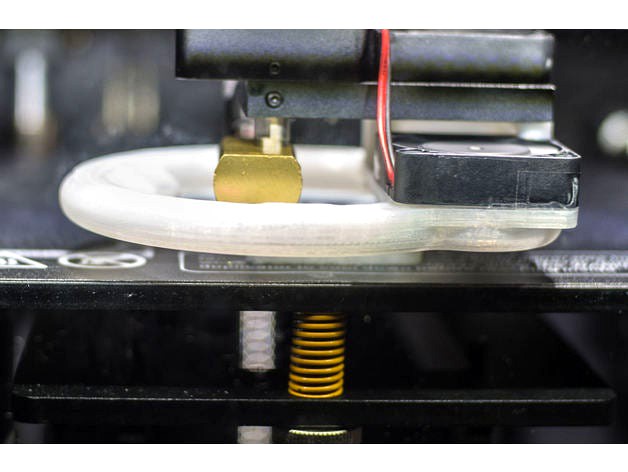
For some reason that I still cannot fathom, there are ducts for the D6 that use the same fan configuration as before, wherein the fan is made into a claustrophobic fizzb**** immersed into a small, dark room where it can't breathe and its screaming to be let out to have some air. This is as it is tackled down and held in place as it tries to blurt out its safe phase "I can't breathe" while the big, hefty, hot heatsink asserts its authority onto it. All while it has to blow through the immensive backpressure of a tiny SQUARE/RECTANGULAR profile into little tiny holes. If airflow protective services existed, they would probably start summarily putting fans down from all the agonizing backpressure they're suffering from. Here I've got a design with a massive, wide ring with a near-circular profile (However widened) with a massive cross section leading to some massive ports. All enough to allow you to stick your finger under the nozzle and feel the flow without having to lick your finger first to feel the pitiful amount of air that would be normally thrown at that molten gooey PLA that wants to just flow and string all over the place.
For those who ask "why aren't you using the air inducement design":
I don't think it works as effectively at the lower layers with such a large ring at low heights off the bed. While it can move a large volume of air, it cannot aggressively direct air right at the plastic. From some of my own quick research it appears designs that throw air directly at the nozzle (Ex: "Two funnels", opposed 180 deg from each other) appear to perform very well in stringing and general cooling. I am using a triple nozzle design as it would have a nozzle at minimum directly facing the plastic and object on most orthogonal objects aligned with the build plate. Otherwise two nozzles will generally have cooling towards the object and the third will be providing cooling over the surface of the object.
If you want me to keep exploring that design or making derivatives using this design as the base platform, let me know and I may work on it. So far this design has made me very happy in regards to cooling performance in printing itself.
This design has:
Thicker walls (1.2mm vs 0.9mm) than the prototype direct cooling duct, which means even if you have issues with occasional strands becoming loose during a prototype print, you're likely to have a functional part that just needs some knife work to cut off the strands instead of taping a broken shell back together. Those thicker walls also make it a little more resistant to droop.
A large diameter ring which means you can see your print and it is moved further away from the hot end and nozzle so it won't droop as easily (in theory) even if you print it out of PLA. I write this within a few hours of making one and using it to print another one of itself but in a nicer, less messy and less rapidly prototype formed.
Big, big ducts. I may make a revision to this design later that further enlarges the ducts but they are currently pushing the limit given that I still need to maintain the screw mounting pattern and the relative placement of the ducts since they're balanced against the fan input.
The fan is moved OUT from under the hot end heatsink. That means it won't ingest hot air blown at the nozzle as easily, nor will it attempt to rapid ingest the hot air coming out of the heatsink. This is all while the fan is in open air so it won't have to suck air down in a horrible manner in a feeble attempt to try to then push that pitiful amount of air through a restrictive ring arrangement.
Smooth, happy surfaces on the inside of the transitions from the fan to the ring to the duct. No sharp corners or carelessly slapped on holes.
DOES NOT REQUIRE REPLACING THE FAN OR EVEN CUTTING THE ZIPTIE TO IT. You merely lift the fan over the gantry to move it to the front side of the extruder and lightly tug on the wire to move it away from the gantry rods so it does not rub on them. As of now the fan is secured by one screw and pressure. I have left a hole in the front to allow you to put another screw on but this part of the design is still "in progress" as I find the fan does not fully seal to the duct due to the lack of a fourth screw to fully "clamp down" the duct to extruder heatsink with the fan. Watch this and you may see a clip for the fan. This means you can print this with your stock fan and hopefully stock duct and get a "working" duct before using this to print itself again as a cleaner, better print. See the attached image of what I used to make the first print of this duct and compare it to the second print which is made after mounting the first print.
Design for additive manufacturing enhancements.
DFAM enhancements:
Both the spacer and the duct are optimized to reduce some areas where material isn't exactly needed.
1a. In the case of the spacer, it has slots and a cavity with a chamfered edge, reducing the amount of material needed and reducing the print time of a tiny little part. The spacer also has a thin webbing between the two tubular spacings so there are fewer retractions.
1b. The duct has a bridging assisting feature for where the fan mounts. Normally that would be one giant gap to bridge which D6 owners should already know is a painful challenge with the stock fan. That feature is made with a 30 degree chamfer that transitions to a fillet so that the bridged gap is effectively less than a centimeter instead of having to cross a 30mm+ cavity or having to remove support (Nasty, nasty and annoying, plus a waste of time. And some cases I assume that it helps with sagging). That feature now is also a skin instead of a solid feature that would normally be infilled, which reduces material needed to print, meaning less time to print given it just becomes rings when sliced.
Practically most sharp corners on perimeters are eliminated and replaced with generous radiis so the printer does not have to do aggressive decelerations to stop one axis and then accelerate from zero ("Jerk"). This means you print faster and there's less time spent with the printer vibrating. Even the ducts themselves are optimized on this design with generous fillets to transition from the ring to the duct. That also prevents excessively turbulent airflow.
Minimized features that have overhang or bridging. See above. The ducts feature a 30 degree angle so that's well within reason to print for an overhang, even with a stock fan.
This is not to mention I slaved away at a hot extruder for two days to ensure that this thing doesn't have stupid problems like a screw hole being blocked by the ring or any of those things called "details."
I will include a shorter standoff for the fan if droop becomes an issue.
It is absolutely imperative that you do not try to overtighten the bolts that connect the duct to the hotend heatsink, you WILL strip a screw even with a finger and thumb on a magnetic bit holder. Ask me why I have tape on my fan.
A warning: You will lose a little bit of print area in the left corner (Perspective: You facing the printer) if you use these ducts, they will bump the motor. They effectively take about 1 inch/2-3cm, as in the legs of a triangle more or less. Obviously you have more to lose if you stick anything like a heatsink onto your steppers.
Also there's a prototype Centrifugal SuperMagnum if you're into mounting your blowers perpendicular. In 40x40x20mm flavor.https://www.thingiverse.com/thing:2452863
When you feel personally offended, start to literally shake and feel like committing a homicide-suicide when someone tells you their pronouns are bridge, cantilever and they call their "thing" "The Gap" then you might have psychological problems that are a little too far for this duct to solve. For those that just feel deeply suicidal when they're trying to print with the stock duct on the D6 and still have those urges to grab for the sharpest object on the desk when you're using a duct that uses stock fan in the standard configuration, then this might make some of those urges go away. If you can make that print with a 11" ("28cm") bridge to show them who really has "The Gap" then maybe some of those weird personal issues will go away. Or maybe its time check into a soft padded room if you need to use your printer in a competitive fashion over complex psychological issues like that.
Heavy, heavy sarcasm aside (And still some more to come)...
For some reason that I still cannot fathom, there are ducts for the D6 that use the same fan configuration as before, wherein the fan is made into a claustrophobic fizzb**** immersed into a small, dark room where it can't breathe and its screaming to be let out to have some air. This is as it is tackled down and held in place as it tries to blurt out its safe phase "I can't breathe" while the big, hefty, hot heatsink asserts its authority onto it. All while it has to blow through the immensive backpressure of a tiny SQUARE/RECTANGULAR profile into little tiny holes. If airflow protective services existed, they would probably start summarily putting fans down from all the agonizing backpressure they're suffering from. Here I've got a design with a massive, wide ring with a near-circular profile (However widened) with a massive cross section leading to some massive ports. All enough to allow you to stick your finger under the nozzle and feel the flow without having to lick your finger first to feel the pitiful amount of air that would be normally thrown at that molten gooey PLA that wants to just flow and string all over the place.
For those who ask "why aren't you using the air inducement design":
I don't think it works as effectively at the lower layers with such a large ring at low heights off the bed. While it can move a large volume of air, it cannot aggressively direct air right at the plastic. From some of my own quick research it appears designs that throw air directly at the nozzle (Ex: "Two funnels", opposed 180 deg from each other) appear to perform very well in stringing and general cooling. I am using a triple nozzle design as it would have a nozzle at minimum directly facing the plastic and object on most orthogonal objects aligned with the build plate. Otherwise two nozzles will generally have cooling towards the object and the third will be providing cooling over the surface of the object.
If you want me to keep exploring that design or making derivatives using this design as the base platform, let me know and I may work on it. So far this design has made me very happy in regards to cooling performance in printing itself.
This design has:
Thicker walls (1.2mm vs 0.9mm) than the prototype direct cooling duct, which means even if you have issues with occasional strands becoming loose during a prototype print, you're likely to have a functional part that just needs some knife work to cut off the strands instead of taping a broken shell back together. Those thicker walls also make it a little more resistant to droop.
A large diameter ring which means you can see your print and it is moved further away from the hot end and nozzle so it won't droop as easily (in theory) even if you print it out of PLA. I write this within a few hours of making one and using it to print another one of itself but in a nicer, less messy and less rapidly prototype formed.
Big, big ducts. I may make a revision to this design later that further enlarges the ducts but they are currently pushing the limit given that I still need to maintain the screw mounting pattern and the relative placement of the ducts since they're balanced against the fan input.
The fan is moved OUT from under the hot end heatsink. That means it won't ingest hot air blown at the nozzle as easily, nor will it attempt to rapid ingest the hot air coming out of the heatsink. This is all while the fan is in open air so it won't have to suck air down in a horrible manner in a feeble attempt to try to then push that pitiful amount of air through a restrictive ring arrangement.
Smooth, happy surfaces on the inside of the transitions from the fan to the ring to the duct. No sharp corners or carelessly slapped on holes.
DOES NOT REQUIRE REPLACING THE FAN OR EVEN CUTTING THE ZIPTIE TO IT. You merely lift the fan over the gantry to move it to the front side of the extruder and lightly tug on the wire to move it away from the gantry rods so it does not rub on them. As of now the fan is secured by one screw and pressure. I have left a hole in the front to allow you to put another screw on but this part of the design is still "in progress" as I find the fan does not fully seal to the duct due to the lack of a fourth screw to fully "clamp down" the duct to extruder heatsink with the fan. Watch this and you may see a clip for the fan. This means you can print this with your stock fan and hopefully stock duct and get a "working" duct before using this to print itself again as a cleaner, better print. See the attached image of what I used to make the first print of this duct and compare it to the second print which is made after mounting the first print.
Design for additive manufacturing enhancements.
DFAM enhancements:
Both the spacer and the duct are optimized to reduce some areas where material isn't exactly needed.
1a. In the case of the spacer, it has slots and a cavity with a chamfered edge, reducing the amount of material needed and reducing the print time of a tiny little part. The spacer also has a thin webbing between the two tubular spacings so there are fewer retractions.
1b. The duct has a bridging assisting feature for where the fan mounts. Normally that would be one giant gap to bridge which D6 owners should already know is a painful challenge with the stock fan. That feature is made with a 30 degree chamfer that transitions to a fillet so that the bridged gap is effectively less than a centimeter instead of having to cross a 30mm+ cavity or having to remove support (Nasty, nasty and annoying, plus a waste of time. And some cases I assume that it helps with sagging). That feature now is also a skin instead of a solid feature that would normally be infilled, which reduces material needed to print, meaning less time to print given it just becomes rings when sliced.
Practically most sharp corners on perimeters are eliminated and replaced with generous radiis so the printer does not have to do aggressive decelerations to stop one axis and then accelerate from zero ("Jerk"). This means you print faster and there's less time spent with the printer vibrating. Even the ducts themselves are optimized on this design with generous fillets to transition from the ring to the duct. That also prevents excessively turbulent airflow.
Minimized features that have overhang or bridging. See above. The ducts feature a 30 degree angle so that's well within reason to print for an overhang, even with a stock fan.
This is not to mention I slaved away at a hot extruder for two days to ensure that this thing doesn't have stupid problems like a screw hole being blocked by the ring or any of those things called "details."
I will include a shorter standoff for the fan if droop becomes an issue.
It is absolutely imperative that you do not try to overtighten the bolts that connect the duct to the hotend heatsink, you WILL strip a screw even with a finger and thumb on a magnetic bit holder. Ask me why I have tape on my fan.
A warning: You will lose a little bit of print area in the left corner (Perspective: You facing the printer) if you use these ducts, they will bump the motor. They effectively take about 1 inch/2-3cm, as in the legs of a triangle more or less. Obviously you have more to lose if you stick anything like a heatsink onto your steppers.