Thingiverse
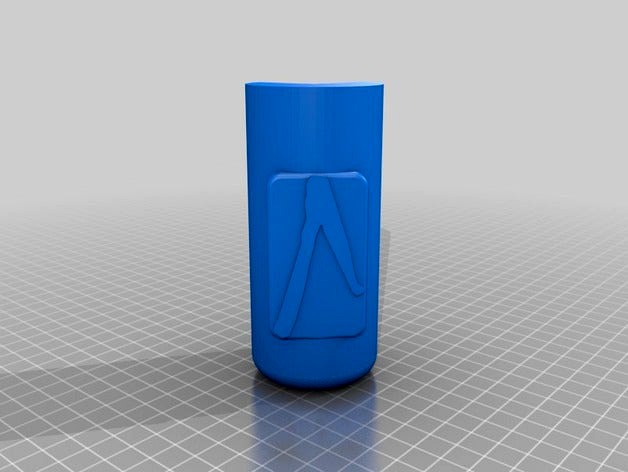
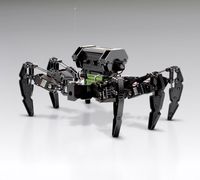
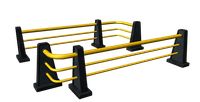
Vorpal The Hexapod Game Arena by vorpal
by Thingiverse
Last crawled date: 3 years ago
This is an add-on accessory for the totally awesome Vorpal Hexapod, If you haven't seen that yet, then this thing won't make sense, so visit there first:
Thing 2513566: Vorpal The Hexapod
I made this entire project and all accessories open source and respectfully ask you to consider supporting the project. We successfully funded on Kickstarter with hundreds of kits sold, and now we have our own store. We've sold over 700 kits so far. We have more than just the Hexapod electronics, we have all kinds of things useful for small robotics and other projects:Vorpal Robotics Store with Hexapod Kits
IMPORTANT: Sign up for our newsletter for new products and notification of improvements: Vorpal Store Newsletter List
Why do I need this for the Hexapod?
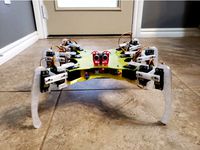
These are corner posts you can use to make a 4 foot by 2 foot field for Vorpal to romp around in. This field is perfect for games like Joust and Capture the Flag, or just for testing. Two to three Vorpal Hexapods can run around in this sized field comfortably.
Here's a video of the field in use during a "Joust" competition:https://www.youtube.com/watch?v=wikXps27vTA
We use this field at all of our demonstrations, Maker Faires, our internal testing area, and other activities so it is tested in real life for many hours and works very well.
PRO TIP: For transportation, the entire thing breaks down in about 1 minute and can be carried conveniently in a "Corn Hole" game bag. Yes, I had no idea what the game "Corn Hole" was until I started searching for 4 foot by 2 foot bags! But it turns out that bags made for this game are perfect for carrying around Vorpal Fields. In fact you could easily put two Vorpal Fields in a typical Corn Hole Game bag, and some bags are large enough to hold several Vorpal Hexapods stored in plastic shoe boxes, batteries, and everything.
How Do I Build The Field?
What you will need:
Four of the Corner Posts printed in your choice of plastic.
Two strips of polycarbonate strip 1/8" thick, 4" wide, 2 feet long. (Available from McMaster Carr in the USA part number 1749K619)
Two strips of polycarbonate strip 1/8" thick, 4" wide, 4 feet long (Available from McMaster Carr in the USA part number 1749K619)
**Note: it may be tempting to substitute acrylic (aka plexiglass) for the polycarbonate (aka Lexan) but acrylic won't last as long, it tends to crack. Polycarb is made to be impact resistant.
A piece of MDF plywood sheet, 1/2" thick, 2 feet by 4 feet. Paint it on both sides (so it doesn't warp) with your choice of colors. You may substitute regular plywood but watch out for splinters.
Duct tape.
Optional: two 3 foot pieces of aluminum angle, roughly 1" by 1" legs and 1/16" thick, but a wide variety of sizes would probably work.
Total cost for everything is right around $50.
Assembly:
Amazingly, if you can buy the parts I listed above you don't need to do any plastic or wood cutting whatsoever! The plastic strips and MDF are exactly the right size for everything to work. If you don't live in a country where McMaster Carr ships and these sized items are not available, well then you may need to do some cutting. However 3mm thick plastic should work pretty well, and you can adjust the size of the field to fit local size material availability, it doesn't have to be exactly 2 feet by 4 feet.
The plastic strips simply slot right into the corner pieces which then sit nicely on top of the MDF sheet. They should hold nicely without doing anything else. It's a tight fit so wobble it in. If for some reason it's loose (maybe you bought the wrong thickness plastic strips or your printer underextrudes) you can put some scotch tape on the end of the plastic to make it a bit thicker.
Secure the bottom of the long strips of plastic to the MDF by using strips of duct tape. Try try to be careful to only overlap the plastic strips by 1/2" or so, leaving most of the tape on the bottom of the MDF so it won't be seen. This stops the plastic from bowing out away from the field.
Optional: If desired, use 3 foot long sections of aluminum angle to secure the centers of the long runs of plastic so they don't bow out. One leg of the angle will be on the bottom side of the MDF, the other end will go against the polycarbonate strip to provide a slot that keeps it pressed against the MDF. You could tape the angle to the MDF, or sometimes frankly we just let the entire thing sit on a table with no tape and it does work ok.
VARIATION: When we're too lazy to carry the MDF to an event, sometimes we just set the walls and corners up right on a table top with no MDF base at all. It does work quite well and is much lighter to carry.
VARIATION: You could make a field of any size by just using different sizes of plastic strip. A 2 foot by 2 foot field or 2 foot by 3 foot field would be extremely easy to carry to a small demo, and would even fit nicely in a suitcase for air travel.
Thing 2513566: Vorpal The Hexapod
I made this entire project and all accessories open source and respectfully ask you to consider supporting the project. We successfully funded on Kickstarter with hundreds of kits sold, and now we have our own store. We've sold over 700 kits so far. We have more than just the Hexapod electronics, we have all kinds of things useful for small robotics and other projects:Vorpal Robotics Store with Hexapod Kits
IMPORTANT: Sign up for our newsletter for new products and notification of improvements: Vorpal Store Newsletter List
Why do I need this for the Hexapod?
These are corner posts you can use to make a 4 foot by 2 foot field for Vorpal to romp around in. This field is perfect for games like Joust and Capture the Flag, or just for testing. Two to three Vorpal Hexapods can run around in this sized field comfortably.
Here's a video of the field in use during a "Joust" competition:https://www.youtube.com/watch?v=wikXps27vTA
We use this field at all of our demonstrations, Maker Faires, our internal testing area, and other activities so it is tested in real life for many hours and works very well.
PRO TIP: For transportation, the entire thing breaks down in about 1 minute and can be carried conveniently in a "Corn Hole" game bag. Yes, I had no idea what the game "Corn Hole" was until I started searching for 4 foot by 2 foot bags! But it turns out that bags made for this game are perfect for carrying around Vorpal Fields. In fact you could easily put two Vorpal Fields in a typical Corn Hole Game bag, and some bags are large enough to hold several Vorpal Hexapods stored in plastic shoe boxes, batteries, and everything.
How Do I Build The Field?
What you will need:
Four of the Corner Posts printed in your choice of plastic.
Two strips of polycarbonate strip 1/8" thick, 4" wide, 2 feet long. (Available from McMaster Carr in the USA part number 1749K619)
Two strips of polycarbonate strip 1/8" thick, 4" wide, 4 feet long (Available from McMaster Carr in the USA part number 1749K619)
**Note: it may be tempting to substitute acrylic (aka plexiglass) for the polycarbonate (aka Lexan) but acrylic won't last as long, it tends to crack. Polycarb is made to be impact resistant.
A piece of MDF plywood sheet, 1/2" thick, 2 feet by 4 feet. Paint it on both sides (so it doesn't warp) with your choice of colors. You may substitute regular plywood but watch out for splinters.
Duct tape.
Optional: two 3 foot pieces of aluminum angle, roughly 1" by 1" legs and 1/16" thick, but a wide variety of sizes would probably work.
Total cost for everything is right around $50.
Assembly:
Amazingly, if you can buy the parts I listed above you don't need to do any plastic or wood cutting whatsoever! The plastic strips and MDF are exactly the right size for everything to work. If you don't live in a country where McMaster Carr ships and these sized items are not available, well then you may need to do some cutting. However 3mm thick plastic should work pretty well, and you can adjust the size of the field to fit local size material availability, it doesn't have to be exactly 2 feet by 4 feet.
The plastic strips simply slot right into the corner pieces which then sit nicely on top of the MDF sheet. They should hold nicely without doing anything else. It's a tight fit so wobble it in. If for some reason it's loose (maybe you bought the wrong thickness plastic strips or your printer underextrudes) you can put some scotch tape on the end of the plastic to make it a bit thicker.
Secure the bottom of the long strips of plastic to the MDF by using strips of duct tape. Try try to be careful to only overlap the plastic strips by 1/2" or so, leaving most of the tape on the bottom of the MDF so it won't be seen. This stops the plastic from bowing out away from the field.
Optional: If desired, use 3 foot long sections of aluminum angle to secure the centers of the long runs of plastic so they don't bow out. One leg of the angle will be on the bottom side of the MDF, the other end will go against the polycarbonate strip to provide a slot that keeps it pressed against the MDF. You could tape the angle to the MDF, or sometimes frankly we just let the entire thing sit on a table with no tape and it does work ok.
VARIATION: When we're too lazy to carry the MDF to an event, sometimes we just set the walls and corners up right on a table top with no MDF base at all. It does work quite well and is much lighter to carry.
VARIATION: You could make a field of any size by just using different sizes of plastic strip. A 2 foot by 2 foot field or 2 foot by 3 foot field would be extremely easy to carry to a small demo, and would even fit nicely in a suitcase for air travel.
Similar models
thingiverse
free

Vorpal Hexapod Coaster/Whiteboard Magnet by vorpal
...other diameters, or even square magnet sheets, will of course also work). these are available from craft stores and amazon.com.
thingiverse
free

Vorpal Hexapod On Board Sign by vorpal
...other diameters, or even square magnet sheets, will of course also work). these are available from craft stores and amazon.com.
thingiverse
free

Feet to elevate Vorpal Hexapod Stand just a little bit by USAF_Paul
...ouldn't twist or jump during operation. be sure to rotate the foot in your slicer so that the flat side is on the print bed.
thingiverse
free

Vorpal Hexapod Name Plates: Blank, Botty McBotface, and Hexy by UMF3D
... robot (stl and 3dm files both included).
as an added bonus you get "botty mcbotface" and "hexy". enjoy!
-drj
thingiverse
free

tab to hold things to 1/4" plastic. by TwoBadCatsLLC
...ightly.
window tab 2 265 has a round part .265" thick so it will be somewhat snug but you can tighten it down all the way.
thingiverse
free
Vorpal Hexapod Capture The Flag Game Pieces by vorpal
...r me at least, they never fall out. if they fall out for you i'm sure a drop of superglue or hot glue will solve the problem.
thingiverse
free

Vorpal Combat Hexapod Nameplate Generator by Danal
...nstead, click the "open in customizer" button above and thingiverse will generate a custom stl with the name you enter!
grabcad
free

T-Strainer with Clear Housing and 1/4 NPT Connection, 3" Long 20 mesh mcmaster 98775K41
...g 20 mesh mcmaster 98775k41
grabcad
t-strainer with clear housing and 1/4 npt connection, 3" long 20 mesh mcmaster 98775k41
thingiverse
free

Vorpal Hexapod Eye Accessories by vorpal
...3mm deep. see our onshape project for exact details. you don't need to use onshape for your contributions, anything you want.
thingiverse
free

Tablecloth clip by Occasionally_Inspired
...s okay. the different size is unnoticeable.
lastly, the corners are thickened for increase stiffness, i.e., better performance.
Vorpal
turbosquid
$10
vorpal scifi.max
... available on turbo squid, the world's leading provider of digital 3d models for visualization, films, television, and games.
turbosquid
free
Vorpal Edge
... available on turbo squid, the world's leading provider of digital 3d models for visualization, films, television, and games.
thingiverse
free

Vorpal Blade Stand by 3dlyx
...vorpal blade stand by 3dlyx
thingiverse
a tiny but stable stand to display beautiful alice's beautiful vorpal blade
thingiverse
free

Crosseyed Vorpal Eyes by Helensdad
...ad
thingiverse
a pair of crossed eyes for vorpal the hexapod. just needs brim removing and a light sanding. paint as you wish...
thingiverse
free
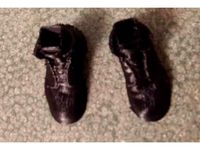
Vorpal Boots by adstaggs
...vorpal boots by adstaggs
thingiverse
https://www.youtube.com/watch?v=q5jiruos_bw
thingiverse
free

Vorpi TPU sneakers ( for Vorpal The Hexapod )
...d )
thingiverse
super-stylish sneakers for vorpal the hexapod
( https://www.thingiverse.com/thing:2513566 )
designed by urukalo
thingiverse
free

Vorpal Lock by nexnox
...ne, two! and through and through
the vorpal blade went snicker-snack!
he left it dead, and with its head
he went galumphing back.
thingiverse
free
Vorpal the Hexapod Dalek eye by Helensdad
...apod dalek eye by helensdad
thingiverse
single eye on a stick for vorpal, inspired by the daleks from the uk sci fi show dr who.
thingiverse
free

Vorpal Hexapod Light Sensor Bracket by vorpal
...d go to any unused servo controller port, and the signal should go to one of the analog ports that scratch can access (a3 or a6).
thingiverse
free
Vorpal Hexapod Coaster/Whiteboard Magnet by vorpal
...other diameters, or even square magnet sheets, will of course also work). these are available from craft stores and amazon.com.
Hexapod
3d_export
$10
Hexapod 3D Model
...ulic piston concept industrial phyzics simulation leg vehicle car animated blender
hexapod 3d model florincristian 97713 3dexport
3d_export
$10

Hexapod Robot 3D Model
...cle car concept ideea 3d model blender aniamted phyzics simulation simulated
hexapod robot 3d model florincristian 97714 3dexport
3d_export
$6
Hexapod Robot 3D Model
...t futuristic industrial vehicle 3d moel blender exterior landscape character
hexapod robot 3d model florincristian 97715 3dexport
3d_export
$79
Japanese Hexapod Robot Kondo KMR-M6 3D Model
...six
japanese hexapod robot kondo kmr-m6 3d model download .c4d .max .obj .fbx .ma .lwo .3ds .3dm .stl irhine.lab 102286 3dexport
3d_export
$79

hexapod platform
...:<br>.jpg(8192x8192)<br>.jpg(4096x4096)<br>normal<br>glossiness<br>mask<br>hope you like it!!
3d_export
$99

3d satelite dish on hexapod platform
...:<br>.jpg(8192x8192)<br>.jpg(4096x4096)<br>normal<br>glossiness<br>mask<br>hope you like it!!
cg_studio
$29
Hexapod3d model
...hexapod3d model
cgstudio
.max - hexapod 3d model, royalty free license available, instant download after purchase.
3d_export
$10

Mosquito 3D Model
...mosquito 3d model 3dexport mosquito insect bug hexapod flyer mosquito 3d model def 19400...
3d_export
$10

Insects Set
...insects is a large widespread group of small invertebrates hexapod common animals. for insects science, insects collections, insect expositions,...
thingiverse
free
Hexapod by razondirk
...hexapod by razondirk
thingiverse
a simple hexapod that i made for a school project. building instructions to follow.
Arena
3ddd
$1

arena
...
3ddd
arena , kattelan , круглый
arena kattelan
turbosquid
$5

Arena
...ty free 3d model arena for download as lwo, 3ds, obj, and fbx on turbosquid: 3d models for games, architecture, videos. (1624789)
turbosquid
$49

Arena
... available on turbo squid, the world's leading provider of digital 3d models for visualization, films, television, and games.
turbosquid
$15

Arena
... available on turbo squid, the world's leading provider of digital 3d models for visualization, films, television, and games.
3ddd
$1

Armchair Arena by Formenti
...armchair arena by formenti
3ddd
arena , formenti
armchair arena by formenti
3ddd
$1

Sofa Arena by Formenti
...sofa arena by formenti
3ddd
arena , formenti
sofa arena by formenti
3ddd
$1

Metallux Arena
...metallux arena
3ddd
metallux
светильник metallux arena.
d - 90 cm, h-55 cm
3ddd
$1

Диван Arena Varaschin
...
3ddd
arena , varaschin , круглый
с материалами
turbosquid
$199

amsoil arena
...squid
royalty free 3d model amsoil arena for download as c4d on turbosquid: 3d models for games, architecture, videos. (1658817)
turbosquid
$75

Movistar Arena
...alty free 3d model movistar arena for download as obj and 3dm on turbosquid: 3d models for games, architecture, videos. (1389912)
Game
3d_ocean
$4
Games
...games
3docean
3d games models real stick
3d, models, sports, games , trail
turbosquid
$5
Games
...s
turbosquid
royalty free 3d model games for download as skp on turbosquid: 3d models for games, architecture, videos. (1612115)
turbosquid
$65

game
... available on turbo squid, the world's leading provider of digital 3d models for visualization, films, television, and games.
turbosquid
$25

Game
... available on turbo squid, the world's leading provider of digital 3d models for visualization, films, television, and games.
turbosquid
$10

Game
... available on turbo squid, the world's leading provider of digital 3d models for visualization, films, television, and games.
turbosquid
$5
Game
...bosquid
royalty free 3d model gameplay for download as blend on turbosquid: 3d models for games, architecture, videos. (1274934)
3d_ocean
$7

game place
...game place
3docean
children game game park game place kids play luna park play
for kids game place
3d_export
$14
game character
...game character
3dexport
game character use for gaming
turbosquid
$20

Game Ready Car For Video Games
...e 3d model game ready car for video games for download as fbx on turbosquid: 3d models for games, architecture, videos. (1499375)
3d_ocean
$5
Game fence
...game fence
3docean
fence game
a high quality game ready fence.