Thingiverse

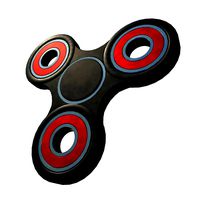
Vorpal Rainbow Fidget Spinner by vorpal
by Thingiverse
Last crawled date: 3 years, 1 month ago
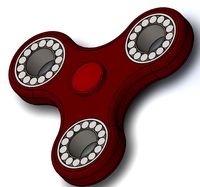
The Vorpal Rainbow Fidget Spinner uses random RGB LEDs and a centrifugal force switch to create a rainbow of colors whenever it's spun. Using a standard CR2032 button cell battery (commonly available in stores) it can light up for 80 hours of spinning time!
https://www.youtube.com/watch?v=G0JT707HtsU
Because of the force switch, no on/off switch is needed. If you spin it, it lights up. If you don't spin it, it doesn't light up. Very simple and effective way to avoid wasting batteries by accidentally leaving it on at the end of the day.
The design is easy to 3D print, requiring no supports, brims, or rafts. The source files are published openly on OnShape.com so you can modify the design if you wish.
Relationship to Vorpal The Hexapod
The Rainbow Fidget Spinner is awesome for use with the Vorpal The Hexapod "Fidget Spinner Challenge" activity. You would add an additional rule: The robot must spin the Rainbow Fidget Spinner fast enough to make it light up. The student who lights it up the fastest, starting from a common starting position, wins.
For other Vorpal the Hexapod activities, see Vorpal Games & Activities on our wiki.
Obtaining the Electronics
This project is open source (Creative Commons Attribution Share-Alike) so feel free to source the parts yourself, but we do offer a convenient kit that includes all the electronics, screws, fidget bearing, etc. See The Vorpal Robotics Store.
Assembly Details
Complete instructions are posted on our wiki under the topic Rainbow Fidget Spinner.
Assembly requires some basic soldering, but it's not very challenging soldering so this is not a bad training exercise for beginners (well, maybe have them just solder two wires together a few times first).
3D Printed Parts
One of each of the STL parts, plus an extra end cap. Just about any kind of plastic is fine and a range of layer heights work. We typically use 0.3mm layers because we're impatient and want it to print fast.
You can optionally decorate the top and bottom plates using an oil marker to outline the little raised curves.
Non-3D Printed Parts Needed
A kit that has all of the parts below (and also the hex key) is available from our store. Please consider supporting us so we can keep creating new open source projects!
1 x 608 Skate Bearing (preferably one made for Fidget Spinners, without grease)
5 x T3 sized Random Color LED. These LEDs have circuitry in them that makes them automatically flash and fade between colors semi-randomly.
8 inches (200mm) of bare hookup wire
1 x Rainbow Fidget PCB which has holes for the LEDs and leads. If you are self-sourcing see below for an easy substitution.
1 x low profile "half circle" battery holder for CR2032. See a picture on our wiki instructions for this project.
1 x CR2032 coin cell battery. These are very commonly available as they are used in calculators and other devices.
1 x Sorenson Lighting Controls Centrifugal Force Switch. See a picture and size info on our wiki.
6 x button head cap screws, M3x5mm
Tools Needed
Soldering iron, solder, rosin flux, etc. for soldering
Wire cutters
2mm hex key for driving the screws (this is included in our kits, but not the other tools)
Self-Sourcing the PCB
If you're not purchasing our kit of parts, here are some options on the PCB.
First option: you can manufacture the DXF file we provide with this Thing if you're into making PCBs. There are also numerous low cost services to manufacture them, although you'd probably want to make 10 or 20 and share with friends to make it economical.
Second option: you can substitute a piece of copper clad breadboard that uses standard 0.1" spacing (2.54mm spacing). A rectangular piece 13 holes by 2 holes will work, just be careful with the hacksaw! As you insert the LEDs, skip every other hole. There will be two holes left at the end, one for the positive lead and one for the negative lead. You can bridge the left side holes and the right side holes with your soldering iron to form the circuit.
We purposely spaced the holes in 0.1" increments so self-sourcers could just cut a piece of breadboard and make their own.
Similar models
thingiverse
free

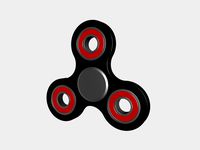
RGB LED Fidget Spinner by FoolsDelight
...do
add hole or button for switch
improve hooks for snapping bottom and top together
reduce tolerances of ball bearing holder clip
thingiverse
free

LED Fidget Spinner by pixelcreatures
...structables.com/id/led-fidget-spinner/
tinkercad file for remixes:https://www.tinkercad.com/things/jt0g8zjqe1y-led-fidget-spinner
thingiverse
free

Fidget Spinner LED by hendrik6073
...gold-plated-sensor-dia-4mm-new/332085609254?sspagename=strk%3amebidx%3ait&_trksid=p2060353.m2749.l2649 )
3 x cr2032 batteries
thingiverse
free

Vorpal Hexapod Fidget Spinner Challenge Game by vorpal
...n, they are focused! and when they get it going fast, they just light up like it was their birthday.
so, simple idea, but worked!
thingiverse
free
Vorpal Hexapod Coaster/Whiteboard Magnet by vorpal
...other diameters, or even square magnet sheets, will of course also work). these are available from craft stores and amazon.com.
grabcad
free

FIDGET SPINNER
...get spinner
grabcad
3d printable fidget spinner with red, yellow and green 5mm led's and cr2032 batteries.
use 22x7 bearing.
thingiverse
free
Vorpal Hexapod Battery Voltmeter Mount by vorpal
...ale jumper to either gnd pin on the nano.
this puts the meter in parallel with the nano, and it will display raw battery voltage.
thingiverse
free

Vorpal Hexapod On Board Sign by vorpal
...other diameters, or even square magnet sheets, will of course also work). these are available from craft stores and amazon.com.
thingiverse
free

Vorpal Hexapod Light Sensor Bracket by vorpal
...you to attach a keyes ky-018 light sensor (or similar clones) to your vorpal hexapod for use with scratch...
thingiverse
free

X Spin Fidget Spinner by growe41
...x spin fidget spinner by growe41
thingiverse
x spin fidget spinner uses 1/2" steel balls for weight
Vorpal
turbosquid
$10
vorpal scifi.max
... available on turbo squid, the world's leading provider of digital 3d models for visualization, films, television, and games.
turbosquid
free
Vorpal Edge
... available on turbo squid, the world's leading provider of digital 3d models for visualization, films, television, and games.
thingiverse
free
Vorpal Blade Stand by 3dlyx
...vorpal blade stand by 3dlyx
thingiverse
a tiny but stable stand to display beautiful alice's beautiful vorpal blade
thingiverse
free

Crosseyed Vorpal Eyes by Helensdad
...ad
thingiverse
a pair of crossed eyes for vorpal the hexapod. just needs brim removing and a light sanding. paint as you wish...
thingiverse
free
Vorpal Boots by adstaggs
...vorpal boots by adstaggs
thingiverse
https://www.youtube.com/watch?v=q5jiruos_bw
thingiverse
free

Vorpi TPU sneakers ( for Vorpal The Hexapod )
...d )
thingiverse
super-stylish sneakers for vorpal the hexapod
( https://www.thingiverse.com/thing:2513566 )
designed by urukalo
thingiverse
free
Vorpal Lock by nexnox
...ne, two! and through and through
the vorpal blade went snicker-snack!
he left it dead, and with its head
he went galumphing back.
thingiverse
free
Vorpal the Hexapod Dalek eye by Helensdad
...apod dalek eye by helensdad
thingiverse
single eye on a stick for vorpal, inspired by the daleks from the uk sci fi show dr who.
thingiverse
free
Vorpal Hexapod Light Sensor Bracket by vorpal
...d go to any unused servo controller port, and the signal should go to one of the analog ports that scratch can access (a3 or a6).
thingiverse
free
Vorpal Hexapod Coaster/Whiteboard Magnet by vorpal
...other diameters, or even square magnet sheets, will of course also work). these are available from craft stores and amazon.com.
Rainbow
3ddd
$1

RAINBOW
...rainbow
3ddd
5point , rainbow
диван в неоклассическом стиле
3ddd
$1

Rainbow chair
...rainbow chair
3ddd
rainbow
rainbow chair
3ddd
free

Sonya Rugs / Rainbow
..., ковер
ковёр rainbow от sonya winner studiohttp://www.sonyawinner.com/rainbow
turbosquid
$59

Rainbow Trout
...quid
royalty free 3d model rainbow trout for download as max on turbosquid: 3d models for games, architecture, videos. (1154951)
turbosquid
$2

Rainbow blocks
...uid
royalty free 3d model rainbow blocks for download as c4d on turbosquid: 3d models for games, architecture, videos. (1287176)
turbosquid
free

Rainbow Pillows
...id
royalty free 3d model rainbow pillows for download as max on turbosquid: 3d models for games, architecture, videos. (1435297)
3ddd
free

Poltrona Rainbow кресло
...poltrona rainbow кресло
3ddd
oro
poltrona rainbow кресло. бренд oro-milano
turbosquid
$39

Rainbow Fish
...e 3d model rainbow fish for download as ma, max, obj, and fbx on turbosquid: 3d models for games, architecture, videos. (1201325)
turbosquid
$29

rainbow cake
... 3d model rainbow cake for download as c4d, 3ds, obj, and fbx on turbosquid: 3d models for games, architecture, videos. (1557637)
3ddd
$1

Sedie Rainbow стул
...sedie rainbow стул
3ddd
oro-milano
sedie rainbow стул. бренд oro-milano
Fidget
3d_export
$10

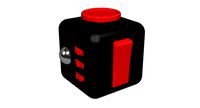
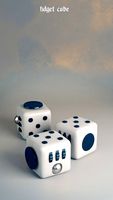
Fidget Cube
...fidget cube
3dexport
fidget cube 3d modeling<br>3d max<br>auto cad
turbosquid
free
Fidget Cube
...ube
turbosquid
free 3d model fidget cube for download as c4d on turbosquid: 3d models for games, architecture, videos. (1370283)
turbosquid
$20

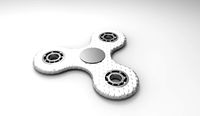
Fidget Spinner
...squid
royalty free 3d model fidget snner for download as c4d on turbosquid: 3d models for games, architecture, videos. (1194595)
turbosquid
$20
fidget spinner
...uid
royalty free 3d model fidget spinner for download as c4d on turbosquid: 3d models for games, architecture, videos. (1168895)
turbosquid
$10
fidget Cube
...osquid
royalty free 3d model fidget cube for download as obj on turbosquid: 3d models for games, architecture, videos. (1173544)
turbosquid
$6

Fidget Cube
...osquid
royalty free 3d model fidget cube for download as max on turbosquid: 3d models for games, architecture, videos. (1205497)
turbosquid
$5

Fidget spinner
...uid
royalty free 3d model fidget spinner for download as dwg on turbosquid: 3d models for games, architecture, videos. (1279860)
turbosquid
$5

Fidget Cube
...osquid
royalty free 3d model fidget cube for download as c4d on turbosquid: 3d models for games, architecture, videos. (1287742)
turbosquid
$5

Fidget Spinner
...uid
royalty free 3d model fidget spinner for download as c4d on turbosquid: 3d models for games, architecture, videos. (1190870)
turbosquid
$2

Fidget cube
...quid
royalty free 3d model fidget cube for download as blend on turbosquid: 3d models for games, architecture, videos. (1488961)
Spinner
turbosquid
$5

Spinner
...turbosquid
royalty free 3d model spinner for download as max on turbosquid: 3d models for games, architecture, videos. (1190412)
turbosquid
$1
Spinner
...turbosquid
royalty free 3d model spinner for download as dwg on turbosquid: 3d models for games, architecture, videos. (1173525)
3d_export
$5
spinner toy
...spinner toy
3dexport
cool spinner toy.
turbosquid
$12
Spinner
...id
royalty free 3d model spinner for download as max and obj on turbosquid: 3d models for games, architecture, videos. (1242592)
turbosquid
$20
Spinner
...lty free 3d model spinner for download as obj, fbx, and blend on turbosquid: 3d models for games, architecture, videos. (1191800)
turbosquid
$15
spinner
...yalty free 3d model spinner for download as max, obj, and fbx on turbosquid: 3d models for games, architecture, videos. (1165932)
turbosquid
$2

Spinner
...oyalty free 3d model spinner for download as ma, obj, and fbx on turbosquid: 3d models for games, architecture, videos. (1187750)
turbosquid
free
Spinner
...lty free 3d model spinner for download as obj, fbx, and blend on turbosquid: 3d models for games, architecture, videos. (1230908)
turbosquid
$29
spinner
... free 3d model spinner for download as 3ds, obj, c4d, and fbx on turbosquid: 3d models for games, architecture, videos. (1471160)
turbosquid
$4
Spinner
...y free 3d model spinner for download as ma, max, obj, and fbx on turbosquid: 3d models for games, architecture, videos. (1201076)