Thingiverse
Vixen GP Goto Conversion Using Meade DS Motors by wt808
by Thingiverse
Last crawled date: 3 years, 3 months ago
Brackets and adapters for installing Meade DS motors on a Vixen Great Polaris telescope equatorial mount. May fit other Vixen equatorial mount models and clones such as:
Vixen SP, SP-DX, GP-E, GP-DX
Celestron CG-5
Synta EQ-4, EQ-5
Skywatcher EQ-4, EQ-5
Orion SkyView Pro
Jinghua HD (Apogee Inc.)
Or make your own brackets for your mount to fit the motor adapter and ring.
Installation on a Vixen GP
Remove the lock ring and threaded collar from both DS motors. Thread on the 3D-printed motor ring until nearly fully seated on the motor threads.
Note the orientation of the ring with the 3D-printed mounting bracket and where the M3 nuts will need to go. Turn the ring as needed until the holes of the ring and bracket line up properly. Make note the holes on the ring where the M3 nuts need to be pressed in.
Remove the ring, press in the three M3 nuts, and reinstall the ring in the proper orientation again.
Press a MF85ZZ bearing into the recess inside each motor. Finger pressure should be enough to seat both bearings.
Press a 635ZZ bearing into each end of the 3D-printed nose piece adapter.
Cut a small flat into the 5mm shaft for the set screw of the 22T gear to prevent the gear from rotating on the shaft when locked. I allowed 4mm of the shaft to protrude from the bottom of the gear to fit in the MF85ZZ bearing in the motor.
Install the 22T gear on the shaft lining up the set screw with the flat. If the underside of the gear is hollow, 3D-print the gear spacer and press it into the gear. This prevents the MF85ZZ bearing from unseating from the motor housing during operation.
Slide the longer end of the shaft through the nose piece and attach the 40T 5mm ID pulley. Check for free rotation and excessive play.
Apply grease to the 22T gear and carefully slide the nose piece into the motor. Note the alignment nubs on the nose that mate with the notches on the motor. Rotate the pulley/gear as needed to align the gear teeth with the nylon gear in the motor as you slide the assembly into the motor.
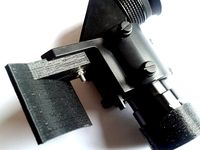
Fasten the motor assembly to the 3D-printed mounting bracket using three M3 screws and washers. Press an M6 nut into the base of the bracket.
Repeat for the other DS motor. At this point, you might want to connect both motors, power supply, and the Autostar controller to the jack panel, power the system on, and test for proper operation.
Install the 40T 6mm ID pulleys on both worm screws of the mount. Do not tighten fully yet.
Carefully install the belt simultaneously as you position the bracket for installation. Once the bracket is positioned properly, insert an M6 bolt through the corresponding opening in the mount and tighten to secure the bracket.
Verify the belt alignment and tighten set screws on the mount pulleys. If the belt alignment cannot be corrected by adjusting the mount-side pulley, you can also shim M5 washers between the motor-side pulley and outboard 635ZZ bearing. Note that you will have to remove the motor from the bracket to access the pulley set screws.
Install the 3D-printed jack panel housing on the RA motor bracket using the two M3 wood screws. Install the jack panel with the 4 screws provided with the panel, or use 4 more wood screws like the ones you used to mount the housing.
Connect the motors and Autostar hand controllers to the jack panel, connect the power supply, and verify proper operation. Note positions where the motor might hit the other motor, mount, jack panel cables, or where the telescope might hit either motor or jack panel.
Notable Autostar configuration parameters
Telescope - 4504/114EQ if FW patched, otherwise DS-127
Alt/Dec Ratio = -03.28533 (1:144 worm ratio)
Az/RA Ratio = +03.28533 (1:144 worm ratio)
Alt/Dec Percent = 75%
Az/RA Percent = 75%
Parts list
2x Meade DS motors (492 or 493)
1x Meade Computer Control jack panel
1x Autostar hand controller (495 or 497) + coil cable
1x 5.5x2.5mm 12VDC power supply, center-positive, 1.5A minimum (preferably with a right-angle DC connector)
1x Meade 505 RS-232 serial interface (optional, RJ11 on handset end, DB9 or USB on computer end)
2x 22T pinion gear, mod1, 5mm ID bore (used for RC cars)
4x 635ZZ ball bearing, double shielded, 5x19x6mm
2x MF85ZZ ball bearing, flanged, double shielded, 5x8x2.5mm
2x 5mm OD x 60mm L stainless round shaft
2x GT2 timing belt, 180mm circumference, 6mm width
2x 40T GT2 timing pulley, 5mm ID bore, 6mm width
2x 40T GT2 timing pulley, 6mm ID bore, 6mm width (I bought four of the 5mm ID pulleys and reamed two to 6mm)
6x M3 x 20mm bolt
6x M3 nuts
6x M3 flat washers
2x M3 x 8mm wood or self-tapping sheet metal screws (6x if the jack panel didn't include screws)
M5 washers (optional, for spacing timing pulleys for belt alignment)
1x M6 x 20mm bolt
1x M6 x 45mm bolt
2x M6 hex nuts
References
"Retrofitting Autostar GOTO control to the Vixen SP and GP style GEM mounts using Meade DS-Series motors", v1.2 2/14/2003https://www.cloudynights.com/ubbthreads/attachments/677648-Retrofit_v1.2.pdf
"Adding Autostar GOTO functionality to your existing telescope", Christopher Ericksonhttp://data-plumber.com/autostarupgrade.htm
Vixen SP, SP-DX, GP-E, GP-DX
Celestron CG-5
Synta EQ-4, EQ-5
Skywatcher EQ-4, EQ-5
Orion SkyView Pro
Jinghua HD (Apogee Inc.)
Or make your own brackets for your mount to fit the motor adapter and ring.
Installation on a Vixen GP
Remove the lock ring and threaded collar from both DS motors. Thread on the 3D-printed motor ring until nearly fully seated on the motor threads.
Note the orientation of the ring with the 3D-printed mounting bracket and where the M3 nuts will need to go. Turn the ring as needed until the holes of the ring and bracket line up properly. Make note the holes on the ring where the M3 nuts need to be pressed in.
Remove the ring, press in the three M3 nuts, and reinstall the ring in the proper orientation again.
Press a MF85ZZ bearing into the recess inside each motor. Finger pressure should be enough to seat both bearings.
Press a 635ZZ bearing into each end of the 3D-printed nose piece adapter.
Cut a small flat into the 5mm shaft for the set screw of the 22T gear to prevent the gear from rotating on the shaft when locked. I allowed 4mm of the shaft to protrude from the bottom of the gear to fit in the MF85ZZ bearing in the motor.
Install the 22T gear on the shaft lining up the set screw with the flat. If the underside of the gear is hollow, 3D-print the gear spacer and press it into the gear. This prevents the MF85ZZ bearing from unseating from the motor housing during operation.
Slide the longer end of the shaft through the nose piece and attach the 40T 5mm ID pulley. Check for free rotation and excessive play.
Apply grease to the 22T gear and carefully slide the nose piece into the motor. Note the alignment nubs on the nose that mate with the notches on the motor. Rotate the pulley/gear as needed to align the gear teeth with the nylon gear in the motor as you slide the assembly into the motor.
Fasten the motor assembly to the 3D-printed mounting bracket using three M3 screws and washers. Press an M6 nut into the base of the bracket.
Repeat for the other DS motor. At this point, you might want to connect both motors, power supply, and the Autostar controller to the jack panel, power the system on, and test for proper operation.
Install the 40T 6mm ID pulleys on both worm screws of the mount. Do not tighten fully yet.
Carefully install the belt simultaneously as you position the bracket for installation. Once the bracket is positioned properly, insert an M6 bolt through the corresponding opening in the mount and tighten to secure the bracket.
Verify the belt alignment and tighten set screws on the mount pulleys. If the belt alignment cannot be corrected by adjusting the mount-side pulley, you can also shim M5 washers between the motor-side pulley and outboard 635ZZ bearing. Note that you will have to remove the motor from the bracket to access the pulley set screws.
Install the 3D-printed jack panel housing on the RA motor bracket using the two M3 wood screws. Install the jack panel with the 4 screws provided with the panel, or use 4 more wood screws like the ones you used to mount the housing.
Connect the motors and Autostar hand controllers to the jack panel, connect the power supply, and verify proper operation. Note positions where the motor might hit the other motor, mount, jack panel cables, or where the telescope might hit either motor or jack panel.
Notable Autostar configuration parameters
Telescope - 4504/114EQ if FW patched, otherwise DS-127
Alt/Dec Ratio = -03.28533 (1:144 worm ratio)
Az/RA Ratio = +03.28533 (1:144 worm ratio)
Alt/Dec Percent = 75%
Az/RA Percent = 75%
Parts list
2x Meade DS motors (492 or 493)
1x Meade Computer Control jack panel
1x Autostar hand controller (495 or 497) + coil cable
1x 5.5x2.5mm 12VDC power supply, center-positive, 1.5A minimum (preferably with a right-angle DC connector)
1x Meade 505 RS-232 serial interface (optional, RJ11 on handset end, DB9 or USB on computer end)
2x 22T pinion gear, mod1, 5mm ID bore (used for RC cars)
4x 635ZZ ball bearing, double shielded, 5x19x6mm
2x MF85ZZ ball bearing, flanged, double shielded, 5x8x2.5mm
2x 5mm OD x 60mm L stainless round shaft
2x GT2 timing belt, 180mm circumference, 6mm width
2x 40T GT2 timing pulley, 5mm ID bore, 6mm width
2x 40T GT2 timing pulley, 6mm ID bore, 6mm width (I bought four of the 5mm ID pulleys and reamed two to 6mm)
6x M3 x 20mm bolt
6x M3 nuts
6x M3 flat washers
2x M3 x 8mm wood or self-tapping sheet metal screws (6x if the jack panel didn't include screws)
M5 washers (optional, for spacing timing pulleys for belt alignment)
1x M6 x 20mm bolt
1x M6 x 45mm bolt
2x M6 hex nuts
References
"Retrofitting Autostar GOTO control to the Vixen SP and GP style GEM mounts using Meade DS-Series motors", v1.2 2/14/2003https://www.cloudynights.com/ubbthreads/attachments/677648-Retrofit_v1.2.pdf
"Adding Autostar GOTO functionality to your existing telescope", Christopher Ericksonhttp://data-plumber.com/autostarupgrade.htm
Similar models
thingiverse
free

Flex / Solid Connector 5/6mm by kubik88
... motor shaft)
motor with 5mm shaft
another 6mm shaft
m3x15 screws (2x)
m3 washers (4x)
m3 safety nuts (2x)
m3x12 set screw (worm)
thingiverse
free

NEMA17 Universal Belted 2:1 Reduction Drive by mildw4ve
...rews
2x m3x25 socket hex screws
4x m3x25 or longer socket hex screws for mounting the top plate and anything that might be on it.
thingiverse
free

Camera Pan/Tilt Head by suromark
...gs
30mm x 5mm ø steel shaft
55mm x 8mm ø steel shaft
keystone network wiring module
m8 screw 60-100mm
m4 screws
m3 screws
washers
thingiverse
free

UM reduced extruder for 3.0mm filament by EazyBreezy
... bearing 3x10x4
2x - 625 bearings 5x16x5
5x - m3 nuts
5x - m3x30 screws
1x - m3x12 screw
1x - little spring to the clamp filament
thingiverse
free

Nema 17 motor mount bracket P3Steel by jusebago
...thingiverse
nema 17 motor mount bracket for bowden extruder p3steel
3x m3 nuts.
2x m3 12mm screws..
1x m3 15mm screw, or longer.
thingiverse
free

backlash free gearbox for nema 17 stepper motor by hamid8Sadra
...(or cnc) for 2mm iron bracket (or plexiglass)
video in youtube channel "learn,make,forget"https://youtu.be/mpu_jl-h0qi
thingiverse
free
VEE CORE XY by maxdesign1990
...h - 300mm 2x
linear shaft
12mm dia shaft length - 400mm 2x
linear bearing
linear bearing 12mm lm12uu 4x
thingiverse
free
Nema 17 belted reduction gear by D14
...earance for bolt and bearing to sit tighter. so, you need to adjust them.
links:
gt2-80t http://www.thingiverse.com/thing:1812138
thingiverse
free
Rackprint Bowden Extruder by Alex_RP
...x m3 screw ~20mm and nuts
2x m3 screw 15mm
bearing 608zz
mk8 drive gear
2x spring ~20mm with ~3mm inner diameter
thingiverse
free
Mini Kossel 1.75mm extruder by wallie
...et head cap screw
2x spring
1x m5 pneumatic straight threaded-to-tube adapter, push in 4 mm 4mm male
tools
m5 manual screw tap
Wt808
thingiverse
free

Li'l Crenellated Pumpkin Puncher by wt808
...li'l crenellated pumpkin puncher by wt808
thingiverse
scale up or down to fit snugly, ie. on 7/16" - 1/2" od
thingiverse
free

Dust Cap, Crosman 22xx PowerMax-HiPAC Fill Nipple Cover by wt808
...rse
dust cap for the integral 8mm foster fill nipple of a powermax-hipac pcp conversion kit for crosman 22xx pistols and rifles.
thingiverse
free

Single Shot Tray, Benjamin Marauder .22 Rifle by wt808
....
i modified these trays to fit tighter than the original. sand the back and bottom sides as needed to get the fit that you want.
thingiverse
free

Dust Cover/Cap, Battery Charger SAE Connector by wt808
...out of connectors that are exposed to the elements. lanyard loop for keeping the cover tethered to the cord or for wall mounting.
thingiverse
free

Single Shot Tray, Benjamin Marauder .22 Pistol by wt808
....
i modified these trays to fit tighter than the original. sand the back and bottom sides as needed to get the fit that you want.
thingiverse
free

Single Shot Tray, Benjamin Marauder .25 Rifle by wt808
....
i modified these trays to fit tighter than the original. sand the back and bottom sides as needed to get the fit that you want.
thingiverse
free

Single Shot Tray, Benjamin Marauder .177 Rifle by wt808
....
i modified these trays to fit tighter than the original. sand the back and bottom sides as needed to get the fit that you want.
thingiverse
free

Single Shot Tray, Benjamin Marauder .30 Rifle by wt808
....
i modified these trays to fit tighter than the original. sand the back and bottom sides as needed to get the fit that you want.
thingiverse
free

Single Shot Tray, Benjamin Marauder .357 Rifle by wt808
....
i modified these trays to fit tighter than the original. sand the back and bottom sides as needed to get the fit that you want.
thingiverse
free

Single Shot Tray, Benjamin Marauder .177 Pistol by wt808
....
i modified these trays to fit tighter than the original. sand the back and bottom sides as needed to get the fit that you want.
Vixen
turbosquid
$100

De Haviland Sea Vixen FAW2
... available on turbo squid, the world's leading provider of digital 3d models for visualization, films, television, and games.
turbosquid
$100

De Haviland Sea Vixen FAW2
... available on turbo squid, the world's leading provider of digital 3d models for visualization, films, television, and games.
cg_studio
$22

telescope3d model
...universe astrologie tripod observatory lunette glass optic astro monocular vixen magnify magnifier spy space zoom .max .mb .fbx .c4d...
thingiverse
free

Vixen by speedtwin69
...vixen by speedtwin69
thingiverse
vixen
3d_sky
$8

Vixen Chandelier
...vixen chandelier
3dsky
vixen chandelier
thingiverse
free

Vixen to mini vixen clamp by Rob94
...vixen to mini vixen clamp by rob94
thingiverse
thingiverse
free

Vixen Dovetail by icimdengelen
...vixen dovetail by icimdengelen
thingiverse
vixen dovetail
thingiverse
free

Vixen Kit by eeprof
...vixen kit by eeprof
thingiverse
vixen kit
thingiverse
free

Vixen 2 mini vixen guiding scope by frondot
...se it with canon l 70-200 f/2,8 is and other lens and svbony vixen, svbony 30x120 mini vixen guiding scope and a asi120mm camera.
thingiverse
free

Arca To Vixen/Synta Finder by Jimmyjamjoejoe
...arca to vixen/synta finder by jimmyjamjoejoe
thingiverse
for attaching a vixen/synta style finder to a tripod head.
Meade
3ddd
$1

Телескоп Meade LX 200
...аботка материалов в 2014 г.
габариты: 845 х 2400 мм
аналогhttp://www.telescopeplanet.co.uk/meade-lx200-acf-gps/20168
turbosquid
free

Syd Mead Entertainment center Home
...yd mead entertainment center home for download as max and 3ds on turbosquid: 3d models for games, architecture, videos. (1523167)
3ddd
$1
Axel Occasional Table Belle Meade
...ble belle meade
•dimensions: 24d 22h
•features: acrylic base with satin brass hub
•starphire glass top with flat polished edge
3d_export
$200

Telescope 3D Model
...model 3dexport telescope telescop scop scope lunette glass astronomy meade space star stars galaxy observatory zoom optic detail detailed...
3d_export
$7

brooklyn museum
...tain its building and collection, only to be revitalized in the late 20th century, thanks to major renovations. source: wikipedia
unrealengine
$35

Mead Hall UE5
...mead hall ue5
unreal engine marketplace
mead hall. 44 unique assets + interior
thingiverse
free
Meade Eyepiece Cover by lanemaxwell
...meade eyepiece cover by lanemaxwell
thingiverse
eyepiece dust cap for meade etx telescopes
3dcadbrowser
free

MEADS
...e system.this 3d object can be downloaded in .max, .obj, .3ds, .fbx, .dxf, .lwo, .stl, .wrl, .ma, .dae, .x and .asc file formats.
thingiverse
free
Meade Spotting Scope Mount by RobertCL
...potting scope on the side of the meade etx125 scope body rather than using the standard mount point that tends to get in the way.
sketchfab
$10

Ornate Medieval Mead Tankard
...
polygons 3,602
vertices 3,600
textures png 4k - ornate medieval mead tankard - buy royalty free 3d model by getdeadentertainment
Goto
3ddd
free

Tod von mertens
...mertens , тумба , лампа bed king size:http://todvon.com/?goto=view§ion;=portfolio&portfolio;=110&cat;=22 night stand:http://todvon.com/?gotoview§ion;=portfolio&portfolio;=108&cat;=17 ...
thingiverse
free

Goto by alberton
...a body in the form of a drop (gota=goto).goto is a bioindicator for water and environment purity. it can be printed in any color.
thingiverse
free

Case for my Rduinoscope goto system by Slim65
...to system by dessislav http://rduinoscope.byethost24.com/index.html
there is still some hole missing for the stepper motor cables
thingiverse
free

The Micro Scope | A Miniture GOTO Telescope. by GregoryHolloway
...tes.
21/03/2021 - added filament weights to the bom and released the universal tripod fixture. details on the instructables page.
thingiverse
free

Sky-Watcher 200P 8" Dobsonian GoTo using OnStep by xlnzee
...odded to fit the 200p dob. the rest of the required files are found on his thingy here: https://www.thingiverse.com/thing:3942813
thingiverse
free

Remix of OpenAstroTracker - DSLR tracking & GoTo mount MEGA CASE Lid With GPS by Shadowolf13
...t you want it tight.
thanks
remix of openastrotracker - dslr tracking & goto mount https://www.thingiverse.com/thing:4472727
thingiverse
free

EQ5 GoTo Nema17 Motor Bracket Set for RJ45 Connector by oddvarness
... as part of rebuilding my old manual sky-watcher eq5 mount to a onstep goto system: https://onstep.groups.io/g/main/message/33535
thingiverse
free

Belt hanger for Kore Trakline, GoTo track belts
...n, but hey, i like mine better and it's much cheaper. also holds belts better and is attached to a regular shirt wood hanger.
thingiverse
free

EQ telescope mount II. for OnStep goto controller by RomanHujer
...d tripod upgrade for telescope with eyepiece plate
my onstep for seben eq3 mount
note:
use stones and cement to fill the weights.
thingiverse
free

Orion XT10 Plus GoTo using OnStep
...s and nuts.
the electronics enclosure is designed for the mks gen l board, a wemos d1 mini wifi board, and a 40x40x20 blower fan.
Ds
3ddd
$1

DS-277
...ds-277
3ddd
desede
ds-277
3ddd
$1

DS-47_Sofas
...ds-47_sofas
3ddd
desede
ds-47_sofas
3ddd
$1

DS-3_Sofas
...ds-3_sofas
3ddd
desede
ds-3_sofas from desede
design_connected
$27

DS-152
...ds-152
designconnected
de sede ds-152 computer generated 3d model.
design_connected
$9

DS 9045
...ds 9045
designconnected
de sede ds 9045 computer generated 3d model. designed by bestenheider, philippe.
design_connected
$16

DS 315
...ds 315
designconnected
de sede ds 315 armchairs computer generated 3d model. designed by philippe bestenheider.
design_connected
$20

DS 166
...ds 166
designconnected
de sede ds 166 armchairs computer generated 3d model. designed by hugo de ruiter.
design_connected
$18

DS-9090
...ds-9090
designconnected
de sede ds-9090 computer generated 3d model. designed by de sede design-team.
3ddd
$1

DS-278-chair
...ds-278-chair
3ddd
desede
ds-278-chair
design_connected
$20

DS-220
...ds-220
designconnected
de sede ds 220 armchairs computer generated 3d model. designed by de sede design-team.
Gp
3ddd
free
Подавитель GPS
...подавитель gps
3ddd
подавитель gps
3ddd
free

Подавитель GPS
...подавитель gps
3ddd
подавитель gps
3ddd
free

Cтол GP
...cтол gp
3ddd
обеденный , giorgio piotto
cтол gp
turbosquid
$5

GPS navigation
...e 3d model gps navigation for download as blend, fbx, and obj on turbosquid: 3d models for games, architecture, videos. (1636695)
turbosquid
$4
GP-5
...lty free 3d model gp-5 for download as 3ds, max, obj, and fbx on turbosquid: 3d models for games, architecture, videos. (1160699)
turbosquid
$60
TomTom GPS
... available on turbo squid, the world's leading provider of digital 3d models for visualization, films, television, and games.
turbosquid
free

GPS/TV
... available on turbo squid, the world's leading provider of digital 3d models for visualization, films, television, and games.
3d_export
$5

Battery GP 3D Model
...battery gp 3d model
3dexport
battery gp
battery gp 3d model wasiliy 40319 3dexport
3d_export
$5

gas mask gp-5
...gas mask gp-5
3dexport
gas mask gp-5
cg_studio
$36

Gps device3d model
...ice3d model
cgstudio
.3ds .c4d .dxf .obj - gps device 3d model, royalty free license available, instant download after purchase.
Conversion
3ddd
$1

Conversation Seat
...шетка
the conversation seat made in englandhttp://www.squintlimited.com/products/the_conversation_seat/gold
+ max 2011
3d_export
$10

Converse 3D Model
...converse 3d model
3dexport
converse shoe pc unix mac
converse 3d model electropainter17075 38067 3dexport
turbosquid
$100

converse-shoe
...quid
royalty free 3d model converse-shoe for download as c4d on turbosquid: 3d models for games, architecture, videos. (1398427)
turbosquid
$10

Conversation Furniture
... available on turbo squid, the world's leading provider of digital 3d models for visualization, films, television, and games.
turbosquid
$7

Converse Allstars
... available on turbo squid, the world's leading provider of digital 3d models for visualization, films, television, and games.
design_connected
$16

Conversation Club Chair
...conversation club chair
designconnected
donghia conversation club chair chairs computer generated 3d model. designed by n/a.
design_connected
$27

Hemicycle Conversation Chair
...rsation chair
designconnected
ligne roset hemicycle conversation chair computer generated 3d model. designed by nigro, philippe.
3d_export
$24

Converse keds 3D Model
...converse keds 3d model
3dexport
converse all star ked shoe clothes sports
converse keds 3d model vermi1ion 26201 3dexport
3ddd
$1

Converse All-Star Shoes
...converse all-star shoes
3ddd
кеды , обувь
converse all-star shoes
design_connected
$18

CONVERSE Jack Purcell Sneakers
...converse jack purcell sneakers
designconnected
converse jack purcell sneakers computer generated 3d model.
Motors
archibase_planet
free

Motor
...base planet
motor motor engine engine electric motor
motor wagner n250213 - 3d model (*.gsm+*.3ds) for interior 3d visualization.
archibase_planet
free

Motor
...motor
archibase planet
motor motor engine engine
motor n151112 - 3d model (*.gsm+*.3ds) for interior 3d visualization.
archibase_planet
free

Motor
...motor
archibase planet
motor motor engine engine
motor n150615 - 3d model (*.gsm+*.3ds+*.max) for interior 3d visualization.
turbosquid
$15

Motor
...otor
turbosquid
royalty free 3d model motor for download as on turbosquid: 3d models for games, architecture, videos. (1639404)
3d_ocean
$5

Electric motor
...electric motor
3docean
car electric engine industry motor phase train vehicle
an electric motor enjoy!
3d_ocean
$18

Electric Motor
...electric motor
3docean
electric motor engine machine mover parts
3d model electric motor for hoist crane
turbosquid
$29

Motor
... available on turbo squid, the world's leading provider of digital 3d models for visualization, films, television, and games.
turbosquid
$5

Motor
... available on turbo squid, the world's leading provider of digital 3d models for visualization, films, television, and games.
3d_export
$5

electric motor
...electric motor
3dexport
electric motor use for industrial purposes
3d_export
$5

servo motor
...tor
3dexport
it's a simple part of servo motor 0.75kw for used in machines assembly to show specified motor in own project.
Using
3ddd
$1

US flag
...us flag
3ddd
флаг
us flag
3d_export
free

Among us
...among us
3dexport
among us red
3d_export
free

Among Us
...among us
3dexport
this 3d-model of a character from the game "among us". it can be used as a toy or decoration.
3d_export
$6

among us
...among us
3dexport
doll from among us in red
3d_export
$5

amoung us
...amoung us
3dexport
amoung us character. was created by cinema 4d 19
3d_export
$5
Humvee us
...humvee us
3dexport
humvee us 3d model good quality for animation
3d_export
$15

among us
...among us
3dexport
turbosmooth modifier can be used to increase mesh resolution if necessary
3d_export
$25

mailbox us
...mailbox us
3dexport
low poly model mailbox us. modeling in the blender, texturing in substance painter
design_connected
$13
Use Me
...use me
designconnected
sitland use me computer generated 3d model. designed by paolo scagnellato.
3d_export
$5

Among Us
...rt
the among us model comes in a variety of colors that can be customized by anyone, and even works with little in the animation