Thingiverse

Velleman K8200 MKS Base Conversion by Middleman
by Thingiverse
Last crawled date: 3 years ago
This is a guide on how to add and convert the Velleman K8200 printer to using the MKS Base CPU board.
What you'll need:
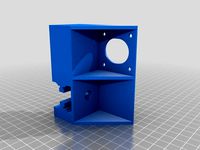
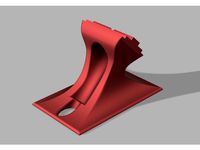
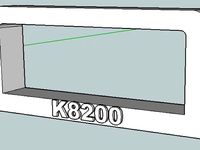
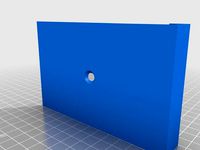
1 x printed MKS Base mount (from above file)
6 x M2x16 screws & nuts
1 x MKS Base board (preferably v1.4 or v1.5)
1 x RepRap Discount Smart Controller (optional)
1 x MKS Base TFT (optional)
1 x 12V/24V fan (optional)
2 x XH2.54 2 pin female headers with cables (red and black)
3 x XH2.54 3 pin female headers with cables (red, black, yellow)
5 x XH2.54 4 pin female headers with cables (white, yellow, black, red)
Thin cables for wiring extensions
Heat shrink sleeves
Soldering iron
Solder
Cable ties
Arduino software for adjusting Marlin settings
Instructions:
1) Remove and desolder all existing header cables from old Velleman board, marking each cable is for which function. ie. X, Y, Z, E1, Fan, Zmin, Ymin, Xmin, Heater etc.
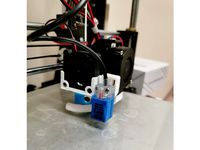
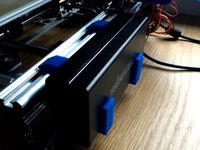
2) Attach MKS Base to mount and attach to printer.
3) Cable soldering, use 2 pin headers for thermal, 3 pin headers for end stops and 4 pin headers for the motors and extruder.
Motors and extruders -
To 4 pin header:
Green > White (1A)
Blue > Yellow (1B)
Yellow > Black (2A)
Orange > Red (2B)
For X motor:
Red > White (1A)
Blue > Yellow (2A)
Green > Black (2A)
Black > Red (2B)
X > X motor
Y > Y motor
Z > Z motor
Extruder > E0 motor
End stops -
To 3 pin header:
Red on new header - CUT OFF
Red > Black - GND (middle)
Brown > Yellow - D pin
X header to X Min
Y header to Y Min
Z header to Z Min
Thermal sensors -
To 2 pin header
Red > Red
Brown > Black
(You may have to extend these cables with extra wiring)
Extruder header to A13
Bed header to A14
Fans:
Red to +
Black to -
To add optional 12v/24V extruder heatsink fan, wire it to
XS1 power socket with incoming power cables.
Heaters:
(these are the multi-twisted cables)
(bottom) Bed to Heater bed terminals
(top) Extruder to E0 terminals
Power:
Power supply to XS1
Red to +
Black to -
For RepRap Discount Smart Controller (optional)
EXP1 to EXP1
EXP2 to EXP2
For MKS Base TFT (optional)
LCD cable AUX to AUX
4) Update configuration.h in firmware:
change #define MOTHERBOARD 78 to #define MOTHERBOARD 33
For RepRap Discount Smart Controller:
edit line 306 to:
define REPRAP_DISCOUNT_SMART_CONTROLLER
5) Save and upload new firmware changes
What you'll need:
1 x printed MKS Base mount (from above file)
6 x M2x16 screws & nuts
1 x MKS Base board (preferably v1.4 or v1.5)
1 x RepRap Discount Smart Controller (optional)
1 x MKS Base TFT (optional)
1 x 12V/24V fan (optional)
2 x XH2.54 2 pin female headers with cables (red and black)
3 x XH2.54 3 pin female headers with cables (red, black, yellow)
5 x XH2.54 4 pin female headers with cables (white, yellow, black, red)
Thin cables for wiring extensions
Heat shrink sleeves
Soldering iron
Solder
Cable ties
Arduino software for adjusting Marlin settings
Instructions:
1) Remove and desolder all existing header cables from old Velleman board, marking each cable is for which function. ie. X, Y, Z, E1, Fan, Zmin, Ymin, Xmin, Heater etc.
2) Attach MKS Base to mount and attach to printer.
3) Cable soldering, use 2 pin headers for thermal, 3 pin headers for end stops and 4 pin headers for the motors and extruder.
Motors and extruders -
To 4 pin header:
Green > White (1A)
Blue > Yellow (1B)
Yellow > Black (2A)
Orange > Red (2B)
For X motor:
Red > White (1A)
Blue > Yellow (2A)
Green > Black (2A)
Black > Red (2B)
X > X motor
Y > Y motor
Z > Z motor
Extruder > E0 motor
End stops -
To 3 pin header:
Red on new header - CUT OFF
Red > Black - GND (middle)
Brown > Yellow - D pin
X header to X Min
Y header to Y Min
Z header to Z Min
Thermal sensors -
To 2 pin header
Red > Red
Brown > Black
(You may have to extend these cables with extra wiring)
Extruder header to A13
Bed header to A14
Fans:
Red to +
Black to -
To add optional 12v/24V extruder heatsink fan, wire it to
XS1 power socket with incoming power cables.
Heaters:
(these are the multi-twisted cables)
(bottom) Bed to Heater bed terminals
(top) Extruder to E0 terminals
Power:
Power supply to XS1
Red to +
Black to -
For RepRap Discount Smart Controller (optional)
EXP1 to EXP1
EXP2 to EXP2
For MKS Base TFT (optional)
LCD cable AUX to AUX
4) Update configuration.h in firmware:
change #define MOTHERBOARD 78 to #define MOTHERBOARD 33
For RepRap Discount Smart Controller:
edit line 306 to:
define REPRAP_DISCOUNT_SMART_CONTROLLER
5) Save and upload new firmware changes
Similar models
thingiverse
free

Titan Aero Extruder Mount for CR-10/Ender 3
...an find the pcb here:https://www.pcbway.com/project/shareproject/toolhead_pcb.html
please consider donating... so i buy filament.
thingiverse
free

Toolhead PCB by RaptorHunter
...ge
20pin molex microfit or any connector a 3mm pitch for the main cable.
please consider donating a pizza or a spool of filament.
thingiverse
free
![[Ender_3] Control box by i-alem](/t/8060279.jpg)
[Ender_3] Control box by i-alem
...60mm fan)
4 x din965 m2.5 x 5 (raspberry)
2 x din934 m4 (ender 3 lcd mount)
nuts:
60x din934 m3
2 x din934 m4 (ender 3 lcd mount)
thingiverse
free
Anet A8 extruder fan and PL08N holder by egusa999
...ions in the firmware marlin2.0:
//nozzle-to-probe offsets { x, y, z }
#define nozzle_to_probe_offset { -30, -40, (your setting) }
thingiverse
free

Extruder Controller v2.2 by MakerBot
...or simple, easy programming.
* it mounts directly to the pinch wheel extruder!
* it is plug and play with the reprap motherboard.
thingiverse
free

Extruder Controller v2.1 by MakerBot
...or simple, easy programming.
* it mounts directly to the pinch wheel extruder!
* it is plug and play with the reprap motherboard.
thingiverse
free

center nozzle fan for reprap with header MK8 by eldino_maker
...center nozzle fan for reprap with header mk8 by eldino_maker
thingiverse
center nozzle fan for reprap with header mk8
thingiverse
free

Anet A8 Z-axis cable chain by oh5gzr
...temperature sensor
extruder stepper motor cooling fan
extruder nozzle cooling fan
prepare yourself for some serious soldering! :)
thingiverse
free

Renoir's RepRap Arduino Mega Shield by renoir
.... if you are running any further circuits, use a separate power supply! (all reprap boards have separate 12v psu headers anyway).
thingiverse
free

Customizable Extruder Cooling Fan by kijja
...n (x / y / z) .
print test the exact location of bolt hole. no need to print out all.
if this design is useful, please click ♥ .
Middleman
thingiverse
free

MKS Sbase & K40 Keller Middleman Board by simpc
...er middleman board by simpc
thingiverse
rahmen zur befestigung des mks sbase & dem middleman board innerhalb des k40 lasers.
thingiverse
free

Gotek Floppy Drive Emulator by Middleman
...by middleman
thingiverse
this is a model of the gotek floppy disk emulator i designed which can be used for sizing, display etc.
thingiverse
free

Guitar Pedal Input Enclosure - Middleman
...n plugs
plugs are connected to pedals
when you are done, remove the 6 plugs and you're pack up. simple and convenient.
enjoy!
thingiverse
free

Rapide Extruder Fan Duct by Middleman
...extruder fan duct design for the rapide series of printers. i could not find the original file so i recreated the design instead.
thingiverse
free

MK8 Extruder Holder for Prusa i3 by Middleman
...usa i3 with horizontal guides. it is compatible with the reinforced prusa x carriage from http://www.thingiverse.com/thing:18657
thingiverse
free

Reach3D 2040 Short Support Bracket Feet by Middleman
...giverse
this is a support bracket feet for the reach3d printer. print off two of these (or more) for a stable printing platform.
thingiverse
free

40MM Fan To Radial Fan Duct Converter by Middleman
...iverse
this is a 40mm to radial fan duct converter i have designed. it can be used with any 40mm fan with standard mount points.
thingiverse
free

SD Card Locking Tab by Middleman
...card which prevents them from being written to. i would suggest using your finest setting (0.1 or 0.2mm nozzle size) to print it.
thingiverse
free
Velleman K8200 MK8 Titan Mount by Middleman
...ou to use a mk8 or e3d titan extruder.
to attach the mount you will need 2 x m5 bolts with m2 large washers and 2 m5 square nuts.
thingiverse
free

Migbot Electron Prusa i3 20A 12V Power Supply Cover by Middleman
... by middleman
thingiverse
this is a remix of phil maddox's power supply cover with switch for the migbot electron prusa i3.
Velleman
thingiverse
free

testing velleman K8200 by treblasnirp
...testing velleman k8200 by treblasnirp
thingiverse
velleman k8200 with abs settings in cura.
thingiverse
free

Velleman solder station by forrozza
...velleman solder station by forrozza
thingiverse
velleman solder station for the gasiron2 but would fit most butane solder irons.
thingiverse
free

Fan Tool K8400 Velleman by dergringo
...fan tool k8400 velleman by dergringo
thingiverse
fan tool velleman k8400
thingiverse
free
Velleman K8055 Box by Cerberus
...berus
thingiverse
a laser cut enclosure for the velleman k8055 relay project board. might fit the k8055n but this is not tested.
thingiverse
free

Velleman Dice Kit Box by Sadesign
...velleman dice kit box by sadesign
thingiverse
box for velleman mk150 electronic dice kit
thingiverse
free

Mini pc holder Velleman k8200 by treblasnirp
...c holder velleman k8200 by treblasnirp
thingiverse
mini pc holder velleman k8200
thx k8200 flat frame clip velleman 3d printer
thingiverse
free

Velleman K8200 Frame Piece by TheMatt2582
...velleman k8200 frame piece by thematt2582
thingiverse
this is a frame part for a velleman k8200.
it's 15cm or 5.91inch long.
thingiverse
free

Velleman robot arm KSR10 gear by spore29
...ot arm ksr10 gear by spore29
thingiverse
gear for velleman ksr10 robot arm kit.
engrenage pour le kit bras robot velleman ksr10
thingiverse
free
Velleman Metal Detector Enclosure by CodeCreations
...enclosure by codecreations
thingiverse
project enclosure for the velleman metal detector kit, commonly available at radio shack.
thingiverse
free
PSU bracket holder for Velleman K8200 by dan241297
...psu bracket holder for velleman k8200 by dan241297
thingiverse
brackets to hols the psu for the velleman k8200
K8200
thingiverse
free
K8200 Mount
...k8200 mount
thingiverse
universal mounting bracket for velleman k8200 printers.
thingiverse
free

K8200 HANDLE by Zalex60
...k8200 handle by zalex60
thingiverse
handle for k8200 printer
thingiverse
free

k8200 belt tension by wreckless19
...k8200 belt tension by wreckless19
thingiverse
needed for k8200
thingiverse
free
k8200 handle by ralfselfjord
...k8200 handle by ralfselfjord
thingiverse
handle for carrying your k8200. to be mounted on the top rail with 2 bolts.
thingiverse
free
Support tablette K8200 by Zalex60
...support tablette k8200 by zalex60
thingiverse
support pour k8200
thingiverse
free

K8200 Pencil Holder by wallie
...k8200 pencil holder by wallie
thingiverse
k8200 pencil holder
thingiverse
free

vm8201 fixation k8200 by domeniconixavier
...vm8201 fixation k8200 by domeniconixavier
thingiverse
kit for printer screenshot 3d k8200
thingiverse
free
testing velleman K8200 by treblasnirp
...testing velleman k8200 by treblasnirp
thingiverse
velleman k8200 with abs settings in cura.
thingiverse
free

Fan Mount K8200 by telegnom
...fan mount k8200 by telegnom
thingiverse
additional fan mount for the k8200 3d-printer.
thingiverse
free
K8200 LCD-Panel by sharandac
...k8200 lcd-panel by sharandac
thingiverse
lcd-panel with sd-card support for the k8200.
Mks
3d_export
$5

scorpion mk
...scorpion mk
3dexport
scorpion mk .zpr,stl,obj,stl,
turbosquid
$6

MK 11
...turbosquid
royalty free 3d model mk 11 for download as blend on turbosquid: 3d models for games, architecture, videos. (1223895)
3d_export
$5

Qubeley MK-II
...qubeley mk-ii
3dexport
3d lowpoly type qubeley mk-ii
turbosquid
$3

MK killer
...lty free 3d model mk killer for download as fbx, obj, and 3ds on turbosquid: 3d models for games, architecture, videos. (1638698)
turbosquid
$25

Valentine Mk
... available on turbo squid, the world's leading provider of digital 3d models for visualization, films, television, and games.
turbosquid
$10

Mk-16
... available on turbo squid, the world's leading provider of digital 3d models for visualization, films, television, and games.
turbosquid
$7

Mk-16
... available on turbo squid, the world's leading provider of digital 3d models for visualization, films, television, and games.
turbosquid
free

mk-2
... available on turbo squid, the world's leading provider of digital 3d models for visualization, films, television, and games.
3d_export
$25

Merkava MK 1 3D Model
... 1 3d model
3dexport
merkava mk-1 tank low-poly model maya mk1 mk mk-2 mk-3 israel army
merkava mk 1 3d model rom64 5311 3dexport
3ddd
$1
мясорубка Panasonic MK G1800P
...мясорубка panasonic mk g1800p
3ddd
мясорубка , panasonic
мясорубка panasonic mk g1800p
Conversion
3ddd
$1

Conversation Seat
...шетка
the conversation seat made in englandhttp://www.squintlimited.com/products/the_conversation_seat/gold
+ max 2011
3d_export
$10

Converse 3D Model
...converse 3d model
3dexport
converse shoe pc unix mac
converse 3d model electropainter17075 38067 3dexport
turbosquid
$100

converse-shoe
...quid
royalty free 3d model converse-shoe for download as c4d on turbosquid: 3d models for games, architecture, videos. (1398427)
turbosquid
$10

Conversation Furniture
... available on turbo squid, the world's leading provider of digital 3d models for visualization, films, television, and games.
turbosquid
$7

Converse Allstars
... available on turbo squid, the world's leading provider of digital 3d models for visualization, films, television, and games.
design_connected
$16

Conversation Club Chair
...conversation club chair
designconnected
donghia conversation club chair chairs computer generated 3d model. designed by n/a.
design_connected
$27

Hemicycle Conversation Chair
...rsation chair
designconnected
ligne roset hemicycle conversation chair computer generated 3d model. designed by nigro, philippe.
3d_export
$24

Converse keds 3D Model
...converse keds 3d model
3dexport
converse all star ked shoe clothes sports
converse keds 3d model vermi1ion 26201 3dexport
3ddd
$1

Converse All-Star Shoes
...converse all-star shoes
3ddd
кеды , обувь
converse all-star shoes
design_connected
$18

CONVERSE Jack Purcell Sneakers
...converse jack purcell sneakers
designconnected
converse jack purcell sneakers computer generated 3d model.
Base
archibase_planet
free
Base
...base
archibase planet
base column column base
base 1 - 3d model (*.gsm+*.3ds) for interior 3d visualization.
archibase_planet
free

Base
...base
archibase planet
base column base column
base 5 - 3d model (*.gsm+*.3ds) for interior 3d visualization.
archibase_planet
free
Base
...base
archibase planet
base column column base
base 7 - 3d model (*.gsm+*.3ds) for interior 3d visualization.
archibase_planet
free
Base
...base
archibase planet
base column column base
base 2 - 3d model (*.gsm+*.3ds) for interior 3d visualization.
archibase_planet
free

Base
...base
archibase planet
base column column base
base 3 - 3d model (*.gsm+*.3ds) for interior 3d visualization.
archibase_planet
free
Base
...base
archibase planet
base column column base
base 4 - 3d model (*.gsm+*.3ds) for interior 3d visualization.
archibase_planet
free
Base
...base
archibase planet
base column base column
base 6 - 3d model (*.gsm+*.3ds) for interior 3d visualization.
archibase_planet
free

Base
...base
archibase planet
foundation base
column base ionic - 3d model (*.gsm+*.3ds) for interior 3d visualization.
archibase_planet
free
Base
...base
archibase planet
foundation base
column base tuscan - 3d model (*.gsm+*.3ds) for interior 3d visualization.
design_connected
$18

Base
...base
designconnected
tom dixon base computer generated 3d model. designed by dixon, tom.