Thingiverse
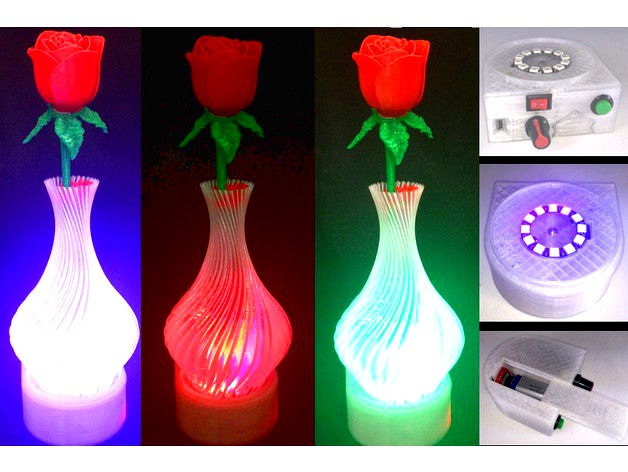
Valentine Vase Dazzler: Color LED Light Base for Valentines Vase & Flowers by vorpal
by Thingiverse
Last crawled date: 3 years ago
Perfect for that special Valentine's Day gift! (Or Mother's Day, birthdays, graduations, etc.)
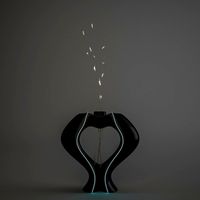
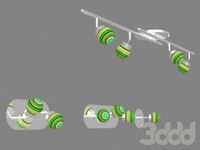
This base allows you to turn a 3D printed vase into a fabulous light show. Here's a couple of videos with examples of the light patterns:
https://youtu.be/cTFc3N4nx0w Uses: Spiral Vase by Yllonnoce and Anniversary Roses by XYZ Workshop
https://youtu.be/hQKWgm4H6uw Uses: s: Plus Vase by by BenitoSanduchi and Anniversary Roses by XYZ Workshop
Create awesome lighting effects with ease. Pick an open source vase to set on top and optionally fill the vase with 3D printed flowers if desired.
You can source your own electronic parts or buy a convenient kit from the Vorpal Robotics Store. Please consider supporting us so we can continue to publish great new open source projects.
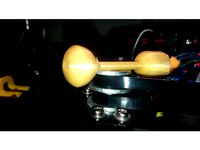
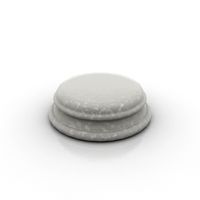
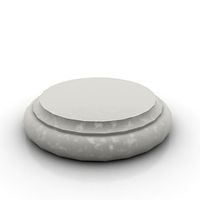
The base incorporates an Arduino Nano and some controls that allow you to select a lighting pattern and a brightness. There are 10 lighting patterns built in, including:
Fades between colors of various hues
Flashes and twirling lights
Flicker effects like a flame
Each time you press the pushbutton on the back, the Vase Dazzler cycles to the next light pattern. The potentiometer dial can be used to select brightness levels.
The Vase Dazzler runs on any kind of 9v battery or can be powered from a mini USB cord, see below for details.
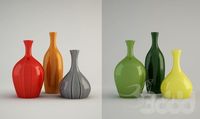
Compatible Vases
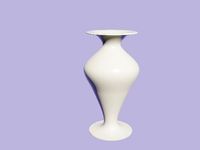
Any vase that is1.5" to 2.5" (40 to 67mm) in diameter where it touches the table top will work well with this project. If the bottom is more than about 3 inches (70mm) it will also work as long as it's not so large as to be unstable. Of course you may be able to scale the size of the vase to make it fit better. For very large vases, you could actually put the Vase Dazzler right inside the vase.
For best effect:
Use a translucent plastic. White or clear translucent plastic works best because then the colored LEDs take over the task of imparting a color.
Print with as large a layer as possible to let maximum light through.
Print with no bottom layers if possible so the light goes right into the vase. Print also of course with no top layers if you want to insert flowers or other decorations.
If your slicer has a "Spiralize" option, that will make the vase transmit more light.
Here are some vases that we've tried, but there are many, many others here on Thingiverse and other sites that should work fine:
PlusVase by BenitoSanduchi
Spiral Vase by Yllonnoce
Cyclodic Vase by scottvader
In some cases you may need to scale the vase to fit.
Power Supply
The kit includes a 9v battery clip. We suggest rechargeable batteries. A 280 mAh NIMH 9v battery will last about 5 hours on a low brightness setting and about 1 hour on maximum brightness (but maximum is overkill for most situations!)
The Arduino Nano's USB port is exposed in the back of the unit, so you may also power it by plugging in a cell-phone charger type 5V power supply with a USB A to mini cord. (NOTE: USB A to mini is not the same as a standard cell phone charging cord which is A to micro. However, A to mini cables are commonly available because they're used in some cameras and video equipment).
Electronics Needed
To help us continue to publish new open source products, please consider purchasing some or all of the parts from our store. We have individual components as well as kits that do not require soldering and have the Nano pre-flashed with the code at our Vorpal Robotics Store.
Parts list:
Arduino Nano
12 RGB LED Ring with addressable LEDs such as WS2812B or similar
10k Panel mount Potentiometer, 1/4" shaft diameter
9x13mm rectangular switch (on/off switch)
Pushbutton designed to fit in a 12mm diameter hole
9v battery clip and 9v battery (rechargeable battery recommended)
Wires, Dupont Jumpers, solder, shrink tube to insulate connections
One M3x10 screw
6 foot USB A to mini cord for powering the device and programming the Nano.
Arduino Code
The code is available on GitHub here: Vorpal Robotics Vase Dazzler
The code is pre-loaded on the Nano if you purchase the kit from the Vorpal Robotics Store
Assembly Instructions and More Information
See the Vorpal Vase Dazzler Wiki Page
This base allows you to turn a 3D printed vase into a fabulous light show. Here's a couple of videos with examples of the light patterns:
https://youtu.be/cTFc3N4nx0w Uses: Spiral Vase by Yllonnoce and Anniversary Roses by XYZ Workshop
https://youtu.be/hQKWgm4H6uw Uses: s: Plus Vase by by BenitoSanduchi and Anniversary Roses by XYZ Workshop
Create awesome lighting effects with ease. Pick an open source vase to set on top and optionally fill the vase with 3D printed flowers if desired.
You can source your own electronic parts or buy a convenient kit from the Vorpal Robotics Store. Please consider supporting us so we can continue to publish great new open source projects.
The base incorporates an Arduino Nano and some controls that allow you to select a lighting pattern and a brightness. There are 10 lighting patterns built in, including:
Fades between colors of various hues
Flashes and twirling lights
Flicker effects like a flame
Each time you press the pushbutton on the back, the Vase Dazzler cycles to the next light pattern. The potentiometer dial can be used to select brightness levels.
The Vase Dazzler runs on any kind of 9v battery or can be powered from a mini USB cord, see below for details.
Compatible Vases
Any vase that is1.5" to 2.5" (40 to 67mm) in diameter where it touches the table top will work well with this project. If the bottom is more than about 3 inches (70mm) it will also work as long as it's not so large as to be unstable. Of course you may be able to scale the size of the vase to make it fit better. For very large vases, you could actually put the Vase Dazzler right inside the vase.
For best effect:
Use a translucent plastic. White or clear translucent plastic works best because then the colored LEDs take over the task of imparting a color.
Print with as large a layer as possible to let maximum light through.
Print with no bottom layers if possible so the light goes right into the vase. Print also of course with no top layers if you want to insert flowers or other decorations.
If your slicer has a "Spiralize" option, that will make the vase transmit more light.
Here are some vases that we've tried, but there are many, many others here on Thingiverse and other sites that should work fine:
PlusVase by BenitoSanduchi
Spiral Vase by Yllonnoce
Cyclodic Vase by scottvader
In some cases you may need to scale the vase to fit.
Power Supply
The kit includes a 9v battery clip. We suggest rechargeable batteries. A 280 mAh NIMH 9v battery will last about 5 hours on a low brightness setting and about 1 hour on maximum brightness (but maximum is overkill for most situations!)
The Arduino Nano's USB port is exposed in the back of the unit, so you may also power it by plugging in a cell-phone charger type 5V power supply with a USB A to mini cord. (NOTE: USB A to mini is not the same as a standard cell phone charging cord which is A to micro. However, A to mini cables are commonly available because they're used in some cameras and video equipment).
Electronics Needed
To help us continue to publish new open source products, please consider purchasing some or all of the parts from our store. We have individual components as well as kits that do not require soldering and have the Nano pre-flashed with the code at our Vorpal Robotics Store.
Parts list:
Arduino Nano
12 RGB LED Ring with addressable LEDs such as WS2812B or similar
10k Panel mount Potentiometer, 1/4" shaft diameter
9x13mm rectangular switch (on/off switch)
Pushbutton designed to fit in a 12mm diameter hole
9v battery clip and 9v battery (rechargeable battery recommended)
Wires, Dupont Jumpers, solder, shrink tube to insulate connections
One M3x10 screw
6 foot USB A to mini cord for powering the device and programming the Nano.
Arduino Code
The code is available on GitHub here: Vorpal Robotics Vase Dazzler
The code is pre-loaded on the Nano if you purchase the kit from the Vorpal Robotics Store
Assembly Instructions and More Information
See the Vorpal Vase Dazzler Wiki Page
Similar models
thingiverse
free

Lithophane Slide-in Box by MacLakey
...me code sketches for the nano as well as wiring from the battery to the nano and nano to neopixels when i get it all figured out.
thingiverse
free

Arduino Mini Pro / Nano with 9V by azanix
...ingiverse
arduino nano or mini pro with 9v battery installed.
suitable for modified project.
version 2 stl have click fit add.
thingiverse
free

Baby bed lamp by ogaillard
... (arduino code)
mini usb lipo battery charger module
lipo battery 3.7v 300mah
slide switches on-off
ultra-bright white led
thingiverse
free

Capacitance Meter by Linp74
...reset button
dupont 4 pin female
9v battery
related code (other autor):
https://www.electronicshub.org/arduino-capacitance-meter/
thingiverse
free
Arduino Nano Addressable LED Case by MVstudios
...able leds can be powered directly and the jst sm connector can back feed power to the arduino eliminating the need for usb power.
grabcad
free

Arduino Nano with mini usb
...arduino nano with mini usb
grabcad
arduino nano with mini usb in stl
grabcad
free

Arduino case with 9v battery holder
...arduino case with 9v battery holder
grabcad
3d print case built to hold uno, speaker, light and the power source
thingiverse
free

Twisted Heart Valentine's Vase by Athruz
...d: https://vorpal-robotics-store.myshopify.com/products/vase-dazzler-kit-no-soldering-required
demo: https://youtu.be/l1vno8mfpne
grabcad
free

coding robot
...ogramming with the button on the
* mode selection switch
* it can follow line
* it has 9v battery slot
* you can use with arduino
thingiverse
free

Arduino Nano remote
...mote with an arduino nano, a 9v battery and a ir-led.
if u have any questions or know how i can improve my design please comment.
Dazzler
thingiverse
free

DAZZLER Light Organ Bracelet by 3Derp
...found on adafruit's website here
see the instructions page for a detailed list of components.here is a video of it in action.
thingiverse
free
Twisted Heart Valentine's Vase by Athruz
...the kids. idea from: https://www.thingiverse.com/thing:42570/#comments kit here if interested: https://vorpal-robotics-store.myshopify.com/products/vase-dazzlerkit-no-soldering-required demo:...
cg_trader
$18

Dazzler | 3D
...del made on my patreon you can check it out at https://www.patreon.com/rks3d dazzler xmen taylor swift cool miniatures figurines
grabcad
free

Honda Dazzler Brake Disk
...honda dazzler brake disk
grabcad
scaled part model of a honda dazzler brake disk (part 43251kspb01za disk, rr brake type a)
cg_trader
$35

DSR 1 modified
...and stimulation response rifle, which is actually a laser dazzler. gun military game ready ammunition war weapon army combat...
3dwarehouse
free

APART HOTEL DAZZLER MIRAFLORES
...apart hotel dazzler miraflores
3dwarehouse
en construccion por hv contratistas
3dwarehouse
free

Dazzler Tower San Telmo
...t in all areas, meeting rooms, snack bar and café, garage parking. #argentina #buenos_aires #dazzler #hotel #hoteleria #san_telmo
3dwarehouse
free

Cordyline australis 'Torbay Dazzler'
...ay dazzler'
3dwarehouse
cabbage palm / high quality / 2d / face camera #plant #2dplant #high_quality_plant #photo_real_plant
3dwarehouse
free

Cordyline australis 'Torbay Dazzler'
...ay dazzler'
3dwarehouse
cabbage palm / high quality / 2d / face camera #plant #2dplant #high_quality_plant #photo_real_plant
Vorpal
turbosquid
$10
vorpal scifi.max
... available on turbo squid, the world's leading provider of digital 3d models for visualization, films, television, and games.
turbosquid
free
Vorpal Edge
... available on turbo squid, the world's leading provider of digital 3d models for visualization, films, television, and games.
thingiverse
free

Vorpal Blade Stand by 3dlyx
...vorpal blade stand by 3dlyx
thingiverse
a tiny but stable stand to display beautiful alice's beautiful vorpal blade
thingiverse
free

Crosseyed Vorpal Eyes by Helensdad
...ad
thingiverse
a pair of crossed eyes for vorpal the hexapod. just needs brim removing and a light sanding. paint as you wish...
thingiverse
free
Vorpal Boots by adstaggs
...vorpal boots by adstaggs
thingiverse
https://www.youtube.com/watch?v=q5jiruos_bw
thingiverse
free

Vorpi TPU sneakers ( for Vorpal The Hexapod )
...d )
thingiverse
super-stylish sneakers for vorpal the hexapod
( https://www.thingiverse.com/thing:2513566 )
designed by urukalo
thingiverse
free

Vorpal Lock by nexnox
...ne, two! and through and through
the vorpal blade went snicker-snack!
he left it dead, and with its head
he went galumphing back.
thingiverse
free
Vorpal the Hexapod Dalek eye by Helensdad
...apod dalek eye by helensdad
thingiverse
single eye on a stick for vorpal, inspired by the daleks from the uk sci fi show dr who.
thingiverse
free

Vorpal Hexapod Light Sensor Bracket by vorpal
...d go to any unused servo controller port, and the signal should go to one of the analog ports that scratch can access (a3 or a6).
thingiverse
free
Vorpal Hexapod Coaster/Whiteboard Magnet by vorpal
...other diameters, or even square magnet sheets, will of course also work). these are available from craft stores and amazon.com.
Valentines
3ddd
$1

Valentine
...valentine
3ddd
дизайнерская софа
turbosquid
$10

Valentine
... available on turbo squid, the world's leading provider of digital 3d models for visualization, films, television, and games.
3d_ocean
$5

Valentine Mug
...icon love model mug polygonal red valentine valentine mug valentines valentine mug 1.lighting setup included 2.render in 3ds max2012...
3ddd
$1

наручники Valentine
... декоративный набор
be my valentine. наручники valentine.декор ко дню валентина для влюбленных
3d_export
$5

Valentine 3D Model
...3d model 3dexport heart love peace sign symbol valentine valentines default scanline renderer procedural caustic valentine 3d model ae3d...
3d_ocean
$5

Valentines Roses
...se 3d model in 4 file formats: 3d studio (.3ds), autodesk fbx (.fbx), wavefront (.obj) y blender (.blend). it contains 3 uv la...
turbosquid
$3

Flowerpot Valentine
...royalty free 3d model flowerpot valentine for download as stl on turbosquid: 3d models for games, architecture, videos. (1692449)
turbosquid
$10

Valentine Special
...d model valentine special for download as obj, fbx, and blend on turbosquid: 3d models for games, architecture, videos. (1364459)
turbosquid
$2

valentine dice
...ree 3d model valentine dice for download as 3ds, obj, and stl on turbosquid: 3d models for games, architecture, videos. (1358437)
turbosquid
$60

Jill Valentine
... available on turbo squid, the world's leading provider of digital 3d models for visualization, films, television, and games.
Valentine
3ddd
$1
Valentine
...valentine
3ddd
дизайнерская софа
turbosquid
$10
Valentine
... available on turbo squid, the world's leading provider of digital 3d models for visualization, films, television, and games.
3d_ocean
$5
Valentine Mug
... valentine mug valentines
valentine mug 1.lighting setup included 2.render in 3ds max2012 with vray 2.00 3.fbx,obj and 3ds format
3ddd
$1
наручники Valentine
... декоративный набор
be my valentine. наручники valentine.декор ко дню валентина для влюбленных
3d_export
$5
Valentine 3D Model
...rt love peace sign symbol valentine valentines default scanline renderer procedural caustic
valentine 3d model ae3d 5413 3dexport
3d_ocean
$5
Valentines Roses
...se 3d model in 4 file formats: 3d studio (.3ds), autodesk fbx (.fbx), wavefront (.obj) y blender (.blend). it contains 3 uv la...
turbosquid
$3
Flowerpot Valentine
...royalty free 3d model flowerpot valentine for download as stl on turbosquid: 3d models for games, architecture, videos. (1692449)
turbosquid
$10
Valentine Special
...d model valentine special for download as obj, fbx, and blend on turbosquid: 3d models for games, architecture, videos. (1364459)
turbosquid
$2
valentine dice
...ree 3d model valentine dice for download as 3ds, obj, and stl on turbosquid: 3d models for games, architecture, videos. (1358437)
turbosquid
$60
Jill Valentine
... available on turbo squid, the world's leading provider of digital 3d models for visualization, films, television, and games.
Vase
turbosquid
$9
vases vase
...bosquid
royalty free 3d model vases vase for download as max on turbosquid: 3d models for games, architecture, videos. (1171666)
3d_ocean
$3

Vase
...s ceramic vase editable vase vase
3d model vase that you can modify easily by moving the shapes. created in 3ds max 2014 version.
archibase_planet
free

Vase
... planet
vase vase with flowers flowers roses vase with roses
vase roses n110413 - 3d model (*.3ds) for interior 3d visualization.
3d_export
$5
vase
...vase
3dexport
vase
3d_export
$5
vase
...vase
3dexport
vase
3d_export
$5

vase
...vase
3dexport
vase
3d_export
$5

Vase
...vase
3dexport
vase
3ddd
$1
vase
...vase
3ddd
vase
3ddd
$1
Vase
...vase
3ddd
vase
3ddd
free
Vase
...vase
3ddd
vase
Flowers
archibase_planet
free

Flowers
...flowers
archibase planet
flowers flower plant
flowers n280214 - 3d model (*.3ds) for exterior 3d visualization.
archibase_planet
free

Flowers
...flowers
archibase planet
flowers flower plant
flowers n180114 - 3d model (*.gsm+*.3ds) for interior 3d visualization.
3d_export
$6

flowers
...flowers
3dexport
flowers
3d_export
$5

flower
...flower
3dexport
flower
3d_export
free

Flowers
...flowers
3dexport
flowers
archibase_planet
free

Flowers
...flowers
archibase planet
flowers flower plant
flowers n110314 - 3d model (*.gsm+*.3ds+*.max) for exterior 3d visualization.
archibase_planet
free

Flowers
...flowers
archibase planet
flowers tulips flower tulip
flowers tulips n180314 - 3d model (*.3ds) for interior 3d visualization.
archibase_planet
free

Flowers
...wers
archibase planet
flowers vase vase with flowers
flowers vase n200215 - 3d model (*.gsm+*.3ds) for interior 3d visualization.
3d_export
$7

Flower
...flower 3dexport various flowers ...
3ddd
$1

flower
...flower
3ddd
цветы
flower
Led
3d_export
$5

led
...led
3dexport
the led is cut with all the parts.
3ddd
$1

Monacor / PARL56DMX / LED-320RGBW / LED-345RGBW / LED-300RGB
... прожектор
http://www.monacor.dk/
parl56dmx
led-320rgbw
led-345rgbw
led-300rgb
turbosquid
$10

LED
...led
turbosquid
free 3d model led for download as blend on turbosquid: 3d models for games, architecture, videos. (1691856)
3d_export
$5

led lamp
...led lamp
3dexport
led lamp, brightness animation
3ddd
free

leds-c4
...leds-c4
3ddd
leds-c4
современный торшер
3ddd
free

leds-c4
...leds-c4
3ddd
leds-c4
настольный лампа
turbosquid
$19

LED
... available on turbo squid, the world's leading provider of digital 3d models for visualization, films, television, and games.
turbosquid
$12

Led
... available on turbo squid, the world's leading provider of digital 3d models for visualization, films, television, and games.
turbosquid
free

LED
... available on turbo squid, the world's leading provider of digital 3d models for visualization, films, television, and games.
turbosquid
free

LED
... available on turbo squid, the world's leading provider of digital 3d models for visualization, films, television, and games.
Color
design_connected
$11
Colors
...colors
designconnected
zanotta colors lounge chairs computer generated 3d model. designed by ilkka suppanen.
3ddd
$1
pillows colors
...pillows colors
3ddd
pillows colors , подушка
pillows colors
3ddd
free
color dress
...3ddd
color dress , манекен , одежда
color dress
3ddd
$1
светильники Colors
... massive , бельгия
светильники massive серия colors, очень веселые
3d_export
$30

color chameleon
...color chameleon
3dexport
color chameleon
3ddd
$1
color vase
...color vase
3ddd
color vase
3d_ocean
$2
color pen
...3d model of color pen. model is based on edge loop topology. all materials are included. model is render ready and ready for use.
3ddd
$1
Color Parquet
...color parquet
3ddd
паркет
color parquet
3ddd
free
color console
...color console
3ddd
консоль
color console
3d_export
$5
Technum Color
...technum color
3dexport
technum color led от imperiumloft https://imperiumloft.ru/dizajn-loft/technum-color-led.html
Light
archibase_planet
free

Light
...light
archibase planet
lamp lighting light
light - s2 - 3d model for interior 3d visualization.
archibase_planet
free

Light
...light
archibase planet
light luminaire lighting
light l0465 - 3d model (*.gsm+*.3ds) for interior 3d visualization.
3d_export
$5

lighting
...lighting
3dexport
lighting
3d_export
$5

lighting
...lighting
3dexport
lighting in livingroom
turbosquid
$3

Lighting Tree with Lights
...d model lighting tree with lights for download as max and 3ds on turbosquid: 3d models for games, architecture, videos. (1585507)
archibase_planet
free

Light
...light
archibase planet
luster lighting solution
light - s - 3d model for interior 3d visualization.
archibase_planet
free

Light
...light
archibase planet
luster lamp lighting
light 1 - 3d model for interior 3d visualization.
archibase_planet
free

Lights
...lights
archibase planet
surgical lights surgical lamp
surgical lights (floor) - 3d model for interior 3d visualization.
archibase_planet
free

Light
...light
archibase planet
lighting luminaire candlelight
light l0463 - 3d model (*.gsm+*.3ds) for interior 3d visualization.
3d_export
$18

street light-lighting-light-xia bing
...
3dexport
street light-lighting-light-xia bing<br>max 2015 v-ray 3 max 2015<br>textures<br>all files in zip...
Base
archibase_planet
free
Base
...base
archibase planet
base column column base
base 1 - 3d model (*.gsm+*.3ds) for interior 3d visualization.
archibase_planet
free
Base
...base
archibase planet
base column base column
base 5 - 3d model (*.gsm+*.3ds) for interior 3d visualization.
archibase_planet
free
Base
...base
archibase planet
base column column base
base 7 - 3d model (*.gsm+*.3ds) for interior 3d visualization.
archibase_planet
free
Base
...base
archibase planet
base column column base
base 2 - 3d model (*.gsm+*.3ds) for interior 3d visualization.
archibase_planet
free

Base
...base
archibase planet
base column column base
base 3 - 3d model (*.gsm+*.3ds) for interior 3d visualization.
archibase_planet
free
Base
...base
archibase planet
base column column base
base 4 - 3d model (*.gsm+*.3ds) for interior 3d visualization.
archibase_planet
free
Base
...base
archibase planet
base column base column
base 6 - 3d model (*.gsm+*.3ds) for interior 3d visualization.
archibase_planet
free
Base
...base
archibase planet
foundation base
column base ionic - 3d model (*.gsm+*.3ds) for interior 3d visualization.
archibase_planet
free
Base
...base
archibase planet
foundation base
column base tuscan - 3d model (*.gsm+*.3ds) for interior 3d visualization.
design_connected
$18
Base
...base
designconnected
tom dixon base computer generated 3d model. designed by dixon, tom.