Thingiverse
Vacuum Table for CNC Machine by infinity111
by Thingiverse
Last crawled date: 3 years ago
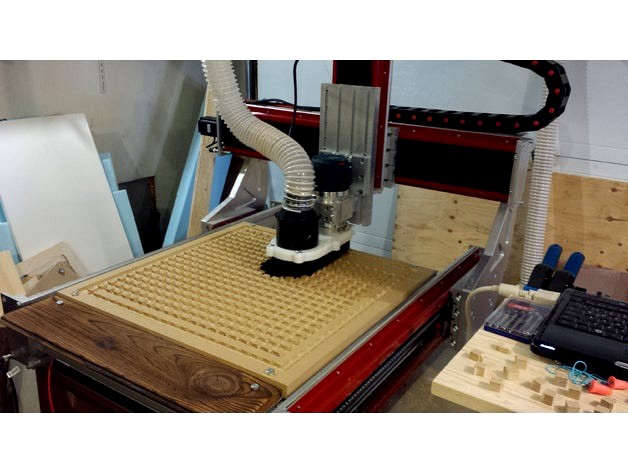
This is a 2ft. x 2ft. vacuum table designed for a CNCRouterparts "Benchtop Pro" CNC Router machine.
Process (in a nutshell):
Obtain your MDF wood
Load the file in Fusion 360 (free for hobbyists)
Select/create your tool and regenerate tool-paths (Note: this could take a while. Fusion 360 just does not like this tool path. My computer uses up to 5GB RAM and 5-10 minutes to make any changes to the main air chamber tool path. )
Process output files (keep operations separate)
Load the file into Mach3 (licensed)
Set your "zero" for X and Y but follow the NOTICE below for setting your Z-zero
Run operation to cut main chamber
Run operation to cut vacuum port
Flip material, re-zero
Run operation to cut "guide holes" - these holes are not through the material
Assemble using duct tape and shop vac
Fasten to work table
Selectively drill out holes for your media size using a cordless drill and drill bit
Enjoy!
NOTICE: You must cut the main air chamber using 2 passes. The file included does NOT do this automatically because my computer could not render the two passes without crashing. To achieve 2 passes, simply calibrate your Z-zero to 0.25 above your material on the first pass, and then calibrate Z-zero to true material top on your second pass.
Bolt Holes (recommended) can be added by creating a sketch on the material border, or by manually drilling. Bolts will keep both pieces of MDF square and tight to the table, while clamps may result in some slippage.
See pictures for more detail.
Required material:
air filter mask, eye and ear protection
two pieces 2x2' MDF, 1" thick
duct tape - for sealing the two tables pieces together around the outer edge
shop vac - I used a small Rigid-brand "5HP Max" shop vac
bolts, clamps or other fastening hardware
cordless drill and 1/8" drill bit - for drilling out guide holes to match your media size
Optional material:
M8x60 bolts, washers and t-slot inserts - for "Benchtop Pro" machine
glue - for gluing the two pieces of MDF together around the outer border and also across all of the inner support "cubes." This can be achieved by spreading glue, sandwiching the two pieces together and then clamping or applying even force (e.g. weight) across the entire surface on a LEVEL surface. I opted NOT to glue the two pieces at first however I did notice that the two MDF pieces have a slight air gap between them which could result in uneven cutting with vacuum pressure changes. However, I'm doing through-cutting and not engraving so I am OK with this, plus this is just an experiment for now.
Note STL file will not work, and is only uploaded to satisfy Thingiverse programming. Fusion 360 does NOT seem to export in any formats compatible with Thingiverse.
Similar models
thingiverse
free

PVC Pipe Clamp (3/4") by zim
...hose clamp and 2 1/4" lag bolts. the two holes for the lag bolts will probably need to be touched up with a 1/4" drill.
thingiverse
free

31" spoil board with dovetail clamping slots by muddyfeet
...these clamps:
oops clamps: https://www.thingiverse.com/thing:4584289
toe clamps: https://www.thingiverse.com/thing:4584288
thingiverse
free

Wire clamp tite clamp maker by rkevinball_5591
...
for making wire clamps
go to hardware store and buy a 1/4" x 5" bolt. cut off threaded part and drill a hole for bolt.
thingiverse
free

2.25" Dust Vacuum Plug by Donovan_Benoit
...r diameter
this version works with the adapter that comes attached to hose from this home depot vacuum hose extension kit vt2520.
thingiverse
free

Hole Jig for Round Stock / Dowel / Pipe by scottmi
....
note: close tolerance in hole size, and thickness of the flange for the bolts are desired for good alignment of the jig parts.
thingiverse
free

Camera Mount by vasile
...or longer bolts, or adjust
the length by placing a second nut on the bolt on the side of the
clamp where the head of the bolt is.
thingiverse
free

Prowin "Wini" Vacuum cleaner hose clamp by Acer54
...rizontal position with supports because then the clamping mechanism should be more stable an robust due to the layer orientation.
thingiverse
free

Vacuum Chamber Air Spreader (1/4") by HeavyMetalGuy
...avymetalguy
thingiverse
i designed this to prevent the air from going straight down into the vacuum chamber when repressurizing.
thingiverse
free

PRO Series "CNC Router Parts" Spoilboard by CNCRouterParts
...of f-clamps. what you'll need 3/4" thick mdf or similar material that covers the desired work area (usually matching...
thingiverse
free

Shop Vac vacuum clamp by sbeav
...thingiverse
shop vac adapter for dust collection specifically for a harbor freight belt sander.its
id is 1.75" in diameter.
Infinity111
thingiverse
free

Golf Tee Game x 4 by infinity111
...al) work best for cutting out the games.
the holes work with the following golf tees: https://www.amazon.ca/gp/product/b00y2163ke
thingiverse
free

MDF Spoilboard for Avid Benchtop Pro 2x2 by infinity111
...ps://www.amazon.ca/gp/product/b0747qx71f
this was cut using a 1/4" end mill and a bosch 1617 router on an avid benchtop pro.
Vacuum
thingiverse
free

BANDSAW VACUUM ADAPTOR TO VACUUM CLEANER
...eaner exit
inner dia: 32mm
outer dia: 36mm
max length in z-axis: 84mm
max length in x-axis: 67mm
max length in y-axis: 67mm
thingiverse
free

Vacuum Adapter
...vacuum adapter
thingiverse
just a quick model of a adapter for vacuum cleaners
thingiverse
free

Vacuum Attatchment
...vacuum attatchment
thingiverse
made this for my vacuum maybe you could use it
thingiverse
free

Vacuum couple
...vacuum couple
thingiverse
this is a couple for a kreg jig to plug a rigid vacuum cleaner.
thingiverse
free

Vacuum nozzle by mrojod
...vacuum nozzle by mrojod
thingiverse
this is a vacuum noozle to replace the stock one of 90% of vacuums
thingiverse
free

Vacuum Pump Coupler
...upler
thingiverse
-6 an to -6 an straight female coupler for diy vacuum chamber or vacuum forming with a cheap ebay vacuum pump.
thingiverse
free

Vacuum Hood by kaxorpie
...dental office. it fits nicely into a 2" vacuum tube connector--the size commonly used for household central vacuum systems.
thingiverse
free

VACUuM ATtACHMENT by theecokid
...vacuum attachment by theecokid
thingiverse
vacuum attachment
thingiverse
free

Vacuum Attachment by JamCav
...vacuum attachment by jamcav
thingiverse
vacuum attachment
thingiverse
free

Vacuum Model by CTElementalists
...vacuum model by ctelementalists
thingiverse
this is the design for robot vacuum
Cnc
thingiverse
free

CNC by Robi1602
...cnc by robi1602
thingiverse
cnc
thingiverse
free

CNC Feet - Nikodem CNC
...ixe-it, and they are a big hole for screw the aluminium profile (on the pictures).
enjoy and thanks nikodem for you amazing cnc !
thingiverse
free

CNC Case
...cnc case
thingiverse
control box to be used with rs-cnc or any other cnc you like.
thingiverse
free

Susferus CNC
...susferus cnc
thingiverse
susferus cnc testing
thingiverse
free

RS-CNC , the new model of R-CNC by RoMaker
...new model of r-cnc by romaker
thingiverse
the rs-cnc is the replacement of the r-cnc (https://www.thingiverse.com/thing:2159840)
thingiverse
free

Fixture- CNC by sidd200970
...fixture- cnc by sidd200970
thingiverse
cnc machine vise for diy cnc machines
thingiverse
free

Cnc Lazer by baymikro
...cnc lazer by baymikro
thingiverse
cnc lazer
thingiverse
free

CNC dusthood by Idegraaf
...cnc dusthood by idegraaf
thingiverse
dusthood for cnc
thingiverse
free

coupling cnc by poggia10
...coupling cnc by poggia10
thingiverse
coupling cnc
thingiverse
free

cnc square by MR_MUSTARD
...cnc square by mr_mustard
thingiverse
square for cnc
Table
thingiverse
free

table table by mertyty
...table table by mertyty
thingiverse
table table
thingiverse
free

table
...table
thingiverse
a table
thingiverse
free

table
...table
thingiverse
a table model!
thingiverse
free

Table
...table
thingiverse
sliding table extender components
thingiverse
free

Table lampshade table by PRATRIK
...table lampshade table by pratrik
thingiverse
a tablelamp that is a table. get it...
thingiverse
free

Mini Table Tennis Table by DarrenGossling
...mini table tennis table by darrengossling
thingiverse
mini table tennis table and table at 20%
thingiverse
free

table in front of table printer by DoESLiverpool
...table in front of table printer by doesliverpool
thingiverse
table in front of table printer
thingiverse
free

TROFY TABLE AND NORMAL TABLE by Santyagus
... table by santyagus
thingiverse
they are designs of tables to print as models, one is a basic table and the other a trophy table
thingiverse
free

Part of Table tennis table by LuZhiShen
...part of table tennis table by luzhishen
thingiverse
this is a part of table tennis table above
thingiverse
free

Table
...table
thingiverse
medieval style table for tabletop games. test printed on an anycubic photon
Machine
thingiverse
free

arcade machine
...arcade machine
thingiverse
miniature arcade machine
thingiverse
free

Machine by eca3d
...machine by eca3d
thingiverse
machine -> bus
thingiverse
free

machine by President909
...machine by president909
thingiverse
machine by aidan [created on 3dtin]
thingiverse
free

ink machin by bendytheprinter
...ink machin by bendytheprinter thingiverse this is the ink machine from the game of bendy and the ink...
thingiverse
free

handle washing machine / Poignée machine a laver
...handle washing machine / poignée machine a laver
thingiverse
test and work in progress
thingiverse
free

granita machine by ississ
...granita machine by ississ
thingiverse
granitas machine
thingiverse
free

DClean Machine Knob
...dclean machine knob
thingiverse
this is a knob for a machine
thingiverse
free

milling machine by arli3d
...milling machine by arli3d
thingiverse
a milling machine
thingiverse
free

game machine by max7th
...game machine by max7th
thingiverse
game machine
thingiverse
free

bucket machines by shura2000
...bucket machines by shura2000
thingiverse
bucket machines