Thingiverse
UV Curing Station for SLA,
by Thingiverse
Last crawled date: 4 years, 3 months ago
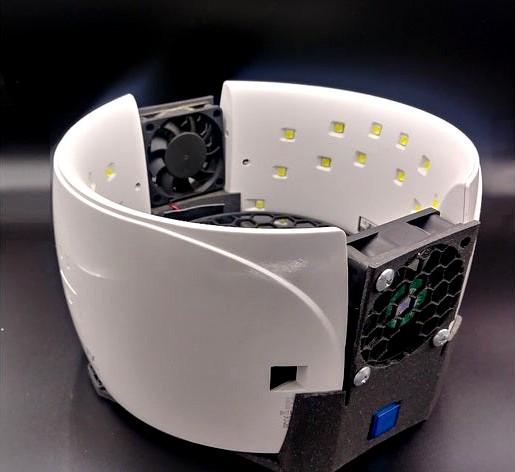
This is a great way to cure prints without breaking the bank. In most cases I can fully cure items in about 3-10 minutes depending on size, resin used geometry and density.
I designed this around readily available and relatively cheap UV lamps, fans, and motors found on Amazon. It was designed as a cheaper alternative to the Prusa UV cure station the CW1 ($699 usd!!) Can you build something cheaper? Yeah just set stuff outside, on one of those $5 solar powered spinning bases. The advantage of this design is the slow rotation offers even UV exposure and the intensity of the two wrap around UV lamps leads to quick and thorough resin curing while the dual fans help dry any remaining isopropanol or other cleaning liquid. Also since all sides are being cured at once this theoretically reduces warping. I like it a lot it is pretty strait forward to assemble, works well, is a convenient size to store and I don't have to go outside where other humans are.
When curing I personally put a white paper plate over the top to help reflect the light a back down and protect me from direct UV exposure (be safe kids).. you can run it with out a top and it works just fine just try to avoid looking into the pretty pretty lights for long with out proper protection.--- If requested I can make a little lid for this----, It just wast something I personally saw the need to spend the time and filament on since it is not technically needed.
If you have a jumbo SLA printer and need a taller Curing station and would like me to try to figure out a double stacked version of this let me know.
This will require a little soldering (or twisting wires together and insulating) so if you are not comfortable with a little low voltage electrical work ask a friend for help or consider buying the Prusa CW1 ($699 usd!!). -Full instructions coming soon-, I welcome your input.. However Assembly is very strait forward, take apart the uv lamps, wire the power from the power supply plug on one of them, through bottom hole and to the lighted button, then back in the button hole and directly to the motor, fans, led lamps (bypass control board), it is low amps and everything is just 12v so there is no real need for a more complex system than that...a timer would be nice but isn't strictly necessary Pull the button in it square hole, Then screw the fans in place one should blow in, one should blow out to create cross breeze. Push the motor in its slot, and slide the platform on the shaft, reassemble the shells of the lamps and glue them in the cradles and you're ready to go!
Here is what you'll need (if in the future these links don't work try searching for the names in your preferred online retailer):
You'll want 2 of these:
SUNUV 24W LED UV Light Nail Gel Dryer Curing Lamp with 2 Timing Setting for Gel Based Polish SUN9C (White)https://www.amazon.com/gp/product/B01JGG5CMO
Push button, you can just wire it all to come on when plugged in but who doesn't love a light up clicky push button?
Baomain 16mm Push Button Switch Latching Square Cap LED Lamp Red Yellow Blue Green Light DC 12V SPDT 5 Pin 4 Packhttps://www.amazon.com/gp/product/B01N2T2LJI/ref=ppx_yo_dt_b_search_asin_title?ie=UTF8&psc=1
Really any 12v 60mmx6omm fans could work:
Wathai 60mm x 60mm x 25mm 12V 2P Dual Ball DC Case Fan Brushless Cooling Fanhttps://www.amazon.com/Wathai-60mm-25mm-Brushless-Cooling/dp/B07Q2JWNFX
Slow geared 12v motor to make it spin:
uxcell Uxcell DC 12V 6RPM Worm Gear Motor 6mm Female Shaft High Torque Turbine Reducerhttps://www.amazon.com/15RPM-Shaft-Torque-Turbine-Geared/dp/B01MXPNX7P
I use this to clean of resin after printing (works great!):
INTLLAB Magnetic Stirrer Stainless Steel Magnetic Mixer with stir bar (No Heating) Max Stirring Capacity: 3000mlhttps://www.amazon.com/gp/product/B072K24X5P/ref=ppx_yo_dt_b_asin_title_o02_s00?ie=UTF8&psc=1
This is the beaker I used to match the filehttps://www.amazon.com/dp/B004DGIII8
That said it was surprisingly hard to get it to fit just right and still make sure the flow was not inhibited by the cage I'm not 100% that other brands would work. The Lab grade glas stans up well to the Ipa and resin residue and works perfectly with the stirrer....That said I have since seen many smarter ways to store and use your IPA for example the pickle container https://www.amazon.com/LOCK-HPL933BT-Pickle-Container/dp/B06WD1F7HD
So look around and use your best judgement for what fits your work station prefrances.
Recommended Accessory:
Lastly one of the best little accessories to an SLA set up is a silicone litter/ pet food mat or some version of it (wham bam sells the slap mat), put it under your machine and clean-up station it'll protect your table contain your spills and clean up easily if you do accidently tip over a resin bottle or something..even has a little lip to keep in liquids.. This one works but i have seen them for less in several big box stores so shop around. Vivaglory Pet Food Mat Large 24" L x 16" W or Small 19" L x 12" W Waterproof Non-Slip FDA Grade Silicone Mat Anti-Messy Design for Puppy Kitty Dog Cat Small Medium Large Animals https://www.amazon.com/Vivaglory-Waterproof-Non-Slip-Stainless-Anti-Messy/dp/B01NBTA4J0
Similar models
thingiverse
free

UV Resin Curing Station for 3D Printed Parts
...o and article on pcburn:
https://youtu.be/qn-az0mdhfqhttps://pcburn.com/diy-uv-resin-curing-station-make-your-own-uv-resin-curer/
thingiverse
free

UV Light Curing Box for Large UV lamp
...yjmvuy3j5chrlzefkswq9qta2otm2mtkznfvzwtjom1awuzywjndpzgdlde5hbwu9c3bfyxrmjmfjdglvbj1jbglja1jlzglyzwn0jmrvtm90tg9nq2xpy2s9dhj1zq==
thingiverse
free

SLA/DLP UV Curing Box by ar_delvecchio
...ant to mess with led strips or nail curing devices with timers.
just put your item in the box and center the uv light on the top.
thingiverse
free

UV curing Station for SLA WITH TIMER
...red/dp/b01mxpnx7p
timer modulehttps://www.amazon.co.uk/gp/product/b073w7q5fy/ref=ppx_yo_dt_b_asin_title_o05_s00?ie=utf8&psc=1
thingiverse
free

UV Curing Box Lamp Mount for SLA resin
... as it will hold what ever you need to cure.
i lined my box with aluminum foil duct seaming tape to line my box for reflectivity.
thingiverse
free

Hydration Dryer by sventhepaddler
... x 30mm brushless blower fan.
i used asin: b07rp14kml
https://www.amazon.com/wathai-brushless-cooling-turbo-blower/dp/b07rp14kml
thingiverse
free

UV Curing Station
...uv curing station
thingiverse
uv curing station for resin printers!!
thingiverse
free

simple lid for a selfmade UV curing station for SLA
...n for sla by ryanthemast to protect the user from accidentally looking into the uv-light.
fusion360 file: https://a360.co/2vub7lq
thingiverse
free

UV Curing Basket by Denko66
...uv curing basket by denko66
thingiverse
basket for putting sla resin prints in sylvanknights' thing for curing.
grabcad
free

Resin cure station
... can fit in a magnet for a better closure of the cover. i used a small magnet and put a screw on the top cover and it works well.
Curing
turbosquid
$80

UV curing oven
...uring oven for download as sldas, max, ige, 3ds, fbx, and obj on turbosquid: 3d models for games, architecture, videos. (1656005)
3d_export
$10

Automatic circuit board UV curing machine
.... the uv curing device consists of five parts: light source system, ventilation system, control system, conveying system and box.
3d_export
$7

display automatic dispensing uv curing line
...display automatic dispensing uv curing line
3dexport
display automatic dispensing, uv curing line
3d_export
$69

plate curing press rubber curing press plate curing press
...pment operation and less maintenance. the temperature is provided by the heating medium (usually steam, heat transfer oil, etc.).
3d_export
$80

uv curing oven
... you can email to me.<br>designed with solidworks 2017, render with keyshot<br>**************************************
3d_export
$15

potion cure life
...nown as the "potions master" ("potions master"). he is one of the main characters in the books in the series.
3ddd
$1
Стул
...ir by rossetto
base available in a range of options
made in italy
steel framework, entirely moulded in cold-cure polyurethane.
3d_export
$35

Madicaments 3D Model
...port
medicines tablets capsules pill physic doctor's stuff cure drug medicaments
madicaments 3d model 3d.dasha 87130 3dexport
3d_export
$26

Salame 3D Model
...xport
salami salame cured sausage meat food antipasto dried texture material italian italy
salame 3d model tartino 35279 3dexport
3d_export
$7

Injection 3D Model
...ort
aid cure equipment drug flu health help injection hospital medical pharmacy science
injection 3d model petrosg 22506 3dexport
Sla
3ddd
$1

CILEK SL ACTIVE
...sl active 3ddd cilek cilek active (sl active white) sla1304 кровать...
3ddd
$1
Cilek SL ACTIVE
...3ddd cilek , стеллаж cilek active (sl active white) 1501-sla стеллаж...
3d_export
$5

ring-love norian-54-64 mm 4pcs
...norian-54 ring-love norian-56 ring-love norian-60 ring-love norian-64 suitable for sla and sls and similar printing...
3d_export
$10

cute kitten v2 stl 3d print model
...print model 3dexport solid type (fdm) and hollow type (sla & dlp)<br>stl file for 3d print<br>size :<br>x : 66...
3d_export
$5
tesseract hypercube
...each diagonal has 6 faces. you can use sls, sla and other technologies to print it. moreover different textures...
3d_export
$23
the last engineer 3d printing figurine
...will also receive "assembly manual" for fff/fdm 1.0 and dlp/sla 1.0 versions in pdf format. the figurine is saved...
3d_export
$5
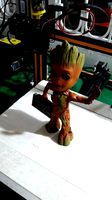
groot con grabadora
...enabled, however you can also use a dlp or sla printer with resin as well. for small scale printouts,...
3d_export
$5
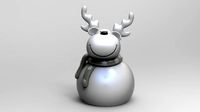
deer christmas 3
...enabled, however you can also use a dlp or sla printer with resin as well. you should use a...
3d_export
$5
deer christmas 2
...enabled, however you can also use a dlp or sla printer with resin as well. you should use a...
3d_export
$5
deer christmas
...enabled, however you can also use a dlp or sla printer with resin as well. you should use a...
Station
3d_export
$5
station
...station
3dexport
station
archibase_planet
free
Station
...station
archibase planet
railroad station railway station bay
railway station n160707 - 3d model for interior 3d visualization.
archibase_planet
free
Station
...station
archibase planet
intercom station equipment
intercom station - 3d model for interior 3d visualization.
archibase_planet
free
Station
...station
archibase planet
station
station n260108 - 3d model (*.gsm+*.3ds) for interior 3d visualization.
3d_export
$5
Station
...station
3dexport
low poly bus station
archibase_planet
free
Station
...station
archibase planet
building station construction
station n170708 - 3d model(*.gsm+*.3ds) for interior 3d visualization.
archibase_planet
free
Station
...station
archibase planet
bus station bus stop
station 1 - 3d model (*.gsm+*.3ds) for interior 3d visualization.
archibase_planet
free
Station
...station
archibase planet
bus station bus stop
station 2 - 3d model (*.gsm+*.3ds) for interior 3d visualization.
archibase_planet
free

Station
...station
archibase planet
bus station bus stop
station 3 - 3d model (*.gsm+*.3ds) for interior 3d visualization.
3d_ocean
$19
Space station
...space station
3docean
space station
space station
Uv
turbosquid
$16

uv microscope
...free 3d model uv microscope for download as max, obj, and fbx on turbosquid: 3d models for games, architecture, videos. (1469743)
turbosquid
$5

Grenade UV
...ee 3d model grenade uv for download as max, max, obj, and fbx on turbosquid: 3d models for games, architecture, videos. (1674956)
turbosquid
$20

Rug With UVs
... available on turbo squid, the world's leading provider of digital 3d models for visualization, films, television, and games.
turbosquid
$10

Uved Character
... available on turbo squid, the world's leading provider of digital 3d models for visualization, films, television, and games.
turbosquid
$1

Katana with UV
... available on turbo squid, the world's leading provider of digital 3d models for visualization, films, television, and games.
turbosquid
free

UV Spot
... available on turbo squid, the world's leading provider of digital 3d models for visualization, films, television, and games.
turbosquid
$30

UV Lamp
...wnload as max, max, unitypackage, upk, max, obj, fbx, and max on turbosquid: 3d models for games, architecture, videos. (1685958)
3d_export
$5

cracked uv sphere
...cracked uv sphere
3dexport
cracked uv sphere. made in blender 3d.
3d_export
free

UV lamp
...up. subscribe to the telegram channel to keep up to date with all the new products:) link:https://t.me/blog_engineer_designer ♥♥♥
turbosquid
$10

Unrigged Deer with UV
...lty free 3d model unrigged deer with uv for download as blend on turbosquid: 3d models for games, architecture, videos. (1282447)