Thingiverse
Universal Air Assist for Diode Laser Cutter / Engraver by senigami
by Thingiverse
Last crawled date: 3 years ago
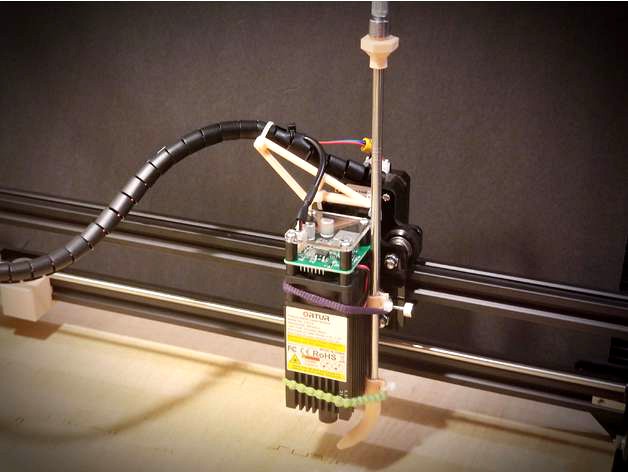
I wanted to add an Air Assist to my Ortur Laser Master but didn't want to have to buy something expensive. I have an airbrush compressor on hand so I decided to use that and included a cap that screws onto the compressor. If you wanted to use a fish tank compressor with a tube you can add a different cap. Once I find a tube I'll make an additional cap attachment. I designed this to attach directly to the laser diode so it should be compatible with most laser diode systems.
Additional Parts Needed:
Standard Metal Straw, bent or straight (available for under $2)
2 rubber bands
2 zip ties (optional)
Printing Tips:
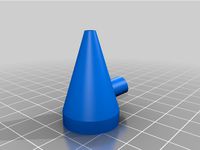
Cura has an experimental option to make overhangs printable which is what I used for the hose screw. Pictured in the images above. I printed the air hose on its side with no supports. It was a little tight going on so I used a heat gun to soften it a bit and it went on fine.
Assembly:
Image instructions are included above.
Slide 2 clips onto the straw and attach the air part and hose connector to each end.
Move one clip next to the air piece and the other a couple of inches over.
When inserted into the gaps in the laser module one clip should rest next to the upper bound of the laser and the lower one should be at the bottom of the laser. This provides stability during movement to prevent the assembly to tilt.
To prevent the staw from slipping down during movement you can tighten the clips using zip ties.
Attach the assembly to the laser module using the rubber bands. You can position this anywhere on the laser module you like. I have found that positioning it near the back right will not interfere with the natural homing of the laser.
Looping the rubber bands below the clips will apply upward pressure which will keep the assembly secure and prevent slipping.
Attach your hose to the top. If you want to suspend the hose from above then use a straight straw. If you want the hose to follow the cable then use a bent straw and angle it in that direction to avoid kinking the hose.
Disclaimer: This item is free to make for personal use but may not be resold without permission. Those who have obtained permission will be listed here.
Additional Parts Needed:
Standard Metal Straw, bent or straight (available for under $2)
2 rubber bands
2 zip ties (optional)
Printing Tips:
Cura has an experimental option to make overhangs printable which is what I used for the hose screw. Pictured in the images above. I printed the air hose on its side with no supports. It was a little tight going on so I used a heat gun to soften it a bit and it went on fine.
Assembly:
Image instructions are included above.
Slide 2 clips onto the straw and attach the air part and hose connector to each end.
Move one clip next to the air piece and the other a couple of inches over.
When inserted into the gaps in the laser module one clip should rest next to the upper bound of the laser and the lower one should be at the bottom of the laser. This provides stability during movement to prevent the assembly to tilt.
To prevent the staw from slipping down during movement you can tighten the clips using zip ties.
Attach the assembly to the laser module using the rubber bands. You can position this anywhere on the laser module you like. I have found that positioning it near the back right will not interfere with the natural homing of the laser.
Looping the rubber bands below the clips will apply upward pressure which will keep the assembly secure and prevent slipping.
Attach your hose to the top. If you want to suspend the hose from above then use a straight straw. If you want the hose to follow the cable then use a bent straw and angle it in that direction to avoid kinking the hose.
Disclaimer: This item is free to make for personal use but may not be resold without permission. Those who have obtained permission will be listed here.
Similar models
thingiverse
free

Air Assist Nozzle for Diode Lasers by ThothLoki
...ort back and let me know how it works for you.
if you find this useful and want to buy me a beer: https://www.paypal.me/thothloki
thingiverse
free

Air Assist Tube for Laser Diode by hwright14
...rom blocking the beam and reducing the power. it also keeps the parts cleaner.
the mounting points are seperated by 43mm and 5mm.
thingiverse
free

Flite Test Foam Rubber Band Guard by jjohnson98
...t models where the wing is attached with rubber bands.
i use a small dab of hot glue on the inside of the u and slip it in place.
thingiverse
free

Neje 40W Laser Module Air Assist by pointybeard
...y so its pointing at the laser beam).
update 4/4/2021
i have uploaded a version to suit 4mm id hose. note i have not tested this.
thingiverse
free

K40 Laser Cutter Air Assist Nozzle with Laser Diode Mounts by dapol
... hole in the side of the nozzle halfway between the diode mounts - this is sized to take standard 6mm aquarium air hose fittings.
thingiverse
free

Rigidbot laser mount for jtech photonics diode by ibraud
...ww.thingiverse.com/thing:614642
no problems printing with the laser attached except that i don't have a part cooling fan...
thingiverse
free
Laser air assist 33mm diode by LordSylow
...
pushed on and is also used as a simple focus wheel.
i cut 3mm mdf in 2 pases with this air assist.
it's simple and it works.
thingiverse
free

Ryobi air compressor side cover by Gigante
...t it a bit to the side if you want to drill a hole in it for the hose.
print solid, and as the picture to make the clip stronger.
thingiverse
free

Spindle / Laser Module holder by Dirka86
...ogle.ca/search?q=cnc+1610&oq=cnc+1610&aqs=chrome..69i57j69i60l2.4101j0j4&sourceid=chrome&ie=utf-8#q=cnc+1610+grbl
thingiverse
free

Straw Vac attachment by oldold7
...nt by oldold7
thingiverse
straw vac attachment, dia size are different, you have to modify yourself, the straw dia in tis is 3.7
Senigami
thingiverse
free

Hose Clip by senigami
...ingiverse
i needed a way to hang the hose for spraying so i threw this together, fits a simple lanyard clip or whatever you like
thingiverse
free

Kindle Cover with Bumpers by senigami
...ngiverse
i really liked the kindle cover that fromfo designed but i wanted a little more drop protection so i added some bumpers
thingiverse
free

Canvas Picture Frame Hanger by senigami
...dn't want to damage the small frame so i made this hanger hook that slides under the back canvas and then will hang on a nail
thingiverse
free

Ender 5 Simple Raspberry Pi Cam, No Screws Needed by senigami
... these clips fit any other frames. if anyone can verify it fitting on any other frame let me know and i'll update the notes.
thingiverse
free

Pi camera holder by lwkalis
...parts. support only needed with long piece. remix from senigami ...
thingiverse
free

Ortur Laser Master 2 Wire Support Guide (Print or Lasercut) by senigami
...s free to make for personal use but may not be resold without permission. those who have obtained permission will be listed here.
Diode
thingiverse
free

Diode bender
...; on the side mark the cutting length to fit a pcb.
designed in openscad. source here: https://github.com/blitzkraft/diode-bender
thingiverse
free
Diode regulator by teacdance
...diode regulator by teacdance
thingiverse
simple diode regulator 2s lipo to 6v rc receiver
thingiverse
free

Case laser diode by leovargas239
...case laser diode by leovargas239
thingiverse
case for 3 cm laser diode
thingiverse
free

Diode Mounts for Flashback Diode Packs by dhench
...ther-for-stepper-motor-compatible-with-drv8825-a4998-drivers%2f152813847024%3fhash%3ditem23946a41f0%3am%3ampfztgaeyk4d5gduz_meela
thingiverse
free
Switch-Diode soldering station by Mangolicious
...he leg of the diode around a 1mm drill (0,04"), put in the switch (from the underside), put the diode in the pin and solder.
thingiverse
free

Diode Bender Jig by krazyderek
...ed model to be as parametric as possible.
added support for pin and shelf to make multiple bends and a final cut to a diode leg.
thingiverse
free

40mm Diode Laser Mount by ramon42k
...40mm diode laser mount by ramon42k
thingiverse
laser mount for 40mm diode laser on eleksmaker a3
thingiverse
free

The nozzle on the laser diode by Jeefse
...rse
the nozzle on the laser diode,to connect the air pressure allows the low power laser to cut thick material, in fewer passes.
thingiverse
free

1N4148 Diode bend jig
...ding jig for 1n4148 diodes and resistors used in diy keyboads like the discipline (https://github.com/coseyfannitutti/discipline)
thingiverse
free

nozzle with diode holder by Germ
...nozzle with diode holder by germ
thingiverse
yaseen
Assist
thingiverse
free

assistant for drilling
...assistant for drilling
thingiverse
this assistant needs for drilling coaxial holes in wood
thingiverse
free

mek assistant - orks
...mek assistant - orks
thingiverse
mek assistant
thingiverse
free

Magazine Assistant by blasterforgePH
...magazine assistant by blasterforgeph
thingiverse
nerf magazine assistant for stryfe. enjoy hassle-free reloading
thingiverse
free

Roll-off assistance by MV1985
...roll-off assistance by mv1985
thingiverse
roll-off assistance
thingiverse
free

Dab Assistant by BigEagleFPV
...ant is a great addition to any smokers life. it will hold the following:
dabber
concentrates
q-tips
isopropyl alcohol
trash
joint
thingiverse
free

EleksMaker Air Assist
...iverse
this is a air assist for eleksmaker laser. i have tested on my own laser as you can see from the photos so you no it fits
thingiverse
free

case home assistant by cveenman
...case home assistant by cveenman
thingiverse
case for home assistant pi incl zwave usb
thingiverse
free

LaserSaur Air Assist by Jamie
...lasersaur air assist by jamie
thingiverse
this is my first cut at an air-assist for the lasersaur laser cutter.
thingiverse
free

Air assist by claudeh
...air assist by claudeh
thingiverse
air assit cnc laser
thingiverse
free

Knife Assistant by ThePlanetMike
...trollably vertically aligned for nice straight slices.
want me to design a 3d printable assistive technology for you? contact me!
Engraver
thingiverse
free

stand engraved by creaate
...stand engraved by creaate
thingiverse
stand engraved
thingiverse
free

Engraved Butterfly by 3DFastPrint
...engraved butterfly by 3dfastprint
thingiverse
engraved butterfly
thingiverse
free

Bird engraving by endurancerobots
...any 3d printer or cnc device with l-cheapo laser engraver ...
thingiverse
free

engraver holder by alien_2005
...engraver holder by alien_2005
thingiverse
engraver holder boxing
thingiverse
free

Ataturk Engraving by oraltosun
...ataturk engraving by oraltosun
thingiverse
this is an engraving which depicts our beloved leader ataturk.
thingiverse
free

Engraved Quote by elizabethh
...engraved quote by elizabethh
thingiverse
the quote " life is a journey not a destination" engraved into a wood block.
thingiverse
free

Skull-engraving by FP-Creator
...skull-engraving by fp-creator
thingiverse
skull-engraving
thingiverse
free

Laser-engraved glass
...aser focused. the text is readable with some effort, but because it's so small, it's not noticeable. i advise against it.
thingiverse
free

DIY Laser Engraver
...diy laser engraver
thingiverse
here a small video of my first try on the engraver
https://www.youtube.com/watch?v=y6hcot0jims
thingiverse
free

Laser engraver bracket by sammywhiskas
...laser engraver bracket by sammywhiskas
thingiverse
chinese laser engraver base mounting brackets.
Cutter
thingiverse
free

paper cutter, letter cutter, Papierschneidemaschine
...paper cutter, letter cutter, papierschneidemaschine
thingiverse
paper cutter for max 6 sheets,
thingiverse
free

Cutter by Alchemicallife
...cutter by alchemicallife
thingiverse
a cutter
thingiverse
free

Cutter plug - bouchon cutter by plumachau
... bouchon cutter by plumachau
thingiverse
a cutter plug - un bouchon de cutter
no supports, no raft - pas de support ni de radeau
thingiverse
free

cookie cutter
...cookie cutter
thingiverse
cookie cutter
thingiverse
free

cutter by sjd26
...cutter by sjd26
thingiverse
cookie cutter
thingiverse
free

Cutter by Jc___
...cutter by jc___
thingiverse
cutters by_mappy
thingiverse
free

cutter cap (for models cutter) by Myf
...ry simple cutter cap. so the cutter with this cap can be safely stored in a case or pouch.there is no risk to cut with the blade.
thingiverse
free

Cutter by jangy83
...cutter by jangy83
thingiverse
excellent knife/cutter
thingiverse
free

CUTTER
...ght folding cutter, you have to print in 0.15
c'est un cutter pliant tres pratique et tres leger, vous devez imprimer en 0.15
thingiverse
free

cookie cutter
...cookie cutter
thingiverse
cookie cutter for christmas
complete, made my first letter of my name to cookie cutter
Universal
thingiverse
free
Lithophane universe
...lithophane universe
thingiverse
it is a lithophane if the universe
thingiverse
free

Unseen university
...unseen university
thingiverse
unseen university based onhttps://www.thingiverse.com/thing:3920992
thingiverse
free

universal joint by boopathin68
...universal joint by boopathin68
thingiverse
universal joint
thingiverse
free

Universal Coupling by rizvith
...universal coupling by rizvith
thingiverse
universal coupling
thingiverse
free

KEY UNIVERSAL by leonk
...key universal by leonk
thingiverse
key universal
thingiverse
free

University of Iowa by nchstech
...university of iowa by nchstech
thingiverse
university of iowa
thingiverse
free

University of Illinois by nchstech
...university of illinois by nchstech
thingiverse
illinois university
thingiverse
free

Purdue University by nchstech
...purdue university by nchstech
thingiverse
purdue university
thingiverse
free

Universal sockets plugs
...universal sockets plugs
thingiverse
universal sockets plugs
thingiverse
free

Universal handle for tools
...universal handle for tools
thingiverse
universal handle for tools
Laser
thingiverse
free

Laser
...laser
thingiverse
first version of a bracket with a clamp to hold a laser.
thingiverse
free

3D Laser Scanner 9mm laser, 12mm laser by Taurus82
...3d laser scanner 9mm laser, 12mm laser by taurus82
thingiverse
happy printing!
happy scanning!
thingiverse
free

"lasers" - art deco laser bits by jimjimjimmyjim
..."lasers" - art deco laser bits by jimjimjimmyjim
thingiverse
"lasers" - art deco laser bits
thingiverse
free

laser gun
...laser gun
thingiverse
basic laser gun model
thingiverse
free

K40 Laser Cut - GuideLine Laser by VINCE27M
...deline laser by vince27m
thingiverse
support modifié pour intégrer des lasers pour pointer l'emplacement de la gravure laser
thingiverse
free

Laser module mount for pocket laser engraver by Ewooks
...laser module mount for pocket laser engraver by ewooks
thingiverse
laser module mount for my pocket laser engraver
thingiverse
free

Laser level by dental2016
...laser level by dental2016
thingiverse
laser level with 12mm diameter red laser
thingiverse
free

NEJE Laser Engraver - Laser Mount Extender by brettcarroll
...e placed closer to the bed.
designed for use on the neje dk 5 laser engraver, but should work on all neje laser engraver/cutters.
thingiverse
free

Laser Mount for 33mm Square Laser by TypicalTitan
...t for 33mm square laser by typicaltitan
thingiverse
modular holder for laser head for diy cnc 3 axis engraver machine on amazon.
thingiverse
free

Eleksmaker Laser BackPlate
... have a different laser fitted on this but dose work for eleksmaker laser as well. this is so you can move laser up and down easy
Air
thingiverse
free

AIR AIR by baylor_yuan
...air air by baylor_yuan
thingiverse
an awesome product made by my friends.they are on kickstarter.(just for learn and study)
thingiverse
free

Air valve
...he air is bleed. but this is enough to regulate the air flow. i use it to adjust the airflow for fluidized bed dyeing (fluidbed).
thingiverse
free

Air Pistol/Air Gun by layerone
... is basicly the same mechanism as air cannon, but less powerfull, and the attck range is only 10 meters.
www.atom3dp.com/en/atom2
thingiverse
free

air ballons by
...air ballons by
thingiverse
these are air balloons
thingiverse
free

Air Gun Air Brake by bkgray115
...air gun air brake by bkgray115
thingiverse
printed but un-tested as of yet
thingiverse
free

air to air rocket by Maverick204
...rts to print
all printed with supports
in this link you can see the corsair in action:https://www.youtube.com/watch?v=rpajlbc9zhq
thingiverse
free

KDC-10 Air to Air refuel tanker by Emn
...kdc-10 air to air refuel tanker by emn
thingiverse
kdc-10 air to air refuel tanker
work in progress
thingiverse
free

Air deflector by JakeCape
...air deflector by jakecape
thingiverse
air deflector for my air dryer.
thingiverse
free

Air knife (compressed air diffuser) by NeverDun
...amshells around modular coolant/air pipes commonly seen in shops. works really well, and is much quieter than a standard nozzle.
thingiverse
free

Air conditioner - air block by alchemico
...outube.com/watch?v=vbnfskuqdes
you can throw ice cubes into the water. air condittioner will work much much much more effectively