Thingiverse
Ultimetal - Large 3D Printer by maxdesign1990
by Thingiverse
Last crawled date: 3 years ago
Build Albumhttps://goo.gl/photos/dA3D3UkkQjNfr7hH6
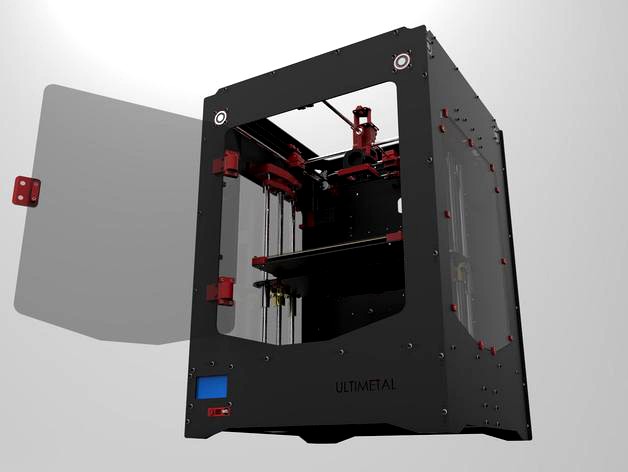
Ultimetal
(V2 coming soon with a range of improvements)
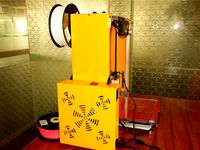
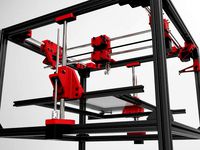
A Printer with a large print volume, rigid metal lasercut chassis,fast motion platform and dual extruder's.
Whats Available:
Full Model .STEP
Lasercut .dxf files
Prototype BOM (Bom used to build prototype use only for reference make your own
from parts list since pricing and parts availability depends on your
region)
Parts and Quantity List
STL Files
More to come such as schematics, wiring diagrams and instructions.
Quick Specifications:
Print Volume: 280mm x 290mm x 320mm (x,y,z)
Print Speed: Up to 200mm/s (Dependent on the User)
Hotend temp: Max <300 Celsius
Heatbed temp 100 Celsius (Possible Higher - Not yet tested)
XY Precision: 10 Micron
Minimum Layer Height: 50 Microns
Leadscrew Precision: 100 Micron deviation per 300mm
Hotend: E3D Chimera
Stepper Motor: Nema 17 1705HS200A 2-AMP 1.8-Step 0.8Nm
(Any Nema 17 motor mounting compatible)
Controller Board: Rumba Board
(Mounting possible for any controller with a suitable 3d printed mount-
An array of mounting holes are available on the chassis)
Extruders: Easy to use extruders with easy access to the hobbedgear
Hobbed Gear: Mk8
Belt: GT2 6mm Wide
Chassis: Lasercut - CR4 Steel Primed and Spray Coated with Acrylic Matte Black Paint
(Mounting hole array at back of chassis and electronics mounting plate for
easy mounting of components of your choice)
Clear Panels: Clear Laser-cut Acrylic (Future Upgrade)
Heatbed: 3mm Borosilicate 300mm x 300mm with 12v Silicon 300w Heatbed
( Standard Mounting holes available for 200x200mm,200x300mm,300x300mm
sized pcd heatbeds)
Heatbed Relay: Celduc somo-40100 Solid State Relay (60V 40AMP MAX DC-DC)
Heatbed Wiring: 12 Gauge Copper Wire
Power Supply: Corsair CX750 (Any standard ATX format power supply can be mounted
to the chassis)
Display Controller: Full Graphic Smart Controller
Controller Firmware: Marlin (Ultimetal modified marlin available on this page to download)
Pulley: 32 Tooth
(More specification details will be added soon)
This printer was developed as a project for my college to build a printer for printing
large models for a research institute. They wanted the capability to use multi materials,
hence the use of a E3D chimera.
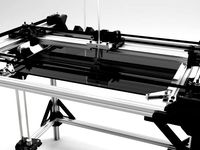
A Cartesian XYZ motion similar to the ultimaker 3d printer is used. This lowers the mass of the moving xy gantry. A bowden system is used to lower the mass further. But extra calibration is required for the bowden system. Lower mass also means that corner definition is improved and faster accelerations and deceleration's are improved.
The steel chassis makes this machine incredible rigid and heavy. If your building it you could lasercut it in aluminium to lower the weight. Heavy is a good thing since it helps lower the resonance and vibration of the machine. The lasercut plates slot into each other and then bolted together.
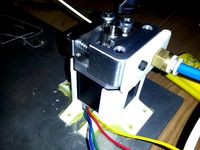
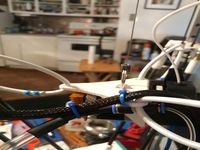
I designed the extruder to be easy to access the filament drive gear. The end of the stepper shaft is supported at the end to decrease the deflection. Pneumatic coupler's are on both end of the extruder to allows ptfe tubing to and from the extruder. The ptfe tube is
in close proximity to the drive gear. Making it easier to print in flexible filaments although
i have not tested this yet.
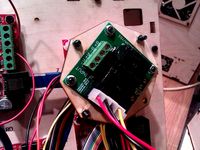
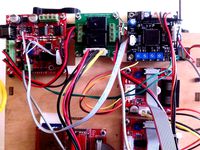
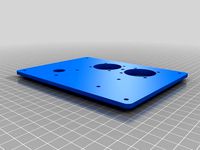
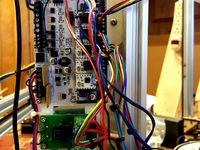
Any controller can be mounted to the chassis provided you design a mounting plate for the controller. The electronic plate has an array of holes 40mm distance apart. If you feel
that any other controller suits your need better no problem. But be sure that is can support 2x Extruder Stepper + 2 Z Stepper + 1 X Stepper + 1 Y Stepper = 6 Steppers.
I have designed mounting and fan system for the rumba controller.
The full graphic display is used for the display. There is no option to change this unless the front lasercut plate is redesigned which is possible. There is a slot at the side for easy access to use an SD card.
Lasercut clear plates .dxf files are available. I haven't added this feature to the printer.
A magnetic latching handle has been designed for the front panel. This feature will
only work for ferrous metals. The printer was originally designed with no clear panels.
So no mounting holes for them on the chassis for now.
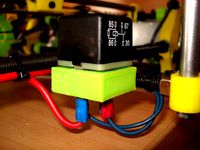
A solidstate relay is used to switch the headbed power. I was originally going to use a circuit i have developed myself. But i decided that it was worth the extra cost of getting
a reliable of the shelf component.
The heatbed heating unit is a silicon heat matt stuck to the 3mm Thich Borosilicate glass
sheet. The silicon mat was applied to the glass using a double sided thermal tape. 12 Gauge copper speaker wire was used to supply the high current.
Ultimetal
(V2 coming soon with a range of improvements)
A Printer with a large print volume, rigid metal lasercut chassis,fast motion platform and dual extruder's.
Whats Available:
Full Model .STEP
Lasercut .dxf files
Prototype BOM (Bom used to build prototype use only for reference make your own
from parts list since pricing and parts availability depends on your
region)
Parts and Quantity List
STL Files
More to come such as schematics, wiring diagrams and instructions.
Quick Specifications:
Print Volume: 280mm x 290mm x 320mm (x,y,z)
Print Speed: Up to 200mm/s (Dependent on the User)
Hotend temp: Max <300 Celsius
Heatbed temp 100 Celsius (Possible Higher - Not yet tested)
XY Precision: 10 Micron
Minimum Layer Height: 50 Microns
Leadscrew Precision: 100 Micron deviation per 300mm
Hotend: E3D Chimera
Stepper Motor: Nema 17 1705HS200A 2-AMP 1.8-Step 0.8Nm
(Any Nema 17 motor mounting compatible)
Controller Board: Rumba Board
(Mounting possible for any controller with a suitable 3d printed mount-
An array of mounting holes are available on the chassis)
Extruders: Easy to use extruders with easy access to the hobbedgear
Hobbed Gear: Mk8
Belt: GT2 6mm Wide
Chassis: Lasercut - CR4 Steel Primed and Spray Coated with Acrylic Matte Black Paint
(Mounting hole array at back of chassis and electronics mounting plate for
easy mounting of components of your choice)
Clear Panels: Clear Laser-cut Acrylic (Future Upgrade)
Heatbed: 3mm Borosilicate 300mm x 300mm with 12v Silicon 300w Heatbed
( Standard Mounting holes available for 200x200mm,200x300mm,300x300mm
sized pcd heatbeds)
Heatbed Relay: Celduc somo-40100 Solid State Relay (60V 40AMP MAX DC-DC)
Heatbed Wiring: 12 Gauge Copper Wire
Power Supply: Corsair CX750 (Any standard ATX format power supply can be mounted
to the chassis)
Display Controller: Full Graphic Smart Controller
Controller Firmware: Marlin (Ultimetal modified marlin available on this page to download)
Pulley: 32 Tooth
(More specification details will be added soon)
This printer was developed as a project for my college to build a printer for printing
large models for a research institute. They wanted the capability to use multi materials,
hence the use of a E3D chimera.
A Cartesian XYZ motion similar to the ultimaker 3d printer is used. This lowers the mass of the moving xy gantry. A bowden system is used to lower the mass further. But extra calibration is required for the bowden system. Lower mass also means that corner definition is improved and faster accelerations and deceleration's are improved.
The steel chassis makes this machine incredible rigid and heavy. If your building it you could lasercut it in aluminium to lower the weight. Heavy is a good thing since it helps lower the resonance and vibration of the machine. The lasercut plates slot into each other and then bolted together.
I designed the extruder to be easy to access the filament drive gear. The end of the stepper shaft is supported at the end to decrease the deflection. Pneumatic coupler's are on both end of the extruder to allows ptfe tubing to and from the extruder. The ptfe tube is
in close proximity to the drive gear. Making it easier to print in flexible filaments although
i have not tested this yet.
Any controller can be mounted to the chassis provided you design a mounting plate for the controller. The electronic plate has an array of holes 40mm distance apart. If you feel
that any other controller suits your need better no problem. But be sure that is can support 2x Extruder Stepper + 2 Z Stepper + 1 X Stepper + 1 Y Stepper = 6 Steppers.
I have designed mounting and fan system for the rumba controller.
The full graphic display is used for the display. There is no option to change this unless the front lasercut plate is redesigned which is possible. There is a slot at the side for easy access to use an SD card.
Lasercut clear plates .dxf files are available. I haven't added this feature to the printer.
A magnetic latching handle has been designed for the front panel. This feature will
only work for ferrous metals. The printer was originally designed with no clear panels.
So no mounting holes for them on the chassis for now.
A solidstate relay is used to switch the headbed power. I was originally going to use a circuit i have developed myself. But i decided that it was worth the extra cost of getting
a reliable of the shelf component.
The heatbed heating unit is a silicon heat matt stuck to the 3mm Thich Borosilicate glass
sheet. The silicon mat was applied to the glass using a double sided thermal tape. 12 Gauge copper speaker wire was used to supply the high current.
Similar models
thingiverse
free
Relay Board Mount by charlespax
...e stepper driver controller. the relay controller adapter allows the relay board to be mounted on the extruder controller board.
thingiverse
free
Cupcake Gen3 Extruder Controller, Relay Board and Stepper Driver Mount by whosawhatsis
...ounting point for a fourth stepper driver for the extruder (or another board of comparable size, because it is fully parametric).
thingiverse
free
NEMA Stepper Motor Mount by Raptorfx
... the stepper motor for the extruder to the ground plate of my printer. used hot glue to mount it, but also m3 screws can be used.
thingiverse
free
Base for automotive relay (heatbed) by rychuwit
...base for automotive relay (heatbed) by rychuwit
thingiverse
i use relay for alimentation heatbed...
print and use ;)
thingiverse
free
Rumba Printer Motherboard TAZ mount by superpirson
... port ends up exceeding the benefit of having a small cheap connector. i am leaving the mount point in for legacy support though.
thingiverse
free
TK300 REPRAP 3d printer with dual extruders DD2 and dual metal hotends E3D by Rockyshi
...ade
building size 300300320mm
layer thickness 0.1-0.4mm
steel side plates
cnc aluminum connecting parts
modular packing
thingiverse
free

Rumba mount for the bigBox printer by BBursell
...rumba mount for the bigbox printer by bbursell
thingiverse
mounts the rumba to the lower support instead of the bottom sheet
thingiverse
free
Sylph Delta Flying Extruder Stepper Mount
...l.
printed in amazon basics white petg,
will need to be rotated before printing, this was from early when i was learning freecad
thingiverse
free

RUMBA Case by Buket0chicken
...makerfarm i3v. i plan to drill the two mounting holes on the side of the printer, as i didn't want to use the existing holes.
thingiverse
free
MakerFarm 12" Pegasus Rumba and Relay board mount by datcomputerguy
... following options:
rumba and heat bed relay
rumba
future options:
rumba, heat bed relay, and raspberry pi
rumba and raspberry pi
Maxdesign1990
thingiverse
free
VEE CORE XY by maxdesign1990
...h - 300mm 2x
linear shaft
12mm dia shaft length - 400mm 2x
linear bearing
linear bearing 12mm lm12uu 4x
thingiverse
free
VULCAN 400 - Large Sized Cartesian 3d Printer by maxdesign1990
...profile bracket
bracket 30 b type slot 8 20x (with fasteners)
bracket 20x40 b type slot 5 4x (with fasteners)
Large
3d_export
$15
large excavator
...large excavator
3dexport
large excavator
design_connected
$22

Daydream large
...daydream large
designconnected
dedon daydream large computer generated 3d model. designed by frinier, richard.
design_connected
$7
Laccio Large
...laccio large
designconnected
knoll laccio large computer generated 3d model. designed by breuer, marcel.
3ddd
$1
MOLTENI LARGE
... подушка , плед
диван molteni&c; модель large
3ddd
$1
Molteni Large
... подушка , плед
диван molteni&c; модель large
3ddd
$1
CLAUDINE LARGE
...audine large
3ddd
claudine large , arflex
модель сделана в размерах и цветах аналога ...
design_connected
$11
Ovo Large
...ovo large
designconnected
cor ovo large armchairs computer generated 3d model. designed by studio vertijet.
design_connected
$4
Cu Large
...cu large
designconnected
kristalia cu large coffee tables computer generated 3d model. designed by monica graffeo.
3d_ocean
$18

Large sausage
...rge meat mental ray obj photorealistic sausage scanned vray
scanned 3d model of large sausage placed on rectangular wooden board.
design_connected
$16
Filly Large
...onnected
photo-realistic 3d models of the filly large chair from bonaldo for 3d architectural and interior design presentations.
Printer
archibase_planet
free

Printer
...inter
archibase planet
printer laser printer pc equipment
printer n120614 - 3d model (*.gsm+*.3ds) for interior 3d visualization.
archibase_planet
free

Printer
...rchibase planet
laser printer office equipment computer equipment
printer - 3d model (*.gsm+*.3ds) for interior 3d visualization.
turbosquid
$100

Printer
...er
turbosquid
royalty free 3d model printer for download as on turbosquid: 3d models for games, architecture, videos. (1487819)
turbosquid
$3

Printer
...turbosquid
royalty free 3d model printer for download as max on turbosquid: 3d models for games, architecture, videos. (1670230)
turbosquid
$1

printer
...turbosquid
royalty free 3d model printer for download as max on turbosquid: 3d models for games, architecture, videos. (1595546)
turbosquid
$1

printer
...turbosquid
royalty free 3d model printer for download as max on turbosquid: 3d models for games, architecture, videos. (1595105)
turbosquid
$10

Printer
...id
royalty free 3d model printer for download as max and 3dm on turbosquid: 3d models for games, architecture, videos. (1607146)
turbosquid
$7

Printer
...royalty free 3d model printer for download as ma, ma, and obj on turbosquid: 3d models for games, architecture, videos. (1644580)
turbosquid
$30

Printer
... available on turbo squid, the world's leading provider of digital 3d models for visualization, films, television, and games.
turbosquid
$20

Printer
... available on turbo squid, the world's leading provider of digital 3d models for visualization, films, television, and games.