Thingiverse
Ultimately Most Compact Mini-ITX Case by Daduck748
by Thingiverse
Last crawled date: 4 years, 4 months ago
With the advent of IoT, Arduino, Raspberry Pi and other various EASY-TO-DO digital electronics and buzz words, we've forgotten about the Mini-ITX motherboard.
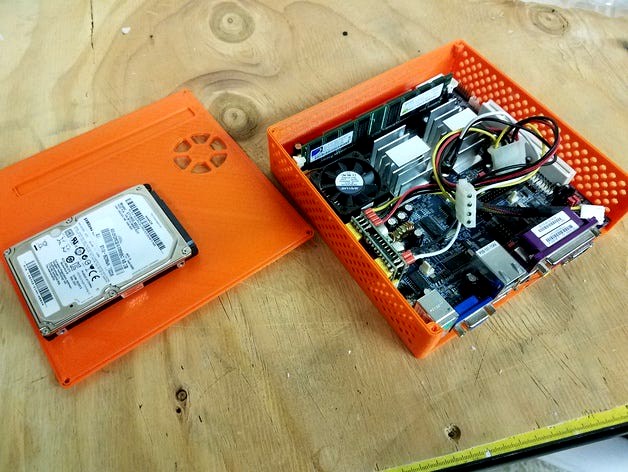
This is an age-old project for me, which started before or around the dawn of 3D printing, and prototyping was mostly done with billet materials or sheet metals, which were too expensive for me at the time. With the wonders of 3D printing, over a decade later, the first of my Mini-ITX cases becomes a reality.
This is a prototype and has many flaws and desires for improvement, but I thought I'd share it anyway. This case is so compact that I had to desolder the audio stack to get it to fit. Other requirements would be to be sure to use short memory modules. I actually hollowed out a 1mm deep pocket for the DIMM to fit. I also need about 0.5-0.75mm to clear the picoPSU as well, but it's not too bad. There is about 2mm of clearance on all sides, so that's not much. I could close that gap up, but then the bmotherboard would really have a hard time sliding in. It's a little bit of a tilt-and-twist trick as it is. That's how compact this case is.
This seems to be a completely usable case, however here are some flaws discovered when the two pieces were finished printing.
The fan exhaust holes are slightly off, but enough to get air flow going
A 1mm slot for the picoPSU needs to be opened, like for the memory slot
Reinforcement along the large surfaces need to be added
The lid mounting holes aren't great, but they work. I made this so compact that I forgot to take the mounting screws and holes in consideration, but it does work.
Here are things that need to be done to improve the case.
A back plate for the case, otherwise it is a fully open back. This case was designed around an EPIA-M... (yeah, one of the original Mini-ITX motherboards) and each motherboard from each motherboard company has their own layout so that would be your responsibility
Supports on the lid to match towering components like heatsinks would improve the overall solid-feeling of the case
Opening the HDD mount for a shock-absorber instead of direct mount would protect the hard drive better
Provisions for rubber feet or bumpers
Things I will work on for a Version 2:
compartment for a RC LiPo, protection and charge circuits. I'm currently looking at 4S 14.8V, 5500mAH battery packs. It's quite difficult to find long and narrow LiPo packs.
Provisions for corner bumpers. I intend this to be a "toss into a bag" computer so it would need bumpers more than feet
Recesses for screw heads
I designed the holes for 6-32 for the motherboard.
The lid was designed for 4-40 screws.
The hard drive is based on the 2.5" drive standard screws which are M3
Threaded inserts would be ideal.
I could have added some internal bosses for the HDD to hide the mounting holes, but it would be more structurally sound by sandwiching the drive vs side-mounting, especially for 3D printed parts. I could be wrong on that.
Anyway, this is probably best printing with ABS or PETG, but I printed mine in orange PLA. Orange, so it doesn't get lost in a pile of black gadgets. This part was printed with 3 shells, 2 top/bottom layers (3 might be better), 10% rectangular infill (5-7% at 30 degrees would probably be better).
The EPIA-M is a really old motherboard, and many other companies have come out with their own boards, so this is not a one-size fits all (specifically the lid), although, "fit" is a loose term. Any Mini-ITX board will FIT in this case. Just keep in mind the placement of the fan and memory. If you have a Mini-ITX board that doesn't resemble the EPIA-M at all, let me know. I can probably design a lid for your board, time permitting. Just send a datasheet or photo of the board.