Thingiverse
Uber 180 Redesign -- No Supports Needed, VTX + Cam Mounts, Motor Guards by Light24bulbs
by Thingiverse
Last crawled date: 2 years, 12 months ago
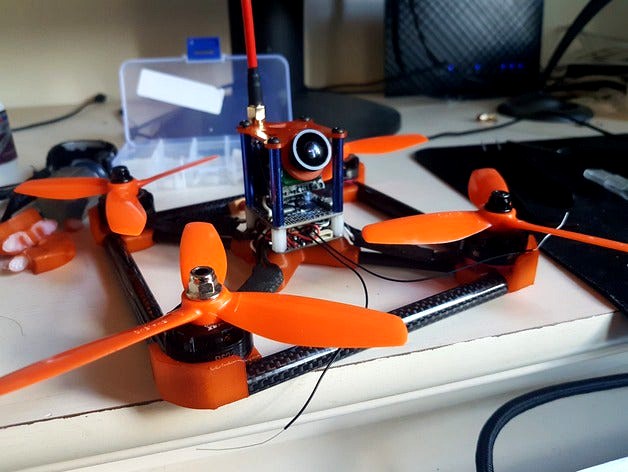
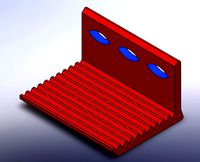
This is a redesign to add features to the Uber and make it more printable.
Mid:
Modifies the design for print-ability. No support is necessary. Original was hard to print and required support. It has been modified to have the cross spars for the battery strap at the bottom, so they can print right on your bed. The bottom has also been flattened, as the original had basically no surface area. Please let me know how these work for you.
Top:
Adds an SMA connection hole to the top plate of the Uber 180. Needed to protect your vtx and also a good way to mount the vtx without any other fasteners. Also removed rounded corners to make printing easier.
Top With Cam Mount:
Added a camera mounting hole for standard size FPV cams. It is angled at 40 or 30 deg, depending which file you choose. Please let me know if you want a different angle, or a different camera size. I tried to make it user configurable, but it just wasn't possible.
Motor Mount:
Added a small guard piece to the motor mount. Should protect the motors from most impacts from the side. They fit rs2205s and should fit any 220x motor.
Notes
Materials
Nylon 910 is the recommended material. Well printed PLA might be strong enough for some pieces some of the time, but Nylon is really the only material strong enough to make this frame viable.
Printing
Go slow and hot to insure good bonding. Thin layers are recommended for strength, depending on your material.
Assembly
You can refer to the original uber180(shown as the remix on this page) for cut lengths and assembly instructions.
I chose to dye my nylon orange with RIT dye.
I lightly glued motor mounts to tubes using superglue. Using less glue means you might actually be able to get it apart later.
Hardware: I used 20mm m3 button head screws and 10mm nylon standoffs with standard 35mm aluminum standoffs on top, from a ZMR kit. I recommend metal screws and standoffs all the way up for structure. I had some nylon screws and they sheared off on impact.
Similar models
thingiverse
free

Some Diatone Taycan build parts
...his.
air unit mount and standoff support
cam plates for dji cam (print of nylon, petg, etc.)
curved duct (i printed this of petg)
thingiverse
free

Über Design Ü120 TPU Parts - Uber Design U120 by theledman
...arm booties and cam mount need to be printed in tpu. i've been printing using this particular tpu and it's printed great!
thingiverse
free

Katana & Swissknife arm guard and motor soft mount by nracing
...ecommend filament : ninjaflex or cheetah, 0.1 layer thickness
you gonna need 10mm screw to mount the motors with this protection.
thingiverse
free

Realacc X210 Antenna mount by Rhymin
...as from crash damage. i used some additional 8mm washers under standoff screws for some additional support being printed in tpu.
thingiverse
free

Emax Babyhawk R 2" arm guard motor soft mount by TweetFPV
... recommend using some blue thread locker on your motor screws.
if you print this and like it please click "i made one"
thingiverse
free

Realacc XS220E top plate with VTX and Camera Mounts by FPV_Pilot
...ally get really hot)
anyway enough rambling... have fun printing and flying.
like and comment if you find this design useful.
thingiverse
free

FlexRC Mini Owl - Micro Swift Mount by DevJam
...king it vulnerable.
added some tabs to the standoffs so the camera is protected during a direct front impact.
i printed in nylon.
thingiverse
free

20x20mm Mount for the AKK Race VTX by ppetermann
... rest of the threaded part at the top.
use a zip tie to hold the vtx in place.
bonus points: i ziptied my rx on the bottom of it.
thingiverse
free

155 hex frame (hexacopter) by thumbs_fpv
... a full size cam+ flight controller. you need a m3 screw+ 30mm spacer. it does have 3 mounting holes for different kinds off vtx.
thingiverse
free

Hyperlow CG VTX Pigtail Mount W/ Capacitor Mount (TBS Unify style pigtail) by Fickert
...ecommend simplify3d as automatic supports tend to make too many.
i included a photo of the best orientation you will print with.
Light24Bulbs
thingiverse
free

Serotonin Earring by Light24bulbs
...ilament.
the picture is dopamine but that's just a reference image, the file is actually serotonin. it looks very similar.
thingiverse
free

Hook, flat bottom which glues on by Light24bulbs
...scale as needed, default scale is 5cm in diameter. i used it to glue to the top of a chickens waterbottle so we could hang it up
thingiverse
free

5/16ths and m8 nut by Light24bulbs
...course. stronger than you would think though.
recommended layer height: 0.1mm
recommended material: pla for dimensional accuracy
thingiverse
free

22xx Removable Countersunk Motor Mount - Wing reptile s800 by Light24bulbs
...motor to a plate, so that you can take the motor on and off as needed.
parts required:
m3 6mm cap head 4x
m3 6mm countersunk 4x
thingiverse
free

45mm Friction Fit Gas Cap for Craftsman Mower by Light24bulbs
...ler. simply friction fits on.
may not properly vent air into the tank but seems to work fine. probably simply leaks enough air.
thingiverse
free

LED Strip Shade and Holder for Standard 8mm strips by Light24bulbs
...ong led strips like these:
http://www.amazon.com/gp/product/b00hsf65mc?psc=1&redirect=true&ref_=oh_aui_detailpage_o02_s00
thingiverse
free

HammerHead Quadcopter 185mm 5inch X-frame CNC Carbon Fiber by Light24bulbs
...dcopter, the uber 180 redesign. available here with or without integrated camera mount: http://www.thingiverse.com/thing:1737107
thingiverse
free

Quanum v2 Goggles Glass Lens Mount from Harbor Freight by Light24bulbs
...upport when printing. they are the trickiest part. if they break off, you might as well just glue the lens in and call it good.
thingiverse
free

Iphone 8+, Galaxy s8/s9/s10 Wireless Charging Stand by Light24bulbs
...keywords=pleson+samsung+fast+wireless+charger
it has a cable slot to hide the cable and overall is nice to look at and works well
thingiverse
free

Enacfire E18 Earbuds battery extender case by Light24bulbs
...ot be necessary. by downloading this design you accept all responsibility, this design is provided without warranty of any kind.
Uber
turbosquid
$9

Uber tank
...d
royalty free 3d model 3d tank uber scetch for download as on turbosquid: 3d models for games, architecture, videos. (1699599)
3d_export
free

Download free Uber sword 3D Model
...download free uber sword 3d model
3dexport
youtoo32
uber sword 3d model bouchet 50494 3dexport
turbosquid
$10

Uber Super Spacey Dice Planet
... available on turbo squid, the world's leading provider of digital 3d models for visualization, films, television, and games.
3d_export
$5

FN SCAR 3D Model
...obj weapon gun fn scar fn scar 3d model uber 19559...
3dfindit
free

UBER
...uber
3dfind.it
catalog: a&t
thingiverse
free

Uber Gnome by megane008
...uber gnome by megane008
thingiverse
my one of the kind gnome for the competition
renderosity
$9

Uber Suit for V4
.../>
- second skin suit,<br />
- helmet,<br />
- boots,<br />
- 5 materials for poser and daz studio</p>
thingiverse
free

Fast And Basic Clothing Hanger Divider (Uberized) by mofosyne
...ce think?
unlike the original design, this is not too practical. as the hole inside 20cm. unless you have a 20cm diameter hanger?
unity_asset_store
$35

Garage & Toolshed Prop Uber Pack by GameTextures
...hed prop uber pack by gametextures asset from gametextures.com. find this & other props options on the unity asset store.
thingiverse
free

Uber Bracker 2.0 by MDalton10
...he screw holes were too flimsy. i added a little big on length and a notch in the front to help you pry the print off of the bed.
Vtx
turbosquid
$1

FPV VTX Antenna
...e 3d model fpv vtx antenna for download as obj, fbx, and stl on turbosquid: 3d models for games, architecture, videos. (1230317)
humster3d
$75

3D model of Toyota 86 GT VTX 2013
...tailed 3d model of toyota 86 gt vtx 2013 in various file formats. all our 3d models were created maximally close to the original.
thingiverse
free

Gnarlyfpv - Primo VTX adapter - Triangle VTX by Gnarlyfpv
...angle vtx by gnarlyfpv
thingiverse
tiny lightweight vtx adapter for the gnarlyfpv primo.
supports most triangle style vtx units.
thingiverse
free

FLOSS2 VTX MOUNT
...floss2 vtx mount
thingiverse
antenna vtx mount floss2
thingiverse
free

Drone vtx offset vtx stack mount by drvonhoss
... offset vtx stack mount by drvonhoss
thingiverse
offset vtx mount so the antenna clears the outer standoff on some drones/quads.
thingiverse
free

Vtx mount by kerst
...vtx mount by kerst
thingiverse
just a vtx mount for spceone 220
thingiverse
free

nano VTX mount 20x20
...nano vtx mount 20x20
thingiverse
for 20x20 stacks and mounts, nano vtx holder like eachine vtx nano or tbs nano vtx.
thingiverse
free

A01 VTX Mount
...ections/camera-vtx/products/a01-25-200mw-5-8g-vtx
and first of all it was design for a primo from gnarly fpv but fit on all tw fc
thingiverse
free

vtx sheath by mabadajo
...vtx sheath by mabadajo
thingiverse
this is to help hold the vtx mast more steady in a crash.
thingiverse
free

SWH210 vtx holder by Dubeswings
...swh210 vtx holder by dubeswings
thingiverse
vtx holder for swh210. fits rctimer micro 200mw vtx
Redesign
3d_ocean
$45

Hyundai SUV vehicle redesigned
...was redesigned by me. 3d model was created in blender3d.preview images were rendered with realistic plugin yafaray.side view o...
turbosquid
free

Colt M16 (Redesign)
... available on turbo squid, the world's leading provider of digital 3d models for visualization, films, television, and games.
turbosquid
$30
3D for Pose Scarlet Witch redesign\para Posar redesign Feiticeira Escarlate
... imprimir redesign feiticeira escarlate for download as blend on turbosquid: 3d models for games, architecture, videos. (1700850)
3d_export
$5

Gaz 21 redesign 3D Model
...gaz 21 redesign 3d model
3dexport
gaz 21 volga
gaz 21 redesign 3d model rossergorp 71511 3dexport
turbosquid
$55

Porsche Cayman 2015 redesign
... available on turbo squid, the world's leading provider of digital 3d models for visualization, films, television, and games.
3d_ocean
$55

Gallardo superleggera redesign
...model was made with blender3d 2.62.preview images were rendered with blender3d and yafaray 0.1.2 realistic rendering engine.ob...
3d_ocean
$55
Chevy Stingray 2013 redesign
...car.i gave my best to create accurate model,but without top view image it wasn’t possible for me.so when i lost a lots of nerv...
turbosquid
$30

Redesign Crash Bandicoot (c4d,obj,max,zpr)
... available on turbo squid, the world's leading provider of digital 3d models for visualization, films, television, and games.
3ddd
$1

Tango Floor Lamp
...3ddd andrey kole , tango , castlewerks andrey kole redesign tango floor lamp by castlewerks. 3dsmax2012 - corona...
3d_export
free

flexuous tweezers
...flexuous tweezers 3dexport i just wanted to redesign a tweezers that be more interesting.<br>you can see the...
Guards
3d_export
$5

guard
...guard
3dexport
very cool guard
turbosquid
$1

guard
... available on turbo squid, the world's leading provider of digital 3d models for visualization, films, television, and games.
archibase_planet
free

Guard post
...base planet
guard post checkpoint building check point
guard post n191015 - 3d model (*.gsm+*.3ds) for exterior 3d visualization.
3d_export
$5

phone guard
...phone guard
3dexport
phone guard. for cell phones the size of 68mm x 144mm
3d_export
$95

coast guard
...coast guard
3dexport
usa coast guard ship low poly. game ready fbx. obj. max 18. 3ds.
turbosquid
$20

Iron guard
...turbosquid
royalty free 3d model iron guard for download as on turbosquid: 3d models for games, architecture, videos. (1623465)
turbosquid
$7

Guard Light
...bosquid
royalty free 3d model guard light for download as ma on turbosquid: 3d models for games, architecture, videos. (1622828)
turbosquid
$5

card guard
...squid
royalty free 3d model card guard for download as blend on turbosquid: 3d models for games, architecture, videos. (1378924)
turbosquid
$5

Guard Tower
...quid
royalty free 3d model guard tower for download as blend on turbosquid: 3d models for games, architecture, videos. (1191976)
turbosquid
$20

Spaceship Guard
...ee 3d model spaceship guard for download as max, obj, and fbx on turbosquid: 3d models for games, architecture, videos. (1227837)
180
3ddd
$1

Ванная POLLSPA-Corazon-180-180
...dd
corazon , pollspa
ванная pollspa-corazon-180-180 примерно по каталогу. текстуры есть.
3ddd
$1

TENSO 180
...ddd
formina , ванна , джакузи
jakuzzi tenso 180
design_connected
$11

Bolero 180
...bolero 180
designconnected
poltrona frau bolero 180 computer generated 3d model. designed by lazzeroni, roberto.
design_connected
$20

Delta 180
...delta 180
designconnected
zanotta delta 180 2-seater computer generated 3d model. designed by emaf progetti.
design_connected
$27

Sayonara 180
...sayonara 180
designconnected
bbb emmebonacina sayonara 180 2-seater computer generated 3d model. designed by giorgio decursu.
turbosquid
$9

Office 180
... available on turbo squid, the world's leading provider of digital 3d models for visualization, films, television, and games.
design_connected
$25

La Mise 180
...la mise 180
designconnected
la mise 180 computer generated 3d model. designed by nichetto, luca.
3ddd
$1

Rishar R-180
...ar r-180
3ddd
rishar , стол
кабинет rishar
стол руководителя r-180
размеры: 1800х880х790
3ddd
free

Riho / MONTREAL 180
...и
ванна riho montreal 180
длина 180
ширина 90
высота 47,5
объем 275
цвет euro white (европейский белый)
страна голландия / чехия
design_connected
$18

FM-180 Armchair
...fm-180 armchair
designconnected
fsm fm-180 armchair computer generated 3d model. designed by heiliger, stefan.
Cam
archibase_planet
free

Cam
...cam
archibase planet
tv camera equipment
cam dolly - 3d model (*.gsm+*.3ds) for interior 3d visualization.
3d_export
$8

Cam and Follower
...ry to linear (reciprocating) motion. as the cam rotates, the follower rises and falls in a process known as reciprocating motion.
3d_ocean
$15
Studio Cam
...p. made in 3ds max 2013 1- 3dsmax with vray render included material and light 2- obj file 3- fbx file hope you like it please...
3d_export
$37

thermal cam
...thermal cam
3dexport
turbosquid
$19
Security cam
...oyalty free 3d model security cam for download as ige and obj on turbosquid: 3d models for games, architecture, videos. (1331128)
turbosquid
$40

Security Cam
...y free 3d model security cam for download as ma, fbx, and obj on turbosquid: 3d models for games, architecture, videos. (1601103)
3d_export
$40

security cam
...security cam
3dexport
home security camera
turbosquid
$280

cam-bot
... available on turbo squid, the world's leading provider of digital 3d models for visualization, films, television, and games.
turbosquid
$33

AT_minivan_(CAM)
... available on turbo squid, the world's leading provider of digital 3d models for visualization, films, television, and games.
turbosquid
$10
video cam
... available on turbo squid, the world's leading provider of digital 3d models for visualization, films, television, and games.
Motor
archibase_planet
free

Motor
...base planet
motor motor engine engine electric motor
motor wagner n250213 - 3d model (*.gsm+*.3ds) for interior 3d visualization.
archibase_planet
free

Motor
...motor
archibase planet
motor motor engine engine
motor n151112 - 3d model (*.gsm+*.3ds) for interior 3d visualization.
archibase_planet
free

Motor
...motor
archibase planet
motor motor engine engine
motor n150615 - 3d model (*.gsm+*.3ds+*.max) for interior 3d visualization.
turbosquid
$15

Motor
...otor
turbosquid
royalty free 3d model motor for download as on turbosquid: 3d models for games, architecture, videos. (1639404)
3d_ocean
$5

Electric motor
...electric motor
3docean
car electric engine industry motor phase train vehicle
an electric motor enjoy!
3d_ocean
$18

Electric Motor
...electric motor
3docean
electric motor engine machine mover parts
3d model electric motor for hoist crane
turbosquid
$5

Motor
... available on turbo squid, the world's leading provider of digital 3d models for visualization, films, television, and games.
3d_export
$5

electric motor
...electric motor
3dexport
electric motor use for industrial purposes
3d_export
$5

servo motor
...tor
3dexport
it's a simple part of servo motor 0.75kw for used in machines assembly to show specified motor in own project.
archive3d
free

Motor 3D Model
...ine electric motor
motor wagner n250213 - 3d model (*.gsm+*.3ds) for interior 3d visualization.
Mounts
3d_export
free

mounting bracket
...the part of a hinge, handle or latch that mounts the hardware to a cabinet. mounting plates make it...
turbosquid
$2

MOUNTING
... available on turbo squid, the world's leading provider of digital 3d models for visualization, films, television, and games.
turbosquid
free

Mounts
... available on turbo squid, the world's leading provider of digital 3d models for visualization, films, television, and games.
turbosquid
free

Mount Fuji
...fuji
turbosquid
free 3d model mount fuji for download as obj on turbosquid: 3d models for games, architecture, videos. (1579977)
3d_export
$5

Headphone mount LR
...headphone mount lr
3dexport
headphone mount l+r
turbosquid
$39

Mount rainier
...quid
royalty free 3d model mount rainier for download as fbx on turbosquid: 3d models for games, architecture, videos. (1492586)
turbosquid
$5

pipe mounting
...quid
royalty free 3d model pipe mounting for download as obj on turbosquid: 3d models for games, architecture, videos. (1293744)
turbosquid
$3

Mounting Tires
...uid
royalty free 3d model mounting tires for download as fbx on turbosquid: 3d models for games, architecture, videos. (1708511)
3d_export
$5

Magnetic GoPro Mount
...pro mount
3dexport
cool magnetic mount for gopro. allows you to mount the camera on flat metal surfaces and get exclusive shots.
turbosquid
$5

Stone Mount
...ty free 3d model stone mount for download as ma, obj, and fbx on turbosquid: 3d models for games, architecture, videos. (1370306)
Supports
turbosquid
$5
Support
... available on turbo squid, the world's leading provider of digital 3d models for visualization, films, television, and games.
3d_export
$8
Support 3D Model
...support 3d model
3dexport
support cantilever console
support 3d model tasal 73900 3dexport
3d_export
$5
phone support
...phone support
3dexport
phone
turbosquid
$12
Support bars
...squid
royalty free 3d model support bars for download as max on turbosquid: 3d models for games, architecture, videos. (1411542)
turbosquid
$8

support weights
...id
royalty free 3d model support weights for download as max on turbosquid: 3d models for games, architecture, videos. (1411538)
turbosquid
$2
headphone support
...royalty free 3d model headphone support for download as sldpr on turbosquid: 3d models for games, architecture, videos. (1357583)
turbosquid
$2

Support for flowers
...royalty free 3d model support for flowers for download as max on turbosquid: 3d models for games, architecture, videos. (1463543)
turbosquid
$14

Flower Support
...alty free 3d model flower support for download as max and obj on turbosquid: 3d models for games, architecture, videos. (1497066)
turbosquid
$5
serum support
...yalty free 3d model serum support for download as c4d and obj on turbosquid: 3d models for games, architecture, videos. (1551267)
3d_export
$10
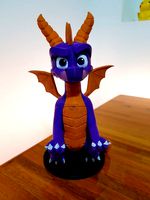
spyro joystick support
...spyro joystick support
3dexport
joystick support of spyro dragon
Needed
3d_export
$5

I need a new job
...i need a new job
3dexport
i need a new job funny sign. include a *.obj file
3d_export
$10

Dog house that doesnt need laundry
...painter available for all software<br>ue4. ue5. blender. maya. 3d max. unity. c4d.<br>formats: .obj .gltf .fbx .blend
3d_export
free

the wall and the sidewalk i give it away for free but in return you need a comment whether it was
...dexport
the wall and the sidewalk, i give it away for free, but in return you need a comment whether it was useful to you or not
3d_export
$5
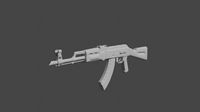
akm - unfinished project
...of akm, needs some work.<br>-no textures<br>-uv mapping needed<br>-geometry fixes needed ...
3d_export
$5

Boots
...
3dexport
does your character need flying boots to make their adventure even more memorable? then this is exactly what you need!
3d_export
$9
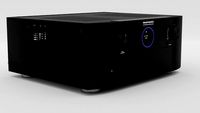
marantz sr7013
...; needs an emission shader with a light blue hue and lastly "readout" needs an emission shader in white.<br>enjoy
3d_export
free

nail
...nail 3dexport a nail for what is needed ...
3d_export
$5

oil can
...ort
can container for oil or any liquid. volume = 1200135 mm3 dimensions in mm ping me if need stl or need customize dimensions.
3d_export
$5

chess
...chess
3dexport
3 d chess is a ready-made project if you need to write right away what each chess piece needs in stl format
3d_export
$5

dragon 3d
...dragon 3d
3dexport
3 d chess is a ready-made project if you need to write right now what each chess piece needs in stl format